

PropellerBraider - Towards a P2-Controlled CNC-Braiding Machine
 Christof Eb.
Posts: 1,597
Christof Eb.
Posts: 1,597
Hi, this is work in progress and an experiment, as it is new. - At least I have not seen this kind of setup.
Perhaps nevertheless it might be inspiring or funny or interesting....
So what is it about?
Braiding is known for hair and also yet another textile method. Others are weaving, knitting, crochet,... (in German there are also knüpfen and wirken, I don't know the English words.)
The basic setup and movements for braiding are quite simple and yet there are many many ways of variation. And this makes this technology interesting for a CNC project, I think.
Variants can go as far as "klöppeln", doing braiding lace:
https://commons.wikimedia.org/wiki/File:Ursuline_lace_2.jpg#/media/File:Ursuline_lace_2.jpg
This picture shows some basics: You need a number of bobbins with strands on them. You will just twist these. Direction and order of the twists creates the patterns.
Here is a very nice site showing lace pattern possibilities: https://www.theedkins.co.uk/jo/lace/patbegint.htm
Well, doing flat braiding lace would be the far end, but there are far simpler but nevertheless interesting goals in between.
There are braiding machines. Simple ones for fixt patterns or even ones for lace. They are optimised for speed and do as many movements in parallel as possible. Here are two videos, where you can see the basic movements and also a machine, which is controlled by punchcards: http://das-kloeppelmuseum.de/die-kloeppeltechniken/
Such fast machine is rather big. One of the reasons for the size is, that each bobbin carrier has some means to maintain tension of the yarn while the distance from the bobbin to the braiding point varies. This is done with a weight or a spring in parallel to a break. This link shows an impressing mechanical round braiding machine and his bobbin carrier in detail: https://fraensengineering.com/3d-printed-braiding-machine/ The height of his carrier is about 165mm. I have studied patents for bobbin carriers. There are quiet a lot....
This picture shows a my very basic means to do a braided cord: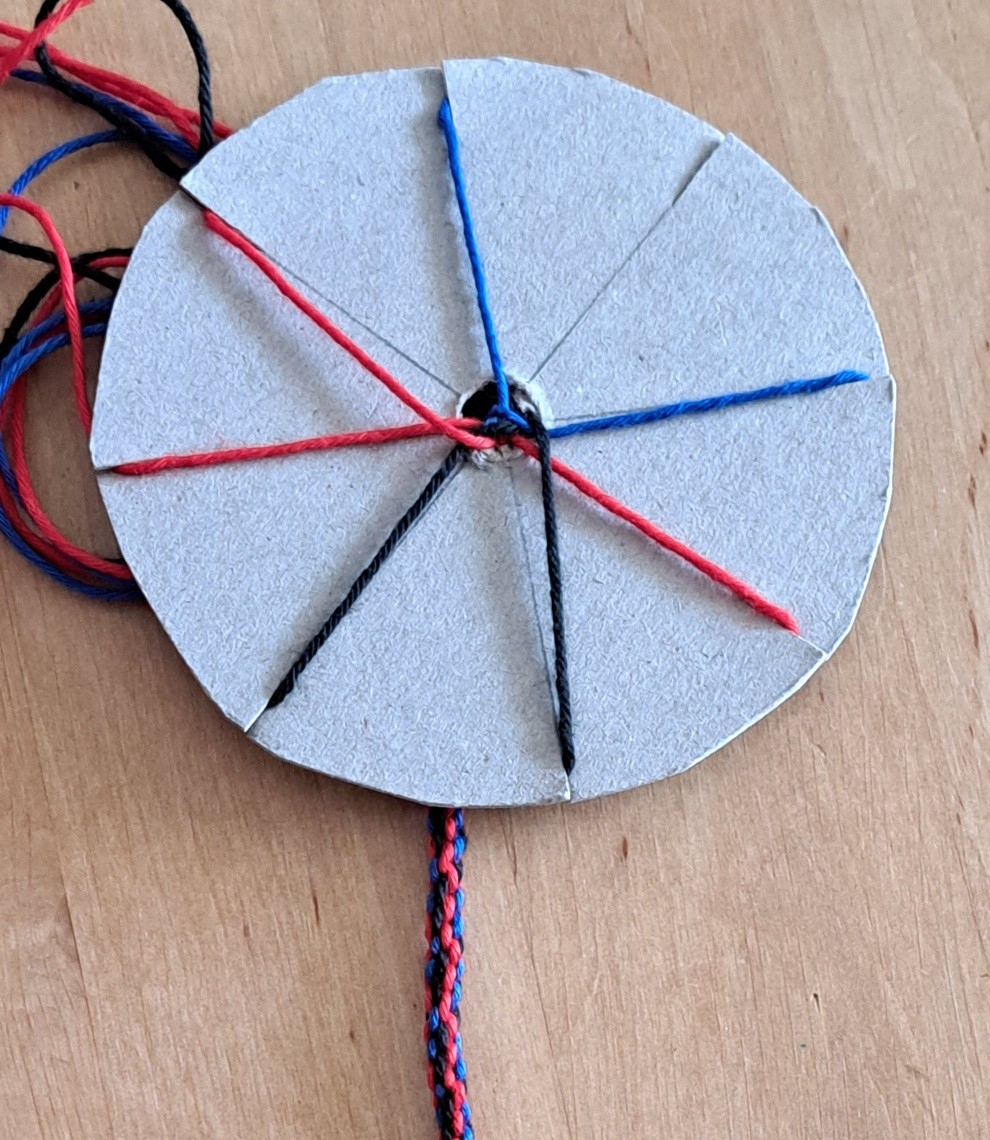
A nice German pdf about this can be found here: https://www.regensburg.de/fm/RBG_INTER1S_VM.a.253.de/r_upload/Onlineprogramm - Freundschaftsarmband.pdf I have learned, that this method is called "Kumihimo". (Actually the way of braiding used here without twists is rather special. It is funny: I have tried to vary the number of strands from 7. But this is the only number that works in this way! Some sort of miracle.)
It shows some basic principles of the way, I want to go here:
- Have some strands of yarn, maybe with different colours
- Each strand will be held on a bobbin
- The bobbins sit on positions on a round plate.
- The fabric or cord leaves downward through the middle of the plate.
- Tension is controlled while moving bobbins.
- Movement of bobbins is not radial but vertical to the plate and in circumferential direction. (I hope, this keeps the question of tension more easy)
- The plate is rotated during work.
For my design, I have decided to split the movements:
The plate with the holding places for the bobbins will rotate and therefore I will call it carousel. A pickup-spindle can grab the bobbin with an electromagnet, has the ability to rotate the bobbin to tighten the yarn and can lift the bobbin.
There will be two pickup-spindles to be able to swap two bobbins more easily.
The idea is to be able to have the possibility of a larger carousel, but to begin with a smaller one. (Have a limited disaster, if it does not work....)
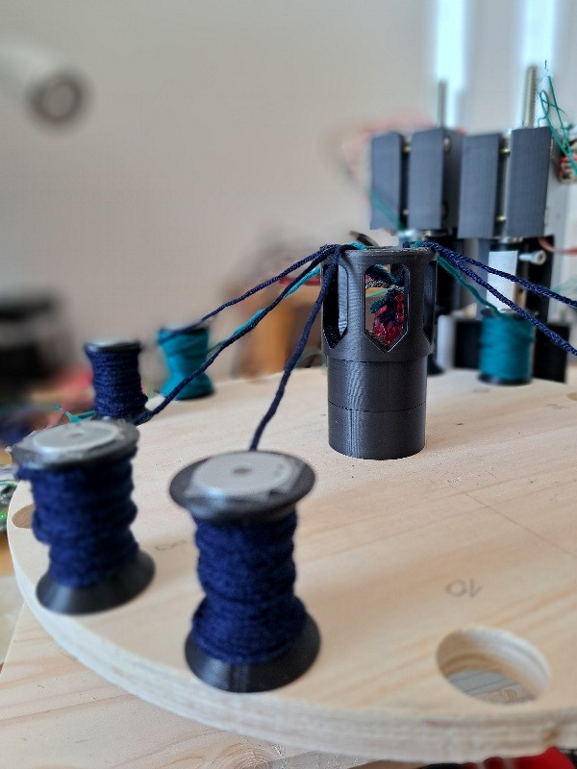
So, here is a picture of the current design, only one pickup-spindle shown: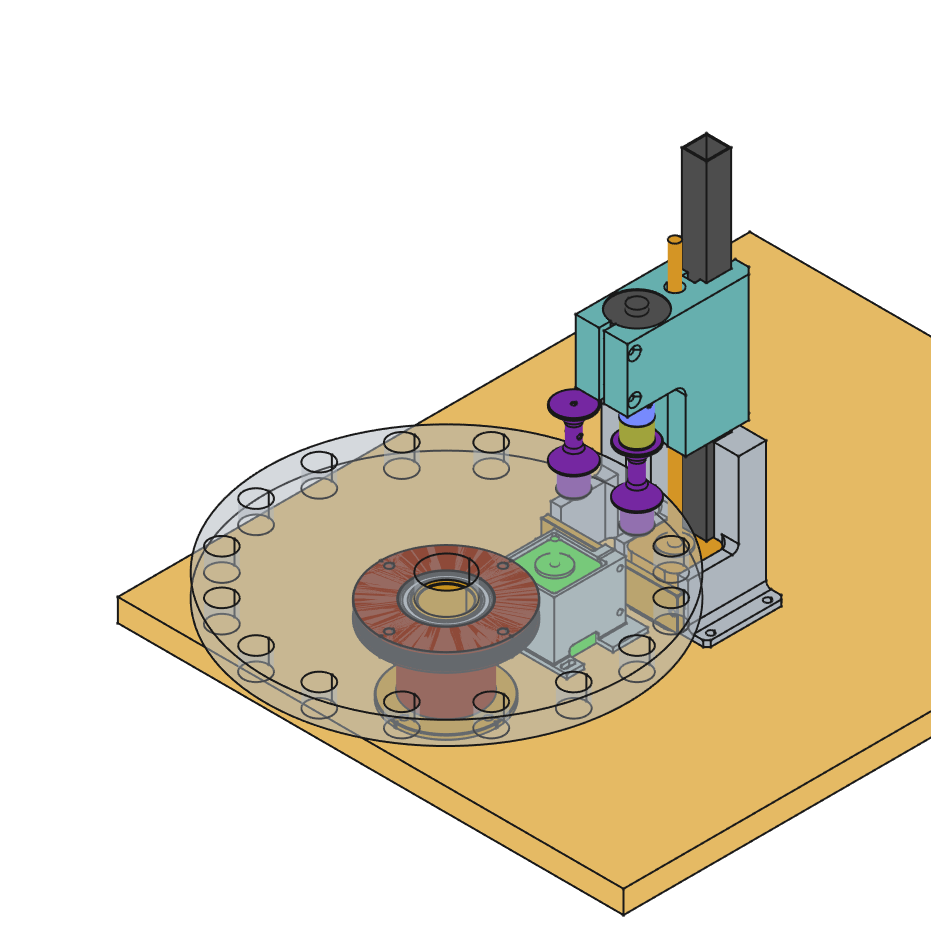
Diameter of the carousel with 16 positions is about 300mm.
There are:
3 step motors, one for rotation via belt drive and 2 for lifting
2 DC motors for the tension and
2 electromagnets.
A 4th step motor will be used to wind up the cord. (Not shown)
I think, that for this project, to have a P2 controller with 8 cores is quite helpful. The actuations are related but not like Bresenham in one movement.
As said before, at the moment this is all theory. I have begun to produce first parts. I don't know, if it will work. ![]()
![]()
![]()
One bigger question is, if the electromagnet will hold and also let go the spindle. It is D20x15mm and said to hold 2,5kg in ideal cases. For solenoid armature, fixed to the bobbin, I hope a steel washer will work. ??? I will provide means for AC voltage and PWM.
Perhaps some comments, ideas?
Have fun, Christof
Edit: Have done some testing with the solenoid. Yes, it will hold and also release the bobbin. But it tends to de-centre the bobbin.
Comments
An update: It's braiding!")
So far I have done braiding with 3 strands and now round braiding with 4 strands, Kumihimo Style.
Have had big problem to 3D-print larger parts from ABS. Awful warping and cracks. A different type of ABS solved this. This even led to a failing main bearing unit....
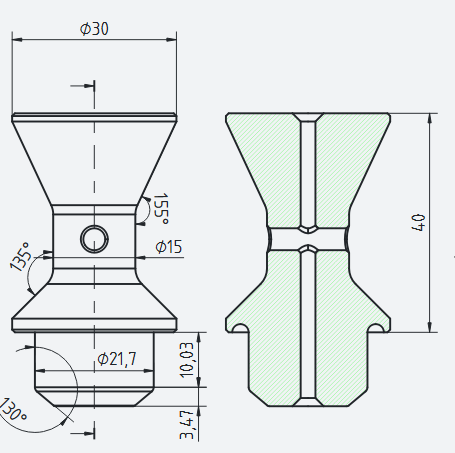
Second difficulty was to find the right shape of the chamfer at the lower end of the bobbin. When the bobbin is put down onto the carousel, it's position shall be realigned. The chamfer leads it then. The picture shows the bobbin. The carousel plate is 12mm thick. The chamfer of the bobbin is also sanded for low friction. The chamfer must allow sufficient variance of position, must not stick when the bobbin is put down and the length of the cylinder must not be reduced too much. Under the carousel there is the belt drive wich must not collide.
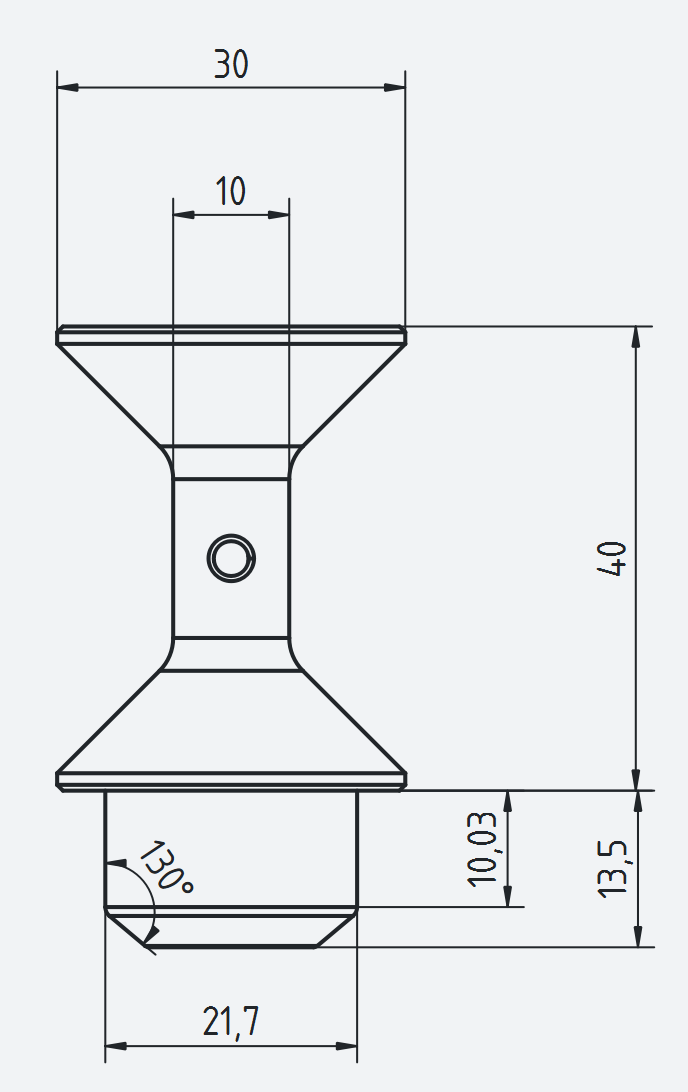
At the upper end of the bobbin a steel washer is glued to the face. To prevent sticking two layers of Tesa film adhesive cover the washer and form a magnetic gap.
The braiding point is now elevated from the carousel plate, which decreases variation of tension. The tensioning motor is not used. Yarn tension is so low, that the motor is not moved, even with no motor current at all.
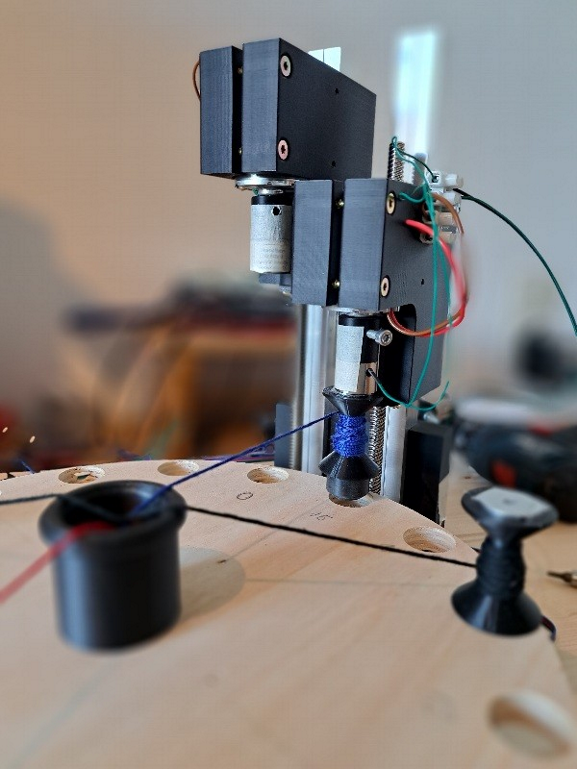
To pull down the braided cord, a peg with weight of about 8,5 grams is attached to the knot at start. When the bobbin is moved down on the carousel, the yarn tension is high and then sometimes the bobbin spins a little bit to release perhaps 1mm of yarn.
And some "product":
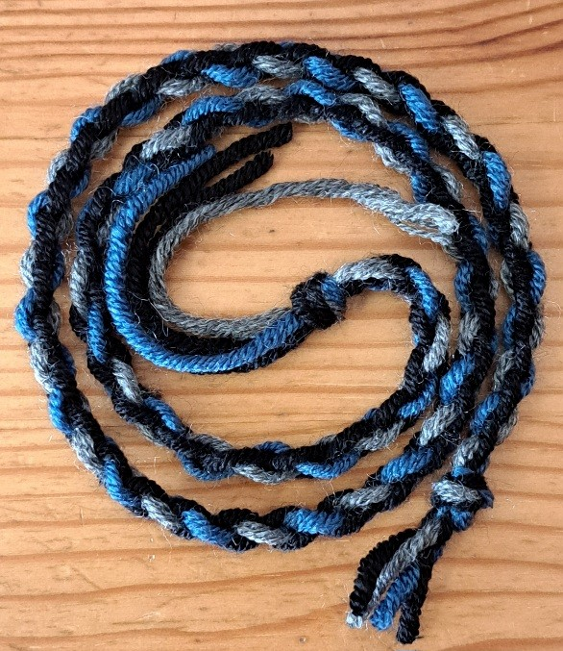
This is acryl wool. Diameter of the picture is about 8cm. I am quiet happy, that the braid has this good regularity. This is very sensible to the tension when the bobbins are wound.
Cheers, Christof
https://youtube.com/shorts/oZYtT4F1XFk
So now there is a video showing a 8-strands round Kumihimo style being done.
Meanwhile a dedicated COG is used to do the stepping of one movement at a time. Sequence of movements is controlled by a cooperative task running in the main COG. With this setup the system remains fully accessible during breading.
Have Fun, Christof
Great project video Christof, an impressive machine!
I have posted the actual version of P2XCForth. https://forums.parallax.com/discussion/176239/p2xcforth-a-fast-hybrid-xbyte-and-c#latest Control of PropellerBraider is done with this Forth, see Block50. One of the nice things about Forth is, that you extend this language. So now for example there is a new command "home", which lets the machines step motors go to the start position. You can type this into the terminal or you can use the new word in a new program. So the description of a breading pattern is a program, that can be compiled and executed. You don't need to write an interpreter, it's already there.
The last line here sets the former bobbin position number 2 to be number 0 from now on.
So evoking "round8" will do one cycle of movements.
The braiding point is elevated some more, which gives better consistency and also makes the braid more dense.
Two variations of the same 8 strands round Kumihimo. You can vary the pattern, if you have different colours at different bobbin positions at start. https://friendship-bracelets.net/patterns/kumihimo?SortBy=&MinColors=&MaxColors=&MinStrings=&MaxStrings=8&MadeByUser=&Keywords=&SimilarToPatternId=&OnlyPatternsWithPhoto=false&OnlyPatternsWithVideo=false lists 80 "proven" nice patterns with 8 strands. This site also has a design tool for patterns.
Great photos.
I am still experimenting with geometry of the braiding point. This version has a smaller diameter, which shall give a braid more dense. Last trials have been with a combination of cotton yarn and some thin acryl. Both have very low elasticity which makes things more difficult.
Also I have now activated one tensioning motor. It sits above the spindle. The electromagnet acts both as a gripper and a clutch. The motor can turn the spindle to tension the yarn. It is driven via a L298 bridge. The motor is rated for 12V but we only use 5V and smartpin PWM to be able to fine tune torque. This setup works. :-) However the actual diameter of the spool has influence on the tension. Well, that's mechanics....
Some update on speed:") ) in P2XCForth and faster variables. My old step routine using smart pulses had unwanted lags, this is solved using smart transitions.
) in P2XCForth and faster variables. My old step routine using smart pulses had unwanted lags, this is solved using smart transitions.
I have invested quiet some time to make the machine faster. There is now a simple Assembler ( as far as I needed it
There has been a "speed barrier". Above it, there was something like a resonance on all axis. It was around 70kHz microstep frequency = 2.1kHz full step frequency. I did and do not understand it. Normal resonance frequencies are supposed to be lower. Also the vertical axis are very different from the rotation yet the limiting frequency was rather similar.
I had used TMC2209 step drivers. I do love that they reduce the current at stillstand. Also they are running very smooth.
I had the impression, that the resonance problem had to do with the chopper frequency of the current regulator. (????)
But after solving the lags issue and swapping the driver modules to DRV8825 I can go 3 (!!!) times faster on all axis. The DRV8825 need active cooling though.
Also acceleration does now use something like dt= c1/(sqrt(d+d0)). d = the smaller distance to the start- and endpoints. dt= step time. Nice, that P2 has Cordic for division and sqrt.
The downside is, that the machine is so fast now, that you cannot press the STOP button in time, if something goes wrong....
There is a unplanned safety feature: The tensioning motor is only clamped, so if there is a vertical collision, it will slip in it's fixture.
I guess this was so called "mid-band" resonance. It normally occurs around the frequency where the torque begins to drop. Below that frequency the motor runs in constant current mode and the torque is nearly constant. Above it the winding inductance causes the current to be limited to a lower value. The torque drops off at an 1/f rate. Around the "corner frequency" the current control loop can become unstable because the current to voltage phase relations goes from 0° (resistive) to 90° (inductive). Back-EMF changing by small speed fluctuations can get close to 180° phase shift and causes positive feedback and oscillations.
It can be damped either with an external speed feedback (encoder) or by adding a small phase shift proportional to the derivative of the motor current.
Video, please!")
https://youtube.com/shorts/D3WCXPby8L0?is=j5OQmkOUTmmqgaGL

looking good, a fascinating project!> @"Christof Eb." said:
Oh, and I think that your machine has pretty better precision at the same time!")
One difficulty is to bring the bearing unit into the exact center of the wooden carousel. But I am quiet astonished that you can 3dprint a gear for a belt with 2mm pitch. And it does not show wear so far, made of ABS.
Well, if you feel so, you could let your machine do braiding. It's all about pick and place.....
Thank you very much for these insights!
And as allways, if you know the right wording, you can Google much better. This has been discussed some years ago here https://forums.parallax.com/discussion/139086/stepper-motor-midband-resonance-compensation
Thank you!
Yes, I am having a lot of fun and do always learn. What I like most is that it is about so many fields. Mechanics, electronics, forth, the whole world of ancient textile methods, history of industry, then patterns and the human desire to make something "nice".
Yes, but interestingly, they were all wrong. Midband resonance has nothing to do with the step-by-step oscillations (overshoot and back-bounce). Midband resonance even occurs with infinite microstep resolution (true sine wave). It is caused by the phase shift of the current and feedback through the loop of torque fluctuations -> speed fluctuations -> back-EMF fluctuations -> current fluctuations back to torque fluctuations.
Fixing this by adding a capacitor+resistor combination might work but the passive damping eats power. Doing the same with software by adding a small phase shift (delay) depending on the derivative of the motor current has the same effect without dissipating power.
There is very little useful information about this on the internet. I found this out by reverse-engineering one of the famous Geckodrives. The featured midband-damping by doing the phase shift with analogue circuitry! They had an opamp sensing the average motor current of both coils and compared the output with a sawtooth slope to generate the delay.
Hi
As this Midband Instability has probably hindered my other projects too, I am trying to dig a bit deeper here. Perhaps I will open a new thread about it. Would need to make some measurements. Have to find a way to measure coil current and coil voltage gnd-free.
I found a thesis by Peter Aicher, which is not especialy focused about this subject but includes a model which looks like a very good basis. Page 10...21
TUM
https://mediatum.ub.tum.de
PDF
Winkelrekonstruktion und sensorlose Regelung von Hybridschrittmotoren
Perhaps you can give me a hint?
Increasing voltage generated by the motor steals voltage to drive R and L with increasing speed. Increasing frequency does increase phase lag of the current through the inductance.
But why do things get better again at even higher speeds?
https://www.geckodrive.com/wp-content/uploads/2023/04/SMBFig4.jpg
Cheers Christof
As I have been quite annoyed over the mystery of the "speed barrier" of the stepper motors I tried to learn more, see here: https://forums.parallax.com/discussion/178110/a-stepper-motor-some-measurements-and-a-model-for-ltspice#latest
While this did not help me to fully understand all of it -the datasheet of the drivers do not tell too much, how current is regulated- I learned that the problems have been related to the working mode of the TMC2209 chip. The TMC2209 module can be switched to from "StealthChop2" mode to "SpreadCycle" mode with a tiny jumper on the lower side of the PCB. In this mode, this driver can work as fast as DRV8825 with a little bit more noise at slowest speeds. The machine works now for both axis with a start-speed of 142 full-steps per second accelerating to top speed of 3125 full-steps per second. To run smoothly 32 microsteps are used.
There are a lot of surprises, a lot to experiment and to learn with this type of machine handling yarn.
The geometry of the braiding point with a small diameter has been an improvement. Together with the tensioning movement, it also allows to omit extra movements, which had been necessary to move the yarn along the braiding diameter. So braiding can be faster now.
Due to the average spinning direction of the carousel the yarn strands can be twisted. These are twine yarns, so they either get more twisted or they get untwisted. Both has to be avoided, so the sum of turn should be neutral for each thread.
The setup works best with yarn, that has some flexibility. So a mixture of wool with 25pc of acryl (as used for socks) works better than pure cotton. Wool of 410m/100gr for 2...3mm needles works well.
Yet another shape of the bobbins. The issue with the former type was, that the thread can get stuck beneath the upper flange, so now there is a modified angle there of 155 degrees. Also the diameter 10mm was increased to 15mm. Idea is, that the tension of the yarn can turn the bobbin in it's bore D22 more easily.
Edit: About speed - the machine can do about 600 spindle movements per hour (one movement: pick spindle, lift, go to destination slot, tighten thread, place spindle, go to new start slot). For the 7 strands round braid this is about 0,5m of braid per hour.
Cheers Christof
So, how often can I fall into the same pit? After I activated yarn tightening of the second pickup spindle the system failed and also crashed! But not really repeatable after some time after start. - I searched for some strange stack overflow or something? Electric pulse from switching off a motor? In the end it was overheating of one driver module due to higher voltage for the higher speed in combination of hot room temperatures. (Solution was to switch over to the TMC2209 for all axis. Current is now reduced to 0,53A for all axis.)
Found some Cotton Yarn "Gruendl Cotton Quick uni" 250m/100gr mercerised, gased, combed, which has some nice gloss. I think the strength of this yarn fits well for this machine.
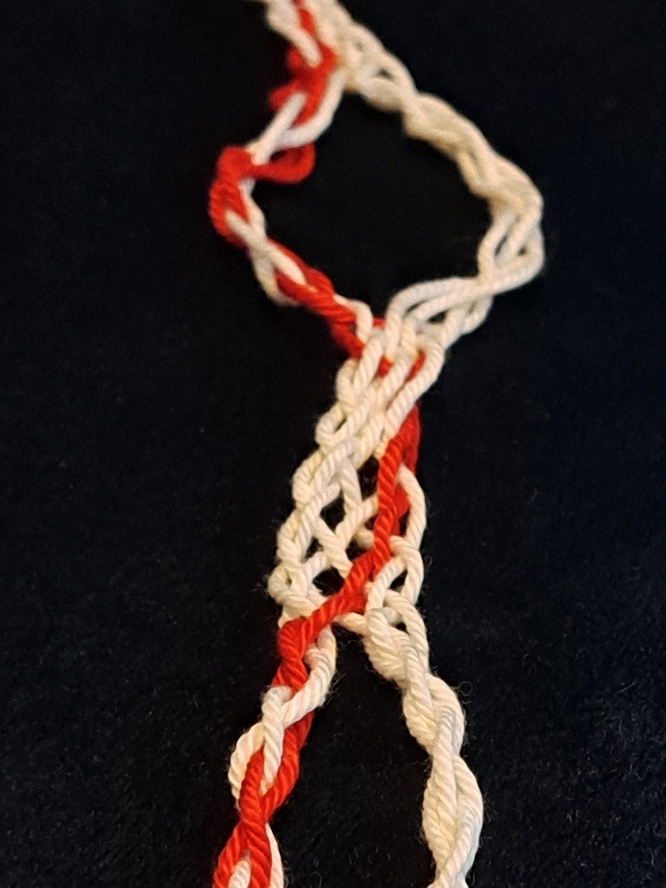
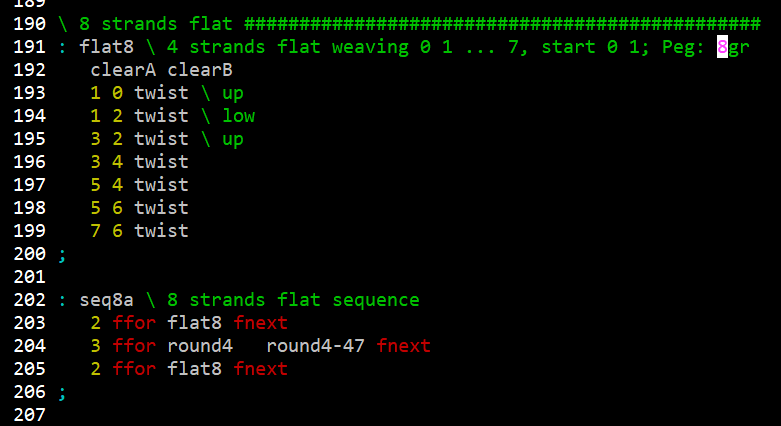
Picture shows a sequence of patterns with 8 strands, 6 white and 2 red. A section of woven style for all 8 strands is followed by 2 parallel "Kumihimo" style round breads for 4 strands each. I think, you can call this sequence "lace". The woven part is an "allowed" pattern for "Kloeppeln" braiding lace, as it only consists of twists of neighbouring strands.
One nice thing about using Forth for such project is, that you can easily create your special description language. Here we can see, that "flat8" first brings the two pickup spindles in secure height and then does 7 twists. A twist is a series of movements, which swaps two yarn spindles.
Perhaps you can print a 3D DNA sequence")
Added a new video showing 8 strands woven style braiding. In this video tightening of the yarn is optimised and better visible. Tightening leads to a product with good consistency and higher density.
https://youtube.com/shorts/niBYh8xRHEg?is=DMzPHD9JEEt0GngT
There are big additional circular movements in the video. These are necessary to push the twist towards the breading point.
The machine does now work as originally intended.")
Perhaps I will add some pull off device to take the produkt from the beading point. Controlled travel. At the moment this is done by weight. 12gr in the video.
Also some single pin acting like a weaving comb to push the twist towards the center might be a good addition.
Cheers Christof
Super smooth machine, I love it!
Thanks!