Hybrid Robot Power Plant => Oversize Boe-Bot
 Ken Gracey
Posts: 7,419
Copy the code below the dotted line and paste it into the same forum posting in the new forum, replacing the old one.
IMPORTANT: Be sure to do a 'Preview Post' first to make sure it's what you want!
.........................................................................
Project Purpose:
_
To develop an outdoor robot power system which can deliver many more amp-hours of energy than batteries, using a gas engine and a modified automobile alternator._The initial purpose was not to build a robot, but to prototype a Hybrid Power Plant that I_could use on an over-the-snow robot. A battery would merely support surges in current demand, like a big capacitor. It wouldn't be there to provide power for anything more than half of a minute. This could lighten my load and extend operating time, particularly for a GPS autonomous robotic project.
_
After building the_Hybrid Power Plant_and running some tests on_it with_real loads I_decided to put some motors on it and test it out_on an R/C robot requiring_much more current. This additional step turned out to be a_big eye-opener, and gave me another purpose to the project - to test the system on a robot.__
_
Mechanical Design:
_
Coupling an alternator to a small gas engine requires that the shafts be perfectly aligned. Small "spider couplings" provide_for up to_1 degree of angular misalignment, and 0.01" of horizontal offset. To_align the engine and alternator I decided to make this a machining project (I had tried other ways before, and failed!). Using belts and pulleys would be out of the question due to_the introduction_of more moving parts, increased system slop and noise, and danger of moving parts.
_
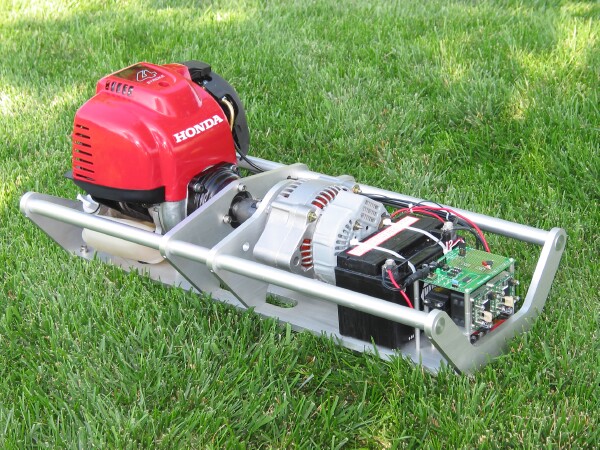
The Hybrid Power Plant would_was built by mounting the engine and alternator on their own plates, using a 3/4" aluminum_rod as an additional alignment (and to double as_handles)._Although the alternator had two mounting holes, I opted not to use these since they_were_offset at different z-axis places. Instead, I machined the front of the alternator flat and drilled/tapped four holes in known locations. These holes allowed me to attach it to its mounting plate and perfectly identify the center shaft. The Honda mini 4-stroke engine (GX35) really needed a clutch - the power curve is way up in the RPMs and it generates little torque until 3,500 RPM. Staton-Inc makes a $60 clutch that has perfect mounting holes, enabling it to be mounted to a plate. I also attached_the back and bottom of the engine to four more mounting locations on the base plate._The thought was that by mounting the engine to some sizeable chunks of aluminum I would smooth out vibration_by closely coupling it to a mass.
_
The parts are all 3/8" 6061 aluminum, anodized clear. If you want to copy this design, you can download my drawings below (I have provided them in DXF format). You will need to scroll down to find them since I'm only given five (5) attachments per post._
_
The_Hybrid Power Plant_now looked like this:
_
_
Electronic Design:
_
Going back to my_purpose, the initial idea was that I'd only build and test a portable Hybrid Power Plant_- I didn't plan on actually using this sytem on a robot._Therefore, my electronics_intiaially_consisted of the following:
_
_
The following SX/B code is an open-loop, potentiometer-controlled servo throttle for the above schematic. This example doesn't count magneto pulses at the same time. I've got both pieces of code working independently, but have yet to integrate them using the SX's RTCC/ISR features.
' Potentiometer Throttle Control
DEVICE_________ SX28, OSCXT2, TURBO, STACKX, OPTIONX
FREQ___________ 4_000_000
'
' I/O Pins
'
Servo__________ PIN_RA.1_ OUTPUT
RCCircuit______ PIN_RC.3_ INPUT
'
' Constants
'
'
' Variables
'
ServoVal_______VAR_______ WORD
analog________ VAR_______ WORD
' =========================================================================
_ PROGRAM Start
' =========================================================================
Start:
__ LOW RC.3
__ PAUSE 5
__ RCTIME RC.3, 0, analog
__ ServoVal = analog/2
__ ServoVal = ServoVal+130
__ PULSOUT Servo, ServoVal__ __'__ PAUSE 20
__ PAUSE 20
__ GOTO Start
_
The Oversized Boe-Bot_
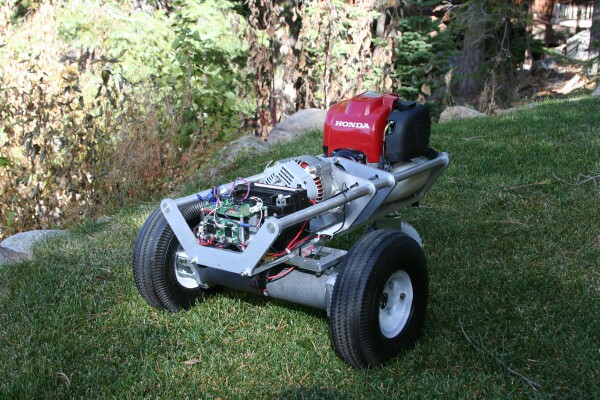
I was satisfied that the Hybrid Power Plant would perform really well, and I was ready to shelf it so I could design a robot around the concept. However, the same friend who helped me with the electronics pointed out that I could further prove out the concept if I simply mounted wheels to the Hybrid Power Plant. It made sense considering I hadn't been able to test the motors with a load. Then I wound up with this:
_
_
_
I switched the HB-25s straight over to R/C function and added a transmitter. I set the engine throttle with a potentimeter/servo (SX/B code below) and didn't bother counting magneto pulses. Away we went! Videos are posted in the next message._Under R/C control the whole system works great. I'm certain the Hybrid Power Plant could be used on an outdoor robot. The videos show the first pilot run when I had 16_Ohms of resistance in the alternator field, but now there's only 8_Ohms and it runs much faster._It'll lay down scratch, slide around corners and reverse at full throttle (I completely destroyed an HB-25 doing this, by the way).
_
The oversized Boe-Bot runs better_backwards due to weight distribution. Since the Hybrid Power Plant was never supposed to roll, this is something I'll fix on the next project._Moving the battery around lets it run better in the Boe-Bot's "normal" direction_with the motors up front._
_
_
Safety First
_
I nearly had several accidents with this whole project. I think they're worth sharing so we can all keep our hobbies for the rest of our lives. First, I had to develop and prototype the magneto RPM circuit with the engine running on my desk, inside the office. It was necessary to attach an SX-Key, a PC and let the system run to develop the code and to tweak the signal conditioning circuit from the magneto. This really shouldn't have been done indoors due to CO poisoning (and noise). I kept doors and windows open, but it was a bad idea and I knew it at the time. Nothing bad happened to me, but I wouldn't do it that way again. Other bad things happen from running an engine on my desk. Once my laptop mysteriously shut down due to vibration. Next time I'll run the engine outside and use several serial cables (this is the same way we used to test BASIC Stamp projects on R/C airplanes, such as the dual-engine synchronizers).__
_
Another time I was a bit unaware of the power I was generating. I had connected the battery to the alternator and increased the throttle to a high RPM. I then disconnected the battery and easily dumped 100A into the voltage/current regulator circuit. The_electronics truly exploded and caught fire - I didn't know if I should have_reached for the fire extinguisher or tried to cut the engine first. I_decided to cut the engine_first._Meanwhile I_exploded capacitors, LEDs and a 25 Ohm/1 W_aluminum housing resistor. The trajectory of all components was away from me. Could have been avoided by keeping the battery connected.
_
I also experimented with some smaller spider couplings to connect the alternator to the engine. Though they were rated for much higher RPMs than I was using, a small misalignment sent_some parts into the air._I wasn't standing_along the axial line of rotation, so I didn't get hit. Before any schoolchildren get to see this I'll need_to build a shield around the coupling.
_
I was prepared for_most of the accidents, but didn't quite anticipate the fire on my desk.__
_
Credits
_
My friend John from Tigerbotics provided_tons of help on the whole project, especially the electronics. Without his assistance I'd still be using a hacksaw to cut aluminum,_trying to understand the "how" instead of "why" and be somewhat frustrated. Since I can't help him with his projects the same way,_my intent with posting the whole project is that others could benefit the same way. __
Post Edited (Ken Gracey (Parallax)) : 10/26/2006 9:48:51 PM GMT
Image Attachment :

Hybrid Power Plant.jpg _ 129KB (image/pjpeg)This image has been viewed 14105 time(s).
Image Attachment :

Voltage Regulator.gif _ 11KB (image/gif)This image has been viewed 14657 time(s).
Image Attachment :

Magneto Servo Schematic.gif _ 19KB (image/gif)This image has been viewed 14294 time(s).
Image Attachment :

Under Load.jpg _ 67KB (image/pjpeg)This image has been viewed 13923 time(s).
Image Attachment :

Mounted on Robot.jpg _ 113KB (image/pjpeg)This image has been viewed 13992 time(s).
IMPORTANT: Be sure to do a 'Preview Post' first to make sure it's what you want!
.........................................................................
Project Purpose:
_
To develop an outdoor robot power system which can deliver many more amp-hours of energy than batteries, using a gas engine and a modified automobile alternator._The initial purpose was not to build a robot, but to prototype a Hybrid Power Plant that I_could use on an over-the-snow robot. A battery would merely support surges in current demand, like a big capacitor. It wouldn't be there to provide power for anything more than half of a minute. This could lighten my load and extend operating time, particularly for a GPS autonomous robotic project.
_
After building the_Hybrid Power Plant_and running some tests on_it with_real loads I_decided to put some motors on it and test it out_on an R/C robot requiring_much more current. This additional step turned out to be a_big eye-opener, and gave me another purpose to the project - to test the system on a robot.__
_
Mechanical Design:
_
Coupling an alternator to a small gas engine requires that the shafts be perfectly aligned. Small "spider couplings" provide_for up to_1 degree of angular misalignment, and 0.01" of horizontal offset. To_align the engine and alternator I decided to make this a machining project (I had tried other ways before, and failed!). Using belts and pulleys would be out of the question due to_the introduction_of more moving parts, increased system slop and noise, and danger of moving parts.
_
The Hybrid Power Plant would_was built by mounting the engine and alternator on their own plates, using a 3/4" aluminum_rod as an additional alignment (and to double as_handles)._Although the alternator had two mounting holes, I opted not to use these since they_were_offset at different z-axis places. Instead, I machined the front of the alternator flat and drilled/tapped four holes in known locations. These holes allowed me to attach it to its mounting plate and perfectly identify the center shaft. The Honda mini 4-stroke engine (GX35) really needed a clutch - the power curve is way up in the RPMs and it generates little torque until 3,500 RPM. Staton-Inc makes a $60 clutch that has perfect mounting holes, enabling it to be mounted to a plate. I also attached_the back and bottom of the engine to four more mounting locations on the base plate._The thought was that by mounting the engine to some sizeable chunks of aluminum I would smooth out vibration_by closely coupling it to a mass.
_
The parts are all 3/8" 6061 aluminum, anodized clear. If you want to copy this design, you can download my drawings below (I have provided them in DXF format). You will need to scroll down to find them since I'm only given five (5) attachments per post._
_
The_Hybrid Power Plant_now looked like this:
_
_
Electronic Design:
_
Going back to my_purpose, the initial idea was that I'd only build and test a portable Hybrid Power Plant_- I didn't plan on actually using this sytem on a robot._Therefore, my electronics_intiaially_consisted of the following:
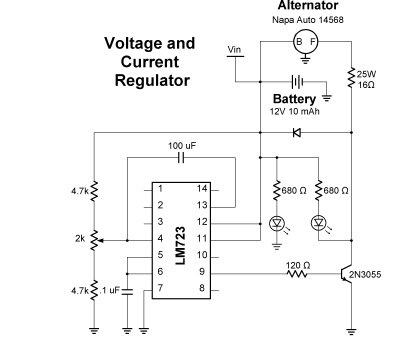
- Alternator_current/voltage regulation_Although I chose a "regulated 1-wire output" alternator from a 1992 Toyota pickup, I determined the regulator_caused some problems for this little engine. It_was difficult to overcome initial_resistance to get the alternator RPMs up_4-6,000 where it produces a lot of power. The alternator was opened up and the voltage regulator was bypassed, bringing the field current outside for my own limiting. This_eliminated all resistance and allowed it to turn really freely._The voltage regulator_design we came up with allows me to limit field current with external resistors, and charge the battery with a shut-off feature if 14.5V is attained (or other voltages,_as set by a potentiometer). This_provided a regulated voltage for motors and other loads, a battery charger, and_15-20 amps of current should I need it. A schematic is below:
_
_
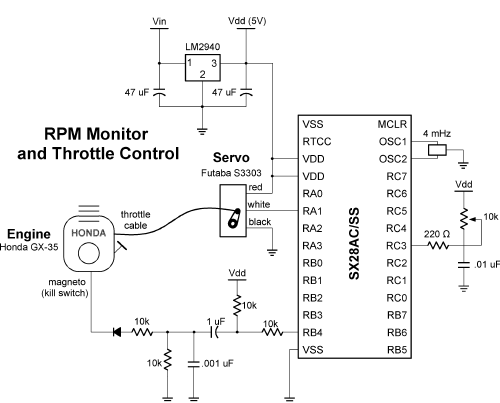
- Throttle control / RPM measurement The amount of current generated relates closely to engine RPM. The higher the engine throttle, the more power! The initial_system_uses an SX28AC/SS (on an SX28 Proto Board)_to count magneto pulses, and a servo to manage the throttle._Having measured_current at different RPMs, the goal was to set the engine at known RPMs and known current output._Controlling these variables would ensure that I'm not overcharging the battery (max charge is 5A) and generating more power than I need._Through_this process I_destroyed many pants and shirts with acid from overcharging batteries. If I was to generate lots of current, I'd have to use what I couldn't put in the battery. With lots of help from a key friend, the following circuit was developed:
The following SX/B code is an open-loop, potentiometer-controlled servo throttle for the above schematic. This example doesn't count magneto pulses at the same time. I've got both pieces of code working independently, but have yet to integrate them using the SX's RTCC/ISR features.
' Potentiometer Throttle Control
DEVICE_________ SX28, OSCXT2, TURBO, STACKX, OPTIONX
FREQ___________ 4_000_000
'
' I/O Pins
'
Servo__________ PIN_RA.1_ OUTPUT
RCCircuit______ PIN_RC.3_ INPUT
'
' Constants
'
'
' Variables
'
ServoVal_______VAR_______ WORD
analog________ VAR_______ WORD
' =========================================================================
_ PROGRAM Start
' =========================================================================
Start:
__ LOW RC.3
__ PAUSE 5
__ RCTIME RC.3, 0, analog
__ ServoVal = analog/2
__ ServoVal = ServoVal+130
__ PULSOUT Servo, ServoVal__ __'__ PAUSE 20
__ PAUSE 20
__ GOTO Start
_
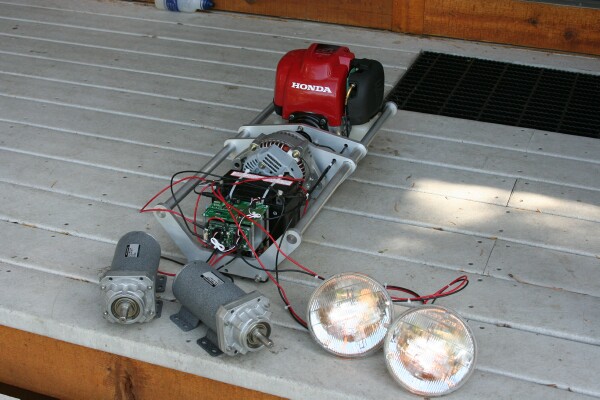
- Car Headlights / HB-25s and_12V_Motors for a Load_To test out the system I needed a big load. I used two 50W high-beam headlights, two massive 12V Groschopp Planetary Gear motors, and_two HB-25s to control the motors._The HB-25s were connected to the SX28CA/SS Proto Board for control (nothing important here - just a PULSOUT pin, value)._I_tested the system out with some big loads, and it worked great._It ran for an hour, keeping the battery charged and headlights on high-beam. I quickly learned that an entire power management system would have control over engine RPM and alternator field resistance. I probably wouldn't care much about the battery since it would always be charged. I'd only generate current_if I was using the power._I was using about 15-20A at 12V. This is what my load looked like:
The Oversized Boe-Bot_
I was satisfied that the Hybrid Power Plant would perform really well, and I was ready to shelf it so I could design a robot around the concept. However, the same friend who helped me with the electronics pointed out that I could further prove out the concept if I simply mounted wheels to the Hybrid Power Plant. It made sense considering I hadn't been able to test the motors with a load. Then I wound up with this:
_
_
_
I switched the HB-25s straight over to R/C function and added a transmitter. I set the engine throttle with a potentimeter/servo (SX/B code below) and didn't bother counting magneto pulses. Away we went! Videos are posted in the next message._Under R/C control the whole system works great. I'm certain the Hybrid Power Plant could be used on an outdoor robot. The videos show the first pilot run when I had 16_Ohms of resistance in the alternator field, but now there's only 8_Ohms and it runs much faster._It'll lay down scratch, slide around corners and reverse at full throttle (I completely destroyed an HB-25 doing this, by the way).
_
The oversized Boe-Bot runs better_backwards due to weight distribution. Since the Hybrid Power Plant was never supposed to roll, this is something I'll fix on the next project._Moving the battery around lets it run better in the Boe-Bot's "normal" direction_with the motors up front._
_
_
Safety First
_
I nearly had several accidents with this whole project. I think they're worth sharing so we can all keep our hobbies for the rest of our lives. First, I had to develop and prototype the magneto RPM circuit with the engine running on my desk, inside the office. It was necessary to attach an SX-Key, a PC and let the system run to develop the code and to tweak the signal conditioning circuit from the magneto. This really shouldn't have been done indoors due to CO poisoning (and noise). I kept doors and windows open, but it was a bad idea and I knew it at the time. Nothing bad happened to me, but I wouldn't do it that way again. Other bad things happen from running an engine on my desk. Once my laptop mysteriously shut down due to vibration. Next time I'll run the engine outside and use several serial cables (this is the same way we used to test BASIC Stamp projects on R/C airplanes, such as the dual-engine synchronizers).__
_
Another time I was a bit unaware of the power I was generating. I had connected the battery to the alternator and increased the throttle to a high RPM. I then disconnected the battery and easily dumped 100A into the voltage/current regulator circuit. The_electronics truly exploded and caught fire - I didn't know if I should have_reached for the fire extinguisher or tried to cut the engine first. I_decided to cut the engine_first._Meanwhile I_exploded capacitors, LEDs and a 25 Ohm/1 W_aluminum housing resistor. The trajectory of all components was away from me. Could have been avoided by keeping the battery connected.
_
I also experimented with some smaller spider couplings to connect the alternator to the engine. Though they were rated for much higher RPMs than I was using, a small misalignment sent_some parts into the air._I wasn't standing_along the axial line of rotation, so I didn't get hit. Before any schoolchildren get to see this I'll need_to build a shield around the coupling.
_
I was prepared for_most of the accidents, but didn't quite anticipate the fire on my desk.__
_
Credits
_
My friend John from Tigerbotics provided_tons of help on the whole project, especially the electronics. Without his assistance I'd still be using a hacksaw to cut aluminum,_trying to understand the "how" instead of "why" and be somewhat frustrated. Since I can't help him with his projects the same way,_my intent with posting the whole project is that others could benefit the same way. __
Post Edited (Ken Gracey (Parallax)) : 10/26/2006 9:48:51 PM GMT
Image Attachment :
Hybrid Power Plant.jpg _ 129KB (image/pjpeg)This image has been viewed 14105 time(s).
Image Attachment :
Voltage Regulator.gif _ 11KB (image/gif)This image has been viewed 14657 time(s).
Image Attachment :
Magneto Servo Schematic.gif _ 19KB (image/gif)This image has been viewed 14294 time(s).
Image Attachment :
Under Load.jpg _ 67KB (image/pjpeg)This image has been viewed 13923 time(s).
Image Attachment :
Mounted on Robot.jpg _ 113KB (image/pjpeg)This image has been viewed 13992 time(s).


Comments
Ken Gracey
Parallax, Inc.
Ken Gracey
Parallax, Inc.
Ken Gracey
Parallax, Inc.
Ken Gracey
Parallax, Inc.
You were quite brave (or something else) to run that in the garage with the car in there too!!!
Bean.
▔▔▔▔▔▔▔▔▔▔▔▔▔▔▔▔▔▔▔▔▔▔▔▔
Cheap used 4-digit LED display with driver IC·www.hc4led.com
Low power SD Data Logger www.sddatalogger.com
SX-Video Display Modules www.sxvm.com
"People who are willing to trade their freedom for·security deserve neither and will lose both." Benjamin Franklin
·
Very nice !!! Always great to see someone push the envelop a bit.
Regarding the spider-type coupling, most small gen-sets (up to maybe 10KW) mount the alternator rotor right on the engine shaft (with either a female Morse taper or a rigid solid coupling) without a front bearing in the alternator. The frame of the alternator then is only holding the stator windings and maybe a small steady bearing on the outboard end of the alternator. Reduces the pain of getting things lined up and vibration free.
Really fine work all around!
Tom
▔▔▔▔▔▔▔▔▔▔▔▔▔▔▔▔▔▔▔▔▔▔▔▔
Tom Sisk
http://www.siskconsult.com
·
I'm not sure I understand the mounting connections you're describing. Could I trouble you to draw me a little picture?
Thanks,
Ken Gracey
Parallax, Inc.
Update: I understand now. The shafts provide alignment on a single bearing system. I've seen the couplings from Northern Supply designed to connect pumps to engines - they're a single piece. I got it now.
Post Edited (Ken Gracey (Parallax)) : 10/26/2006 11:28:43 PM GMT
No problem; BTW, not meant as criticism of the design!
I used the same set up back about 1980 to build an eddy-current coupling to drive the main hoist drum on a crane. Just used the rotor out of an alternator mounted to the shaft of a motor that ran at constant speed.
After several less than wonderful attempts at alignment, a machinist at the university's shops put me onto the idea of the rotor being mounted only to the motor shaft. He just used a piece of 3" shafting, about 6" long, bored out to the motor shaft size on one end and the rotor shaft size on the other.
I'm also going to find a picture of a LeTourneau tree-crusher I used to maintain. Your machine's layout looks remarkably like the crusher....except it had an 8-cylinder diesel driving about a 300 KW generator, 125 HP DC traction motors on each of the 3 wheels ......and weighed in at 35 Tons, and stood 15 feet high. The company also had a bigger one at 75 Tons but I didn't have to work on that one.
Cheers
▔▔▔▔▔▔▔▔▔▔▔▔▔▔▔▔▔▔▔▔▔▔▔▔
Tom Sisk
http://www.siskconsult.com
·
·· Attached are three shots of the LeTourneau tree crusher. Photos are by David M. Moehing, Mississippi U, www-forestryimages.org.Used with permission.
· This what your Boe-bot can grow into!
Cheers,
Tom Sisk
··
▔▔▔▔▔▔▔▔▔▔▔▔▔▔▔▔▔▔▔▔▔▔▔▔
Tom Sisk
http://www.siskconsult.com
Good work, it looks like you have a strong base to build on.
▔▔▔▔▔▔▔▔▔▔▔▔▔▔▔▔▔▔▔▔▔▔▔▔
John R.
8 + 8 = 10
I wonder if its legal (and safe) to leash it on the streets fully automomous, with sensors, cameras, GPS etc... Like a really big boe-bot!· Do you think it will need licence plates?
Regards Thanos
▔▔▔▔▔▔▔▔▔▔▔▔▔▔▔▔▔▔▔▔▔▔▔▔
Greekbotics: Greek Robotics Forum
(Translate it using Babelfish)
·
You could use two universal joints to couple the altercator and engine, also... Check McMaster-Carr or MSC. But, it is certainly a percent or two more efficient using Stamptrol's idea of mounting direct.
-Parsko
That puppy is loud! I hope you're wearing hearing protection when you're using it indoors. Otherwise you won't have much to protect in a little while.
▔▔▔▔▔▔▔▔▔▔▔▔▔▔▔▔▔▔▔▔▔▔▔▔
OS-X: because making Unix user-friendly was easier than debugging Windows
links:
My band's website
Our album on the iTunes Music Store
▔▔▔▔▔▔▔▔▔▔▔▔▔▔▔▔▔▔▔▔▔▔▔▔
·"Imagination is the one weapon in the war against reality."
-Jules de Gaultier
That would also be a function of speed... You could gear ratio something down to pull a building if you wanted to, but at the sacrifice of speed.
The real measure would be how much horse power the hybrid unit could deliver after converting from gas to electric. How energy efficient
is the conversion? ...and then again, to answer your question, how energy efficient are the drive motors used in combination with the electronics?
▔▔▔▔▔▔▔▔▔▔▔▔▔▔▔▔▔▔▔▔▔▔▔▔
Beau Schwabe
IC Layout Engineer
Parallax, Inc.
This is one cool concept, since it is gas powered robot that can be controlled without any kind of hard mechanism.
I cant wait to see the real application of this.
▔▔▔▔▔▔▔▔▔▔▔▔▔▔▔▔▔▔▔▔▔▔▔▔
·"Imagination is the one weapon in the war against reality."
-Jules de Gaultier
Just seen this , Where did you get the motors
Brian
From eBay, surplus. They were really low-cost ($30 each) and the guy had 14 of them!
I'm about ready to unleash version 2 of this robot. I've really tidied up the whole system with a mini alternator, no clutch, and less parts everywhere.
Ken Gracey
Brian
Post Edited (Brian Beckius) : 1/28/2007 1:57:09 AM GMT
-Henryhttp://forums.parallax.com/showthread.php?p=628728
▔▔▔▔▔▔▔▔▔▔▔▔▔▔▔▔▔▔▔▔▔▔▔▔
Paul Baker
Propeller Applications Engineer
Parallax, Inc.
I just wish I had the machine shop resources to enlarge my projects. It is amazing how much hardware a microcontroller can actually manage.
▔▔▔▔▔▔▔▔▔▔▔▔▔▔▔▔▔▔▔▔▔▔▔▔
"If you want more fiber, eat the package.· Not enough?· Eat the manual."········
Another project I am playing with is a simple $5.00 car 110v AC/DC inverter 75W I got from Ebay and an older trolling motor battery from my bass boat that is just a little weak for tournament fishing. Hooked (no pun) it up to a 12v solar panel, and its been lighting my garage for 2 1/2 months so far.
Been thinking of daisy chaining the other 4 batterys I have together and getting some more juice, but those big solar panels are expensive.
Don't know how I didn't see this sooner!
Having a mobile, self-propelled generator is really a useful application for working with power tools in remote areas.
A lot of the Japanese gas generators have excellent sound-proofing already. The real problem is ventalation of the CO in an enclosed space.
▔▔▔▔▔▔▔▔▔▔▔▔▔▔▔▔▔▔▔▔▔▔▔▔
"If you want more fiber, eat the package.· Not enough?· Eat the manual."········
▔▔▔▔▔▔▔▔▔▔▔▔▔▔▔▔▔▔▔▔▔▔▔▔
Thank's Brian
www.truckwiz.com
·"Imagination is more important than knowledge..." ·· Albert Einstein
I haven't found an alternator with a mounting system I like, so I'll take a look at the mini Cooper design. For my current hybrid robot (not yet posted, but soon!) I've drilled and tapped the face of the alternator so I could mount it on a plate of aluminum. It's too difficult to figure out the XYZ spatial relationship of the mounting holes of the existing alternators - they're really made for aligning belts instead of shafts.
I'll be able to share the latest project shortly.
Ken Gracey
Parallax, Inc.
http://www.jegs.com/webapp/wcs/stores/servlet/product2_10001_10002_749983_-1
post edit: ·This link is for a differnt alt than a mini cooper one
I'll post a photo of the mini cooper alt. tonight
·
▔▔▔▔▔▔▔▔▔▔▔▔▔▔▔▔▔▔▔▔▔▔▔▔
Thank's Brian
www.truckwiz.com
·"Imagination is more important than knowledge..." ·· Albert Einstein
Post Edited (Brian Beckius) : 3/22/2007 3:52:46 AM GMT
▔▔▔▔▔▔▔▔▔▔▔▔▔▔▔▔▔▔▔▔▔▔▔▔
Thank's Brian
www.truckwiz.com
·"Imagination is more important than knowledge..." ·· Albert Einstein