

Getting Started With the Nextion HMI
 JonnyMac
Posts: 9,850
JonnyMac
Posts: 9,850
Life has been very busy lately, but I was happy when Ken reached out and asked if I would jump back to do P2 presentations. You've probably seen the announcements, but we're going to do this over a 3-week period in December. This will be a review of P2 programming in Spin, and we'll work with the some specific hardware.
Information and registration link can be found here:
-- https://www.parallax.com/touch-screen-holiday-lighting-control-project-with-jonnymac-live-coding-and-building/
Q: What if I'm new to the P2?
A: No worries! We'll move slowly and make sure that nobody is left behind.
Week 1: The Nextion HMI -- Programming the 9th Cog
Week 2: Reviewing protocols: Async Serial, I2C, "Smart" LEDs
Week 3: Bringing it all together with a simple touch-screen lighting controller
Ken is creating kits to simplify ordering. It would be useful to have essential prototyping parts, too -- things like pots, resistors, buttons, LEDs, etc.
My goal for the first session is to save you hours of watching videos on YouTube (unless you want to). There are a few folks out there providing reasonable information about using the Nextion, but most online tutorials are for the Schmarschmino, not the Propeller. That said, by big ego thinks that once you've sat through my session, you'll understand how to lift good ideas from projects using other processors for your own.
The Nextion requires a bit of programming, but it's not difficult. Like any other coding, though, planning is really important. The scripting language used looks a bit like C, but doesn't follow all of C's rules nor syntax. It's a simplification, which means for some things we have to do a bit of work. By working through some examples together, you'll get the hang of it.
There are two ways to get code into the Nextion: though a serial link, or with a microSD card. You probably have a USB-to-Serial adapter that provides 5v that you can use to run the Nextion directly from your computer while working on HMI development. This is the one I use.
https://www.amazon.com/gp/product/B07FCGS8TN
This has a jumper to set Vcc to 5V (needed for the Nextion) or 3.3V, and male headers that connect directly to the Nextion's cable.
When connecting to the P2 (or P1), remember to put a resistor in the TX line from the Nextion because this has a resting state of 5V (3.3K to 10K is fine). If you're using "the JonnyMac" connect the blue TX line from the Nextion to one of the 3-pin headers (signal line). You'll need a M-M cable to go from the downstream side of the resistor to the P2 RX pin. The P2 TX pin can be connected directly to the display.
I really like creating nice displays, and for the "art" side of things I use Inkscape. It's free, easy-to-use, and will create PNG files that are used by the display. For the projects I present you'll get the PNG files, and I'll give you the SVGs that you can modify if you want to do that.
Attached to this message is a connection diagram and a couple of preview graphics for projects that will be part of the presentation.
Happy Thanksgiving!, and I'm looking forward to seeing everyone in the sessions.
Update: I just came across this post in the Nextion forum: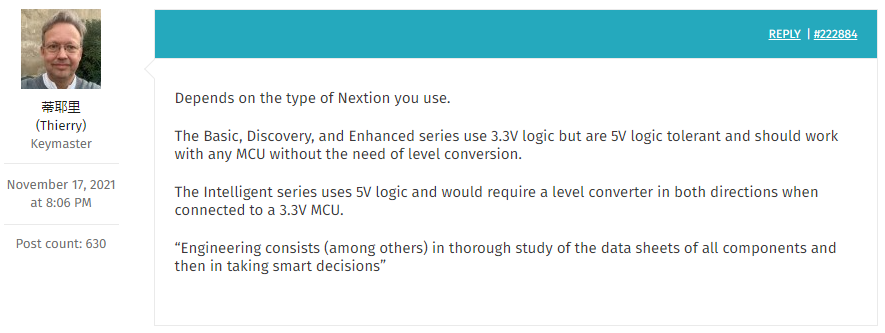
This suggests a resistor in the Nextion TX line is only required for the Intelligent displays. I did a bit of poking around on their web site for a standard data sheet (which they don't seem to have), but they do have this posted (this from the basic series module).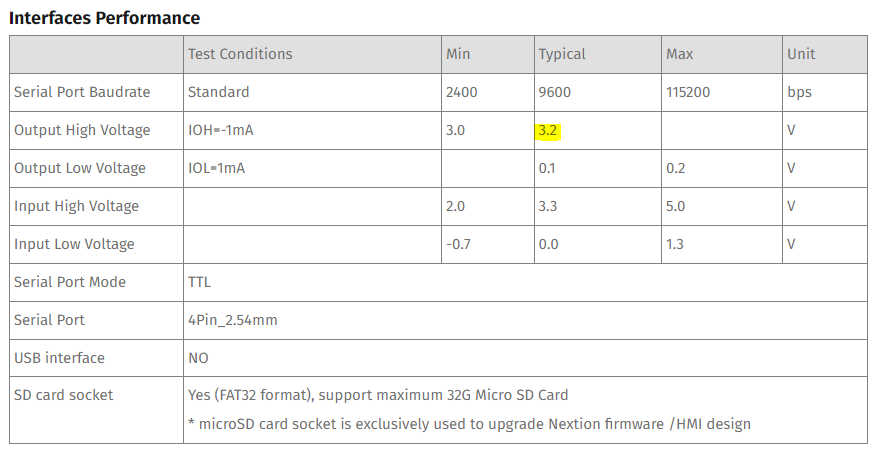
The resistor in the TX line from the Nextion will never cause harm, and if you're using the intelligent display (orange PCB), it will protect the Propeller.
Another Update: I have verified that you can use a Prop-Plug to download a TFT file to the Nextion display. The connections diagram has been updated. Note that using the Prop-Plug only applies to the Basic and Enhanced displays; the Intelligent series uses 5V IO.
p2_code.zip
-- unzip this to a P2 project folder
0_get_started.zip, 1_waveform.zip
-- unzip these to your Nextion folder
Comments
Files for Week 2
-- code-12 (nextion-2).zip holds the P2 files for Week 2
-- passcode.zip holds an update to the Nextion HMI file for the pass code project (with sources).
-- pixels.zip holds the Nextion HMI file and graphics sources for it. This file shows how to spice up the Nextion slider control with simple graphics.
See post at/near end for Week 3 files -- forum won't let me attach them to this post.
I have the latest Nextion editor and it doesn’t open any existing examples anywhere-. Says created with older version or corrupt. But you can create your own new.
Nice. I personally would be interested in the graphing capabilities, so if that’s something you can cover, I’d appreciate it.
It's not something I've needed or looked into -- yet. That said, I do remember at least one video on graphing that seemed sensible; I'll try to find it again and have a look.
I've only seen that issue one and don't remember how I dealt with it. I've mostly watched YouTube videos and then manually recreated the projects. Last night I watched this video
...and recreated (using Inkscape) a version that is very similar, but matches my aesthetics and programming style. I am going to make one modification to this project before the class. ATM, the string at the top of the screen is part of the background image. I'm going to make that a string in the display so that it can be modified by the Nextion or the Propeller.
In the video the project sends the page number to the host. My strategy is a simple syntax like this:
command=value
...where command is a string identifier used by the Propeller, and value is numeric. It's easy to parse the two elements out of the string. In my passcode project, when the code is entered correctly, the message sent to the Propeller is
locked=0
Pressing any button while in the unlocked state will reset the lock status and send this message:
locked=1
By using a string with a terminating CR, it's easy to look at the output on any terminal. In fact, during week 1 we'll use a simple terminal app in the P2 that lets us see and parse strings coming from the Nextion, and let us send commands back. Easy-peasy.
Thanks, I imported the keypad and its a little too wide, I think I have to edit the Jpeg size before importing.
If you're talking about the passcode keyboard, I'll give you the source graphic files now. The first is for the off state, the second for the on state. My version of the project uses buttons in "image crop" mode for the number keys, and crop objects to hide or reveal the status dots and lock status graphics. This will be the first project we code in the session, so I don't want to release the Nextion project file yet.
The reason the JPGs are oversized is that I used the snipping tool while running the simulator and there's a bit of blur on the edge -- the PNGs that are attached are correctly sized and what I use in my project.
Here's my version of the project in the Nextion editor. I added a text box (white text on black bkg) so that I can change the heading. As this sits above the graphic, there was no need to update the original image files.
Yes, I did the same and have the same graphic, the reason its cut-off on mine I think, is the screen size I selected. If you look at the Attribute on the bottom right of your editor, it says W 320 and h 480. Mine says W 272 h 480. I selected a 4.3" device, which device are you using a 5"?
I'm using a 3.5" display with 480x320 resolution. Part # is NX4832T035_011 (you have the NX4827T043_011 selected). If this is the screen you're using you'll have to recreate the graphics in 480 x 272 pixel format.
Thats what I was thinking. This is how your graphic fits into my 4.3". Seems like half the battle is creating the graphic for your own project.
If you want a really nice display, yes. I am a long-time user of Inkscape and am able to create nice displays (my opinion) in a reasonable amount of time.
Great to see you presenting this, Jon. The timing for me is perfect. Looking forward to the class!
Ken tells me there is a fair number of people signed up for the sessions (thank you, I'm thrilled), so I thought I'd put out a bit of information for those who have downloaded the Nextion editor and want to begin to work with it before we start. We will use the basic display, but not all of the objects/widgets available to it. These are the widgets/objects that I think are most useful (for what I'm doing, anyway).
We will chat briefly about objects not on this list (waveform and gauge [later]).
I've attached a screencap of my editor for the getting started project. The goal is to put widgets on the screen, place them, then code the interactions between them using events and Nextion's C-like scripting language.
On thing you might want to experiment with is Tools\Font Generator. Objects like Text, Number, Button and others require an installed font, and I've found that the Nextion font generator doesn't render fonts the same size as when I sketch a screen using Inkscape.
Tip: Create a font folder under your Nextion folder so that you have them all in one place.
Once we understand how to use the various widgets, I'll show you how to get a bit fancy as in the projects in my first post. Admittedly, it takes a little effort, but I find the "art" part of these projects very relaxing, and think the final output is well worth the effort.
There was a request to cover the waveform widget, so I've added a couple simple demos for that. One uses a 10K pot (for analog input), the other uses a DHT22 temp/humidity sensor. Hopefully, you already have these (or something you can substitute) if you want to try those projects live.
How do I delete this message?
That was me, thanks!
Expecting to see you online today!
The files for today's (Dec 8) presentation are attached to the 1st and 2nd posts of this thread.
p2_code.zip
-- unzip this to a P2 project folder
0_get_started.zip, 1_waveform.zip
-- unzip these to your Nextion folder
passcode.zip, gauge_test.zip, menorah.zip, graphic_tach.zip, escape_timer.zip (optional)
-- unzip these to your Nextion folder
Thanks, everyone, for your participation in today's presentation. Please feel free to post questions here -- I'll do my best to answer them.
I missed it. I am SO grumped. But… clients… yo… (bangs head on table)
@CJMJ : You asked how to turn off component names in the editor. There is a barely-visible ID button, just to the left of the zoom control at the top of the screen. This toggles the IDs.
Jon,
I loved again you demonstration.
I quit half way, we have to sleep in Europe.
Today I hope to get the video. I was on a cliffhanger, starting P2 part.
Thank you, You inspired me again!
Daniel
Thanks for the time you spent in the session, and I hope you find the other material useful (when the video gets posted). We really did cover a lot of material today -- I was mentally very tired at the end. Hope to see you next week.
Thanks Jon! I had to miss the live presentation, but ran through your excellent examples! I'll check the video when posted!
dgately
Due to timezone differences live wasn’t an option. But thankfully that’s not necessary in this day and age")
I hope you found the waveform demos helpful. The waveform isn't hard to use; one just has to remember to use the component ID versus the component name in the add command.
@JonnyMac : Thanks for the "hide/show ID" button reveal. That's almost an Easter egg. It's one of those hidden in plain sight things. Works like a charm.
For those wanting to get a head start on week #2, I've posted the Nextion project file in post #2.
I have this thing now - it should be Enhanced series - 3V3? - I have to find some time to play.