

SUPER-SIZED ROBOT: SERVOS

Hi all,
Ken announced something about the super-sized robot. He wrote: ".....What are your ideas for making the servos? Keep in mind we could be making up to ten of them. We'd use the 12V motors from our Motor Mount and Wheel Kit. "
My idea is a "fake" servo...
A 3D printed enclosure for the 12V Motor Mount and Wheel Kit in a shape similar to a real servo.
The axle of the 12V motor kit will come out from that "fake "servo-enclosure in the right position like the real servo. And In the same way the cables ...
The question is: will be able the 12v kit to fit inside to the fake servo?
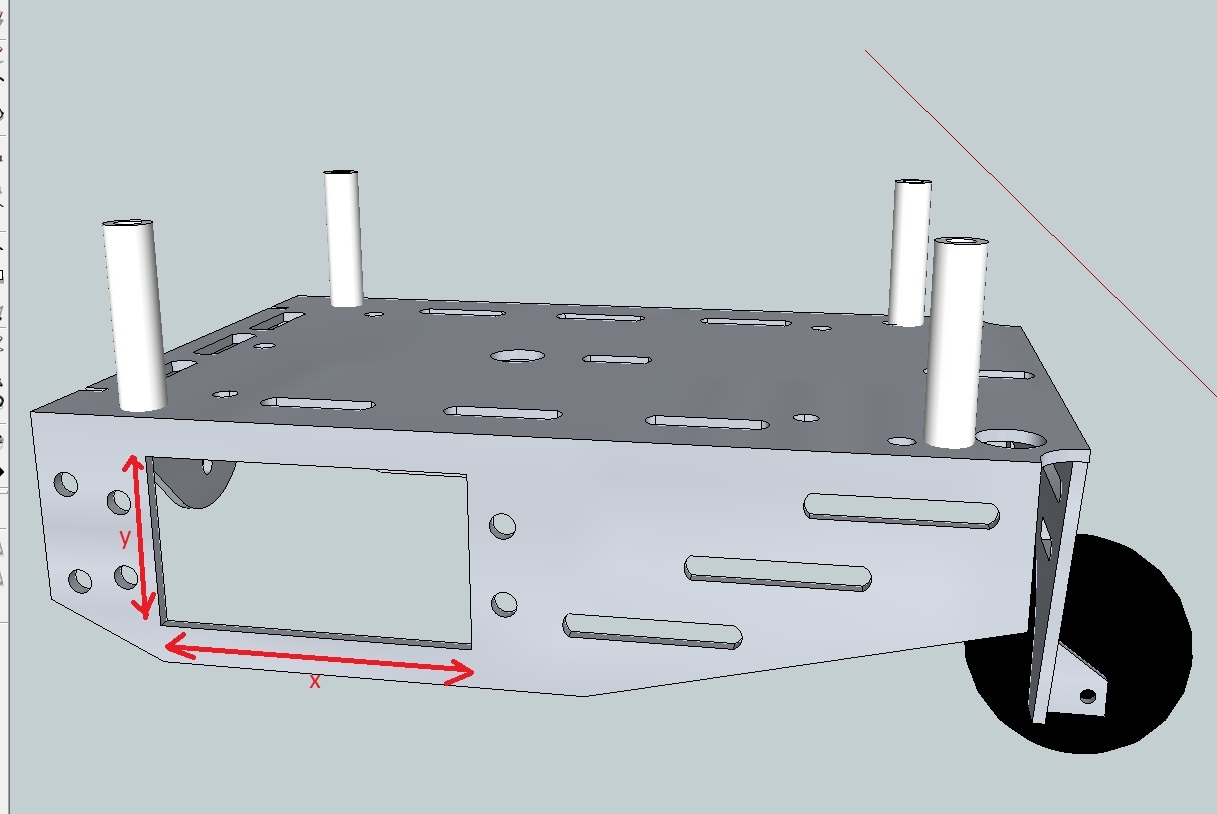
How much exactly is the dimension (x,y) of the "window" that is supposed to hold the servo in the Supersized robot model?
Ken announced something about the super-sized robot. He wrote: ".....What are your ideas for making the servos? Keep in mind we could be making up to ten of them. We'd use the 12V motors from our Motor Mount and Wheel Kit. "
My idea is a "fake" servo...
A 3D printed enclosure for the 12V Motor Mount and Wheel Kit in a shape similar to a real servo.
The axle of the 12V motor kit will come out from that "fake "servo-enclosure in the right position like the real servo. And In the same way the cables ...
The question is: will be able the 12v kit to fit inside to the fake servo?
How much exactly is the dimension (x,y) of the "window" that is supposed to hold the servo in the Supersized robot model?
Comments
The "fake" servo enclosure is the yellow translucent colour (with the super-sized dimensions, and inside is the 12V motor kit.
The only we have to do is to print the "Fake" servo enclosure with a Black ABS filament .....
I would use a CNC or laser cutter to cut out panels that can be fit together to create the main shape, then perhaps 3d print the "top" part with the mounting flanges and mounting spot for the 12v motor kit.
This would make it much faster to produce, and less prone to 3d printing failures (which are much more common with such large parts).
Judging by some of the pics on fb I'd say there is more than enough room. Unless I'm looking at the wrong 12v motors.
Thin sheet metal could work for the servo body, or wood. Too much to 3D print for me personally.
I agree with Roy,
The backside of the servo could be a wooden box painted black and only the top part 3d printed...
Also, the part of the "servo" that has the four holes in order to be attached on the robot's chassis could be wooden too...
See the model above from W9GFO and imagine the wooden plate extended left and right in order to fit on the robot's chassis.....
I had thought about using a wood plate for mounting the servo to the chassis, but decided against it because the plastic is plenty strong enough and it would interfere with the belt reduction and motor mounting plate - which must be adjustable so that the belt can be properly tightened.
As for the back shell, sure you could make that out of sheet metal or wood, but why? That is a lot of work to do ten times over, I prefer to let the machines do the work. I guess if you don't have access to a 3d printer then that is a good reason why.
The large prints sure do take some time though. You gotta have something else to do other than wait for it to finish. The red pulley pictured below took over 30 hours to print but there was no other reasonable way to make it - the pulley is crowned like a bandsaw wheel to keep the belt centered. The servo top only took about 12 to 15 hours.
He's got a solution that will work perfectly. Rich, I need to order some more chassis parts for us. I'll get these to you in the next couple of weeks (I'm going to ask my contact at Sierra College if they're willing to cut a few more for us). How many of these servo enclosures can be made?
Ken Gracey
Probably about four or five per week is realistic, barring any mechanical issues and as long as I can keep feeding the printer with filament. Of course that is assuming that the current design will work. I still need to create a cooling solution, don't want to have the motor (and driver) cooking inside an air tight plastic enclosure.
Everything is scaled up 5x, so the size of that "window" is about 210mm X 104mm. The servo body is 203mm (274mm incl. mounting tabs) x 100mm x 189mm. This size was chosen as the smallest that would fit the 12V motors.
Just over 3/4 lb, or about 400 ft.
That's a lot of filament!!
I've often had issues printing large stuff with ABS (so much warping), which is why I made my earlier post. PLA might be ok, but for structural things it tends to break too easily.
PETG is what I have settled on for most things.
Cutting the "box" part of the servo on my glowforge would only take a few minutes.
I would prefer to print in ABS (stronger, withstands heat better and can be vapor smoothed), but that is not possible without a heated chamber. I do intend to get a dedicated ABS printer, don't know when though.
I found PLA to be more brittle, especially around mounting points. I've had PLA parts just snap of flanges, where the same thing in PETG holds.
Are you going to have 1/5 scale penguins too??