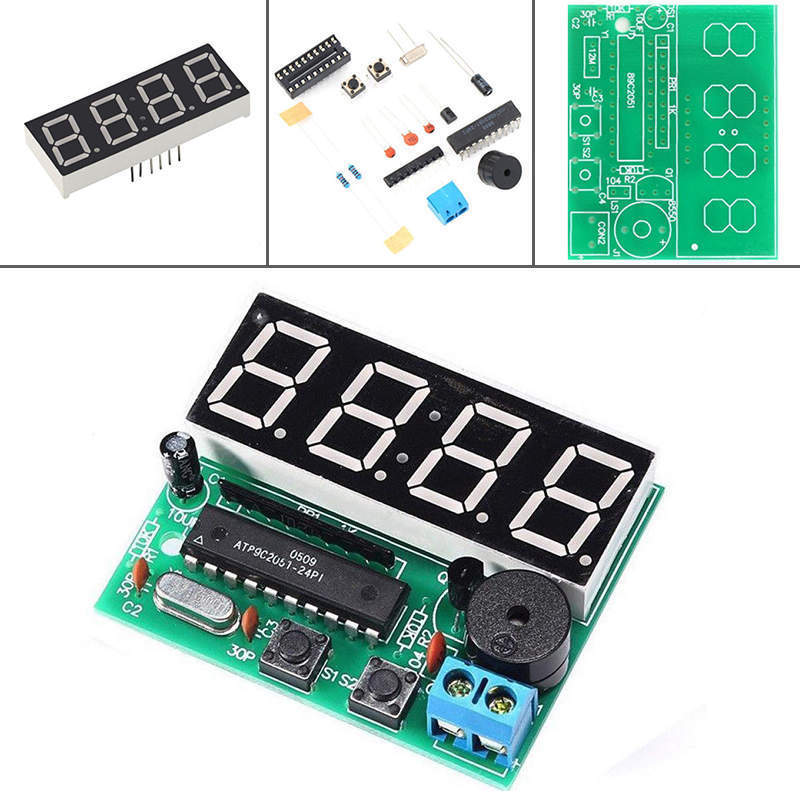
$2 Clock Kit
 erco
Posts: 20,263
Real men build their own digital clocks! IMO it's worth $2.19 just for the soldering practice. Don't get rusty on me, guys! An IC socket is included, but real men solder directly, as the picture shows. Sockets are for suckers. 
Ken: Stock up on these for the next Parallax Expo/P2 party "Learn to Solder" booth.
BYO 3-6VDC supply. USB works for me. Scotch for me, Preston.
https://www.ebay.com/itm/1set-DIY-Kit-C51-4-Bits-LED-Digital-Electronic-Clock-Production-Suite/272590606700

Ken: Stock up on these for the next Parallax Expo/P2 party "Learn to Solder" booth.
BYO 3-6VDC supply. USB works for me. Scotch for me, Preston.
https://www.ebay.com/itm/1set-DIY-Kit-C51-4-Bits-LED-Digital-Electronic-Clock-Production-Suite/272590606700


Comments
IIRC, it appeared into a two-month sequence, 1976 Radio and Electronics article (August/September), just in time for me to gave myself an early Xmas gift!
After nine years into electronics' field, It was the first 40-pin ic I ever had soldered (3817A). Had lots of fun assembling it.
Seriously, this is indeed a nice practice project. Extra credit for students if they remember to solder in the 10K resistors shown in the parts picture but missing on the finished board. My guess is that they're pullups, so they're probably needed!
I built my digital clock when I was 14/15 years old. Of course it used 74 series TTL chips and Nixie tubes. I was very proud of my home made PCB, hand drawn with PCB marker pen and etched in a tank of seriously over powerful acid in the local University's chemistry lab, boy did that fizz. The design was a mash up of various magazine articles I had seen. It was quite a hit, nobody had digital clocks in 1971.
Just recently I was pondering building a second clock. This kit is nice but it would have to be something a bit special.
Speaking of kits and soldering practice. As anyone tried out these HAKKO T12 ripoff temperature controlled soldering kits:
http://www.instructables.com/id/DIY-Hakko-T12-Compatible-Soldering-Station/
https://www.banggood.com/Digital-Soldering-Iron-Station-Temperature-Controller-Kits-for-HAKKO-T12-Handle-p-1254007.html?cur_warehouse=CN
They use similar tip and thermal control system as the HAKKO FX-951, at about a fifth the price. Or a tenth if you have a suitable PSU already.
Of course you will need to already have a soldering iron in order to build the soldering iron...
Anyway a mate and I built the electronics, we had a chassis built for us - about 1m x 1m base and 0.3m high at one end and 1m at the other. It had to fit under an escalator in a shopping centre. We wired this part ourselves.
Now... There were 4 displays of 5m wide by 2m high. The clock consisted of plastic cylinders with a flat recessed and printed with digits. There were 12 large digits 1-12 for the hour, 60 slightly smaller ones 0-59 for the minutes, and 60 much smaller ones 0-59 for the seconds.
Each digit was backlit by a 40W 240Vac standard light globe. When the digit was off, the globe(s) were at 50% brightness. Our electronics decoded the clock output and then drove an SCR for each globe, with a diode across each SCR to allow for the 50% illumination when not selected.
IIRC it took 5 electricians 8 days to wire the lights to our electronics frame. Fortunately we were only responsible for the frame electronics.
The clock faces were designed by the building architects. They couldn't find a company to build the electronics for the clock as they required. We just happened to be chatting with the building lighting contractor and we quoted and got the job.
The clock ran for a number of years before they updated the wall. But I have to confess that while we were in the building we used to hear people discussing what they thought the displays were. Never did we hear anyone say it was a clock. Caused a lot of discussion, so maybe it was a successful piece of art.
"5m wide by 2m high" What?!
Would be great if you had a picture of that monster clock.
We had to install it while the building was under construction. That was an eye-opener, particularly for a 22yo. I started my first company for this, and it was quite profitable
The polishing of the marble styled concrete floors was quite interesting. Our frame sat on the floor, but it was enclosed behind a cupboard door.
I built that 3817A clock twice since the first one got shocked. I think it's in the garage on a shelf somewhere. I think it still works. Even controls a relay to turn a light on and off.
Hey if I add a WiFi module to it I can make it an Iot and turn lights on and off from by phone. Old meets new
Mike
It would be a piece of cake to use your iphone to reset it to flash 12:00.
The original AT89C2051 was Atmel's 20 pin version of AT89C51.
Still sells, with many Asian clones, only mainly these days in the ISP/Drop in AT89LP2052 faster cored versions
I notice 'Atmel' is missing from the picture, tho the date code appears to be 2005
They are 8051 core, so any 8051 tool chain works.
However, the genuine original AT89C2051 needs 12V on RST, and parallel load, so it's not really Y2018 material.
A more recent 20-pin 8051, more suited to new designs, is the Nuvoton N76E003, sub 30c for 18kF, & Silabs EFM8 family.
New 8051's continue to release, with STC rolling out STC8x series - that has a 24b opcode fetch, so is faster again, and it appears that all models have an inbuilt USB-connect loader. (USB LS in SW?)
OMG, what if this is a pre-Y2K clock? It might not even work this millennium. DOH!
You might have to hack the cheapie AVR programmer from 5 years ago to update this chip.
https://forums.parallax.com/discussion/147784/sum-of-the-parts
Hehe, there is that risk...
The photo really does look like ATP92051, but the web body text says AT89C0251, but is rather vague if this is pre-loaded.
It really has to come preloded with the clock.
Does ATP92051 mean some cheap OTP version ?
Another ebay link does show Atmel logo, and a 16xx date code, and a circuit.
Someone commented it does not last long on batteries !!
Circuit is 'creative', the old 89C2051 lacks high source P-side, so they MUX the display with N-fets on all sides, and shunt a pullup to gnd.
This means a '1' draws more current than a '8'
Sometimes those photos show a board that isn't even soldered, just with the components shoved in the holes. I've seen photo "mistakes" like transistors & caps installed backwards. Not a problem until soldered & powered up.
Many times an IC is shown with badly bent pins. "It is left as an exercise to the reader..." to unmangle the pins and try to assemble.
My favorite perpetual Chinese mistake is the silk screen on 433 Mhz transmitter PCBs, marked "ATAD". Yeah, should be "Data". Unlikely to be corrected in my lifetime.
I wouldn't read too much into that. It could be an unlicensed clone made years ago (is the code in YYMM or MMYY format?), and the P is merely an error made by a person who confused an Arabic number with a Roman letter. Just as fat = oil in mistranslated documents, and screw = f--... Never mind.
My programmer was a small adapter board to fit onto an Arduino Mega that did most of the interface work. The adapter board has a charge pump to generate the 12V from the 5V available on the Mega.
All the details on on my blog. Part 1 is here: http://ceptimus.co.uk/?p=216 you can navigate to part 2 from there.
https://www.quaxio.com/programming_an_at89s4051_with_an_arduino/
I just now found the elusive pic I was looking for yesterday of an unsoldered kit. Check the assembly job on this Chinese kit. One transistor is reversed, and those photocell line sensors look to be precision aligned!
"If that chip's a-rockin' don't come a-knockin'."
Roger that. I say again, "Can you verify proper LED polarity?"
Some cheapie eBay LEDs have the flat plastic on the wrong edge
Probably why they are cheap!
DATA is transmit and ATAD is receive?
I have some of those. Always test before soldering!
Perfect! Likewise, if we reverse the power polarity on this $2 clock kit, can we reverse time?
https://www.ebay.com/itm/6-Digital-LED-Electronic-Clock-DIY-Production-Suite-Kit-Module-9V-12V-AT89C2051/142252668792?epid=851150753&hash=item211eeb7778:g:l~oAAOSwa81aF8Xz
Edit: I just noticed that this clock has only one button. I wonder how you set it?