

Operation sub $20 Robot platform inc processor

The Making of a Robot including Mcu for less than $20
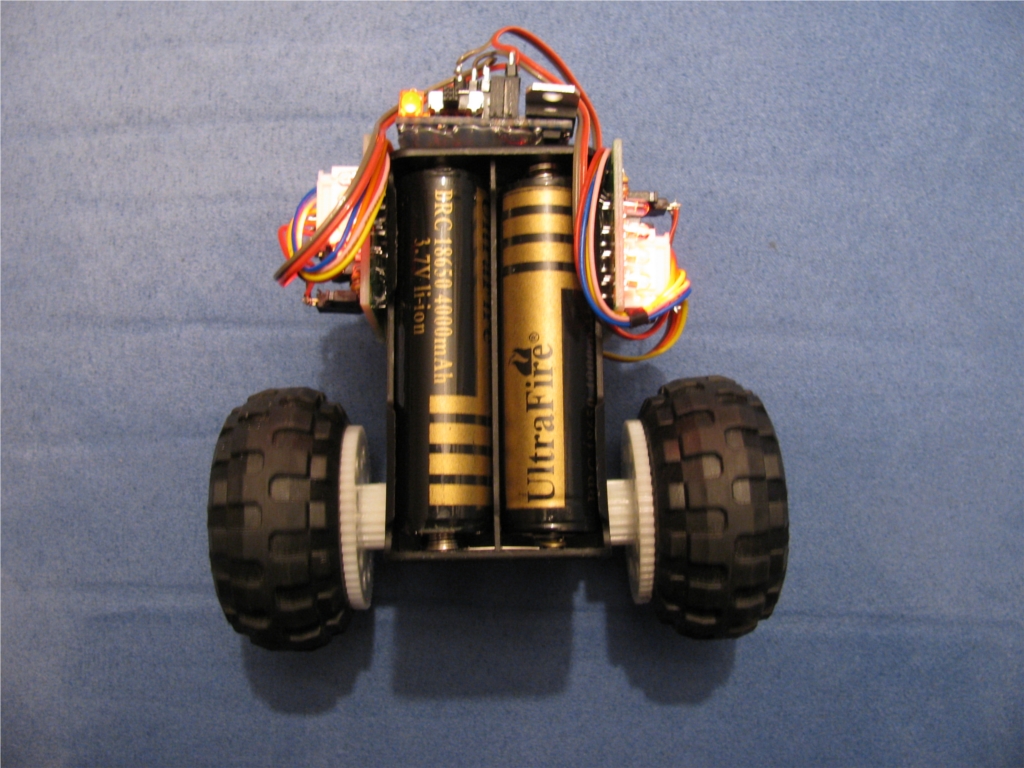
This project was devised to show how easily it is to make a robot on limited funds.
It is a good "Starting Off" Robotic base as it can be easily changed and transformed.

I am using 5V Stepper Motors, type 28BYJ-48 With Drive Test Module Board with ULN2003 chip.
With 2x 18650 3.7V li-ion batteries (mine are 4000mAhr).
This is just the start of the project and there are many additions planned for it.
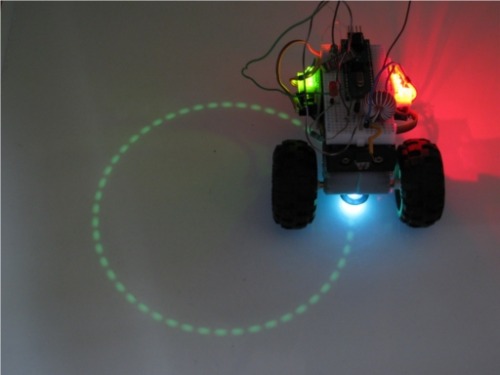
I have attached a "UV" led so that i could scribe/track its progress :-

It is a cross platform base, meaning that any micro computing unit (Brain) can be used ie. Propeller , Picaxe or Arduino (aka Atmega).
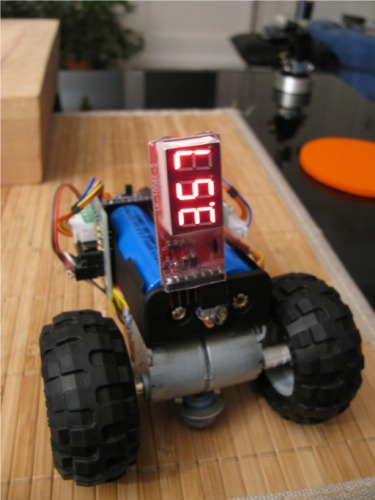
$2 lipo tester :-
Due to its low cost i foresee me building a "Swarm" of them .....this one is already the second (first being a picaxe version).
The base uses Geared Stepper motors which means that it is very precise and repeatable in its movements. ( forget your sloppy continuous servos )
Now my biggest bugbear ..... the base works easily and well with my Propstick and MDA board ....
..... however to achieve a sub $20 propeller version i need a good (inc P&P) supplier of 40pin P8X32A-D40 chips or the Basic Stamp family.
If anyone can point me in a direction then i think it will open up a new chapter in cost effective (accurate) robots.... (ie for schools and education)
Regards Gareth
This project was devised to show how easily it is to make a robot on limited funds.
It is a good "Starting Off" Robotic base as it can be easily changed and transformed.
I am using 5V Stepper Motors, type 28BYJ-48 With Drive Test Module Board with ULN2003 chip.
With 2x 18650 3.7V li-ion batteries (mine are 4000mAhr).
This is just the start of the project and there are many additions planned for it.
I have attached a "UV" led so that i could scribe/track its progress :-
It is a cross platform base, meaning that any micro computing unit (Brain) can be used ie. Propeller , Picaxe or Arduino (aka Atmega).
$2 lipo tester :-
Due to its low cost i foresee me building a "Swarm" of them .....this one is already the second (first being a picaxe version).
The base uses Geared Stepper motors which means that it is very precise and repeatable in its movements. ( forget your sloppy continuous servos )
Now my biggest bugbear ..... the base works easily and well with my Propstick and MDA board ....
..... however to achieve a sub $20 propeller version i need a good (inc P&P) supplier of 40pin P8X32A-D40 chips or the Basic Stamp family.
If anyone can point me in a direction then i think it will open up a new chapter in cost effective (accurate) robots.... (ie for schools and education)
Regards Gareth

1024 x 768 - 541K
500 x 375 - 24K

375 x 500 - 42K
Comments
Once again, you've done it!!
This is solution many have sought and the problem with using the propeller is the price point of the brain. This wouldn't be a bad solution though even with an MDA or a $25 QuickStart as the brain. The parts for a bare bones Propeller brain still run around $12 or so and the BASIC Stamp even more.
I would love to combine all the ridiculously cheap Ebay parts into a single general interest project: 4-relay boards, keychain camera, stepper motors, hc-sr04 sensors, etc. There are so many parts under $5 that there are cheap projects staring us in the face...
I like the way the motors are just stuck together and need no body.
We're working on a similar project with about the same equipment and goals.
http://code.google.com/p/propforth/wiki/LittleRobot
I decided to cheat and not include the cost of the processor in the $20; this has the dual effect of allowing the use of the Prop Quickstart as an easy "first phase" board, and permits use of any other board. Many folks have TMS430 and we can still do a bulk order etc.
We use the cheap bluetooth module as a cable replacement, so the bot can be controlled from a smart phone with a free terminal program, or with an android/IOS app.
We use the cheap ultrasonics sensor as the only environmental awareness at this time.
With just the ultrsonic and steppers we can:
* scan 360
* determins direction to obsticals and open space
* determine "next location"
* move
* repeat
From this, we think we can "map a room" the the extent that the robot knows when it has returned to the start point, but this is still in development.
We also think we can swarming by using "close by not too close". The robot wants to see a reading within the max sensor range, but greater than the robots turning radius. So it wants to get close but not too close, maybe to read something at half max range. The effect should be:
If it detects an object getting closer, it move away;
if it detects an object moving away, it follows.
I haven't done the experiments yet, but I think we might be able to get something that looks like a swarm effect out of just this.
Of course, I'm using propforth since it has lowest overhead for me, but I would be interested in sharing notes and results. Some of the participants here wants to use SPIN, C, BASIC, etc, and they would appreciate the non forth options.
I often rework the hot glue with a gas soldering with a flame thrower attachment.
$7.99 for propeller and
$0.99 for resonator and
$1.00 for sundries resistors caps veroboard and 3.3V regulator
$5.00 for stepper motors P&P free
$3.11 for 2 li-ion 4900mAhr batteries P&P free
$2.00 for batterybox P&P free
..............$20 breakpoint......
$0.50 pingpong ball
$2.47 for 2 rubber Wheels 50mm diameter
Thats about the ballpark figure......however the wheels can be pinched from a Lego kit and the pingpong ball can be a broken recycled one.
Try searching ebay for
"USB To TTL / COM Converter Module Build-in CP2102" or just "CP2101"
These are $2.50 inc p&p ........
.... all you have to do is port the DTR signal "hot wire it" as a Reset line into the propeller .... i have converted 2 already
(warning ....confusion can occur with the modules inviting reset pin ....this is the reset pin for the module only and should not be used as reset line into propeller)
Much better, I'll have to try some of these!
CheapBots are coming!
I will need a few days to take this info in an mull it around.........
My first Swarm impressions are to fit RF links (xbee compatibles) or even short distance IR.
Each identical, however each starting off with its own special "Trait" .... ie cliff detect ..... wall detect.... line follow
.... when two meet then this information is TXed/RXed between them .... meaning a cliff detect robot will gain wall detect knowledge etcetcetc
enough for the momo i need to put my silverfoil cap on........
Heres the deal ..... this one was trickier than normal as i had to tack a wire onto the smd pin.
You just need a 104 capacitor on end on the DTR signal leading out to a spare pin as Reset line.
This was the thing that caused me concern. Can the beginner hot wire the DTR? If so they can build the whole circuit from parts. I know they can (eventually), but for the first group, I want to minimize the unknowns. For my first group I've advised them to start with the (more expensive) option to start from the quick start.
I'm going to cite your design as the "phase 2" after the teachers get the first group of kids build the bots. It IS possible to get kids to solder properly, but I don't want to scare the teachers.
Do you have an actual class that is going to build your design? Can you give us the class size and age? My guys are interested in your progress.
Here is another version i hacked where all of the CP2102 pins are taken out to solder pads...... luxury :-
Still the 104 capacitor attached to DTR solder pad..
Here you see the red wire (just).... that pin i use for RESET line ....Caution a track must be cut ....see last picture.
See my surgical cut (with dremel none the less) just above the leftmost pin.
Essentially this breaks the 5V going to this pin and leaves the pin floating so you can connect the other end of the Reset cap to it.
Thats it another one hot_wired.....
With respect to teaching.....no i do not have a class to unleash this version of the little robot variant onto.......Yet....
.... BTW if you include a downward pointing tube (center axis of the motor) a marker pen can be inserted and .....hey presto TurtleBot .....which is widely used by schools.
(thinking about it i may even modify mine to accept a UV pen, at moment i have a UV led with magnet fixing)
Were you one of the entrants in the AFRON "10 Dollar Robot" Design Challenge?
http://robotics-africa.org/design_challenge.html
I only know of Digi-Key as a cheap (in volume) supplier for Propeller.
Where'd you get the wheels? (My audio isn't working so couldn't hear the video, only see) If it helps, you can probably get cheaper wheels in volume from aliexpress.com ...
I love the idea of low cost diy robots to get them in the hands of more people (kids in particular). I look forward to viewing again when I have audio working
Michael
I have three versions so far :-
From Left to Right
Lego 45mm Rubber compound
Playmobile 50mm Rubber compound
Wooden 65mm with Rubber "O" ring ..... now my preferred choice
In the middle is a Lego cross axle extensions ...... which is the key to attach wheel to motor (you could also use lego gears)
I drilled the Playmobile and wooden one with a 4.5mm drill and stuck Lego spiggot thingies so that they are compatible.
It also means that a quick "Pit-Stop" can be made for changing tires......
I have chosen them because they are pretty common to find .... go hijack your kids... or neighbor kids Lego sets and give them back a 20Dollar robot.....
___________________________________________________________________________
OK ..... so i better show a quick walk through ...
Take one of these Lego cross axle extensions :-
and cut these two lugs out down to the middle of the cross axle extension (not an easy task
Then push fit the cross axle extension onto the motor shaft and enjoy the flexibility that it brings....
Colourful zigzag lines are the Port/Starboard motor LEDs (yes i changed the Starboard to Green), also an orange on/off LED.
The current @5V = circa 200mA/motor under running conditions and only 220mA under stall conditions...
You toy with us so...
Did one wheel stall, causing the "spiral"?
Haha.... Yes i toy (only because it caused me to scratch my head for a bit too)...
The spiral version was using the playmobile wheels.
The truth is the stepper motor was not stalling, however the stepper motor due to its impulsive behaviour was jumpturning the wheel hub faster against the grippy tyre......(ie slipping)
.... so now i have glued the hub and tyre together.. no more spiral ..
.....i would put a challange to you to create a software spiral. (i did see your "S" routine)
BTW2 :- in the meantime i have made a picaxe stepper driver 08m2 version using 4 outputs and 2 inputs for sensors, i am hope_ing to produce a dedicated PCB...... this means that its a stand alone board that can be driven by simple logic levels.
BTW3 :- the 3 spare inverters on the driver board should not be overlooked (i used 2 of them to invert the programming logic RX/TX so the "cost effective" usb/ftdi converters (mentioned somewhere above) can be used to program picaxe systems as well (tested as working)).
Spiral would be good challenge with a stepper, I'll add it to my long "to do"list. Probably easier with CR servos. Gareth, you would like our figure 8 and oval challenges.
http://forums.parallax.com/showthread.php?138125-Erco-s-Figure-Eight-Challenge&highlight=erco%27s+figure+challenge
http://forums.parallax.com/showthread.php?139717-Erco-s-Oval-Office-Challenge&p=1099311&viewfull=1#post1099311
BTW, I have accumulated a ridiculous number of those HC-SR04 sensors. I'll give you some free if yours don't turn up. Yeah, really.
Ingenious! Which is preferable to ingenuous.
Hi Gareth,
Nice robot you got there. I would like to try make one myself.
Could you share the links to purchase the parts, especially the Battery, Wheels, Stepper Motors and Controllers?
Tnx for Ultrasonic offer :- i am afraid the postage to Switzerland would already be 12 dollar :-( (if delivery fails then i may have to take up your offer to get the wheels rolling or the sense sense_ing.)
ebay.co.uk kicks up the best results for me.....however be warned these are not fast delivery - and these listings change quickly.
battery boxes :- http://cgi.ebay.co.uk/ws/eBayISAPI.dll?ViewItem&item=110760929553
batteries :- http://cgi.ebay.co.uk/ws/eBayISAPI.dll?ViewItem&item=180961966166
motor :- http://cgi.ebay.co.uk/ws/eBayISAPI.dll?ViewItem&item=271005201851
My wooden Wheels are from a local craft shop ... however lego and playmobile wheels will get you running.
Here is my first attempt .... much training is required ..... not the result i wanted ... however robot had other things on its mind .
In my case the robot started out on course and completed the first ring.....
.... however at the start the robots voltage regulator seems to have clipped the bottle and thus threw it ever so slightly off course .........
.... end result is the robot decides to "Toast" me instead.......good robot.......
It just goes to show how powerful the motors are.