

Old School Rapid Prototyping
 erco
Posts: 20,263
erco
Posts: 20,263
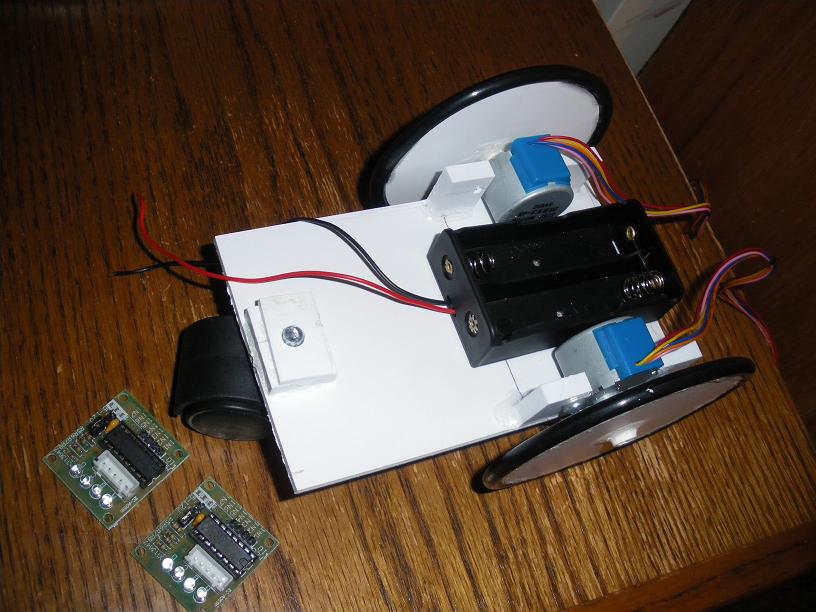
Just over an hour from start to assembled. Hand fabbed this on the fly... no measurements, that looks about right, etc. Band saw, drill press, disk sander and superglue. No lathe, no 3D printing. Built from scrap styrene and 2 O-rings, but if you bought it, maybe 3 bucks worth of materials.
IMHO hand fab skills will never be out of date. Printing is more useful for second generation stuff, one you've hand built and tested and modified and tested and modified and tested and modified and tested and modified...
Anyhoo, learned forimistas will recognize this as a robot chassis using those $3-4 stepper motors from China, just 'cuz somebody hadda do it. I expect it will be pretty good as a dead reckoning platform. You'll be seeing more of this little guy after I get the 'lektrics on board.
816 x 612 - 87K
Comments
Motors? Check.
Caster? Check.
Power? Check.
Deck for 'lectronics? Check.
Looks like you're good to go!
Nicely played for PLASTIC!! :0(
You know what else works good for this type of prototyping? Double sided sticky tape and hot glue!
Jeff
Lately, I've begun to feel more adept at CAD tools than with hand tools. Plus, I suffer fewer injuries from sharp objects. Rapid prototyping for me means drawing it in Corel and cutting it out on the laser. (I'm sure my seventh-grade shop teacher would blanch if he read this.)
-Phil
Sure, if you have all day to "rapid prototype"...
Me, I only had my lunch hour!
http://www.kickstarter.com/projects/1901380976/flipbookit-mechanical-flipbook-art-and-kit?ref=discover_pop
I have exactly this idea for the Little Robot(tm) project (does the (tm) Smile even do anything? but I digress)
http://code.google.com/p/propforth/wiki/LittleRobot
For me, the wheels wobble. I 3D printed couplings and tried putting two opposing 2mm set screw to hold the shaft, it didn't work so well. Is there a better way to do that?
I have the idea the REAL engineers make stuff out of scrap as kids, and only buy pre-built stuff when they earn enough (from engineering) to afford it. If somebody buys pre-built for them, it could be detrimental.
Anyway. the little robot(tm) project is going to try to get kids to "eye-ball" the build, and do successive iterations as they discover how to improve stuff. Just like on the forums, but in a class room.
I
Rich
There's nothing like working with different materials hands-on to learn what works and what doesn't. It's this iterative process that teaches us what glue works with different materials, how big a bolt is big enough and how to do the hundred mechanical things that every electrical/electronic experimenter/hacker/techie should know.
Nothing quite like wading into a still-smoking, quivering pile of techo-dung and pulling out the salvageable parts and getting back to work!
Cheers,
@
I have real trouble getting them both round and concentric. Sometimes they're round but the servo horn isn't centered, other times they're out of round, but the servo horn is in the middle. My fabrication technique is either a Dremel with a circle cutting jig or scroll saw with an attempt to true things up via sanding. A lathe would make this trivial, but I don't plan to buy one. I've wondered if somehow I can use my drill press to spin the wheel while I sand it true.
Sanding would be difficult. I see everything flexing and undulating when sanding meaning you are never getting it really round.
Erco, I agree. Even though I spend a lot of time in CAD and CAM I do sometimes just go out and put a few holes 'here and um..... here' and get something on there to test. Hell, sometimes a cardboard cutout can tell you a lot.
...(sigh) my Hero!!!
:thumb:
Thin, watery superglue is useless, It goes everywhere except where you intend and ruins things. Go to your local hobby shop and buy a nice bottle of medium or thick gap filling superglue (CA for snobs) and accelelerator (kicker). You can make nice thick bonds and fillets with the thick stuff. Per Gadgetman, you CAN glue unglueables like nylon servo horns, polyethylene, etc. Rough 'em up good all over with rough sandpaper & remove dust, clean finger oils & such off with alcohol & let dry, put superglue on one part and accelerator on the other and put 'em together. Add more superglue to make fillets & flanges so that if they do break off, they will leave a "footprint" to aid reassembly.
Concentric wheels? Cinchy. I cut disks out of styrene sheet & drill a center hole (loosey goosey). Make hubs to fit your motor shaft from your vast supply of styrene/PVC small bore tubing (hobby shop, Home Depot). I hand drilled slightly for a good press fit on the motors (diameter-wise, sneak up on it, there's no going back) then lightly glue the hub on the disk wheel. Spin on a hand-help sliding-fit shaft to make sure it's perpendicular and spins true. Lock down with generous CA fillets on both side of the disk. Drill a hole in a flat board to hold that sliding fit shaft so this jig holds your wheel perpendicular to the disk sander. Spin the wheel slowly by hand against the disk sander until it's round, then sand to size. My wheels were too thin to cut a groove for the O-rings, so guess what? Superglue holds them on.
Like everything else, it's a skill you build. If you rarely try it, you'll be disappointed with your results. Don't wait for a critical application, make a few things just for fun. You'll improve and learn your own shortcuts the more you do. A Dremel is a very good investment, too. Given the proliferation of 3D printers, laser cutters, and the elimination of high school shop class, hand craftsmanship is quickly becoming a lost art. Don't let that happen! It's like working on an old Corvair. You gotta get your hands dirty, and it's actually a lot of fun.
That's sort of what I was thinking I might try with my drill press. I would mount the servo horn to a roughly cut wheel. I would then mount the servo horn on a dowel roughly the size of a servo spline and chuck the dowel in the drill press. I would then turn on the drill press and move a sanding block slowly towards the center until the wheel was true. photomankc's idea of using lathe tools might work better than a sanding block.
Perhaps one day the wooden Boe bot will sport wooden wheels!
-Phil
(On Chinese tools?
With parts from Taiwan!
erco,
After elections you could potentially get a sponsor AND free material for more robots <- removing the signs yourself and using the corrugated polypropylene :-)
Need a few layers for a robot though.
Heck, that's a fantastic idea. Why wait? I'll start yanking down Obama signs right now! But the chassis & wheels made therefrom would always be crooked and lack any certificate of authenticity...
Oops, no talk of religion or politics in the forum. My bad. God Bless America!
I will remove the above.
moderatur sensiz tingling. [i may be old, but i haz frienz with biggur teeth.]
but if u want all ur robotz to say obama, i gess thatz ur bizniss.
-browz
Obama side down, Browser! Oops, did I faux paw (sic) again?
Tax experts did respond to Yahoo Answers and confirm that a certain overpaid 2011 tax return can be amended before 4/15/2015 to get all the over-payment refunded, possibly with interest.
At least he didn't lie when he said he never paid below 13%.
First time I read this, I thought it said LAWYERS instead of LAYERS...
..the way this thread is headed, I may have not been too far off!!
Where do you get motors that run slow enough and have enough power to do the job?
Motors and gearing are always a problem for me.
The super glue and drill press do work quite well at getting things true.
I usually use a dremel tool carbide wheel while the part is spinning on the drill press.
It's easier to not get out of round than with sand paper.
It's pretty suprizing how true you can make light duty items using drill press and dremel tool.
I don't see near as many presidential signs this year as in the past, plenty of signs for local and state offices, just fewer presidential signs.
I wonder if this is due to new media and money being spend on TV ads?
So anyhow, to keep this on topic, nice little 'bot Erco.
C.W.