

Propeller-Based Reverse Geo-Cache Birthday Present Project
 WBA Consulting
Posts: 2,940
WBA Consulting
Posts: 2,940
Introduction:
This project started after seeing this web page about an arduino based Reverse Geo Cache box. It was given as a wedding present. It simply gave the person a distance from the target position to enable triangulation of the desired spot. The concept is rather ingenious and clever. I thought that it would be a really cool idea for my wife's upcoming 35th birthday. I managed to sell several of my surplus computers to fund a new laptop that would be perfect for a briefcase sized version. So, here goes......
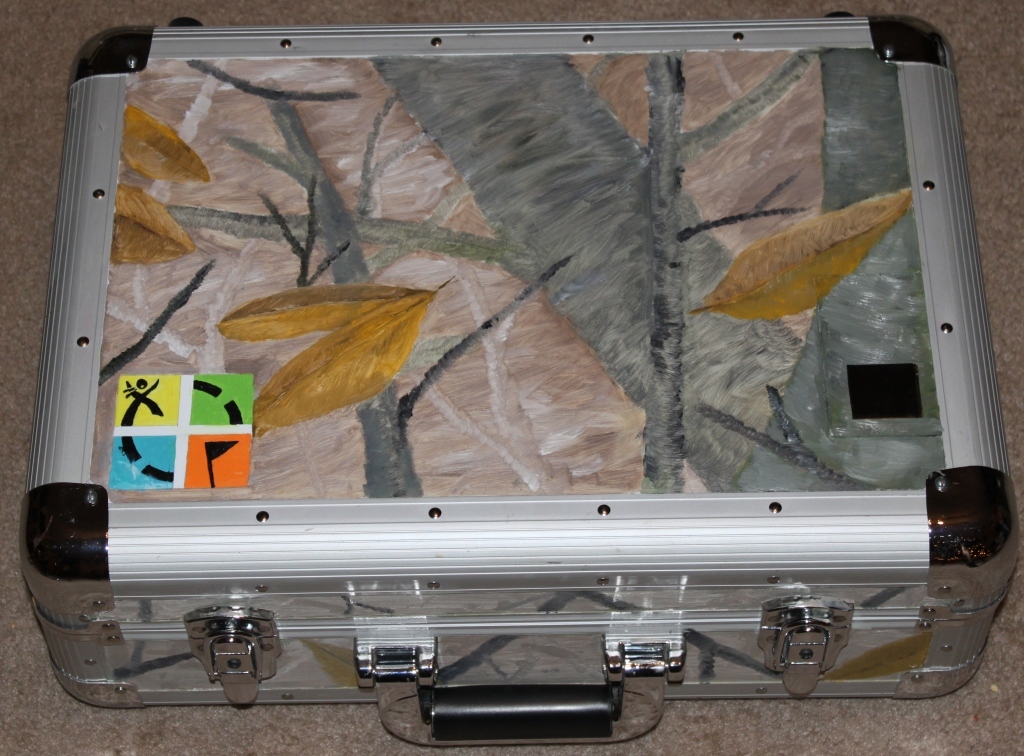
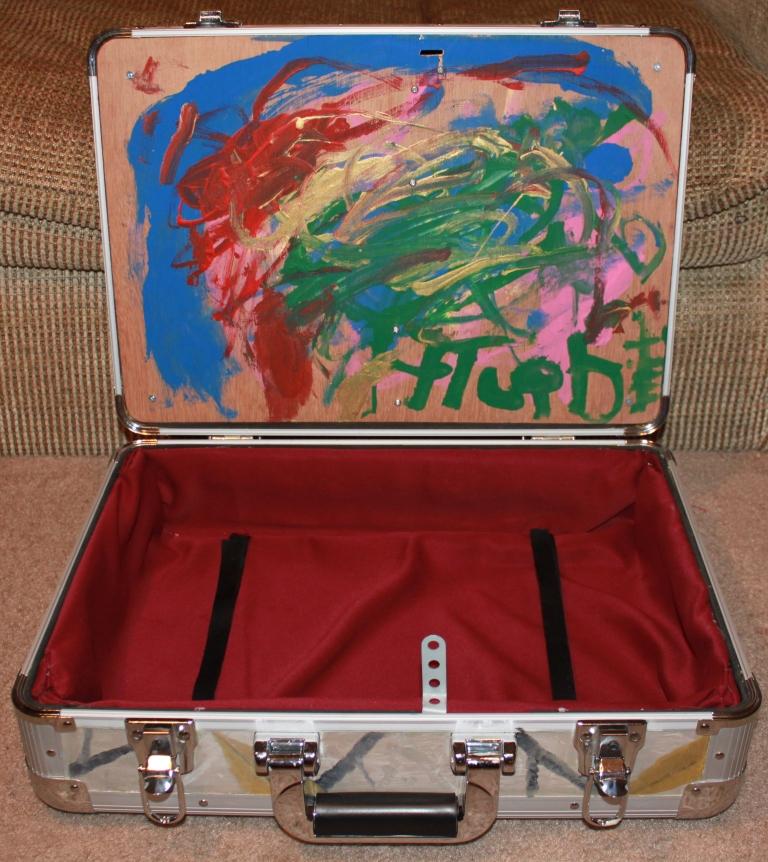
The case is an aluminum briefcase (used to be a portable thermostat demonstration setup) that has surfaces made from sheet aluminum backed with 1/8" fiberboard and 1/8" foam. The sheet aluminum was easily cut free-hand using diamond bit in my dremel tool. The fiberboard/foam was cut with a Husky razor knife. The flat surfaces of all sides except the bottom were painted by my mother-in-law with oil paints in a woodlands style camouflage. The 3" square Geo-Cache Logo was free hand painted by my sister-in-law. The inside of the bottom was lined with a burgundy fabric and two velcro straps to hold the slipcase holding the laptop. The board used to cover the electronics in the lid was cut to fit snugly and the masterpiece on it was painted by my 3 year old daughter. The display "window" on the front side was cut from a piece of non-glare polycarbonate type material. After cutting the rectangle in the case to fit the GPS module and uOLED display, the polycarbonate was attached with 3M VHB tape. The protective mylar on the top of the polycarbonate was cut down to the size of the display and completely painted over. When the paint was dry, the remaining mylar was removed, leaving a clear window the size of the display. I wasn't expecting everything turn out as well as it did, but I had a lot of help.
▔▔▔▔▔▔▔▔▔▔▔▔▔▔▔▔▔▔▔▔▔▔▔▔
Andrew Williams
WBA Consulting
WBA-TH1M Sensirion SHT11 Module
Special Olympics Polar Bear Plunge, Mar 20, 2010
Post Edited (WBA Consulting) : 1/2/2010 11:54:21 AM GMT
This project started after seeing this web page about an arduino based Reverse Geo Cache box. It was given as a wedding present. It simply gave the person a distance from the target position to enable triangulation of the desired spot. The concept is rather ingenious and clever. I thought that it would be a really cool idea for my wife's upcoming 35th birthday. I managed to sell several of my surplus computers to fund a new laptop that would be perfect for a briefcase sized version. So, here goes......
The case is an aluminum briefcase (used to be a portable thermostat demonstration setup) that has surfaces made from sheet aluminum backed with 1/8" fiberboard and 1/8" foam. The sheet aluminum was easily cut free-hand using diamond bit in my dremel tool. The fiberboard/foam was cut with a Husky razor knife. The flat surfaces of all sides except the bottom were painted by my mother-in-law with oil paints in a woodlands style camouflage. The 3" square Geo-Cache Logo was free hand painted by my sister-in-law. The inside of the bottom was lined with a burgundy fabric and two velcro straps to hold the slipcase holding the laptop. The board used to cover the electronics in the lid was cut to fit snugly and the masterpiece on it was painted by my 3 year old daughter. The display "window" on the front side was cut from a piece of non-glare polycarbonate type material. After cutting the rectangle in the case to fit the GPS module and uOLED display, the polycarbonate was attached with 3M VHB tape. The protective mylar on the top of the polycarbonate was cut down to the size of the display and completely painted over. When the paint was dry, the remaining mylar was removed, leaving a clear window the size of the display. I wasn't expecting everything turn out as well as it did, but I had a lot of help.
▔▔▔▔▔▔▔▔▔▔▔▔▔▔▔▔▔▔▔▔▔▔▔▔
Andrew Williams
WBA Consulting
WBA-TH1M Sensirion SHT11 Module
Special Olympics Polar Bear Plunge, Mar 20, 2010
Post Edited (WBA Consulting) : 1/2/2010 11:54:21 AM GMT
1024 x 756 - 414K

768 x 815 - 88K

782 x 768 - 82K
768 x 862 - 113K
Comments
Obviously, the locking mechanism needs to function perfectly for this type of project. I followed the original design by using a servo to act as my "actuator". However, I ran through several methods across several hours in creating the mechanics that would attach to the servo. I first tried the cam lock from an IKEA bookshelf (as shown by sstone86 in the sandbox thread). However, after mutilating three cam locks and nearly ruining the gearhead on my only standard servo, I gave up on that method. I am not sure how sstone86 accomplished the one shown in his picture, but my hat's off to him after my failed attempt.
Next, I tried using eyehooks similar to the original design, but just couldn't get it to work out right. After digging through all of my project boxes and trying a few other things, I stumbled across a bag of screw mount cable ties made by Panduit. I also happened to find a pack of mixed diameter dowels in my "junk" that contained some the fit the cable mounts perfectly. I pulled out an old car stereo rear bracket bar (like rigid plumbers tape) and FINALLY had a feasible idea for the mechanism. I was very disappointed in myself with how much time it took me to get the locking mechanism squared away. Granted, much of the time was very late at night and I may have had trouble focusing, but consider myself a little better than average with figuring things out like this. Hopefully I will get past "should be simple" stumbling blocks like this a little faster in the future.
After check-fitting about a dozen times, I mounted everything to the back of the board painted by my daughter using 6-32 hardware. The servo linkage was made from unbending a wire egg holder from an easter egg coloring kit. I don't know why I had it on my workbench, but it was the perfect diameter and rigidity. The servo is secured with a strap made from actual plumbers tape. It snugged up nicely around the servo without damaging it. Using my Husky razor knife again, I cut a notch where bracket bar needed to pass through to mate with one of the holes of the bracket bar.
The bracket bar was mounted to the bottom half of the case by utilizing the screws for one end of the handle mount. Worked perfectly! (I must admit I came across this method purely by accident after cutting the foam away to make a spot to drill holes for my own screws). After a few bends of the bracket bar with 2 pairs of pliers and some minor tweaking, I had a working lock mechanism. The board just needed to be secured to the lid so it could provide the secure lock once the dowel was engaged. I could have cut off the top two holes of the bracket bar, but I didn't want to waste precious time deburring, etc. (remember, I was finishing this portion in the wee hours of the same day it was to be given to my wife, so time was of the essence)
▔▔▔▔▔▔▔▔▔▔▔▔▔▔▔▔▔▔▔▔▔▔▔▔
Andrew Williams
WBA Consulting
WBA-TH1M Sensirion SHT11 Module
Special Olympics Polar Bear Plunge, Mar 20, 2010
Post Edited (WBA Consulting) : 1/2/2010 11:54:43 AM GMT
The code creation for this project was very fun, intimidating, frustrating, annoying, enlightening, time-consuming, and rewarding. I am still a newbie with the propeller (only been playing with the propeller since UPEW '09 in July) and my weakness is still SPIN fundamentals. However, as I mentioned on another post somewhere before, I can mash up SPIN objects fairly well already. I may not completely understand what everything does, but I can accomplish tasks that would be above my head with anything other than the propeller chip.
Some of my development is in the Reverse GeoCache Project thread in the sandbox. However, I cleaned things up quite a bit since those and added heavy commenting, developmental version details, a connection list, etc, to the final version attached here. This project started with the Google Earth GPS SD Card Logger by Paul_H. After getting it to work properly on my demoboard, I moved onto harvesting that program's core for this project. Over several hours each day for a week, the project moved from the demoboard, to my Propeller PDB, and finally to the USB Protoboard that is installed in the case. The PPDB made testing and debugging extremely easy. I have already gotten my money's worth for it as far as I am concerned. On the PPDB, I did all the code learning for the servos, uOLED display, and it made the debugging process easy by having extra LEDs, pushbottons, and servo headers at my finger tips. Kye's servo engine is extremely easy to use, and that helped me considerably to get past the servo learning curve. Kye's object worked out perfectly, but I noticed that the servo jitters a bit upon power up by itself. To compensate for that, I start the servo engine early on in the program and ensure that the servo is in the locked position. If I cycled power at the right time after power up, I could "jitter" the servo a bit at each power cycle to eventually drive it far enough to open the box. The uOLED was a bear at first, but once I figured out it's quirks (IE: you must have the pullup on it's receive pin) I got rather comfortable with displaying text how and where I wanted with ease. The uOLED object by Steve McManus is easy to use and provides the necessary tools to put the uOLED display to work for you. I will be playing with it more to learn about displaying pictures from the uSD card as well as drawing shapes because it will be used in one of my propeller design contest entries.
The basic program concept is as follows (detailed program flowchart is attached):
- Power up and initialize
- If bypass switch is enabled, open box if it's held while showing a pixel "progress bar" on screen, then reboot after a delay
- If bypass switch is not enabled, continue normally
- Flash Happy Birthday message on screen a few times
- Show "locating" while waiting for GPS satellite lock
- Once NMEA strings begin flowing from GPS module:
- Check longitude/latitude against target location
- If not matched, display long/lat in red on screen and loop to checking location
- If matched show long/lat in green briefly, then flash "you got it" on screen before unlocking.
The connections are quite simple and straightforward, so I did not bother with a schematic, just a connection list. NOTE: The I/O pins for the servo and uOLED are defined in their SPIN object files, not the main program.- P00 - LED1 Status LED, 330 ohm series resistor through LED to GND
- P02 - SW01 Bypass Switch, 10k pullup, switch pulls to GND
- P04 - Servo data pin (defined in servoEngine1.spin)
- P05 - uOLED Reset Pin
- P06 - uOLED TX (connected to uOLED module RX pin and 10k pullup)
- P07 - uOLED RX (connected to uOLED module TX Pin)
- P16 - GPS Module Output pin (connected to GPS Module SIO pin)
- P17 - Not Connected but referenced by GPS object so it must be left unconnected
- uOLED Vcc - +3.3V
- GPS VCC - 5V
- Servo VCC - 5V
- ALL GNDs - Vss
- Battery pack routes through main power switch then to protoboard input
The program code has a lot of comments and seems to be somewhat clean for understanding. I am sure there are bugs hiding in it somewhere and that the code could probably be streamlined by power-SPINners. (I know it's using two versions of the full-duplex serial objects for example). I would appreciate any feedback, constructive criticism, ridicule, and (hopefully) a few compliments.I do plan on making another version that is stripped down to the GPS module and LCD Terminal AppMod for a cost effective version. I used the uOLED because I originally planned on loading pictures onto the uSD card that would be displayed as clues for a scavenger hunt that would involve multiple locations. Since I was working to a fixed deadline, I didn't get to figuring out how to do all of that. I still want to accomplish that, so look for that version as well someday (hopefully in time for UPEW). For now, this is considered done and I am shifting gears back to my two propeller contest entries.
▔▔▔▔▔▔▔▔▔▔▔▔▔▔▔▔▔▔▔▔▔▔▔▔
Andrew Williams
WBA Consulting
WBA-TH1M Sensirion SHT11 Module
Special Olympics Polar Bear Plunge, Mar 20, 2010
Post Edited (WBA Consulting) : 1/2/2010 8:13:06 PM GMT
The hardware installation in the lid ended up being rather fun as it was done at the final hours of the project and it meant I was nearing a completed, working project. As mentioned before, the Parallax GPS module and uOLED 128 Display were mounted underneath the polycarbonate piece that sat over a rectangular cutout in the case. I had some 1/4" tall nylon hex standoffs that were ideal for mounting the GPS module, but they would not work for the display. The only way I could get the display to be near-flush to the polycarbonate, was to use hot-glue on the mounting tabs, and secure it directly to the fiberboard. After cutting away a considerable size of the foam around the rectangle, I bit the bullet and mounted the uOLED display with hot-glue. I installed the nylon standoffs to the four corners of the GPS module and while holding it in place, tacked them with hot-glue them to the fiberboard. When that cooled, I unscrewed the GPS module and added additional hot-glue to the standoffs to make sure they were solid enough to handle the weight of the GPS module. The GPS is easily removable with this method. The display will have to be surgically removed.....
The Parallax USB Propeller Protoboard is secured with zipties to two Panduit self adhesive ziptie mounts. All of the red wires seen have either a Molex SL Series male or female crimp terminal on the ends. Female where attached to the GPS and Display and male where plugged into the protoboard. I eventually soldered the male terminals directly to the protoboard. Not recommended, but functional when in a hurry. The pull-up resistors are simply plugged into female socket strips on the protoboard. (I later worried about them falling out during transporting of the case, but after 10 days, they are still securely in place). The 9.6v battery pack is actually for a New Bright radio control car that I got as a $5 WalMart clearance shelf deal. It is mounted using the same mounts and zipties as the protoboard. I changed the battery pack end to a DC plug and the battery charger to a DC jack, so that it can be used directly with my parallax development boards.
The power switch and bypass switch were installed at the very end. As such, they became victims of the "just glue it down and be done with it" mentality. There was already a small rectangular hole in the lid portion, so I figured I would make use of it. The bypass switch is an on-off pushbutton that is wired using Molex female terminals to the leads (no solder) and hot-glued in a molded fashion: lots of glue, slowly and accurately applied, to "form" a molded looking mount. It came out much nicer than the brutality of the process usually promises. It is positioned so that it is barely visible from the exterior. The power switch is a C&K rocker switch mounted in a Polycase plastic box leftover from another project. It already had a DC barrel jack for the battery pack wired through the switch and to a DC plug, so it was perfect. As it was the final piece, it was simply glued into place as-is with the switch positioned in the opening. Luckily, it fit very well and I didn't have to move my fancy bypass switch mold to make room for it. (I should have mounted the power switch first)
Blocks of wood were secured to the corners using wood screws through the corners of the lid (where the shiny corner protector pieces are) so that the locking board could be secured to the lid. The one on the middle is only held on with hot-glue, but is only there to add stability to the lid/locking board.
Somewhat of a partslist:
▔▔▔▔▔▔▔▔▔▔▔▔▔▔▔▔▔▔▔▔▔▔▔▔
Andrew Williams
WBA Consulting
WBA-TH1M Sensirion SHT11 Module
Special Olympics Polar Bear Plunge, Mar 20, 2010
Post Edited (WBA Consulting) : 1/2/2010 11:55:54 AM GMT
The final hours of the project went fairly smooth and I was pretty excited to have it come together in time. I completed the case around 5am, put the new HP Pavillion DV4 in the Victorinox slip case, strapped it in, locked it up, and went to bed. I got up at 8, grabbed the case and my Garmin GPS and went into the backyard. I placed the case around the back corner of the house. I stored the location in the Garmin GPS under the place name of "Birthday". I then wrapped up the GPS in birthday paper with a note that said "First Clue: Favorites-Birthday".
When my wife opened the GPS, she figured out the clue pretty quick, but the GPS showed her that she was already where she was supposed to be, so I had to tell her that she did need to go outside and pinpoint the coordinates. Using the Garmin GPS to locate, she found the box and brought it in the house. Unfortunately, the function of my design wasn't as obvious as the original design, so after trying to open the box by unlocking the latches, she was a little confused. I had to show here where the power switch was since it was actually located on the bottom. My program doesn't explain the purpose of the case, so I had to explain some things as it came on. She saw the Happy Birthday Chelle! message, then when the locating message came on and sat for a while, I explained that it was a GPS module and it needed to be near the window. Once it found 3 satellites and locked, the display showed the longitude and latitude in red. I hinted that we must be in the wrong spot for her present, so we got ready to head out.
My original intent was to have the case lead her on a multiple location scavenger hunt that would give her new clues at each location to lead her to the target location. Since I was unable to get that portion of the program figured out in time, I did the clues verbally. The first clue lead us to where I proposed to her, but after arriving there and having the display still in red, I gave her the second clue. She figured it out as the church where we were married, but since she knew that there were three clues to the final location, she also figured out that the target location must be Maidu Community Center in Roseville, CA where we had our wedding reception. We heading there and after powering up the case while sitting on the statue in front of the main building, the case unlocked. She opened the case and was pretty excited and surprised to see a new laptop sitting inside.
Overall the presentation went very well and she was very happy with the concept. It would have worked much better had I been able to get the scavenger hunt portion into the program and made the design a little more user friendly, but I was happy that she enjoyed it. It would have been nice to have a picture of my daughter signing I Love You as the startup display, so I will be trying to figure that out for "version 2".
▔▔▔▔▔▔▔▔▔▔▔▔▔▔▔▔▔▔▔▔▔▔▔▔
Andrew Williams
WBA Consulting
WBA-TH1M Sensirion SHT11 Module
Special Olympics Polar Bear Plunge, Mar 20, 2010
Post Edited (WBA Consulting) : 1/2/2010 10:17:45 PM GMT
▔▔▔▔▔▔▔▔▔▔▔▔▔▔▔▔▔▔▔▔▔▔▔▔
Andrew Williams
WBA Consulting
WBA-TH1M Sensirion SHT11 Module
Special Olympics Polar Bear Plunge, Mar 20, 2010
This is a fantastic project and a wonderfully personal birthday present. Great job all around.
▔▔▔▔▔▔▔▔▔▔▔▔▔▔▔▔▔▔▔▔▔▔▔▔
Whit+
"We keep moving forward, opening new doors, and doing new things, because we're curious and curiosity keeps leading us down new paths." - Walt Disney
▔▔▔▔▔▔▔▔▔▔▔▔▔▔▔▔▔▔▔▔▔▔▔▔
Andrew Williams
WBA Consulting
WBA-TH1M Sensirion SHT11 Module
Special Olympics Polar Bear Plunge, Mar 20, 2010
Propeller-Based Reverse Geo-Cache Birthday Present Project
This project is absolutely amazing. You put a lot of fine work into it!
Your presentation is excellent. It shows much skill, talent and heart.
humanoido
▔▔▔▔▔▔▔▔▔▔▔▔▔▔▔▔▔▔▔▔▔▔▔▔
Chris Savage
Parallax Engineering
Check out the new Savage Circuits TV!
·
http://forums.parallaxinc.com/forums/default.aspx?f=21&m=414611
Congrats on a great project
Glad it had the desired effect too!
Job well done!
Baggers.
Arduino based GPS Adventure box
http://www.kickstarter.com/projects/253922454/gps-adventurebox-give-the-gift-of-fun-and-adventur
I have wanted to build a cool Geocache container or project for years, just havn't come up with anything yet. I will have to put a pin in this project for my future projects
By total coincidence, I was reviewing the code last night after mentioning a bug I never resolved to a friend and I figured it out in a few minutes (I had "==" where I should have had "==="). I would say it is 90% complete and the only code left to finalize is the section for cycling the 5 clues/coordinates because I can't remember if I actually tested that piece. The project's "guts" would also support adding a servo so the hardware could be used to make a reverse geocache box by loading different code with target coordinates.
I will start up another project thread once I take some pictures and verify the docs/code for posting. Attached is the system flow diagram I made for it back in March of 2012. The rectangular banner blocks are what would show on the LCD.
That is a great concept for kits as long as the parts are readily available. Have you thought changing out the parts from The Shack to a place like Mouser or somewhere that isn't going anywhere? When all others fail, you could use a place like McMaster-Carr (https://www.mcmaster.com/) for anything in the world
The current prototype is made from parts available at radio shack at the time and I will keep using it to finalize code. Clockwise from top left: Parallax PM-648 GPS, Parallax Quickstart with added 7805, panel mount switch, Parallax Serial 16x2 LCD, and the 9 volt battery with snap on connector.
200 cases!! Thats a lot of cases haha. I had a similar thing happen years ago with one of my builds. The project changed design and then I had some 100 plastic cases; I had to downsize to save space, so kept a handful and sold/recycled the rest.
You could cut these up and put a propeller dip chip one each. Should give you a $12 solution with the other bits and bobs.
The old Propeller Proto board could be cut down for smaller projects and give some prototyping space in a small form factor. I had some pictures of a trimmed down board on the thread for my Svara project (digital version of a magic 8 ball)
EDIT - I just found your code included upthread. I'll post back in a few weeks with results. Carry on!