

Cody Computer
 frederickthe3rd
Posts: 14
frederickthe3rd
Posts: 14
UPDATE: As promised years ago, full documentation and sources are now available under GPLv3. A draft eBook in PDF form is also available for free download.
- codycomputer.org has photos/videos, links, and a brief writeup.
- GitHub has the sources and design files (KiCad, SPIN, STL files, and 65C02 assembly).
- The Cody Computer Book (in draft form) documents the project and is always freely available to download.
Some of the below information is no longer current.
The Cody Computer is an 8-bit retrocomputing project built around the Propeller 1 and the 65C02. In many respects it can be viewed as part of the same lineage as the Prop-6502 and Propeddle, but with different tradeoffs resulting from different end goals; the key similarities involve the use of the Propeller to replace most (but not all) other logic, and of course the data/address bus multiplexing used in those designs to keep pin counts manageable. Rather than emulate an existing system, the primary goal of the Cody Computer is to be a modern take on a late 1970s or early 1980s home computer, one that could be built relatively cheaply by an intermediate-experienced "maker" as an educational project.
I'm hoping to have the system finally finished by the end of the year, at which point I plan to upload all design files, including KiCad schematics and PCBs, STL files, and assembly sources for the Cody Basic interpreter. What I'd really like to do is write a cartoony little book (featuring a cartoony little Pomeranian named Cody) that walks you through the theory of operation and the build of the system, similar to introductory computer books of the 1980s, but we'll see how far things get.
The computer's named after my Pomeranian, Cody, who was actually very instrumental in the entire process of getting this off the ground at all. I used to talk about getting a Commodore PET to hack on and my wife pointed out that I already had a "Commodore pet" (Cody) who seemed to share an interest in many of the same hobbies, I started wondering how truly difficult it would be to build a simplified 8-bit along the lines of something like a "Commodore 64 Junior" for lack of a better term. Basically, I experimented with several different approaches and the ones that Cody seemed to get the most excited about is what I went with. Regrettably, he succumbed to veterinary treatment in June of 2020, living to see the final build get to the "TV Typewriter" stage of development but not much beyond.

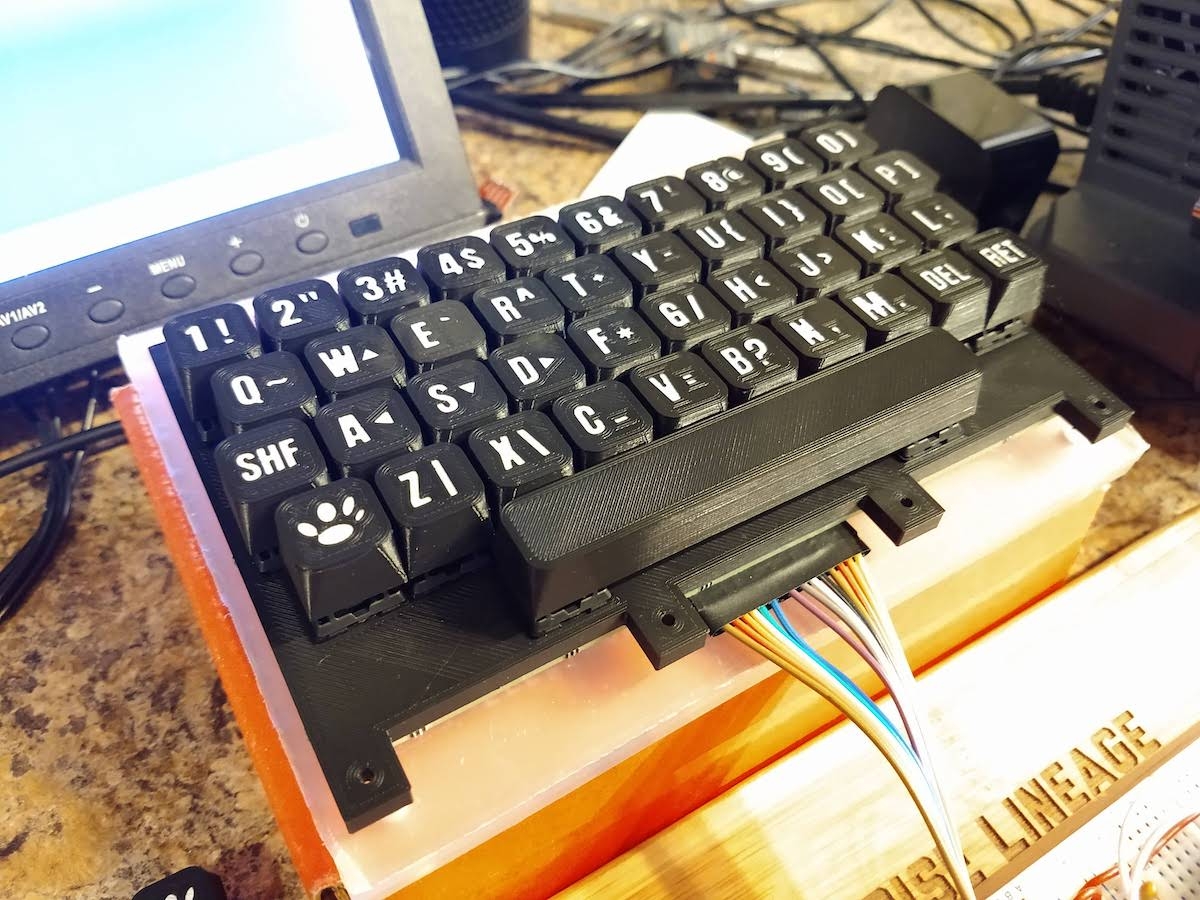
The long-term goal is to have a finished machine completely capable of being constructed at home using through-hole components on PCBs, with the surrounding enclosure, case, and even the keyboard being produced on a home-quality 3D printer. As I haven't finalized the design for the main PCB, there's no enclosure, but the keyboard's successfully been constructed using PCB-mount Cherry keyswitches on a nonstandard spacing, along with 3D printed plates and keycaps.
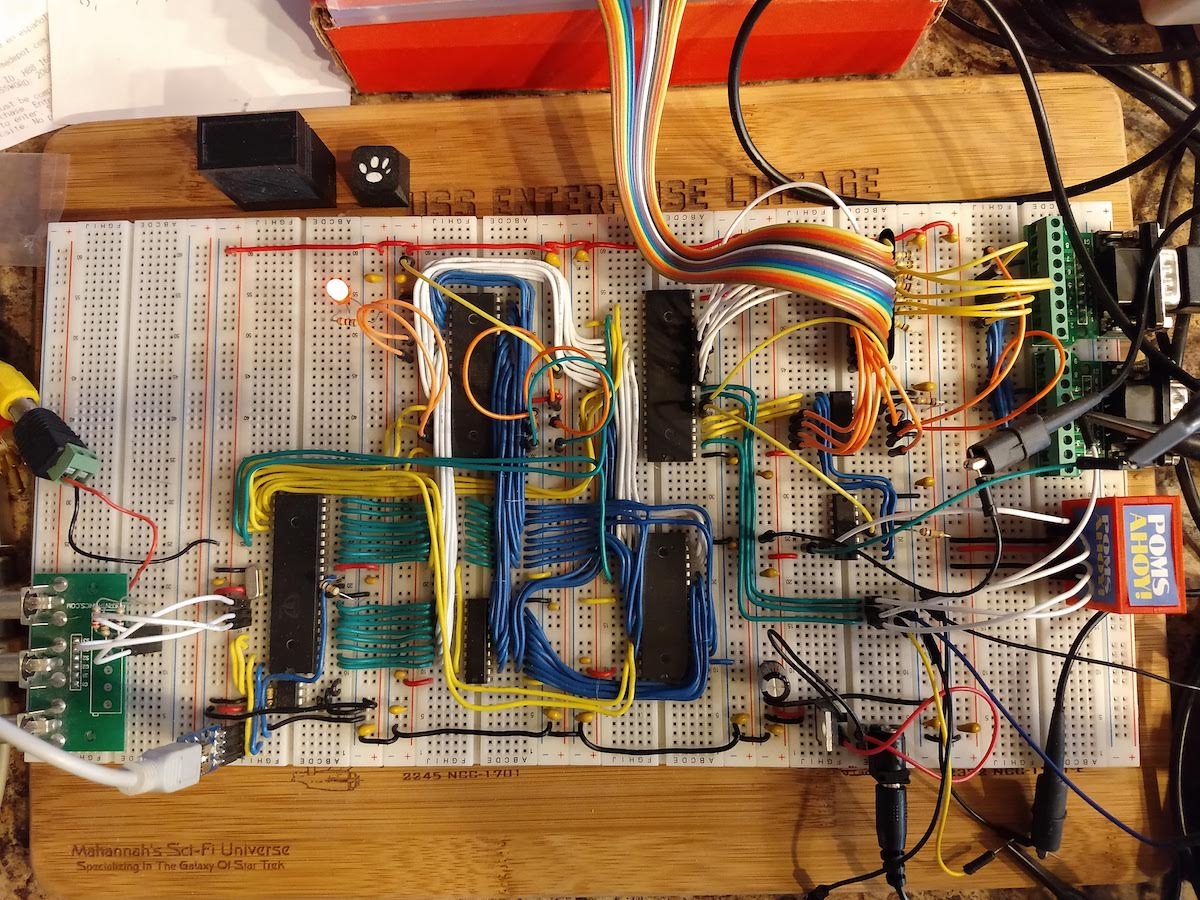
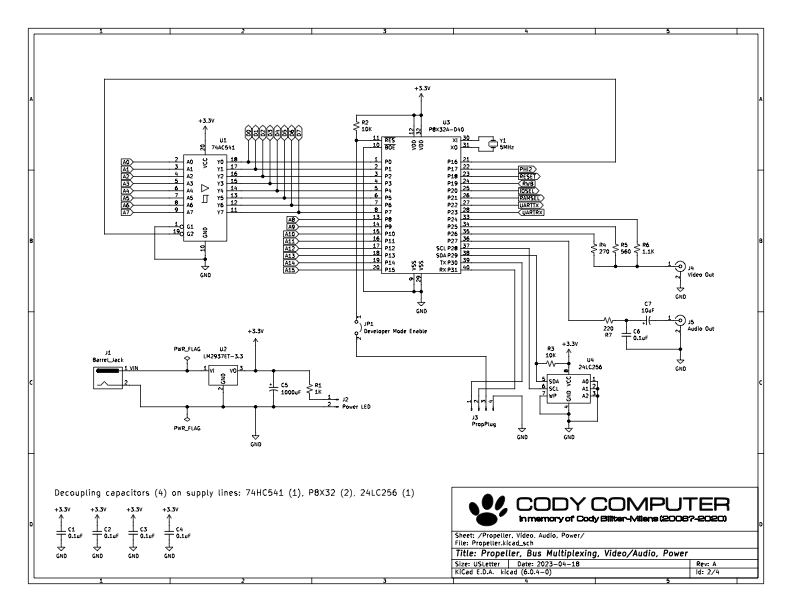
The hardware consists of a 65C02 clocked at 1 MHz by the Propeller, a '541 buffer for arbitrating the lower byte of the address bus, a 128Kx8 SRAM (less than half of which is used) a 65C22 for I/O operations, a 4051 used as a keyboard row decoder (joystick inputs are mapped as "rows"), and a '138 used as a decoder for SPI chip selects.
In terms of operation, the Propeller acts much like the TED of the Commodore Plus/4 series, encapsulating video and audio along with a variety of additional logic all into one device. One core has a tightly-written main loop that handles bus accesses from the 65C02 (also ensuring based on cycle-counting that hub accesses will always be aligned so that a 1 MHz system clock is always achievable). Other cores are responsible for video and audio generation. This functionality is all exposed to the 65C02 by mapping 16 kilobytes of hub memory into the top 16K of the 65C02's address space (which means that the Propeller's internal memory also acts as the computer's ROM, video buffer, and "registers" for video and audio).
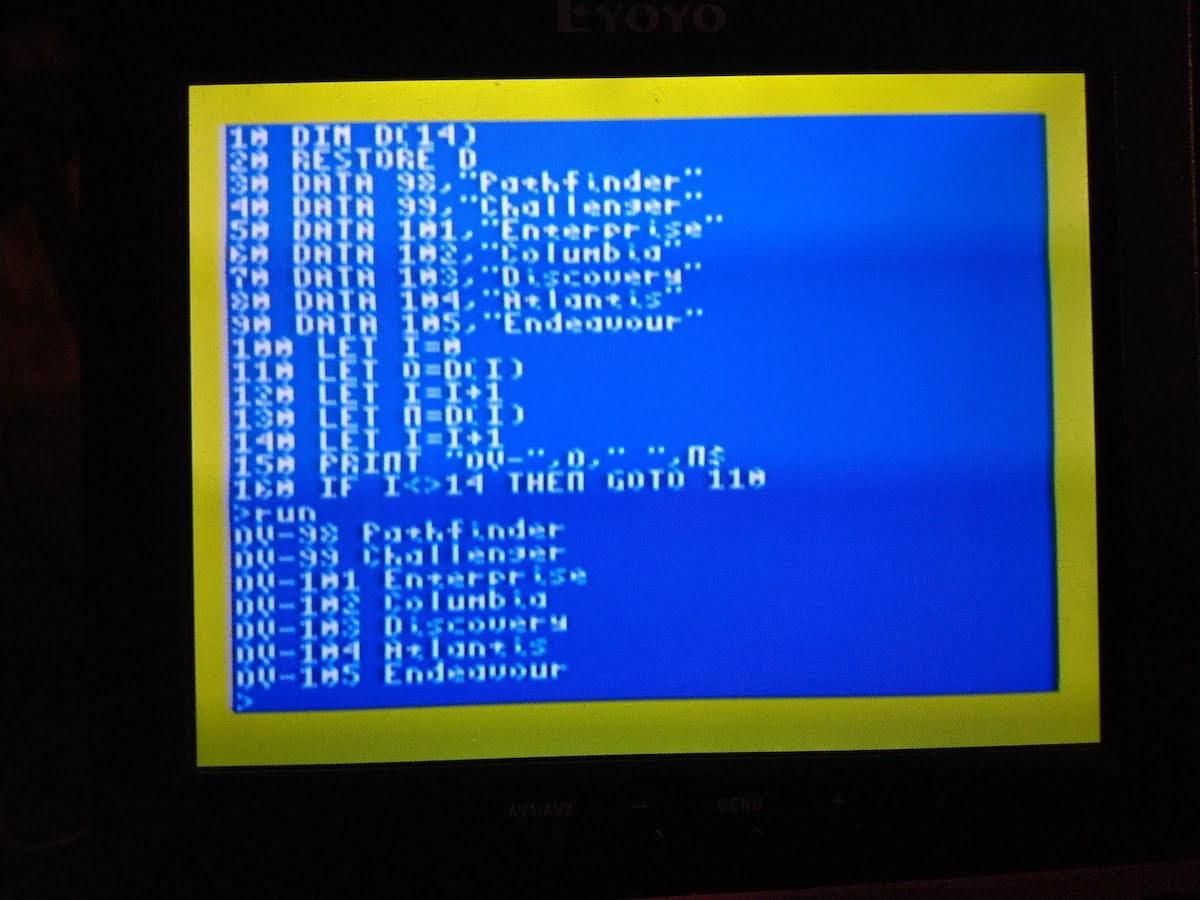
For software I've implemented Cody Basic, which can be considered a tokenized dialect of 1970s Tiny Basic with additional extensions. It also supports byte and word arrays, strings, DATA statements, and so on, but DEC or Microsoft BASIC it is not; most all of that works by treating variables as holding pointers, similar to how some Tiny Basic dialects implemented similar features in a C-like or BCPL-like fashion. The kernel and the BASIC interpreter clock in at around 6 kilobytes, which isn't bad for what it does, but I do suspect a more proficient 65C02 assembly programmer could have optimized it better. Much of the interpreter relies on a minimal "kernel" layer for basic operations, but the line between the kernel and the BASIC is not particularly enforced.
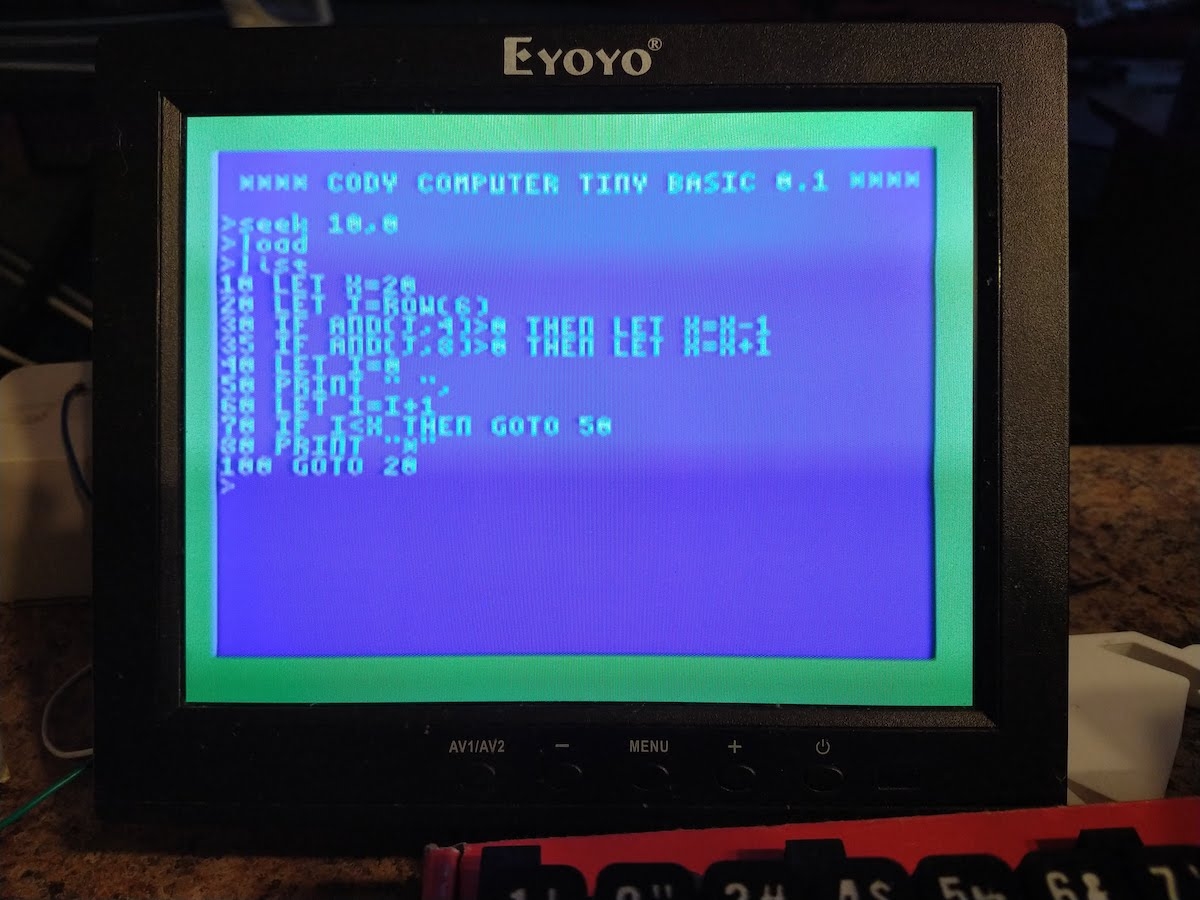
Storage is provided via cartridges; each contains a typical SPI EEPROM or FeRAM (the only restriction being that they have to be 3.3 volts and support the same basic read/write operations built into the kernel). There's no filesystem as despite the modern-day technology used, the inspiration was more from the era of tape storage (or at best the stringy floppy); where back in the day you'd record the values on a tape counter, here you just specify the starting page in the EEPROM, and kernel code and Basic commands take care of the rest; a virtual "head" is positioned using a SEEK command, LOAD and SAVE commands save starting at the current location, and the HEAD command tells you the current page and device.
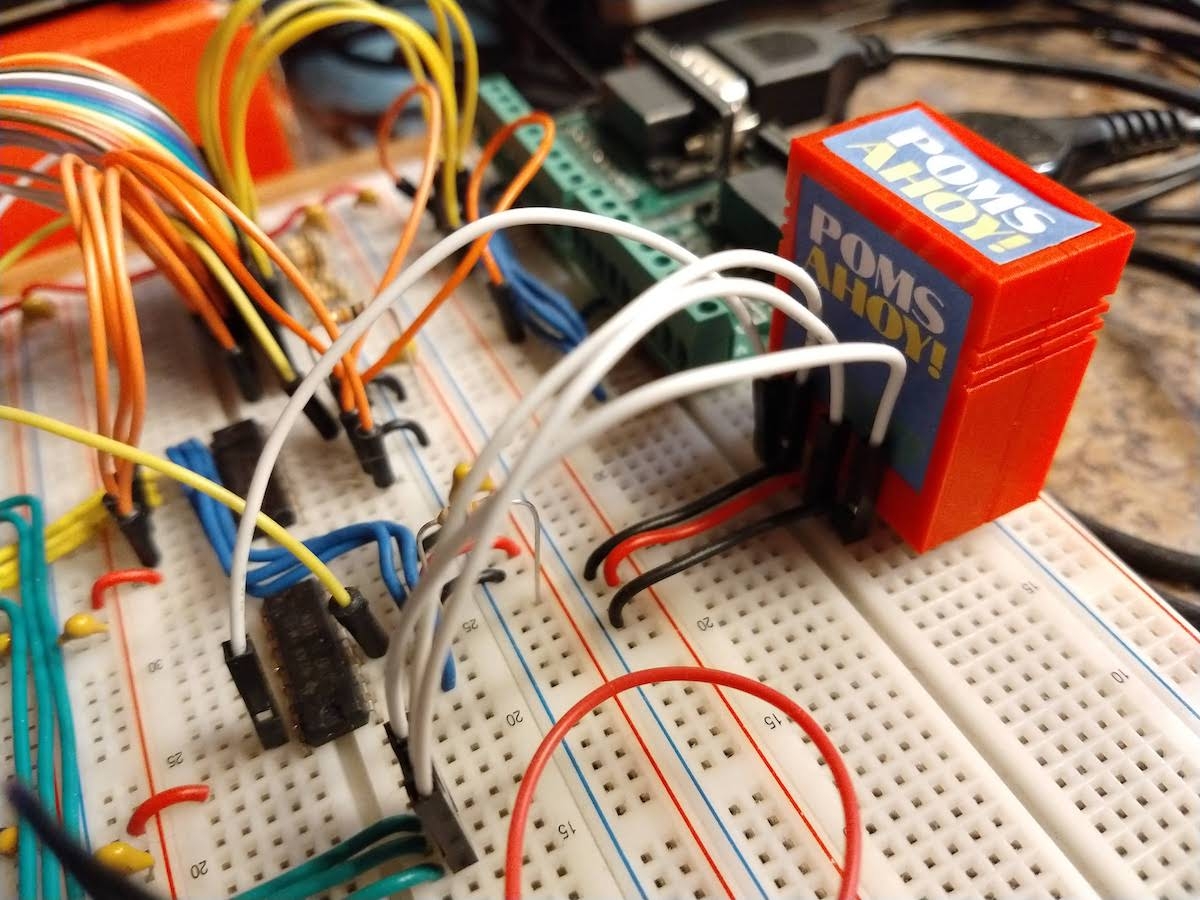
(No, it currently doesn't have a game called Poms Ahoy; it's a reference to a Ducks Ahoy game cartridge that I had as a toddler.)
I also have a bit more detailed information posted in the Cody Computer topic on the 6502.org hardware forums, but I'm happy to post some additional information here as well if there's interest. I know that the Propeller community and forums were an incredibly useful resource when working on this. The only reason that I never really had to ask questions was that so many people here and there had answered them all in advance; the existing examples and tutorials were sufficient that someone could figure out the rest on their own. Hopefully this can serve as a bit of inspiration as well, and in the end, perhaps be another resource out there along with all the others.
Comments
This is definitely the definition of a hobby. Great work.
Question, did you write the firmware in SPIN or C?
Mike
For the Propeller side, it's all SPIN (actually it's almost all PASM, but from within SPIN).
That's a neat little computer you built there! Good stuff.
This project (and attached pictures) are a great example of breadboard use ala:
https://forums.parallax.com/discussion/172584/breadboard-why-and-how-people-still-use-it
It's really cool how you made your own key caps. Did you model them yourself or are you using existing STL files? I wouldn't mind trying that sometime.
Awesome job by the way!
Hello
You mentioned the TVT in your posts. How did Mr. Lancaster's TV Typewriter ideas influence your amazing project?
For example the Prop Backpack device that I use that @PhilPi came up with, largely follows his ideas for video generation, CF, "Cheap Video Cookbook", and "Son of Cheap Video". Those two by the way also discuss how to bring video on the cheap to a 6502 based system.
Mascot asleep.
I modeled those in OpenSCAD. For the Cherry MX switches they have a cruciform mount, and from there it was relatively easy to measure them with some calipers and play around with OpenSCAD until I got something that fit rather snugly. I would not go into it expecting that you're going to get an injection-molded-quality keycap by any means, but they can be serviceable with a bit of patience.
Some further background if you're interested: The keyboard actually took up quite a bit of development effort. I started out trying to see if one could make a more modern Don Lancaster "low cost keyboard" out of some stretched extension springs and some carbon rubber contacts but ended up going another direction. As I mentioned, my little Cody was always at my side through all this, and for whatever reason (likely the clicky noise) he really liked little, loud tactile switches (which is odd as we never did clicker training or anything like that with him, and to him "training" was watching trains go by in Georgia), so I finally just went with some tactile switches for the first keyboard. I knew they wouldn't exactly be the most pleasant to type on for humans, but it was at least a way to keep things moving forward, and it also received the wag of approval.
I started out making rounded keycaps for tact switches on the 3D printer but they required a lot of post-processing and careful painting, and you'd get paint into the grooves, etc., from the layers in the print that you couldn't completely sand down, and then it'd look all weird. It also took hours (!) to post-process each keycap to look good, so I didn't really think that would be a viable option. You might be able to pull it off with some of the various smoothing goops one can order, but I didn't really delve into that.
At that point I just switched over to using decals, which looked pretty nice and held up better than I was expecting; I drew up the designs in Inkscape and my wife was able to find some decent decal paper that held up pretty well with a coat or two of clearcoat. Given the level of detail one could get using the decals, at that point I planned to have a more C64-style keyboard that allowed input of various symbols using meta keys and the like.
Unfortunately, I also remember that entering PETSCII on my Commodore 64 felt like I was trying to type in hieroglyphics under the best of circumstances. It wasn't exactly the most user-friendly of experiences even back in the 1980s, and I didn't really suspect between the arcane entry methods and the horrible tact switches that it would provide the kind of welcoming experience one would really hope for.
This design was the last one that Cody got to actually see, and you could actually click away on the tact switches (albeit painfully) and type text on the screen. He thought it was one of the coolest things that you could push a button over here, and then it'd show up on the glowing TV screen over there, and if I hadn't built it with the tact switches, he'd never have gotten to see that.
After Cody died I really wanted to try to make the nicest clicky keyboard I possibly could, and I kept thinking that some really nice mechanical keyswitches might be the way to go; he liked buttons that clicked, and unlike tact switches, people can actually type on mechanical keyswitches. I had already seen some projects online where people had printed various kinds of keycaps using their 3D printers, and in some cases where they'd managed to make doubleshot-like keycaps by printing the legends face-down with the keycaps on top. We didn't have a lot of luck getting that to print consistently (if things weren't lined up exactly right with the height above the print bed, the legends would blur horribly, and no matter how many turns we took trying to level it, it felt more luck than science). What ended up working was breaking it up into a stack so you weren't printing back into an existing layer at the same height, and that seemed to make everything a lot less fussy.
First, you print the first couple of layers with the legends in the keycap color:
Next, switch out the filament and fill in a blank square as the equivalent of a "doubleshot" portion inside for the next couple of layers:
Switch out the filament again and print the remainder of the keycap and stem:
Then just pop the keycaps on the switches:
Note that the spacing is nonstandard, which is another reason that I couldn't just use someone else's keycaps as a base; Cherry MX spacing is something like 19mm if memory serves, and these are somewhat smaller by a few millimeters, with the entire keyboard being slightly larger than a 4x6 inch index card.
Note that this does assume that your printer is reasonably well dialed-in and that you're comfortable enough with Cura and Cura plugins (or the equivalent for your slicer) that you can specify different starting offsets/heights. The filament changes are a minor nuisance, but if you batch your prints together, you're not having to change out filament as much as it might seem; for example, start with black for the first layers of a batch, switch to white for the inner blanks, then back to black for the remainder of the batch and the starting layers of the next batch, and so on.
I would also note that while I didn't have any trouble getting the layers to adhere with the start and stop printing (and some of the little islands/pockets in some of the legends), I do wonder if that could end up being a problem for some. I also want to experiment with different print beds and see what kind of different textures can result since the mirror surface is frankly kind of weird for a keycap.
Lastly, while you might be able to get more detailed designs/legends with this approach if you use a smaller nozzle for the initial layers, rather than complicate things even more, I went with a more boring layout with just alphanumerics and punctuation to keep things readable and simple.
frederickthe3rd,
It seems you and I have some similar interests...the 6502 was the first CPU I learned to program on (Commodore VIC-20 and Apple II). I too have a 6502-based retro computer, as well as a couple of Z80-based retro computers. But I noticed we have the same oscilloscope as well.")
https://savagecircuits.com/galleries/
The overall influence was more in terms of philosophy than in construction. As mentioned above, I did play around with a more modern take on the low-cost keyboards from his Radio Electronics article before going a different route. In similar fashion, I did read through the PDF versions of his Cheap Video books when debating how to go about video generation, as initially I debated a Propeller-only design (with a 6502-like emulation, something like a modern "fantasy console" as appears to be a thing now) or a traditional 6502-based design with some old-school discrete components or a CPLD to handle video generation.
As much as the Cody Computer is obviously inspired by the computers I grew up with in the 1980s, I think the overall ethos is more that of the 1970s, and that's probably the common thread more than any specific technical aspect. At that point you could still build a computer from a kit, in theory you could basically build more or less the same machine from more or less the same components that you could buy from a catalog (though the Ataris were an exception in that regard as they were already into their own custom silicon by that point), and the overall ecosystem was much more hobbyist-friendly, hacker-friendly (in the original sense of the term), and "open" than by the time I got my Commodore 64 in 1985. As cool as that all was to a young boy, I do think looking back as an adult that we lost something when that transition happened.
As a more modern comparison, we have the various new-retro systems like the ZX Spectrum Next, the Mega65, and the Commander X16; those are products you buy and you use and you consume and perhaps even do a bit of programming, and maybe they make you feel like a kid again, but for me I doubt it. Then you have the systems like the Propeddle or the RC2014 or this little Cody Computer, which are the things that you can build with your own hands in your own home, that are intended to be shared as much as to be a product in itself, that are simple enough that you can understand them but actually quite powerful for what they do, and don't really require much beyond a source for PCBs, a soldering iron, and an order to Jameco or Mouser. I obviously fall more into the latter camp, and to me it's amazing what I can do with a Propeller in a 40-pin DIP, or that I can get affordable US-made PCBs in a week or two, or that I can go into the other room, design a mechanical component or enclosure, and get it from a cheap 3D printer in a few hours at most. I think that captures the feel of what made all this fun in the first place, even if in some ways it's so different.
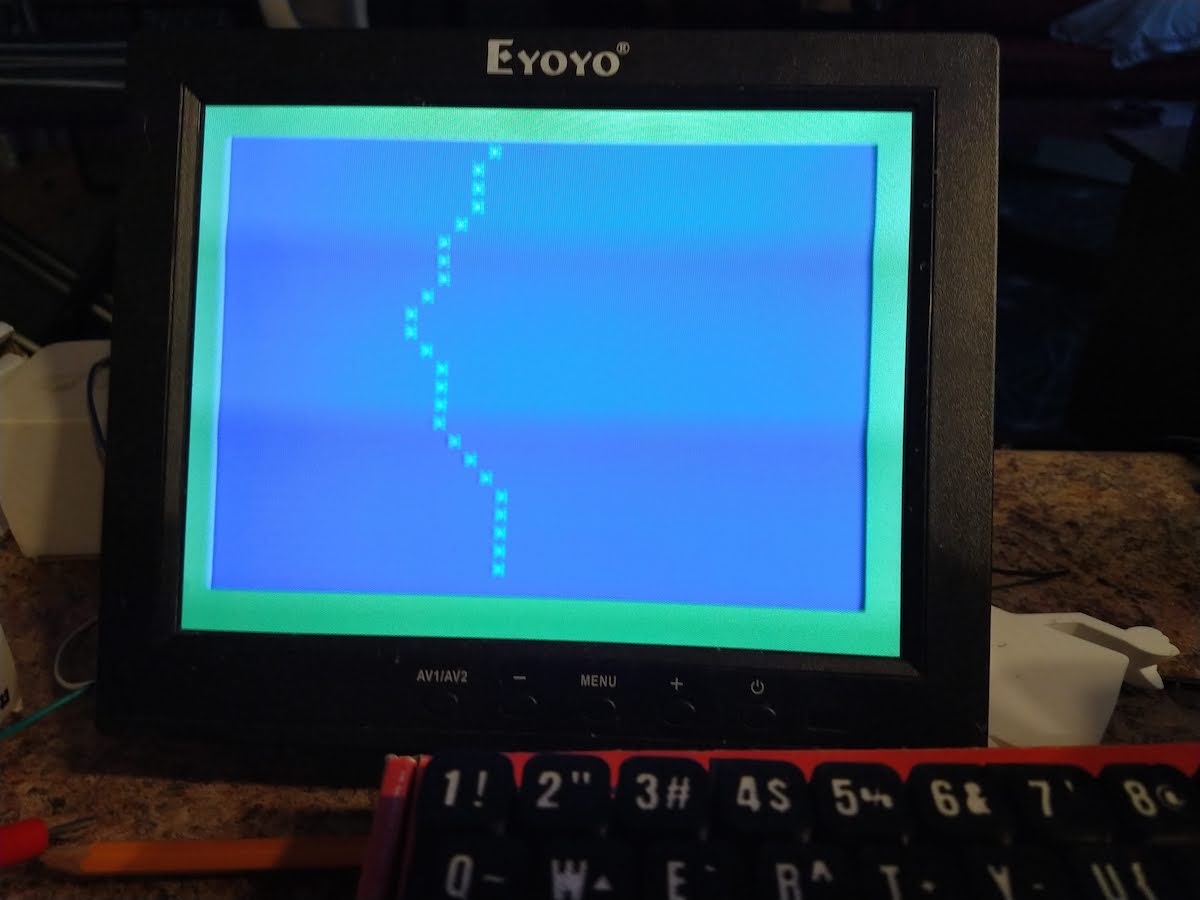
And in the end, Cody, for whatever reason, seemed to really like the 6502 and the Propeller when I'd sit and have these little conversations with him (and I realize how insane that sounds), so that's what I ended up going with. Everything I went with had to go through my Director of Engineering, and he seemed to approve of the Propeller's video generation capabilities in particular (the graphic itself is not mine, it's actually a screenshot from a Commodore Plus/4 game, "Pets Rescue", that I converted to a Propeller-compatible format as a test when I was trying to sort out video generation).
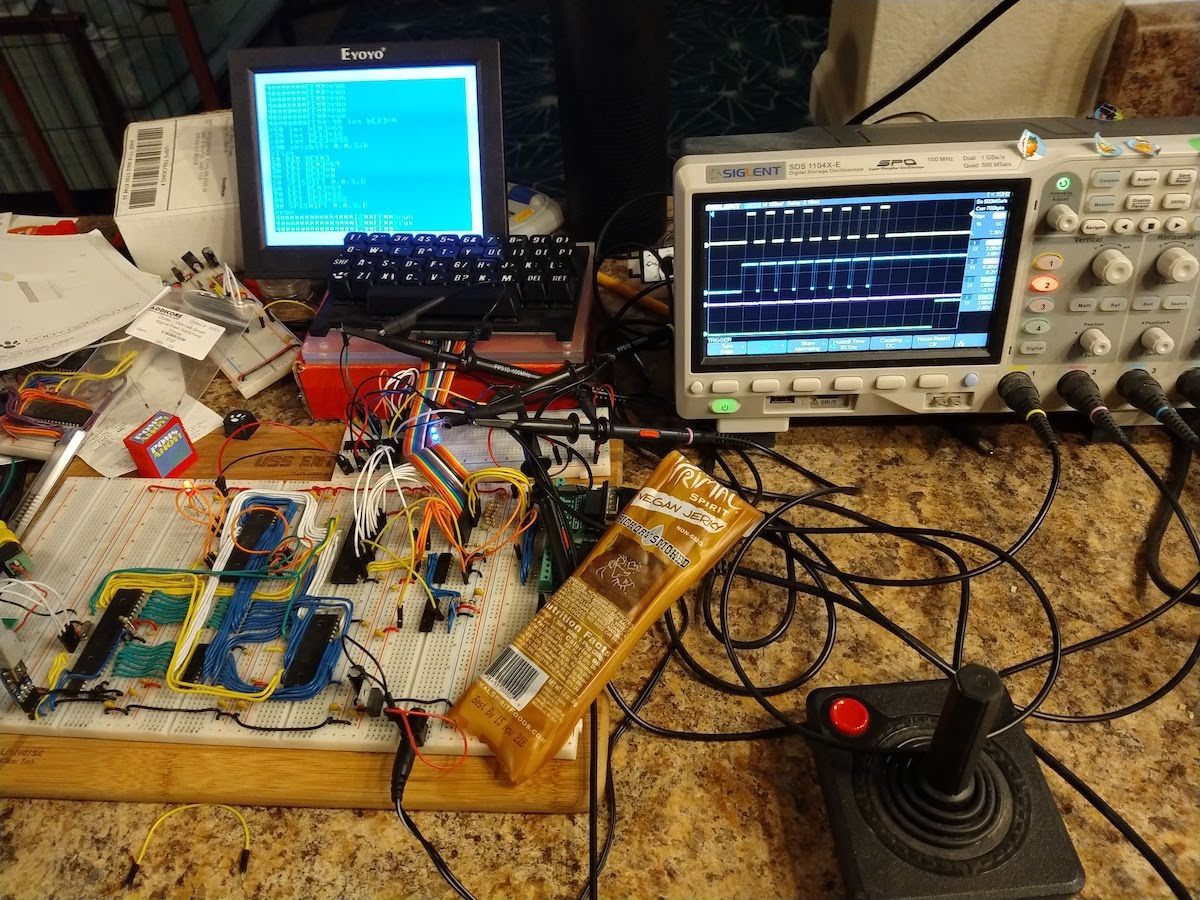
The Siglent's actually been a very good scope, though I wasn't sure at the time if it was the right choice. For the listed specs it had the right price, and I was getting to the point that I needed one; at that point most online reviewers seemed to have entered standard orbit above Rigol and buying a Siglent was still a bit of an outlier.
I briefly entertained going with a Tektronix or Keysight scope mostly for bragging rights and a bit of well-intentioned economic nationalism, but they didn't have anything in that range for the price, and online it had been suggested that some of their entry-level ranges may be rebadges anyway. In some ways it reminds me of my father, who wanted a scope from Tek but ended up getting one from GoldStar, and it was fine, but it wasn't cool.
I used to have several Tek scopes...my favorite being the MDO3104 I had. I have had a really nice Teledyne LeCroy WaveSurfer. Sadly, between 2017 and 2018 I lost everything. All my test equipment, most of my tools...almost all of my parts and accessories. It's been very slow trying to get started again while dealing with medical issues. So besides the Siglent Scope, I also bought a Siglent Waveform generator and Siglent Power Supply. I didn't want to get the LA option for the scope, so instead I got a Saleae, which has always been my favorite. Ironically, both the Tek MDO3104 and the WaveSurfer had Scope, Waveform Gen, DVM, LA, etc.
I miss those tools.
Good sentiment, I think. If you're at the point where you implement a unique/proprietary tile/sprite renderer on a FPQFP/BGA FPGA to hook to a 65C02, you're just creating another unnecessary platform.
To that, the Propeller really is a great thing. "Super" fast CPUs with nice assembly language and more flexible graphics than any hardware solution. And all in a DIP package.
Explaining your problems to some sort of animal (even if it's just plush or well, rubber) is actually a well-known programming technique.
At the risk of bumping a very old thread, here's a brief update on this project. Too many other things always seem to get in the way of finishing it, but as we were clearing out one of the rooms in the house today, I managed to get a few photos (though they're not great and the room's a bit dusty as we work on it).
It's intended more as an educational piece or a toy, so it has that look (though it's rather obvious where most of the design inspiration came from). The top of the case is actually held in by magnets from a local hardware store and the keyboard slides into 3d-printed brackets on the side. The brackets and the PCB affix to the bottom portion of the case with four screws since it's unlikely you're going to be taking that apart that often.
You can't see the ports all that well, but the back has a PropPlug port, audio and composite video out, and an expansion port; the little cartridges I came up with, sadly, aren't going to fit in, but that's not a big deal as you could still have a "cartridge" that plugs in the expansion port. The DC jack and two Atari-style joystick ports come out the side, though they're not all that obvious in these photos.
I still need to come back and work on the firmware, and I'm also thinking of redoing large portions of the BASIC interpreter I wrote if I ever find the time.
At some point this will all go up on a website, but I don't want to post it until I have the last few things done.
Using the Propeller, of course, makes many last-minute changes rather easy with respect to changing the simulated peripherals (video, audio, UARTs). It's a good little chip.
Such a great project! I first thought the keyboard was oversized, like a Fisher-Price kiddy keyboard. Thanks for describing how you print the keycaps. Love the photos with Cody.
The keyboard actually turned out really well. In real life it's about the size of the trackpad on my 16-inch MacBook Pro but it's serviceable.
For the finished keyboard, it has fewer keys than the prototypes did. Partially that was an economic consideration as you can usually buy keycaps in batches of 35/36 from various sites, so it made more sense to limit the layout to a smaller number of keys. It also meant that I needed one fewer line to read the keyboard matrix, which meant that the entirety of the keyboard scan could fit on one 65C22 port, leaving the other one and the other 65C22 peripherals for the expansion port on the back.
The legends actually aren't 3d printed any more; it's all air-dry clay shoved into the legends and then cleaned up with water or a damp cloth. We originally tried that way back when but it didn't work well on curved keycaps because of layer lines and all the preprocessing required. These are flat and printed against the print bed, so there's no problem; I've also had really good luck printing them right-side-up with ironing enabled in Cura.
My wife actually suggested the air-dry clay approach years ago, and since then I've seen a few other accounts of people doing the same; some people also suggest bright white silicone-based caulk but I had less luck with that.
Nice project!
It would be interesting to have more information like schematics and to learn what the Propeller does.
Thanks for sharing!
Christof
I plan to release everything about it when it's done, and I also hope someday to write a project book about it (just as a free PDF, but organized more like the books I grew up with).
All the schematics and PCB layouts were done in KiCad, all the 3d-printed parts were designed in OpenSCAD, and even the keycap legends and badges were designed in Inkscape, so everything should be accessible to anyone who would be interested. Right now the biggest holdup is getting the firmware at a point I'm happy with before I release it. It works, but I don't like what I have in certain places, and other parts of it could be made better from a user/programmer perspective. Seeing what I like and what I don't like, I think I know what has to happen now, but I don't know when I'll have the time.
Anyway, as far as the circuit, here's a brief explanation. The Propeller basically drives the CPU and most of the circuit with the help of a '541 buffer to alternate between data and address lines on the bus; the technique is very similar to Dennis Ferron's project and Goudsmit's Propeddle project, just far simpler as it needs to do less. The Propeller generates the phi clock for the 65C02, handles address decoding for other chips, and also acts as a video chip, sound chip, UART, and ROM mapped to the top 16K of the 6502's address range:
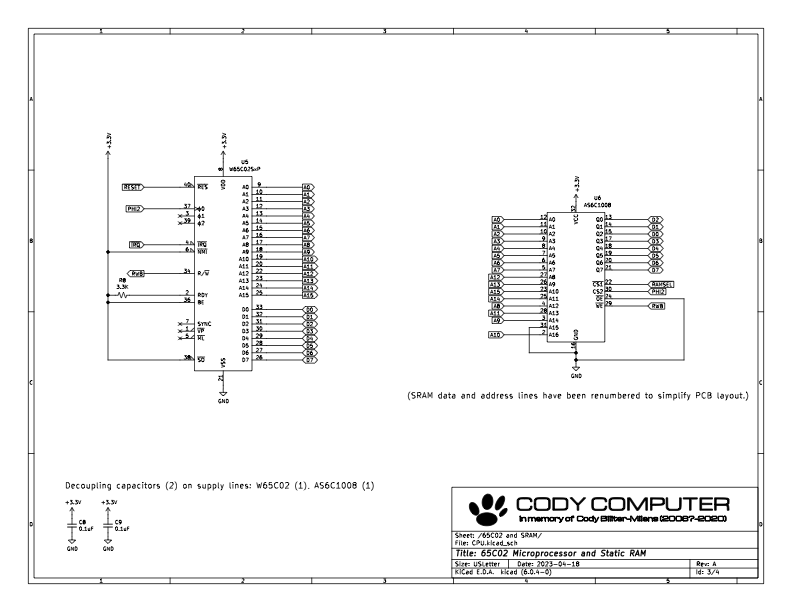

The rest of the board is more or less a traditional 65C02/65C22 circuit with a static RAM (more below), all running at 3.3V to keep things simple:
The 65C22 provides most of the I/O exposed on the expansion port and also handles keyboard/joystick decoding with the help of a 4051 (a trick I learned from Garth Wilson's website many years ago, itself discussing how the Oric handled keyboard scanning):
The end result is kind of a "Commodore 64 Junior" in terms of capability, but philosophically it's more like the Commodore Plus/4. The Commodore Plus/4 was basically a 6502 computer built around the TED chip to keep things simple and cheap. For the Cody Computer, the Propeller serves the same basic function, it's just that the dedicated "hardware" is mostly implemented in PASM.
Like I say, when I finally get this done, I'm going to post it all somewhere anyway; that was the whole point of doing it. If anyone has any big questions before then (or if I end up never getting around to it for some reason), send me a message. The prior content on these forums certainly helped me a lot when I was building it.
Thanks for this inspiring information!
I like the multiplexing of the address lines to save ports. And it is interesting, that you use P1 as ROM. I often thought, that 32kB of memory is not much for this "8*32bit chip". But you certainly can cram a lot of 8bit code into it....
Wish you a lot of fun with the project!
Christof
Just seeing this, WOW! What an amazing project you have made and documented, frederickthe3rd! Love the Cody computer and the whole story behind it. Thank you for doing it and sharing it here. Be proud of what you have done, Cody sure is!
Merry Christmas, everyone. I'm bumping this thread one last time as the sources/documentation are all available now.
The original post has been updated with links, but here they are as well:
Merry Christmas for you too!
I always enjoy seeing the Cody photos. Thanks for sharing all the details.
The cody computer made it into a hacking site: https://www.hackster.io/news/the-cody-computer-is-an-accessible-gateway-to-8-bit-computing-eed4d72f4653