

P1 and the triple P board
 iseries
Posts: 1,547
iseries
Posts: 1,547
in Accessories
What’s with the Propeller mini Plug and Play board?
Well if you’re not an Electronics Engineer and just want to program and connect your devices this could not be easier.
Let's begin with a video showing this board in action:
Propeller Mini Plug and Play Board
Mike
Well if you’re not an Electronics Engineer and just want to program and connect your devices this could not be easier.
Let's begin with a video showing this board in action:
Propeller Mini Plug and Play Board
Mike
Comments
Code running on the P2 were the same libraries copied over to the P2 with no modifications except for the font on the P1 was dumped and added to the display programs.
The assembly program for the Neo Pixel Ring (WS2812) was converted to run on the P2 as it has different instructions and runs faster.
Mike
So...........
Are you trying to sell these?
Does the board breakout all of the Mini's i/o lines?
What is the max input voltage?
Nice Job!
Shawn
Actually I have two versions of this board. One with the components facing up and one with them facing down. I prefer the face down unit. Underneath the propeller mini is a 3 or 5 volt 1 amp buck converter that can be used in place of the LDOs on the board. So for driving servos you would pick the 5 volt option and install the 5 volt unit.
Not all the pins are used on the Propeller mini. Each connector is made up of Power, GND, and N number of pins. With the current configuration that's about 19 IO pins.
All the connector cables are hand made with a needle nose pliers and a soldering iron for good measure. It is very simple to put together and very inexpensive.
I have several project that use this board. If I need to test something out I just grab a unit and plug the devices in.
I have the boards in KiCad with not very good labeling on the boards. I had OSH park make the boards for about $20 for 3 boards. The 5 volt regulator is about $7.
You can run the boards up to 12 volts but the best is 7.5 volts for heat on the propeller mini's LDOs.
I would like a P2 with this same configuration but don't know that it will be usable since the P2 takes up to much space. For most projects the Propeller mini does the job.
Mike
I will have to download KiCad and check it out.
If your new to KiCad I would go through these tutorials sponsored by DigiKey. KiCad Info
Mike
Adafruit has STEMMA, and Sparkfun has QWIIC for there boards. Both are going the I2C direction.
Parallax is going with Click boards which I am not a fan of since it requires the board to be mounted on pins. By using thin cables I am able to move the device to a location that works for me or even into the end product away from the Propeller.
Mike
Silcon Hookup Wire 30 gauge
Rectangler Connectors
Crimp Pins for Connector
Mike
These are the ones I'm looking at.
https://www.digikey.com/en/products/detail/murata-power-solutions-inc/7803SR-C/1926158
Which ones did you use?
Shawn
I used these units which emulate a standard 7805 LDO. 5v Buck.
There is also a 3 volt unit as well. These units are good to 1 amp.
Mike
PS I see you made the Face down board which means that the components on the Propeller Mini are face down so you solder the pins on the top side of the board instead of under. IE no components are showing.
@Mike,
I still haven't had a chance to put these boards together but I'm getting close. Did you soldier the buck converters to the boards or did you use some kind of female to female coupling so that you can swap different bucks out?
Thanks
Shawn
I used a right angle connector so I could change it out if need be.
Right Angle Connector Link
Mike
Oh..... nice, haven't seen one like that before, I will have to pick some of those up.
I soldiered the board up this afternoon and was able to program it with a propplug. My next step is to try and get a WX ESP module hooked up and running. Also to get some Right Angle Connectors and Buck Converters ordered.
Thanks
Shawn
I ended up purchasing these voltage regulators.
3.3V regulator.
https://pololu.com/product/2122
5.0V regulator.
https://pololu.com/product/2836
I haven't pushed them yet, but they are small.
@Shawna ,
I don't like the 3.3v regulator as it has a limited voltage range of only 11.8 volts. Not good for 12v power supplies but not a show stopper.
On the board you need to set if you are going to use no regulator and just use the onboard mini power supplies, or you want to use an upgraded power supply for either the 3.3v or 5v but not both. There is solder blobs to pick what setup you want.
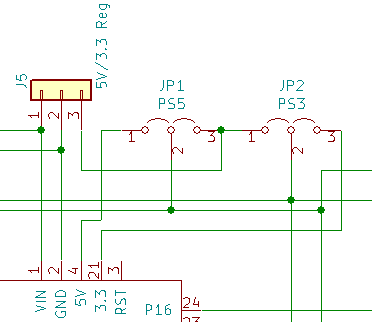
No regulator: JP1 1-2, JP2 2-3. (use onboard regulators)
3.3v regulator: JP1 1-2, JP2 1-2.
5v regulator: JP1 2-3, JP2 2-3.
Mike
Well....... here it is, I like the format of the board a lot. Thanks again Mike!
Shawn