

A new propeller based minisumo robot.
 Chad George
Posts: 138
Chad George
Posts: 138
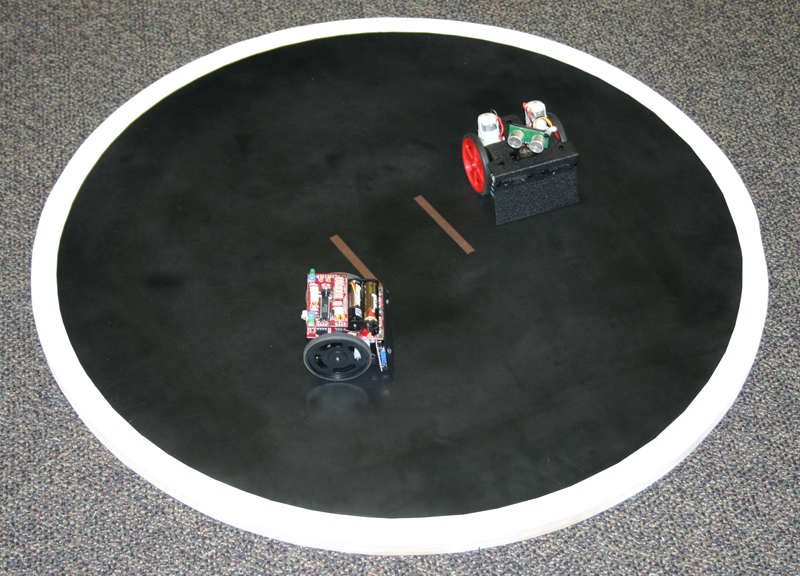
I've been working on a new mini sumo robot kit for the past few months. I'm using it in a two week summer robot camp I'm running next week at a local school. I've been a little quiet about it until now because it kept changing so much. I did mention it to Ken a few weeks ago at the Sensors Expo. Technically I'm still in development but its a fairly mature product and I hope to have it available pretty soon.
The robot has a lot more capability than mini sumo robots usually do and the robot controller by itself can be used in other applications.
Here's the list of it's specs:
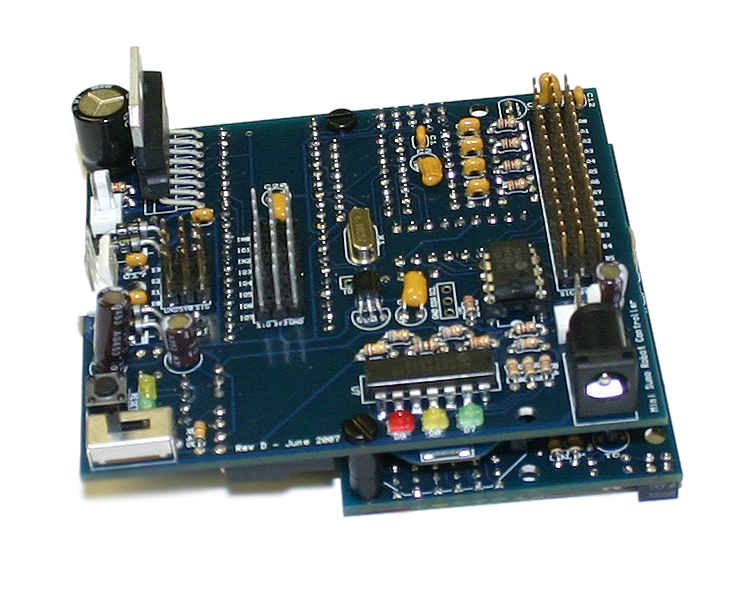
Robot Controller - 2 sided pcb with all thru hole components
- Propeller (of course) with a 6MHz crystal
- Header for Prop Plug
- 5.0V and 3.3V LDO Voltage Regulators
- 1024K EEPROM
- A 10 pin daughter board connector
- 5.0V, 3.3V, GND
- shares first 2 analog inputs with analog header
- 5 digital I/O directly connected to Propeller pins
- 28 I/O channels on 3 pin/channel (hobby servo style) header with power,ground and signal on each set.
- 8 analog inputs via MCP3208 with individual RC filters and MCP1541 external 4.096V reference (or tie to 5.0VCC)
- 8 digital I/O via MCP23S08 configurable with interrupt on change, programmable internal pullup
- 8 digital I/O connected to Propeller pins
- 2 digital inputs buffered with a hex non-inverting buffer for high speed 5.0V tolerant input
- 2 lines shared with 10 pin daughter connector
- 4 digital I/O connected to Propeller pins
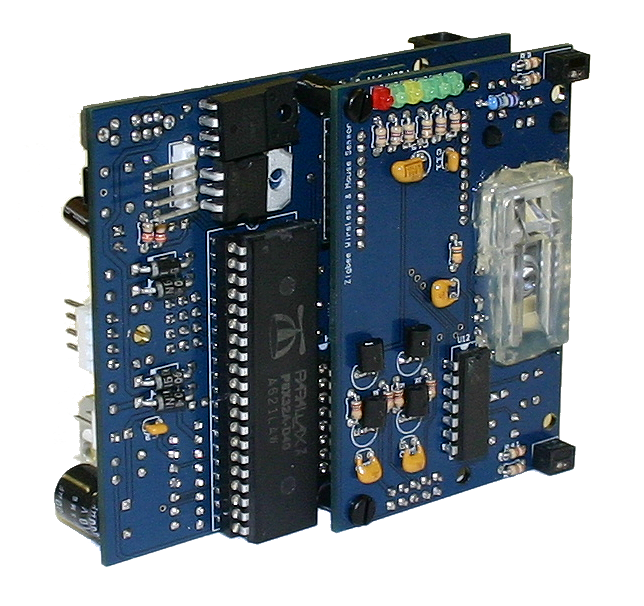
Daughter Board - tab routed with robot controller
- 400 dpi Optical Mouse Sensor
- provides relative distance moved in X and Y directions
- minimum,maximum and average pixel intensities
- squall value (# of salient points being tracked by sensor)
- retrieve entire 18x18 pixel image array at 6 bits/pixel
- when offset toward the middle/front of a 2 wheeled robot the sensor can provide closed loop drive control for rate of turn and speed
- when placed in the center of a holonomic robot the sensor can provide closed loop of omnidirectional drive control
- XBee Zigbee Wireless Header
- RSSI brought out to LEDs
- Tx and RX LEDs
- Connection Status LED
- 2 x QRD1114 Line Sensor connected to analog inputs
Overall Robot Kit Specs
- SRF05 ranging sonar mounted on panning micro servo with low profile steel bracket
- 2 analog line sensors (QRD1114)
- 2 analog ranging IR proximity sensors (GP2D120)
- 4 servo outputs (1 used on pan servo)
- 2 pwm controlled motor outputs using the 4A L298D Dual Motor Driver
- Integrated XBee wireless, but supports any serial I/O modem (using BlueSMIRF, etc)
- 8 unused General Purpose 5.0V I/O
- 1 unused High Speed 5.0V Input
- 3 unused High Speed 3.3V I/O
- everything is on sockets except two 4ch open drain comparators and the 6.0Mhz crystal
- 2000 or 2400 mAhr 7.2V Li-Ion battery with integrated protection circuit (in pack)
- battery monitor circuit to display 5 levels of battery voltage on Red,Yellow,Green LEDs
- 2.1mmx5.1mm power jack for connecting charger (with battery installed)
- 3 position power switch: Off, On (no motor power), On
- switched battery power brought to .100 header for powering external device
- PropPlug compatible .100 programming header
- Yellow and Green General Purpose indicator LEDs (uses pins 30,31)
- I2C signals for EEPROM (SCL,SDA,GND) brought out to .100 in header (header not installed)
- 1 digital I/O and GND brough out to .100 in header (header not installed)
- Single piece 18g laser cut steel frame with crinkle powder coat finish
- Uses solarbotics' 90 degree gearmotors 224:1 or 143:1 and 2 motors available
- Uses solarbotics' new plastic wheel with molded on tread and built in optical encoder pattern
- Fits 10cmx10cm size and weighs 457 grams fully loaded.
- Can either ride on the front scoop (for sumo) or on nylon wear pads (low friction)
I also have designed a 38khz IR proximity sensor board that mounts in the GP2D120 spots for use in a low cost bare bones kit.
I'm very interesting in getting feedback on the design and people's interest in something like this.
-Chad
The robot has a lot more capability than mini sumo robots usually do and the robot controller by itself can be used in other applications.
Here's the list of it's specs:
Robot Controller - 2 sided pcb with all thru hole components
- Propeller (of course) with a 6MHz crystal
- Header for Prop Plug
- 5.0V and 3.3V LDO Voltage Regulators
- 1024K EEPROM
- A 10 pin daughter board connector
- 5.0V, 3.3V, GND
- shares first 2 analog inputs with analog header
- 5 digital I/O directly connected to Propeller pins
- 28 I/O channels on 3 pin/channel (hobby servo style) header with power,ground and signal on each set.
- 8 analog inputs via MCP3208 with individual RC filters and MCP1541 external 4.096V reference (or tie to 5.0VCC)
- 8 digital I/O via MCP23S08 configurable with interrupt on change, programmable internal pullup
- 8 digital I/O connected to Propeller pins
- 2 digital inputs buffered with a hex non-inverting buffer for high speed 5.0V tolerant input
- 2 lines shared with 10 pin daughter connector
- 4 digital I/O connected to Propeller pins
Daughter Board - tab routed with robot controller
- 400 dpi Optical Mouse Sensor
- provides relative distance moved in X and Y directions
- minimum,maximum and average pixel intensities
- squall value (# of salient points being tracked by sensor)
- retrieve entire 18x18 pixel image array at 6 bits/pixel
- when offset toward the middle/front of a 2 wheeled robot the sensor can provide closed loop drive control for rate of turn and speed
- when placed in the center of a holonomic robot the sensor can provide closed loop of omnidirectional drive control
- XBee Zigbee Wireless Header
- RSSI brought out to LEDs
- Tx and RX LEDs
- Connection Status LED
- 2 x QRD1114 Line Sensor connected to analog inputs
Overall Robot Kit Specs
- SRF05 ranging sonar mounted on panning micro servo with low profile steel bracket
- 2 analog line sensors (QRD1114)
- 2 analog ranging IR proximity sensors (GP2D120)
- 4 servo outputs (1 used on pan servo)
- 2 pwm controlled motor outputs using the 4A L298D Dual Motor Driver
- Integrated XBee wireless, but supports any serial I/O modem (using BlueSMIRF, etc)
- 8 unused General Purpose 5.0V I/O
- 1 unused High Speed 5.0V Input
- 3 unused High Speed 3.3V I/O
- everything is on sockets except two 4ch open drain comparators and the 6.0Mhz crystal
- 2000 or 2400 mAhr 7.2V Li-Ion battery with integrated protection circuit (in pack)
- battery monitor circuit to display 5 levels of battery voltage on Red,Yellow,Green LEDs
- 2.1mmx5.1mm power jack for connecting charger (with battery installed)
- 3 position power switch: Off, On (no motor power), On
- switched battery power brought to .100 header for powering external device
- PropPlug compatible .100 programming header
- Yellow and Green General Purpose indicator LEDs (uses pins 30,31)
- I2C signals for EEPROM (SCL,SDA,GND) brought out to .100 in header (header not installed)
- 1 digital I/O and GND brough out to .100 in header (header not installed)
- Single piece 18g laser cut steel frame with crinkle powder coat finish
- Uses solarbotics' 90 degree gearmotors 224:1 or 143:1 and 2 motors available
- Uses solarbotics' new plastic wheel with molded on tread and built in optical encoder pattern
- Fits 10cmx10cm size and weighs 457 grams fully loaded.
- Can either ride on the front scoop (for sumo) or on nylon wear pads (low friction)
I also have designed a 38khz IR proximity sensor board that mounts in the GP2D120 spots for use in a low cost bare bones kit.
I'm very interesting in getting feedback on the design and people's interest in something like this.
-Chad
740 x 596 - 491K
644 x 606 - 491K

760 x 756 - 583K
800 x 576 - 747K
Comments
I'm particularly interested in your integration of the optical mouse tracker. That's something I've been interested in
but have never seen a good solution for. It would probably be very useful in a Sumo ring!
Do you have a video of the thing in action?
Yes the optical mouse sensor is very useful for a sumo robot. It makes a big difference actually sensing that you are being pushed around and what direction. I don't have any video yet, but I'll make sure to get some during my robot camp and its finale tournament.
The manufacture of the mouse sensor makes it pretty simple to use. They make it a matched kit with the sensor, optical grade led, led clip and lense. The only difficult part is that the lense was designed to float/clip into a molded mouse body which in turn holds everything in proper position and most importantly the proper distance from the surface. Its a little bit of a hack but my kit has the lense hot glued in place. It actually works really great and also keeps dirt and other nasties out from gap the lens and circuit board. The only really critical part is holding the bottom of the lense exactly .09 in off the surface being tracked. But I've been able to sufficiently close both riding on the front scoop and driving on nylon spacers. Of course, for me the mouse sensor is one of the best features of the kit and I kept tweaking the design until it worked right.
Oh, the best part is that mouse sensors are dirt cheap compared to competitive technologies like encoders or accelerometers and gyros.
john,
I'm still working on the price. During my camp I charged $100 for the robot. I made it optional as I had some sponsors who were going to provide kits for those who didn't want to buy their own. Everyone attending chose to buy a robot. Of course I set the price before I designed the kit (which for the record is a bad idea). I ended up having to subsidize a bit of the cost from my camp funds. But these robots in the camp kits are completely loaded with batteries/chargers, the sonar kit, and the analog IR, and even a prop plug. I wanted the students to have everything they will need to keep programming at home and I'm going to be running an after school club with them in the Fall.
That all being said, I have enough extra parts from the camp supplies to make 15 units almost immediately available. I'm going to be breaking up the kit into a bare bones system with several levels of add-ons. So I expect to be considerably less than $100 for a bare bones (but fully working) basic kit and considerably more than $100 when everything is upgraded to the state that I am doing for my camp. I'll be working out the details over the next month or so and getting everything ready. Until then, I might be willing to sell some kits with everything but what you can order from Digikey. And I certainly expect to have controller only kits/boards available once everything gets figured out.
Also I've found that a wireless link to a computer makes a huge difference when programming robots which generally can't do what they're suppose to while·attached to the end of a programming cable.
I'm developing a propeller version of the BoeBot's Microsoft Robotics Studio driver that emulates the boebot. And a little later I'll write a complete set of PC drivers that can take advantage of all the additional capabilities of my robot.
On the topic of the Robotics Studio, I'm finishing up a "compiler" for the program files generated by the Visual Programming Language toolset which converts the data flow graphs into executable code to run in the propeller natively. The VPL is what I'm teaching during the second week of my camp and I don't believe anyone has managed to write a Windows Mobile emulator for the propeller just yet...maybe for the Prop2.
OK, seriously for those interested, and maybe Parallax has an inside scoop, but I was talking to one of the developers of the Robotics Studio a few weeks ago and he informed me there is something "in the works" for integrating microcontrollers into the MSRS.·He was pretty·tight lipped·on any details, but he said it was coming·down the road. For those who love robots but hate M$ get over it and check this out because they're doing something pretty significant and its all free (for now).
I also use the wireless for driving the robot around with my xbox controller, but thats mostly just for testing things and showing off.
·
Will you post here when kits are ready for sale, or is there a webpage I should check?
Mike
Any chance of the board being mount compatible with the Parallax sumo? I have quite a few of them, and have a number of students who own them as well. It would be very cool to be able to upgrade these 'bots to a Prop.
I would be very interested in purchasing some whether or not they are compatible. I run a couple of Sumo classes a year, and adding the capabilities of the Prop would be awesome.
What age group are you doing Sumo's with?
Jonathan
▔▔▔▔▔▔▔▔▔▔▔▔▔▔▔▔▔▔▔▔▔▔▔▔
www.madlabs.info - Home of the Hydrogen Fuel Cell Robot
I'm glad to hear that there is interest in the kit.
I don't have one of the parallax sumo robot kits so I can't say for certain what would be involved, but it should be very close to the same size. The main board on my kit is 3in wide and 3.5in long.
As for mounting holes we'd definitely need to make a little plastic or metal converter board that would have the right standoff location for both kits, but that would be trivially easy to do.
Of course the setup wouldn't be compatible with the mouse sensor board as this rides on the bottom where the battery pack is on the parallax kit.
I'm running my sumo camp with 4th - 8th graders. We're spending one week soldering the kits together (the mechanical assembly is really trivial with my kit and only takes about 20-30 min). The second week we're going to be programming them using Microsoft's Visual Programming Language tool that is in the Robotics Studio. I'll have a compiler that generates code to run in the propeller from their data flow graphs created in VPL.
Chad.
The mounting of the Parallax sumo board is 70mm by 70mm, or ~ 2-3/4 by 2 3/4, so mounting your board should be pretty easy. It might be possible to work out the mounting of the mouse sensor board. There looks to be enough space between the servos on the main board to stuff the battery pack.
I'm very interested in your VPL programming interface. Sounds like a good way to bring Spin to the younger crowd. I'd love to get a look at that sometime too.
Let me know as soon as you have a board available for purchase. I'd like to buy one and see what I can do with it on a Parallax chassis. Contact me at jpeakall AT madlabs.info
Thanks, and looks like a really neat project!
Jonathan
▔▔▔▔▔▔▔▔▔▔▔▔▔▔▔▔▔▔▔▔▔▔▔▔
www.madlabs.info - Home of the Hydrogen Fuel Cell Robot
Jonathan
▔▔▔▔▔▔▔▔▔▔▔▔▔▔▔▔▔▔▔▔▔▔▔▔
www.madlabs.info - Home of the Hydrogen Fuel Cell Robot
This makes all three proximity sensors at least read at the same scale and a little "absolute" position error really doesn't matter very much.
There is no ps2 connector since its only the sensor chip that I am using. The sensor connects to the Prop via a 2 wire SPI at ~1Mhz. The sensor returns a delta X and delta Y since last read when polled for position. By sampling quickly and integrating these small changes a position can be obtained.