Amp Switcher
Sorry this post is so long, but it's my first electronics project that I designed from scratch, so I'm a little excited.
I have this hybrid home audio system. Some of it is modern home theater gear and some of it is DIY/retro. It's all routed through an Onkyo TX-SR800 home theater amp. I use it to drive the center and surround speakers. But for the left & right speakers I take a line out from the Onkyo and feed it to a customized Linear Power car stereo crossover. The high output goes to a Dynakit Stereo-70 which drives a pair of Ariel 5b speakers that I built. The low output goes to a Hafler DH-200 which drives a home-built subwoofer.
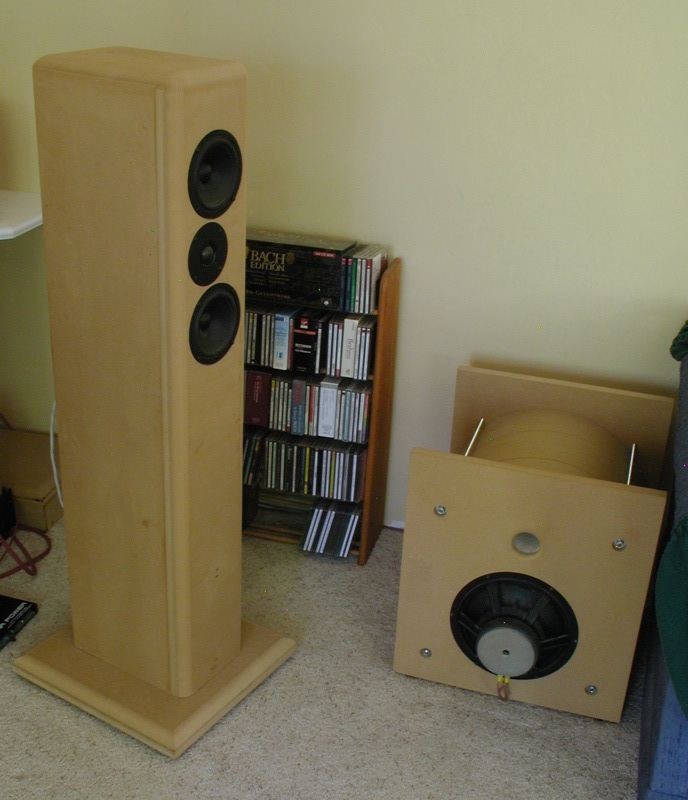
An Ariel and the subwoofer:

The Linear Power crossover sends out a spike when power is applied or removed so it has to be turned on before the amplifiers and turned off after the amplifiers. But since the Dynakit is a tube amp, you have to wait about 20 seconds after turning it off before removing power from the crossover. The crossover is powered by a 12-volt lead-acid battery. When the system isn't being used the battery is connected to a charger. These were all routed through a DPDT switch. The amps were plugged into a power strip and controlled with its switch. The switches were over in the corner of the room on the floor, so turning everything on and off was an inconvenience. Besides, it can be easy for someone to flick the switches in the wrong order and potentially damage a speaker.
I decided to build something that would allow me to turn the amps and crossover on and off from my remote. I read Jon Williams' Nuts & Volts article about deciphering the Sony remote codes. I used that information to decipher the remote codes for my Onkyo. I modified his Sony-based SX program to work with my Onkyo and added the ability to cycle power with a push button. The program controls power to the amps and the 12V routing between the crossover, battery, and charger.
My electronics knowledge is sketchy at best (my background is in software). I tried to figure out how to route the 12V between the crossover, battery, and charger with MOSFETs and supporting hardware, but then I figured I had two unused slots on the RC-4 so I just used DC SSRs. When I first hooked everything up, the 12V routing didn't work--everything was always connected to everything else. But then I realized that while the AC SSR's output is non-polar, the output of the DC SSR has a positive and negative. Of course the way I initially hooked them up was the 25% chance of both of them being backwards. When I reversed them both, it worked perfectly.
The operation of the program is like this:
When the current state is off and a power on command is received (or the button is pushed):
1) Disconnect the charger and battery
2) Connect the crossover and battery
3) Turn on the amps
4) Blink the LED quickly a few times during steps 1-3 and leave it on
When the current state is on and a power off command is received (or the button is pushed):
1) Turn off the amps
2) Blink the LED slowly while waiting about 20 seconds
3) Disconnect the crossover and battery
4) Connect the charger and battery
5) Turn the LED off
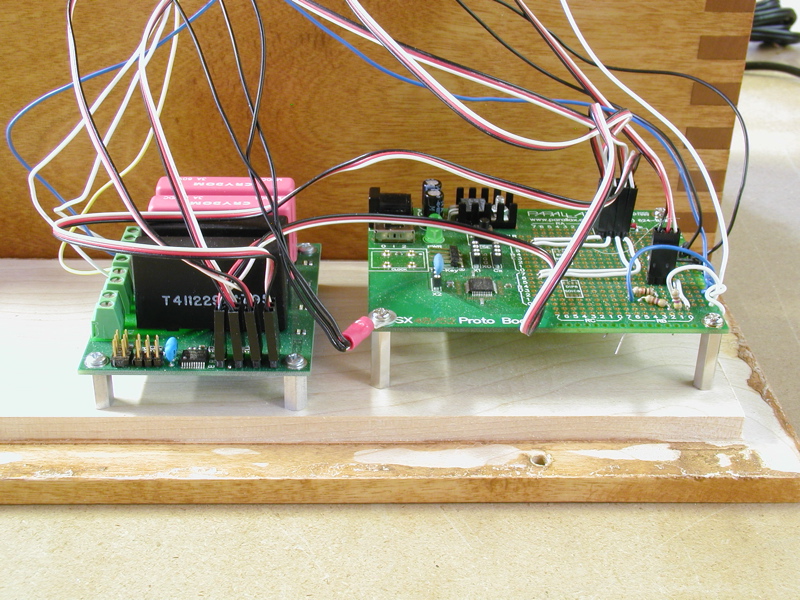
The boards:

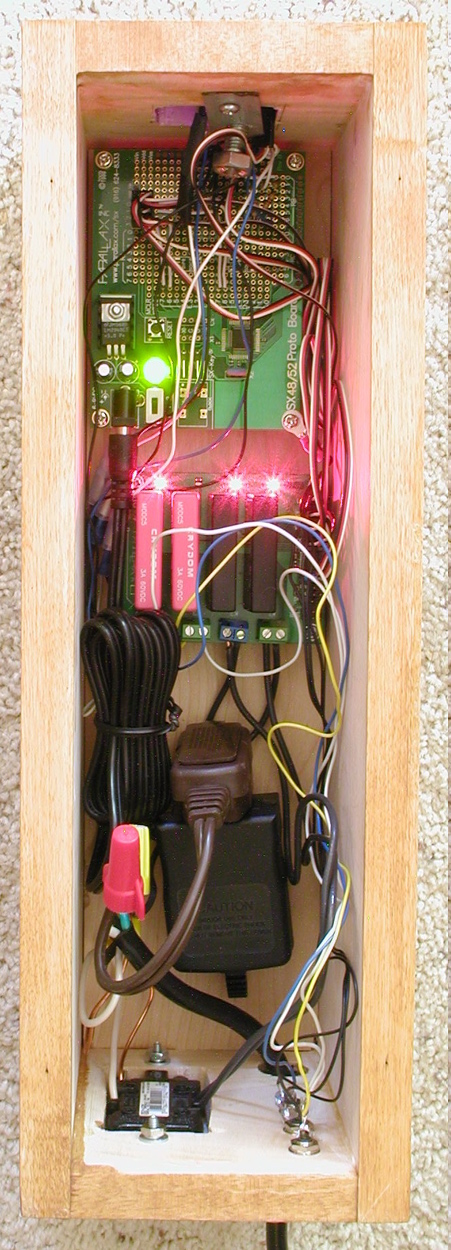
Inside the box:

When I first connected the amps through the SSRs, I noticed a small 60Hz hum. I connected the amps directly to the power strip and found that there was even more hum, so it turns out I actually get better sound using the SSRs!
So now the whole conglomeration can be powered on and off with one touch on the remote.
The back:

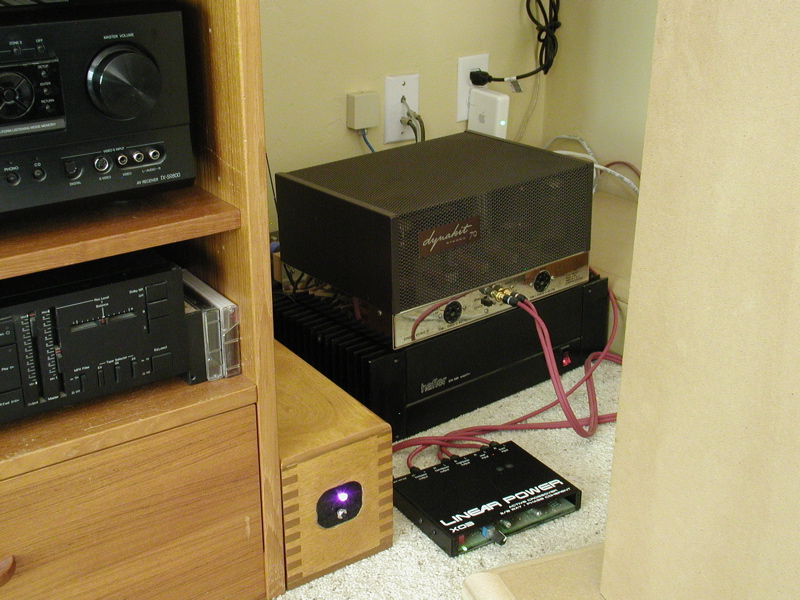
In place:

Schematic and source code are attached to the next post
▔▔▔▔▔▔▔▔▔▔▔▔▔▔▔▔▔▔▔▔▔▔▔▔
OS-X: because making Unix user-friendly was easier than debugging Windows
links:
My band's website
Our album on the iTunes Music Store
Post Edited (SSteve) : 6/1/2007 4:56:16 PM GMT
I have this hybrid home audio system. Some of it is modern home theater gear and some of it is DIY/retro. It's all routed through an Onkyo TX-SR800 home theater amp. I use it to drive the center and surround speakers. But for the left & right speakers I take a line out from the Onkyo and feed it to a customized Linear Power car stereo crossover. The high output goes to a Dynakit Stereo-70 which drives a pair of Ariel 5b speakers that I built. The low output goes to a Hafler DH-200 which drives a home-built subwoofer.
An Ariel and the subwoofer:
The Linear Power crossover sends out a spike when power is applied or removed so it has to be turned on before the amplifiers and turned off after the amplifiers. But since the Dynakit is a tube amp, you have to wait about 20 seconds after turning it off before removing power from the crossover. The crossover is powered by a 12-volt lead-acid battery. When the system isn't being used the battery is connected to a charger. These were all routed through a DPDT switch. The amps were plugged into a power strip and controlled with its switch. The switches were over in the corner of the room on the floor, so turning everything on and off was an inconvenience. Besides, it can be easy for someone to flick the switches in the wrong order and potentially damage a speaker.
I decided to build something that would allow me to turn the amps and crossover on and off from my remote. I read Jon Williams' Nuts & Volts article about deciphering the Sony remote codes. I used that information to decipher the remote codes for my Onkyo. I modified his Sony-based SX program to work with my Onkyo and added the ability to cycle power with a push button. The program controls power to the amps and the 12V routing between the crossover, battery, and charger.
My electronics knowledge is sketchy at best (my background is in software). I tried to figure out how to route the 12V between the crossover, battery, and charger with MOSFETs and supporting hardware, but then I figured I had two unused slots on the RC-4 so I just used DC SSRs. When I first hooked everything up, the 12V routing didn't work--everything was always connected to everything else. But then I realized that while the AC SSR's output is non-polar, the output of the DC SSR has a positive and negative. Of course the way I initially hooked them up was the 25% chance of both of them being backwards. When I reversed them both, it worked perfectly.
The operation of the program is like this:
When the current state is off and a power on command is received (or the button is pushed):
1) Disconnect the charger and battery
2) Connect the crossover and battery
3) Turn on the amps
4) Blink the LED quickly a few times during steps 1-3 and leave it on
When the current state is on and a power off command is received (or the button is pushed):
1) Turn off the amps
2) Blink the LED slowly while waiting about 20 seconds
3) Disconnect the crossover and battery
4) Connect the charger and battery
5) Turn the LED off
The boards:
Inside the box:
When I first connected the amps through the SSRs, I noticed a small 60Hz hum. I connected the amps directly to the power strip and found that there was even more hum, so it turns out I actually get better sound using the SSRs!
So now the whole conglomeration can be powered on and off with one touch on the remote.
The back:
In place:
Schematic and source code are attached to the next post
▔▔▔▔▔▔▔▔▔▔▔▔▔▔▔▔▔▔▔▔▔▔▔▔
OS-X: because making Unix user-friendly was easier than debugging Windows
links:
My band's website
Our album on the iTunes Music Store
Post Edited (SSteve) : 6/1/2007 4:56:16 PM GMT


Comments
▔▔▔▔▔▔▔▔▔▔▔▔▔▔▔▔▔▔▔▔▔▔▔▔
OS-X: because making Unix user-friendly was easier than debugging Windows
links:
My band's website
Our album on the iTunes Music Store
Nice job on the project.
    IF powerButton = buttonDown THEN
        ' Button is pressed--toggle power
        OPTION = $0                    ' Disable interrupts
        rxCmd = 0                    ' Abort any command that was in process
        hasCmd = 0                    ' Cancel any received command
        IF powerState = 0 THEN
            PowerOn
        ELSE
            PowerOff
        ENDIF
        OPTION = $88
    ENDIF
If not, please let me know because it means I don't understand the OPTION register.
BTW, I saw you and John at the Maker Faire. I should have said hi, but I didn't have anything particularly interesting to say so I just checked out your booth for a minute.
▔▔▔▔▔▔▔▔▔▔▔▔▔▔▔▔▔▔▔▔▔▔▔▔
OS-X: because making Unix user-friendly was easier than debugging Windows
links:
My band's website
Our album on the iTunes Music Store
I wonder what technique you used to label your input? I see black texts on that wooden box.
▔▔▔▔▔▔▔▔▔▔▔▔▔▔▔▔▔▔▔▔▔▔▔▔
·"Imagination is the one weapon in the war against reality."
-Jules de Gaultier
▔▔▔▔▔▔▔▔▔▔▔▔▔▔▔▔▔▔▔▔▔▔▔▔
OS-X: because making Unix user-friendly was easier than debugging Windows
links:
My band's website
Our album on the iTunes Music Store
Nice work on your project
A friend helped me design the cylindrical subwoofer using a program called BassBox Pro (http://www.ht-audio.com/pages/BassBoxPro.html). The drivers are a pair of ScanSpeak 25W/8565-01s pointed at each other and wired out of phase. If you want the construction specs, I might be able to dig them up somewhere. I just did a quick look around and didn't see them.
▔▔▔▔▔▔▔▔▔▔▔▔▔▔▔▔▔▔▔▔▔▔▔▔
OS-X: because making Unix user-friendly was easier than debugging Windows
links:
My band's website
Our album on the iTunes Music Store