Duty Cycle for More Reliable Accelerometer Measurements
 Andy Lindsay (Parallax)
Posts: 1,919
Duty Cycle for More Reliable Accelerometer Measurements
·
This activity introduces BASIC Stamp duty cycle measurements, which you can use to make your Memsic 2125 Dual Axis Accelerometer tilt and acceleration measurements more accurate in temperatures above or below room temperature.·
·

·
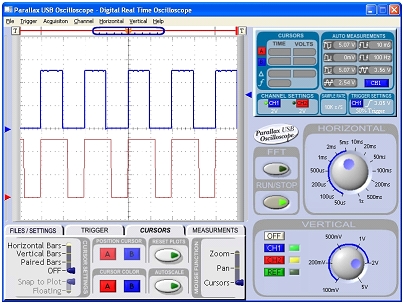
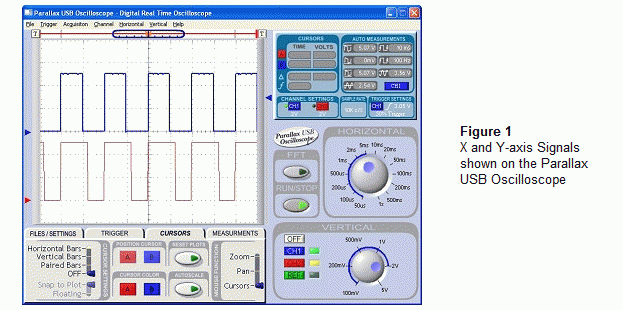
Figure 1 shows an example of the x and y-axis signals the MX2125 sends the BASIC Stamp, viewed with the help of the Parallax USB Oscilloscope and its software.· The top signal is the accelerometer's x-axis signal, and its high and low times are about the same.· In terms of tilt, when the MX2125 sends high signals that last the same time as the low signals, it indicates that the accelerometer is being held level on that axis.· Assuming it's room temperature, both the high and low times should both be about 5 ms.· The command PULSIN 6, 1, x can measure the duration of one of the signal's high times and store 2500 in the x variable.· The y-axis signal is below the x-axis signal.· Notice that the high times are wider and the low times are narrower.· That's because the high times that last around 6 ms, while the low times are around 4 ms.· This signal indicates that the y-axis is tilted to almost vertical.· For this signal, PULSIN 7, 1, y will store the value 3000 in the y variable, indicating a 6 ms measurement.· Measuring the low time with PULSIN 7, 0, y will store the value of 2000 in y, indicating 4 ms.·
·

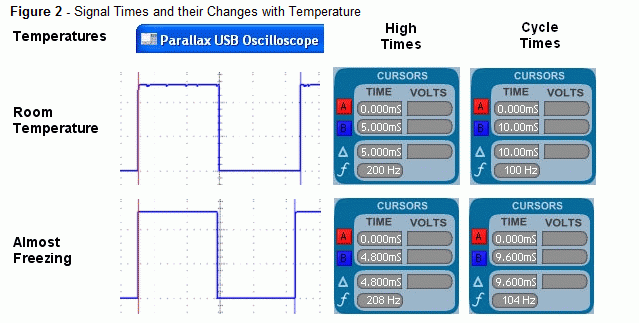
In the previous activities, only the high time was measured to indicate tilt, which works fine at room temperature.· However, if accuracy is important and you expect the temperature to vary more than a few degrees, high time measurements won't work all that well.· That's because high and low times for each axis change quite a bit with temperature.· When the MX2125 operates in a warmer environment, both the high and low times last longer.· When it operates in a colder environment, both the high and low times are shorter.
·
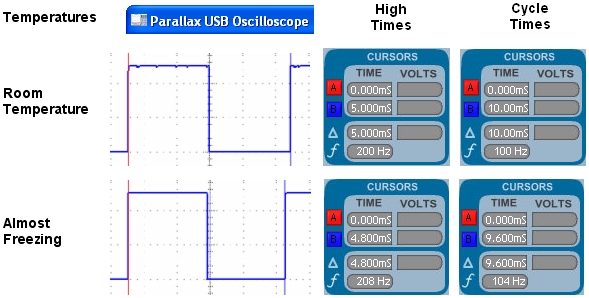
For an example of just how much the MX2125's measurements can change with temperature, take a look at the comparison in Figure 2.· At room temperature with the x-axis held level, the high time is 5 ms and the cycle time (high time + low time) is 10 ms.· While operating at just above freezing, the high time at level is 4.8 ms, and the low time is 9.6 ms.· By measuring just the high time of 4.8 ms, it would indicate that the accelerometer is tilted 16 % off level.·
·

·
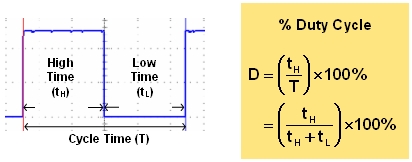
Duty cycle is the way to get accurate tilt and acceleration measurements that don't depend so much on temperature.· Figure 3 shows a close-up of the x-axis signal along with the equation for duty cycle.· Duty cycle is the ratio of high time to cycle time.· Since cycle time is the time it takes a signal to repeat itself, you can also think of duty cycle as the high time divided by the low time plus the high time.· While room temperature high time axis measurements can vary between 3.75 and 6.25 ms with 5 ms being level, percent duty cycle measurements vary between 37.5 and 62.5 % with 50.0 % being level.· Duty cycle certainly corrects the 16 % error on the almost freezing measurement from Figure 2.· With duty cycle, the calculation goes like this: (4.8 ms ÷ 9.6 ms) × 100 % = 50 %, which is level.·
·

·

Parts and Circuits
√······· This activity uses parts, equipment and circuits from How to - Accelerometer (1) Fundamentals and Tilt Measurement.· If you have not already done so, review the activity and build and test the circuit before continuing.
PBASIC Long Division for Duty Cycle Calculations
The BASIC Stamp is designed to perform integer math, and it always rounds down.· When the numerator is larger than the denominator, division problems are fairly straightforward.· For example the BASIC Stamp will send the digit 5 to the Debug Terminal in response to the command DEBUG DEC (20 / 4).· The BASIC Stamp always rounds down to the nearest integer with the / operator, so the result of 18 / 4 is also 5.· The modulus operator // is used to tell how much is left over after the division problem.· For example, you can use the command DEBUG "18 / 4 = ", DEC (18/4), " remainder = ", DEC (18//4)to display 19 / 4 = 4 remainder = 3.· With duty cycle calculations like 2500 / 5000, the result of the / operator will always be 0, but it will also always have a remainder, which is the key ingredient for long division.·
·
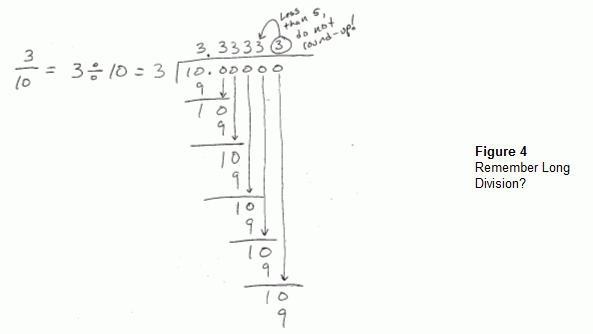
Remember long division from grade school?· For a quick refresher course, check out Figure 4.· The next example program is the PBASIC version of this algorithm with four digits to the right of the decimal point.
·

·

Example Program – FractionToDecimal.bs2
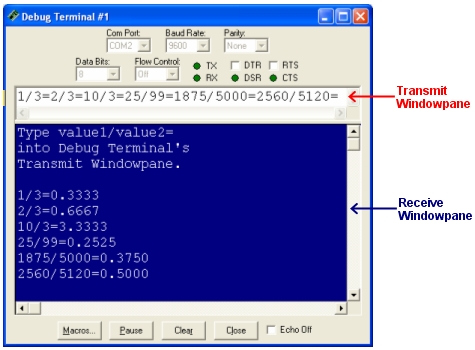
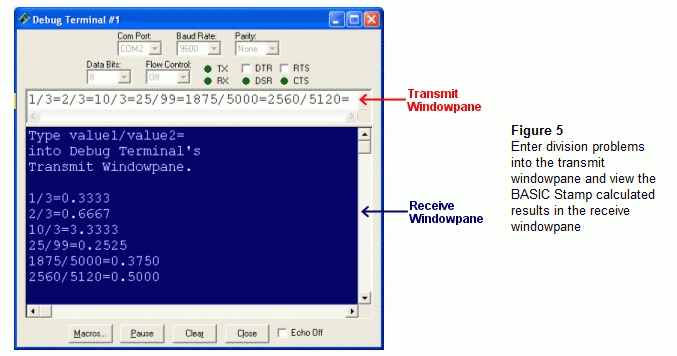
Figure 5 shows the Debug Terminal long division results generated by FractionToDecimal.bs2.· To test the program, just type your dividend, the / character, the divisor, and the = character into the Debug Terminal's transmit windowpane.· What you typed will be displayed in the Receive Windowpane along with the result, which is calculated by the BASIC Stamp.
·

·

·
√······· Enter and run FractionToDecimal.bs2.
√······· Try the division problems shown in Figure 5 along with some of your own.
·
How FractionToDecimal.bs2 Works
Figure 6 shows how the statements in the integer and fractional quotient routines relate to long division.·
·
(a)··· A DEBUGIN command captures the numerator input as you type it into the Debug Terminal's transmit windowpane.· When you press the / key, it completes the DEBUGIN command since / is a non-digit.
(b)··· A DEBUGIN command captures the denominator input as you type it into the Debug Terminal's transmit windowpane. ·When you press the = key, it completes the DEBUGIN command.
(c)··· The integer quotient qI is calculated with the / operator.·
(d)··· The remainder is calculated with the // operator, then the fractional quotient variable qF is set to zero.·
(e)··· Each time through the FOR...NEXT loop, the remainder r is multiplied by 10.· Then, the fractional quotient qF is multiplied by 10 and added to the remainder divided by the denominator to build the quotient.· Before each repeat of the FOR...NEXT loop, the new remainder has to be calculated.·
(f)···· The four digits to the right of the decimal point are added to the qF variable each time through the FOR...NEXT loop.· The statement qF = (10 * qF) + (r / d) multiplies qF by 10 to move the previous result digits to the left, then adds in the next digit r / d to the result.·
(g)··· After the FOR...NEXT loop, the fifth digit is calculated.· Following the usual rounding rules in math, if the fifth digit is 5 or greater, 1 is added to the fourth digit.
·

Your Turn - Division Subroutine
√······· Modify FractionToDecimal.bs2 so that the Main Routine calls a division subroutine.·
√······· Test it and verify that it works.·
Measure and Display Percent Duty Cycle
The next example program makes use of several techniques you might not have thought about while developing your long division subroutine for FractionToDecimal.bs2.· The program has a bit variable named xy that you can set to either X (a constant for 0) or Y (a constant for 1).· This allows you to choose both the I/O pin to get accelerometer measurements from and the variable that stores the long division result, dC(X) or dC(Y).· You can also set xy equal to either X or Y to select which variable to display in the Debug Terminal.·
Example Program – MeasureDisplayPercentDutyCycle.bs2
This example program displays the calculated duty cycle in terms of a percent value.·
·

·
√······· Enter, save, and run ApplicationProgram.bs2.
√······· Test your accelerometer, leveling it, tilting it, and holding it vertical and rotating it.
·
How MeasureDisplayPercentDutyCycle.bs2 Works
The x and y-axis duty cycle values are stored in a two variable array declared as dC VAR Word(2).· Two constants are declared for record keeping: X CON 0 and Y CON 1.· With these constants instead of referring to the x-axis as dC(0), we can use dC(X) instead.· Likewise, dC(Y) replaces dC(0).· The FOR...NEXT loop first sets the xy variable to X, which causes the PULSIN commands to measure the high and low pulses on P6.· It also causes the long division subroutine, which was renamed Duty_Cycle, to store its result in dC(X).· The second time through the FOR...NEXT loop, xy is set to Y, so the PULSIN measurements are taken on P7, and the Duty_Cycle subroutine's result is stored in dC(Y).· In the Your Turn section, you will add two more subroutines that use this same indexing system, and they plug easily into the program.
·
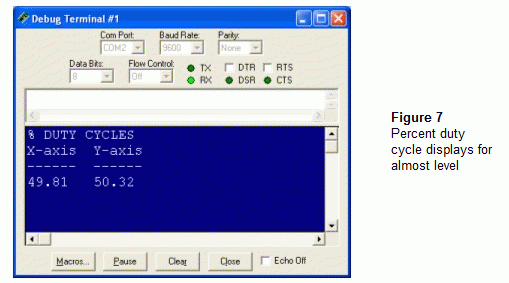
The long division subroutine in this program stores the fractional value in the same four digit integer format.· To get the format shown in Figure 7, individual digits in the values are displayed with the DIG operator.· For example, DEBUG DEC dC(X) DIG 3 displays the 4 shown in Figure 7.· DIG 2 displays the 9.· Placing a DEBUG "." between the DEBUG commands with the DIG operators displays the decimal point.· The DEBUG commands that use DIG 1 and DIG 0 display the 8 and the 1.· A similar process is used for the dC(Y) variable.·
Your Turn - Correcting Zero Offset and Scaling for Milli-Gravity Measurements
Do you have a surface that you know is level, but the Debug Terminal reports some tilt?· There are a number of factors that contribute including variations in what's level on the Board of Education, it's rubber feet, the breadboard, and etc.· There's also some manufacturing variations inside the MX2125 that the datasheet calls "zero offset error".· You can compensate for these kind of errors with a couple of constants, and a few commands to correct to 50.00 % duty cycle.· Here's how:
·
√······· Save MeasureDisplayPercentDutyCycle.bs2 as DutyCycleYourTurn01.bs2
√······· Add two declarations to the constants section:
·
ZeroOffsetX··· CON···· 0···················· ' Corrects x-axis level value
ZeroOffsetY··· CON···· 0···················· ' Corrects Y-axis level value
·
√······· Set the values of ZeroOffsetX and ZeroOffsetY so to be positive or negative values, depending on whether you need to add or subtract to get the given axis value to zero when level.
·
√······· Add this command to the Main Routine, just after the GOSUB Duty_Cycle command:
·
GOSUB Value_Adjustments················· ····' Scale to gravity/1000
·
√······· Add this subroutine to the program:
·
'
[noparse][[/noparse] Subroutine - Value_Adjustments ]
Value_Adjustments:
·
· IF xy = X THEN dc(xy) = dC(xy) + ZeroOffsetX ' Correct for zero offset.
· IF xy = Y THEN dc(xy) = dC(xy) + ZeroOffsetY
·
· dC(xy) = dC(xy) MIN 3750 MAX 6250······· ····' Restrict to +/- 12.5%
·
· RETURN
·
√······· Test and tune your modified program.
·
The dc(X) and dc(Y) variables currently store values that range from 3750 to 6250 with level being 5000.· When the duty cycle is either 3750 or 6250, it means that axis is subject to 1 g.· In this case, g doesn't stand for gram, it stands for the earth's gravity.· You can apply scale and offset to these values so that they range from -1000 to 1000 (- 1 g to + 1 g) for mg measurements.· Remember, in this activity, mg is 1/1000 of the earth's gravity, not 1/1000 of a gram!
·
√······· Save DutyCycleYourTurn01.bs2 as DutyCycleYourTurn02.bs2
√······· Add this subroutine call after Value_Adjustments:
·
GOSUB Scale_To_Milli_g
·
If you subtract 3750 from either dC(X) or dC(Y), the variable will store a value that could range from 0 to 2500.· We want it to range from 0 to 2000.· To scale the variable down, all you have to do is multiply by 20/25 or 0.8.· Unlike the duty cycle calculations, we always want to multiply by 0.8.· This is where the ** operator comes in.· To multiply by 0.8 with **, use the integer result of 0.8 × 65536, which is 52429.· Here is an example of a subroutine that multiplies the dC array variable by 0.8.·
·
√······· Add this subroutine to the program.
·
'
[noparse][[/noparse] Subroutine - Scale_To_Milli_g ]
Scale_To_Milli_g:
·
· dC(xy) = dC(xy) - 3750···················· ' 0 to 2500
· dC(xy) = dC(xy) ** 52429·················· ' Multiply by 0.8 -> 0 to 2000
· dC(xy) = dC(xy) - 1000···················· ' -1000 to 1000, 0000 = level
·
· RETURN
·
√······· Modify the Initialization routine like this:
·
'
[noparse][[/noparse] Initialization ]
·
DEBUG "TILT in Milli-G", CR·················· ' Display heading
·
√······· Change these lines in the main routine:
·

·
√······· Test your modified program and verify that it now displays milli-g measurements ranging from -1000 to 1000 with 0 being level.
·

Summary
In this activity, the PULSIN command was used to measure both the high and low times of the axis signals transmitted by the Memsic 2125 Dual Axis Accelerometer module.· These high and low times were used to calculate the duty cycle using the equation: % duty cycle = 100 % × ( high time/(high time + low time) ).· A long division routine was introduced to make this fractional calculation accurate to four digits, and it was applied to the duty cycle calculations.·
Questions
1.······ What's the equation for duty cycle?
2.······ Why is the result of a duty cycle calculation always less than zero?
3.······ What can you do to store a value that's less than zero in a BASIC Stamp variable?
4.······ What is a signal's cycle time?
5.······ How do a signal's high time and low time relate to its cycle time?
6.······ What happens differently if you change PULSIN 7, 1, y to PULSIN 7, 0, y?
7.······ If PULSIN 7, 1, y stores the value 5500, how long is that in ms?
8.······ If PULSIN 6, 0, x stores the value 4500, how long is that in ms?
9.······ How does the value the PULSIN command stores in a variable relate to milliseconds?
10.·· What does it mean when the high time is the same width as the low time on the Parallax USB Oscilloscope screen?
11.·· What does it mean if the high time is wider than the low time on the Parallax USB Oscilloscope screen?
12.·· What dies it mean if the high time is narrower than the low time on the Parallax USB Oscilloscope screen?
13.·· What does 50 % duty cycle mean in terms of high and low time?
14.·· What does 40 % duty cycle mean in terms of high and low time?
15.·· What does 60 % duty cycle mean in terms of high and low time?
16.·· What happens to the pulse durations when the MX2125 is operated in a warmer environment?
17.·· What happens to the pulse durations when the MX2125 is operated in a cooler environment?
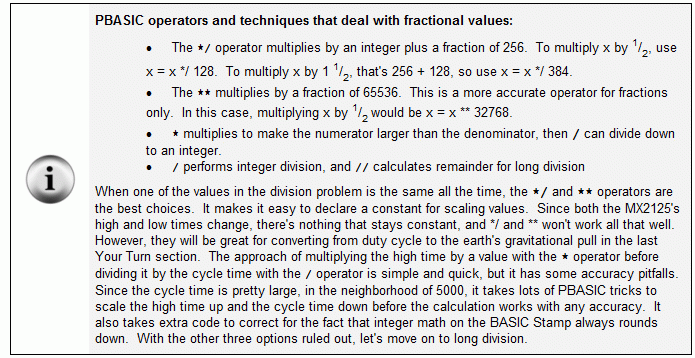
18.·· In what situations are the */ and ** operators most useful?
19.·· If the numerator is smaller than the denominator, what will the result be when you divide with the / operator?
20.·· If the numerator is smaller than the denominator, what will the result be when you calculate the reminder with the // operator?
21.·· What variable stores the integer value of the quotient in FractionToDecimal.bs2?
22.·· What variable stores the fractional value of the quotient in FractionToDecimal.bs2?
23.·· How does FractionToDecimal.bs2 cause the two variables to be displayed as a value with a decimal point?
24.·· What variable makes it possible for MeasureAndDisplayDutyCycle.bs2 to store the different fractional division results in different variables?
25.·· What variable in MeasureAndDisplayDutyCycle.bs2 makes it possible to choose between P6 and P7 for PULSIN measurements.
26.·· What operator can you use to display individual digits in the value a variable stores?
27.·· What value is the numerator in MeasureAndDisplayDutyCycle.bs2?
28.·· What value is the denominator in MeasureAndDisplayDutyCycle.bs2?
29.·· What does "zero offset error" do to your accelerometer measurements?
30.·· How can the MIN and MAX operators cause the sensitivity error to be masked?
31.·· What kind of code do you need to use to remedy zero offset error?
32.·· What operator can you use to scale from duty cycle to mg measurements?
33.·· Why don't you have to use a long division subroutine for scaling from duty cycle to mg measurements?
Exercises
1.······ If the high time is 55 ms and the low time is 55 ms, what's the duty cycle?
2.······ If the high time is 10 seconds and the low time is 20 seconds, what's the duty cycle?
3.······ If the high time is 20 seconds and the low time is 10 seconds, what's the duty cycle?
4.······ If the high time is 1 ms, and the cycle time is 2 ms, what's the duty cycle?
5.······ If the duty cycle is 50 %, and the low time is .5 ms, what's the high time?
6.······ If the duty cycle is 60 %, and the high time is 50 ms, what's the low time?
7.······ If the cycle time is 100 ms and the duty cycle is 1 %, what's the low time?
8.······ If the cycle time is 100 ms, and the duty cycle is 1 %, what's the high time?
Projects
1.······ Write a PBASIC program that performs multiplication that gives you results up to 99,999,999.· Use hand multiplication as your guide.
2.······ Write a program that performs long division with up to eight digits to the right of the decimal point.
3.······ Now, it's time to compare your the measurement errors for just the high time against the percent duty cycle measurements when the temperature varies.· The best way to do this is by calculating the percent error for each technique.· Here are the equations you can use.·
·
···········
·
The tideal value in the high time method should be 2500.· Let's say the actual value turns out to be 2415.· The percent error is:
·
···· 100% × (2500 - 2415) ÷ 625 = 5.60 %.··
·
Likewise, Dideal is the ideal percent duty cycle (50.00 %).· Let's say that your actual measurement is 49.90 %, the percent error is:
·
···· 100% × (50.00 - 49.90) ÷ 12.50 = 0.80 %.··
·
√······· Save DutyCycleMeasurements.bs2 as DutyCycleMeasurementsYourTurn.bs2.
√······· Modify DutyCycleMeasurementsYourTurn.bs2 so that it displays a new row for each measurement, and so that it displays the high time next to the percent duty cycle measurement.· The program should display a new measurement every 15 seconds.
√······· Optionally, modify the program so that it performs and displays the error calculations.· Otherwise, you will need to use a calculator or a spreadsheet to do the calculations.
√······· Find a level spot where the duty cycle is very close to 50% for both axes.
√······· Store your setup (accelerometer, board of education, etc) in a freezer for half an hour.
√······· After the half hour, immediately return your setup to the level surface, and run DutyCycleMeasurementsYourTurn.bs2.·
√······· Continue to take measurements until the high time indicates that the device has returned to operating at room temperature.
√······· Compare the percent errors from freezing to room temperature for the percent duty cycle and high time measurements.
·
_____________________________________________________________________________
·
The draft material in this Topic·is part of a forthcoming Stamps in Class text by Andy Lindsay.
·
(c) 2004·by Parallax Inc - all rights reserved.··
Post Edited (Andy Lindsay (Parallax)) : 2/3/2005 3:15:51 AM GMT
·
This activity introduces BASIC Stamp duty cycle measurements, which you can use to make your Memsic 2125 Dual Axis Accelerometer tilt and acceleration measurements more accurate in temperatures above or below room temperature.·
·
·
Figure 1 shows an example of the x and y-axis signals the MX2125 sends the BASIC Stamp, viewed with the help of the Parallax USB Oscilloscope and its software.· The top signal is the accelerometer's x-axis signal, and its high and low times are about the same.· In terms of tilt, when the MX2125 sends high signals that last the same time as the low signals, it indicates that the accelerometer is being held level on that axis.· Assuming it's room temperature, both the high and low times should both be about 5 ms.· The command PULSIN 6, 1, x can measure the duration of one of the signal's high times and store 2500 in the x variable.· The y-axis signal is below the x-axis signal.· Notice that the high times are wider and the low times are narrower.· That's because the high times that last around 6 ms, while the low times are around 4 ms.· This signal indicates that the y-axis is tilted to almost vertical.· For this signal, PULSIN 7, 1, y will store the value 3000 in the y variable, indicating a 6 ms measurement.· Measuring the low time with PULSIN 7, 0, y will store the value of 2000 in y, indicating 4 ms.·
·
In the previous activities, only the high time was measured to indicate tilt, which works fine at room temperature.· However, if accuracy is important and you expect the temperature to vary more than a few degrees, high time measurements won't work all that well.· That's because high and low times for each axis change quite a bit with temperature.· When the MX2125 operates in a warmer environment, both the high and low times last longer.· When it operates in a colder environment, both the high and low times are shorter.
·
For an example of just how much the MX2125's measurements can change with temperature, take a look at the comparison in Figure 2.· At room temperature with the x-axis held level, the high time is 5 ms and the cycle time (high time + low time) is 10 ms.· While operating at just above freezing, the high time at level is 4.8 ms, and the low time is 9.6 ms.· By measuring just the high time of 4.8 ms, it would indicate that the accelerometer is tilted 16 % off level.·
·
·
Duty cycle is the way to get accurate tilt and acceleration measurements that don't depend so much on temperature.· Figure 3 shows a close-up of the x-axis signal along with the equation for duty cycle.· Duty cycle is the ratio of high time to cycle time.· Since cycle time is the time it takes a signal to repeat itself, you can also think of duty cycle as the high time divided by the low time plus the high time.· While room temperature high time axis measurements can vary between 3.75 and 6.25 ms with 5 ms being level, percent duty cycle measurements vary between 37.5 and 62.5 % with 50.0 % being level.· Duty cycle certainly corrects the 16 % error on the almost freezing measurement from Figure 2.· With duty cycle, the calculation goes like this: (4.8 ms ÷ 9.6 ms) × 100 % = 50 %, which is level.·
·
·
Parts and Circuits
√······· This activity uses parts, equipment and circuits from How to - Accelerometer (1) Fundamentals and Tilt Measurement.· If you have not already done so, review the activity and build and test the circuit before continuing.
PBASIC Long Division for Duty Cycle Calculations
The BASIC Stamp is designed to perform integer math, and it always rounds down.· When the numerator is larger than the denominator, division problems are fairly straightforward.· For example the BASIC Stamp will send the digit 5 to the Debug Terminal in response to the command DEBUG DEC (20 / 4).· The BASIC Stamp always rounds down to the nearest integer with the / operator, so the result of 18 / 4 is also 5.· The modulus operator // is used to tell how much is left over after the division problem.· For example, you can use the command DEBUG "18 / 4 = ", DEC (18/4), " remainder = ", DEC (18//4)to display 19 / 4 = 4 remainder = 3.· With duty cycle calculations like 2500 / 5000, the result of the / operator will always be 0, but it will also always have a remainder, which is the key ingredient for long division.·
·
Remember long division from grade school?· For a quick refresher course, check out Figure 4.· The next example program is the PBASIC version of this algorithm with four digits to the right of the decimal point.
·
·
Example Program – FractionToDecimal.bs2
Figure 5 shows the Debug Terminal long division results generated by FractionToDecimal.bs2.· To test the program, just type your dividend, the / character, the divisor, and the = character into the Debug Terminal's transmit windowpane.· What you typed will be displayed in the Receive Windowpane along with the result, which is calculated by the BASIC Stamp.
·
·
·
√······· Enter and run FractionToDecimal.bs2.
√······· Try the division problems shown in Figure 5 along with some of your own.
·
[color=#008000]' Accelerometer Projects[/color]
[color=#008000]' FractionToDecimal.bs2[/color]

[color=#008000]'{$STAMP BS2}[/color]
[color=#008000]'{$PBASIC 2.5}[/color]

[color=windowtext]n              VAR     Word                  [/color][color=#008000]' Numerator[/color]
[color=windowtext]d              VAR     Word                  [/color][color=#008000]' Denominator[/color]
[color=windowtext]r              VAR     Word                  [/color][color=#008000]' Remainder[/color]
[color=windowtext]qI             VAR     Word                  [/color][color=#008000]' Quotient-integer[/color]
[color=windowtext]qF             VAR     Word                  [/color][color=#008000]' Quotient-fractional[/color]
[color=windowtext]i              VAR     Nib                   [/color][color=#008000]' Iterations[/color]

[color=#0000ff]DEBUG[/color] [color=#ff0000]"Type value1/value2="[/color][color=windowtext], [/color][color=#800080]CR[/color][color=windowtext],             [/color][color=#008000]' Display instructions[/color]
      [color=#ff0000]"into Debug Terminal's"[/color][color=windowtext], [/color][color=#800080]CR[/color][color=windowtext],[/color]
      [color=#ff0000]"Transmit Windowpane."[/color][color=windowtext], [/color][color=#800080]CR[/color][color=windowtext], [/color][color=#800080]CR[/color]

[color=#0000ff]DO[/color]                                           [color=#008000]' Main routine loop[/color]

  [color=#0000ff]DEBUGIN[/color] [color=#000080]DEC[/color][color=windowtext] n                              [/color][color=#008000]' Get numerator[/color]
  [color=#0000ff]DEBUGIN[/color] [color=#000080]DEC[/color][color=windowtext] d                              [/color][color=#008000]' Get denomenator[/color]

[color=#008000]  ' Calculate integer quotient.[/color]

[color=windowtext]  qI = n / d[/color]

[color=#008000]  ' Calculate fractional quotient.[/color]

[color=windowtext]  r  = n // d                                [/color][color=#008000]' Remainder[/color]
[color=windowtext]  qF = 0                                     [/color][color=#008000]' Clear fractional quotient[/color]
  [color=#0000ff]FOR[/color][color=windowtext] i = 1 TO 4                             [/color][color=#008000]' Four digits to right of decimal[/color]
[color=windowtext]    r  = r * 10                              [/color][color=#008000]' Multiply remainder by 10[/color]
[color=windowtext]    qF = (10 * qF) + (r / d)                 [/color][color=#008000]' Multiply quotient by 10 and add[/color]
[color=windowtext]    r = r // d                               [/color][color=#008000]' Calculate next remainder[/color]
  [color=#0000ff]NEXT[/color]
  [color=#0000ff]IF[/color][color=windowtext]((r * 10 / d) >= 5) [/color][color=#0000ff]THEN[/color][color=windowtext] qF = qF + 1     [/color][color=#008000]' 5th digit, round up if needed[/color]

[color=#008000]  ' Display integer.fractional quotient.[/color]

  [color=#0000ff]DEBUG[/color] [color=#000080]DEC[/color][color=windowtext] qI, [/color][color=#ff0000]"."[/color][color=windowtext], [/color][color=#000080]DEC4[/color][color=windowtext] qF, [/color][color=#800080]CR[/color]

[color=#0000ff]LOOP[/color]                                         [color=#008000]' Repeat main routine loop[/color]
How FractionToDecimal.bs2 Works
Figure 6 shows how the statements in the integer and fractional quotient routines relate to long division.·
·
(a)··· A DEBUGIN command captures the numerator input as you type it into the Debug Terminal's transmit windowpane.· When you press the / key, it completes the DEBUGIN command since / is a non-digit.
(b)··· A DEBUGIN command captures the denominator input as you type it into the Debug Terminal's transmit windowpane. ·When you press the = key, it completes the DEBUGIN command.
(c)··· The integer quotient qI is calculated with the / operator.·
(d)··· The remainder is calculated with the // operator, then the fractional quotient variable qF is set to zero.·
(e)··· Each time through the FOR...NEXT loop, the remainder r is multiplied by 10.· Then, the fractional quotient qF is multiplied by 10 and added to the remainder divided by the denominator to build the quotient.· Before each repeat of the FOR...NEXT loop, the new remainder has to be calculated.·
(f)···· The four digits to the right of the decimal point are added to the qF variable each time through the FOR...NEXT loop.· The statement qF = (10 * qF) + (r / d) multiplies qF by 10 to move the previous result digits to the left, then adds in the next digit r / d to the result.·
(g)··· After the FOR...NEXT loop, the fifth digit is calculated.· Following the usual rounding rules in math, if the fifth digit is 5 or greater, 1 is added to the fourth digit.
·
Your Turn - Division Subroutine
√······· Modify FractionToDecimal.bs2 so that the Main Routine calls a division subroutine.·
√······· Test it and verify that it works.·
Measure and Display Percent Duty Cycle
The next example program makes use of several techniques you might not have thought about while developing your long division subroutine for FractionToDecimal.bs2.· The program has a bit variable named xy that you can set to either X (a constant for 0) or Y (a constant for 1).· This allows you to choose both the I/O pin to get accelerometer measurements from and the variable that stores the long division result, dC(X) or dC(Y).· You can also set xy equal to either X or Y to select which variable to display in the Debug Terminal.·
Example Program – MeasureDisplayPercentDutyCycle.bs2
This example program displays the calculated duty cycle in terms of a percent value.·
·
·
√······· Enter, save, and run ApplicationProgram.bs2.
√······· Test your accelerometer, leveling it, tilting it, and holding it vertical and rotating it.
·
[color=#008000]' -----[noparse][[/noparse] Accelerometer Projects ]---------------------------------------------[/color]
[color=#008000]' MeasureAndDisplayPercentDutyCycle.bs2[/color]
[color=#008000]' Measure and display percent duty cycle with the MX2125.[/color]

[color=#008000]'{$STAMP BS2}[/color]
[color=#008000]'{$PBASIC 2.5}[/color]

[color=#008000]' -----[noparse][[/noparse] Constants ]----------------------------------------------------------[/color]

X              CON     0                    [color=#008000] ' X index value[/color]
Y              CON     1                    [color=#008000] ' Y index value[/color]

[color=#008000]' -----[noparse][[/noparse] Variables ]----------------------------------------------------------[/color]

dC             VAR     Word(2)              [color=#008000] ' Add[/color]
xy             VAR     Bit                  [color=#008000] ' x/y index[/color]
xyPin          VAR     Nib                  [color=#008000] ' Stores 6 or 7[/color]

tH             VAR     Word                 [color=#008000] ' High time[/color]
tL             VAR     Word                 [color=#008000] ' Low Time[/color]

r              VAR     Word                 [color=#008000] ' Remainder[/color]
i              VAR     Nib                  [color=#008000] ' Iterations[/color]

[color=#008000]' -----[noparse][[/noparse] Initialization ]-----------------------------------------------------[/color]

[color=#0000ff]DEBUG[/color] [color=#ff0000]"% DUTY CYCLES"[/color], [color=#800080]CR[/color],                  [color=#008000] ' Display heading[/color]
      [color=#ff0000]"X-axis  Y-axis"[/color], [color=#800080]CR[/color],
      [color=#ff0000]"------  ------"[/color], [color=#800080]CR[/color]

[color=#008000]' -----[noparse][[/noparse] Main Routine ]-------------------------------------------------------[/color]

[color=#0000ff]DO[/color]                                           [color=#008000]' Main routine loop[/color]

  [color=#0000ff]FOR[/color] xy = X [color=#0000ff]TO[/color] Y                            [color=#008000]' FOR xy = 0 TO 1[/color]

    xyPin = 6 + xy                           [color=#008000]' xyPin = 6 or 7 for P6 or P7[/color]
    [color=#0000ff]PULSIN[/color] xyPin, 1, tH                      [color=#008000]' Get axis high time[/color]
    [color=#0000ff]PULSIN[/color] xyPin, 0, tL                      [color=#008000]' Get axis low time[/color]

    [color=#0000ff]GOSUB[/color] Duty_Cycle                         [color=#008000]' Call Duty_Cycle[/color]

    [color=#0000ff]IF[/color] xy = X [color=#0000ff]THEN DEBUG[/color] [color=#800080]CRSRX[/color], 0            [color=#008000]' Display axis names[/color]
    [color=#0000ff]IF[/color] xy = Y [color=#0000ff]THEN DEBUG[/color] [color=#800080]CRSRX[/color], 8

    [color=#0000ff]DEBUG[/color] [color=#000080]DEC[/color] dC(xy) DIG 3,                  [color=#008000]' Display as percent value[/color]
          [color=#000080]DEC[/color] dC(xy) DIG 2, [color=#ff0000]"."[/color],
          [color=#000080]DEC[/color] dC(xy) DIG 1,
          [color=#000080]DEC[/color] dC(xy) DIG 0

  [color=#0000ff]NEXT[/color]

[color=#0000ff]  PAUSE [/color]100                                  [color=#008000]' Slow the refresh rate[/color]

[color=#0000ff]LOOP[/color]                                         [color=#008000]' Repeat main routine loop[/color]

[color=#008000]' -----[noparse][[/noparse] Subroutine - Duty_Cycle ]--------------------------------------------[/color]

Duty_Cycle:

  r  = tH  // (tH + tL)                      [color=#008000]' Calculate remainder[/color]
  dC(xy) = 0                                 [color=#008000]' Clear duty cycle[/color]

  [color=#0000ff]FOR[/color] i = 1 [color=#0000ff]TO[/color] 4                             [color=#008000]' Iteratively calculate 4 digits[/color]
    r  = r * 10
    dC(xy) = (10 * dC(xy)) + (r / (tH + tL))
    r = r // (tH + tL)
  [color=#0000ff]NEXT[/color]

  [color=#0000ff]IF[/color] r * 10 / (tH + tL) >= 5 [color=#0000ff]THEN[/color]            [color=#008000]' Use 5th digit for rounding[/color]
    dC(xy) = dC(xy) + 1
  [color=#0000ff]ENDIF[/color]

  [color=#0000ff]RETURN[/color]
How MeasureDisplayPercentDutyCycle.bs2 Works
The x and y-axis duty cycle values are stored in a two variable array declared as dC VAR Word(2).· Two constants are declared for record keeping: X CON 0 and Y CON 1.· With these constants instead of referring to the x-axis as dC(0), we can use dC(X) instead.· Likewise, dC(Y) replaces dC(0).· The FOR...NEXT loop first sets the xy variable to X, which causes the PULSIN commands to measure the high and low pulses on P6.· It also causes the long division subroutine, which was renamed Duty_Cycle, to store its result in dC(X).· The second time through the FOR...NEXT loop, xy is set to Y, so the PULSIN measurements are taken on P7, and the Duty_Cycle subroutine's result is stored in dC(Y).· In the Your Turn section, you will add two more subroutines that use this same indexing system, and they plug easily into the program.
·
The long division subroutine in this program stores the fractional value in the same four digit integer format.· To get the format shown in Figure 7, individual digits in the values are displayed with the DIG operator.· For example, DEBUG DEC dC(X) DIG 3 displays the 4 shown in Figure 7.· DIG 2 displays the 9.· Placing a DEBUG "." between the DEBUG commands with the DIG operators displays the decimal point.· The DEBUG commands that use DIG 1 and DIG 0 display the 8 and the 1.· A similar process is used for the dC(Y) variable.·
Your Turn - Correcting Zero Offset and Scaling for Milli-Gravity Measurements
Do you have a surface that you know is level, but the Debug Terminal reports some tilt?· There are a number of factors that contribute including variations in what's level on the Board of Education, it's rubber feet, the breadboard, and etc.· There's also some manufacturing variations inside the MX2125 that the datasheet calls "zero offset error".· You can compensate for these kind of errors with a couple of constants, and a few commands to correct to 50.00 % duty cycle.· Here's how:
·
√······· Save MeasureDisplayPercentDutyCycle.bs2 as DutyCycleYourTurn01.bs2
√······· Add two declarations to the constants section:
·
ZeroOffsetX··· CON···· 0···················· ' Corrects x-axis level value
ZeroOffsetY··· CON···· 0···················· ' Corrects Y-axis level value
·
√······· Set the values of ZeroOffsetX and ZeroOffsetY so to be positive or negative values, depending on whether you need to add or subtract to get the given axis value to zero when level.
·
√······· Add this command to the Main Routine, just after the GOSUB Duty_Cycle command:
·
GOSUB Value_Adjustments················· ····' Scale to gravity/1000
·
√······· Add this subroutine to the program:
·
'
[noparse][[/noparse] Subroutine - Value_Adjustments ]
Value_Adjustments:
·
· IF xy = X THEN dc(xy) = dC(xy) + ZeroOffsetX ' Correct for zero offset.
· IF xy = Y THEN dc(xy) = dC(xy) + ZeroOffsetY
·
· dC(xy) = dC(xy) MIN 3750 MAX 6250······· ····' Restrict to +/- 12.5%
·
· RETURN
·
√······· Test and tune your modified program.
·
The dc(X) and dc(Y) variables currently store values that range from 3750 to 6250 with level being 5000.· When the duty cycle is either 3750 or 6250, it means that axis is subject to 1 g.· In this case, g doesn't stand for gram, it stands for the earth's gravity.· You can apply scale and offset to these values so that they range from -1000 to 1000 (- 1 g to + 1 g) for mg measurements.· Remember, in this activity, mg is 1/1000 of the earth's gravity, not 1/1000 of a gram!
·
√······· Save DutyCycleYourTurn01.bs2 as DutyCycleYourTurn02.bs2
√······· Add this subroutine call after Value_Adjustments:
·
GOSUB Scale_To_Milli_g
·
If you subtract 3750 from either dC(X) or dC(Y), the variable will store a value that could range from 0 to 2500.· We want it to range from 0 to 2000.· To scale the variable down, all you have to do is multiply by 20/25 or 0.8.· Unlike the duty cycle calculations, we always want to multiply by 0.8.· This is where the ** operator comes in.· To multiply by 0.8 with **, use the integer result of 0.8 × 65536, which is 52429.· Here is an example of a subroutine that multiplies the dC array variable by 0.8.·
·
√······· Add this subroutine to the program.
·
'
[noparse][[/noparse] Subroutine - Scale_To_Milli_g ]
Scale_To_Milli_g:
·
· dC(xy) = dC(xy) - 3750···················· ' 0 to 2500
· dC(xy) = dC(xy) ** 52429·················· ' Multiply by 0.8 -> 0 to 2000
· dC(xy) = dC(xy) - 1000···················· ' -1000 to 1000, 0000 = level
·
· RETURN
·
√······· Modify the Initialization routine like this:
·
'
[noparse][[/noparse] Initialization ]
·
DEBUG "TILT in Milli-G", CR·················· ' Display heading
·
√······· Change these lines in the main routine:
·
·
√······· Test your modified program and verify that it now displays milli-g measurements ranging from -1000 to 1000 with 0 being level.
·
Summary
In this activity, the PULSIN command was used to measure both the high and low times of the axis signals transmitted by the Memsic 2125 Dual Axis Accelerometer module.· These high and low times were used to calculate the duty cycle using the equation: % duty cycle = 100 % × ( high time/(high time + low time) ).· A long division routine was introduced to make this fractional calculation accurate to four digits, and it was applied to the duty cycle calculations.·
Questions
1.······ What's the equation for duty cycle?
2.······ Why is the result of a duty cycle calculation always less than zero?
3.······ What can you do to store a value that's less than zero in a BASIC Stamp variable?
4.······ What is a signal's cycle time?
5.······ How do a signal's high time and low time relate to its cycle time?
6.······ What happens differently if you change PULSIN 7, 1, y to PULSIN 7, 0, y?
7.······ If PULSIN 7, 1, y stores the value 5500, how long is that in ms?
8.······ If PULSIN 6, 0, x stores the value 4500, how long is that in ms?
9.······ How does the value the PULSIN command stores in a variable relate to milliseconds?
10.·· What does it mean when the high time is the same width as the low time on the Parallax USB Oscilloscope screen?
11.·· What does it mean if the high time is wider than the low time on the Parallax USB Oscilloscope screen?
12.·· What dies it mean if the high time is narrower than the low time on the Parallax USB Oscilloscope screen?
13.·· What does 50 % duty cycle mean in terms of high and low time?
14.·· What does 40 % duty cycle mean in terms of high and low time?
15.·· What does 60 % duty cycle mean in terms of high and low time?
16.·· What happens to the pulse durations when the MX2125 is operated in a warmer environment?
17.·· What happens to the pulse durations when the MX2125 is operated in a cooler environment?
18.·· In what situations are the */ and ** operators most useful?
19.·· If the numerator is smaller than the denominator, what will the result be when you divide with the / operator?
20.·· If the numerator is smaller than the denominator, what will the result be when you calculate the reminder with the // operator?
21.·· What variable stores the integer value of the quotient in FractionToDecimal.bs2?
22.·· What variable stores the fractional value of the quotient in FractionToDecimal.bs2?
23.·· How does FractionToDecimal.bs2 cause the two variables to be displayed as a value with a decimal point?
24.·· What variable makes it possible for MeasureAndDisplayDutyCycle.bs2 to store the different fractional division results in different variables?
25.·· What variable in MeasureAndDisplayDutyCycle.bs2 makes it possible to choose between P6 and P7 for PULSIN measurements.
26.·· What operator can you use to display individual digits in the value a variable stores?
27.·· What value is the numerator in MeasureAndDisplayDutyCycle.bs2?
28.·· What value is the denominator in MeasureAndDisplayDutyCycle.bs2?
29.·· What does "zero offset error" do to your accelerometer measurements?
30.·· How can the MIN and MAX operators cause the sensitivity error to be masked?
31.·· What kind of code do you need to use to remedy zero offset error?
32.·· What operator can you use to scale from duty cycle to mg measurements?
33.·· Why don't you have to use a long division subroutine for scaling from duty cycle to mg measurements?
Exercises
1.······ If the high time is 55 ms and the low time is 55 ms, what's the duty cycle?
2.······ If the high time is 10 seconds and the low time is 20 seconds, what's the duty cycle?
3.······ If the high time is 20 seconds and the low time is 10 seconds, what's the duty cycle?
4.······ If the high time is 1 ms, and the cycle time is 2 ms, what's the duty cycle?
5.······ If the duty cycle is 50 %, and the low time is .5 ms, what's the high time?
6.······ If the duty cycle is 60 %, and the high time is 50 ms, what's the low time?
7.······ If the cycle time is 100 ms and the duty cycle is 1 %, what's the low time?
8.······ If the cycle time is 100 ms, and the duty cycle is 1 %, what's the high time?
Projects
1.······ Write a PBASIC program that performs multiplication that gives you results up to 99,999,999.· Use hand multiplication as your guide.
2.······ Write a program that performs long division with up to eight digits to the right of the decimal point.
3.······ Now, it's time to compare your the measurement errors for just the high time against the percent duty cycle measurements when the temperature varies.· The best way to do this is by calculating the percent error for each technique.· Here are the equations you can use.·
·
···········
·
The tideal value in the high time method should be 2500.· Let's say the actual value turns out to be 2415.· The percent error is:
·
···· 100% × (2500 - 2415) ÷ 625 = 5.60 %.··
·
Likewise, Dideal is the ideal percent duty cycle (50.00 %).· Let's say that your actual measurement is 49.90 %, the percent error is:
·
···· 100% × (50.00 - 49.90) ÷ 12.50 = 0.80 %.··
·
√······· Save DutyCycleMeasurements.bs2 as DutyCycleMeasurementsYourTurn.bs2.
√······· Modify DutyCycleMeasurementsYourTurn.bs2 so that it displays a new row for each measurement, and so that it displays the high time next to the percent duty cycle measurement.· The program should display a new measurement every 15 seconds.
√······· Optionally, modify the program so that it performs and displays the error calculations.· Otherwise, you will need to use a calculator or a spreadsheet to do the calculations.
√······· Find a level spot where the duty cycle is very close to 50% for both axes.
√······· Store your setup (accelerometer, board of education, etc) in a freezer for half an hour.
√······· After the half hour, immediately return your setup to the level surface, and run DutyCycleMeasurementsYourTurn.bs2.·
√······· Continue to take measurements until the high time indicates that the device has returned to operating at room temperature.
√······· Compare the percent errors from freezing to room temperature for the percent duty cycle and high time measurements.
·
_____________________________________________________________________________
·
The draft material in this Topic·is part of a forthcoming Stamps in Class text by Andy Lindsay.
·
(c) 2004·by Parallax Inc - all rights reserved.··
Post Edited (Andy Lindsay (Parallax)) : 2/3/2005 3:15:51 AM GMT










Comments
·MEMSIC-Dual.BS2 and·MeasureAndDisplayPercentDutyCycle.BS2
It·does the·Duty Cycle calculation·and uses·those numbers·to·calculate the G-force and tilt angle.
Unfortunately my MEMSIC·does not·show 90 degrees when tilted back or to the right. It does show 90 degrees when tilted forward or to the left.
I would like to have someone else have a look at the code and try·it to see whether it is the code or the sensor.
Thanks
Russ
NOTE: I made a small change to the code. There were some lines left from MEMSIC-Dual.BS2 that needed to be revised.
Post Edited (Russ) : 11/24/2005 3:12:19 PM GMT
The MX2125 datasheet mentions two general categories of error inherent to the MX2125: (1) Zero g offset and (2) sensitivity.
(1) Zero g offset error is the difference between the actual and ideal values the MX2125 sends when the net gravity forces acting on an axis are zero. For example, when the sensor is held perfectly level, both duty cycle measurements should be exactly 50%. If the actual measurement for the x axis at level is 51.5%, then the zero g offset for that axis is 1.5%. Your program's ZeroOffsetX and ZeroOffsetY constants correct for this error assuming constant temperature.
(2) Sensitivity error is best imagined as stretching and compressing the axes, and I think this is what your program will next need to correct. With sensitivity error, instead of 37.5% to 62.5%, the actual duty cycle for an axis might range from 37.4% to 62.7%. Your program does not yet have a feature for scaling these raw values back to the nominal range (37.5 to 62.5%). Correcting for this error at constant temperature would involve measuring the actual extremes (tilted +/-90 degrees) and then using them to come up with scale factors that bring the measurements into the correct range. I've tinkered with this a bit, and it looks like the correction needs to be made for each half of each axis because the tendency to stretch is different on opposite sides of the zero tilt.
Once you add temperature variations into the mix, all bets are off, and the correction techniques are much more involved. Both the zero g offset and sensitivity errors are actually related to the MX2125's internal temperature, which is indicated by an analog voltage transmitted by the device's Tout pin. The Memsic web site has an appnote that explains the equations for correcting both kinds of errors, and one of the methods looks like it can be implemented with the help of an LTC1298 12-bit A/D converter and a uM-FPU floating point coprocessor. The technique and equations are discussed on pages 6 and 7 of AN-00MX-002, which is available for download from the Memsic site - www.memsic.com.
Regards, Andy
Post Edited (Andy Lindsay (Parallax)) : 11/24/2005 6:38:03 AM GMT
PBasic did not like 'mG(xy_Index).BIT15 ' so i added another WORD variable just to get the sign (overkill I suppose, but my experience with the math and the bits is pretty shallow).
Any thoughts about these two lines of code:
var_word = mG(xy_Index) ' Used to get the sign using the .BIT15
DEBUG "G Force... ", (var_word.BIT15 * 13 + " "),
DEC (ABS mG(xy_Index) / 1000), ".", DEC3 (ABS mG(xy_Index)), " g",
CLREOL, CR
I could not figure out how to get this line to work:
DEBUG "G Force... ", ( mG(xy_Index).BIT15 * 13 + " "),
DEC (ABS mG(xy_Index) / 1000), ".", DEC3 (ABS mG(xy_Index)), " g",
CLREOL, CR
Also:
Thank you Andy for posting this infomation on long division and making it possible for me to get the 'Duty Cycle' calculated. The program works with the ADXL202JQC part that I have been messing with. The Duty Cycle calculation is a must for the ADXL.
Yeah, I don't really know of a nice way to get the .bit operator to work with indexed arrays either. One workaround would be to right-shift the variable by 15. That'll move bit15 to bit0 and the result will be the same as if you had used the .bit15 operator. Something like this should work:
DEBUG "G Force... ", mG(xy_Index) >> 15 * 13 + " ",
DEC (ABS mG(xy_Index) / 1000), ".", DEC3 (ABS mG(xy_Index)), " g",
CLREOL, CR
I'm really glad the duty cycle code is working out for your app; it's good to know the example is getting used. Thanks for posting your code BTW, the display looks great.
Regards, Andy