How to - Adding Inline Images to Your Posts
 Andy Lindsay (Parallax)
Posts: 1,919
Adding Inline Imagesto Your Posts
A picture might be “worth a thousand words” as the old adage goes, but a picture and a few well chosen words can be priceless when it comes to electronics projects. Inline images can help get the point across or communicate information others might need to assist you. Here are links to a few examples that include circuit schematics, illustrations, and project photos:
How to - Boe-Bot Line Following with QTI Sensors
How to - Piezospeaker Volume Control
Source Images
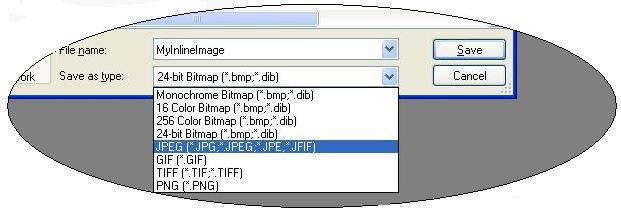
Whether it’s scanned hand drawings, screen captures from a cad program, digital photos, or bitmaps drawn in Paint, they should all be converted to the web-friendly JPEG format. If you don’t have any photo editing software on your computer, not to worry, the Paint program that comes with Windows can convert just about anything to a .jpg file. After you’re done editing, cropping, annotating and resizing the image, click File, then Save as… In the Save As window, choose JPEG from the Save as type menu.
All the images in this post were processed with Paint. Working with Paint takes a little practice, but it’s amazing what you can do with it.
Capturing an Active Window or a CAD Circuit
You can convert just whatever you see on your monitor to a JPEG with the help of Paint and the Print Screen (Prt Sc) key. The Prt Sc key captures what you see on your monitor and stores it to the clipboard. Alt + Prt Sc captures just the active window. Once you’ve got the image on your clipboard, paste it into Paint, clean it up, and save it as a JPEG. That’s how the image above was captured.
Circuit CAD programs tend not to have an export to JPEG option, but you can use this technique to get a quick JPEG copy of what you drew:
- If you are capturing an active window, set it to a screen friendly size.
- If you are capturing a circuit or layout from CAD software, make sure to zoom in/out to a useful size.
- Press Alt + Prt Sc to copy the window.
- In Paint, click Edit and select Paste.
- Clean up the image and save it as a JPEG.
Inserting JPEGs into Your Posts
The Quick Reply field at the bottom of existing threads doesn’t work real well for HTML editing. Use the Post Reply button instead, or New Topic if you want to start a new thread.

As far as I know, a post with inline images requires two passes.
First pass:
- Enter the text portion of your post. It’s a good idea to write the filenames of the images you plan to insert as place holders.
- Use the Attachment manager to upload the files you plan to include.
- Click Submit.

Second pass:
- All your images will appear at the bottom of your post. Open them and copy their hyperlink addresses (http://forums.parallax.com/forums/attach...)

- Click the Edit Post button to go back into your post.
- After you have placed your cursor where you want to insert the image, click the Insert Image button.

- Paste the image’s hyperlink into the Image URL field, then click Add Image.
- Try to keep the original images 6 inches wide or less; that’s usually 624 pixels wide.
Please Observe
- Use hyperlinks or references to existing material instead of images whenever possible.
- Downsize high resolution photos before posting. Again, 6-inches wide or smaller. Even breadboard close-ups should only take 250 KB.
- Crop any part of a screen capture that isn’t necessary.
- Try to keep images 6 inches wide or less.
- If you are using a photo editing software, use compressed JPEGs.
- If your post is applicable to more than one group, post it in the most appropriate group only. Post references to it in the other the other groups.
Post Edited (Andy Lindsay) : 11/15/2004 6:25:38 AM GMT
A picture might be “worth a thousand words” as the old adage goes, but a picture and a few well chosen words can be priceless when it comes to electronics projects. Inline images can help get the point across or communicate information others might need to assist you. Here are links to a few examples that include circuit schematics, illustrations, and project photos:
How to - Boe-Bot Line Following with QTI Sensors
How to - Piezospeaker Volume Control
Source Images
Whether it’s scanned hand drawings, screen captures from a cad program, digital photos, or bitmaps drawn in Paint, they should all be converted to the web-friendly JPEG format. If you don’t have any photo editing software on your computer, not to worry, the Paint program that comes with Windows can convert just about anything to a .jpg file. After you’re done editing, cropping, annotating and resizing the image, click File, then Save as… In the Save As window, choose JPEG from the Save as type menu.
All the images in this post were processed with Paint. Working with Paint takes a little practice, but it’s amazing what you can do with it.
Capturing an Active Window or a CAD Circuit
You can convert just whatever you see on your monitor to a JPEG with the help of Paint and the Print Screen (Prt Sc) key. The Prt Sc key captures what you see on your monitor and stores it to the clipboard. Alt + Prt Sc captures just the active window. Once you’ve got the image on your clipboard, paste it into Paint, clean it up, and save it as a JPEG. That’s how the image above was captured.
Circuit CAD programs tend not to have an export to JPEG option, but you can use this technique to get a quick JPEG copy of what you drew:
- If you are capturing an active window, set it to a screen friendly size.
- If you are capturing a circuit or layout from CAD software, make sure to zoom in/out to a useful size.
- Press Alt + Prt Sc to copy the window.
- In Paint, click Edit and select Paste.
- Clean up the image and save it as a JPEG.
Inserting JPEGs into Your Posts
The Quick Reply field at the bottom of existing threads doesn’t work real well for HTML editing. Use the Post Reply button instead, or New Topic if you want to start a new thread.
As far as I know, a post with inline images requires two passes.
First pass:
- Enter the text portion of your post. It’s a good idea to write the filenames of the images you plan to insert as place holders.
- Use the Attachment manager to upload the files you plan to include.
- Click Submit.
Second pass:
- All your images will appear at the bottom of your post. Open them and copy their hyperlink addresses (http://forums.parallax.com/forums/attach...)
- Click the Edit Post button to go back into your post.
- After you have placed your cursor where you want to insert the image, click the Insert Image button.
- Paste the image’s hyperlink into the Image URL field, then click Add Image.
- Try to keep the original images 6 inches wide or less; that’s usually 624 pixels wide.
Please Observe
- Use hyperlinks or references to existing material instead of images whenever possible.
- Downsize high resolution photos before posting. Again, 6-inches wide or smaller. Even breadboard close-ups should only take 250 KB.
- Crop any part of a screen capture that isn’t necessary.
- Try to keep images 6 inches wide or less.
- If you are using a photo editing software, use compressed JPEGs.
- If your post is applicable to more than one group, post it in the most appropriate group only. Post references to it in the other the other groups.
Post Edited (Andy Lindsay) : 11/15/2004 6:25:38 AM GMT


Comments
Attached images open in some type "black box", and whenever I try to scroll, the box+image disappears. Since many images require scrolling, this is kind of a problem.
Thanks.
Whenever I attach an image, it is always small. I'm hoping to figure out how to attach a full sized image inline.
Off to the test form to experiment.
2. Upload your images.
3. Preview your post. The image thumbnails will appear at the bottom of the preview.
4. For each image, right click on its thumbnail, and select "Copy link address" -- not "Copy image address."
5. Paste this address between the img tag placeholders from step 1. above.
That's all there is to it!
-Phil
I do not see how to do number 4.
When I use the attachment manager to upload images if I right click on the thumbnails all I
get are standard windows context items "Copy link address" or 'Copy image address appear
nowhere.
I must be doing something wrong like using the wrong thing to upload images.
I tried a test message tonight to play aound but still do not see the number 4 selections
Thank's for any info
Tom
Which browser/OS are your using? BTW, Firefox says, "Copy link location."
-Phil
IE 8 on both Win 7 and Vista
Tom
Post what you can in the Test forum, and I'll see what I can ferret out.
-Phil
I have a post tonight in the test area all I can get is them inline .
I was going to try and get a link to put between
-Phil
Interesting, see my last post in the test area where you answered
Tom
Phil's method didn't work for me either.
I skip Phil's #1.
Here's my #4.
4. Right click image you want pasted. Select "Open Link in New Tab".
5. Select new tab. Drag mouse over image. The image should turn blue indicating it has been selected. Press ctrl+c (copy).
6. Return to editing window on previous tab. Click inside edit area where you want the picture to be placed. Press ctrl+v (paste).
That should do it. It works for me anyway.
I'm using IE8 on Win7.
Duane
First one worked
Second one also, I see I need to scale down Agilent Scope Images
Sept 3, I deleted the large scope pic no need to take up space here for a test
My method in post #7 still works for me on Firefox.
-Phil
Any ideas about video?
Nevermind...
You da man Phil!
How about strike text? Couldn't figure that one out...
-Phil
Never had to do this stuff - with all the "modern" conveniences! Fun to learn though...