

How to use Home Assistant with Parallax
 iseries
Posts: 1,547
iseries
Posts: 1,547
For this project you need the following:
Raspberry Pi
Parallax WX module
Parallax P1/P2
I say that there is another project out here that used MQTT to connect to devices for Home Assistant, but this project will just use WX module to transport the data.
I know I'm late to the party but only recently came across Home Assistant after looking at some hardware the used voice assistance with HA.
After seeing this and setting it up a wanted to have it monitor some of my weather station devices. These devices use the Parallax WX module to connect up to my network and then I have a Pi Zero poll these devices every hour to get updated data. The data is in JSON form at looks like this:
{"time":1738228405, "voltage":7823, "current":27, "temperature":-22, "humidity":8012, "pressure":2915, "light":514}
On the WX module I just defined a URL to monitor for "/weather" that when accessed returns the above JSON data.
The Pi Zero app looks like this: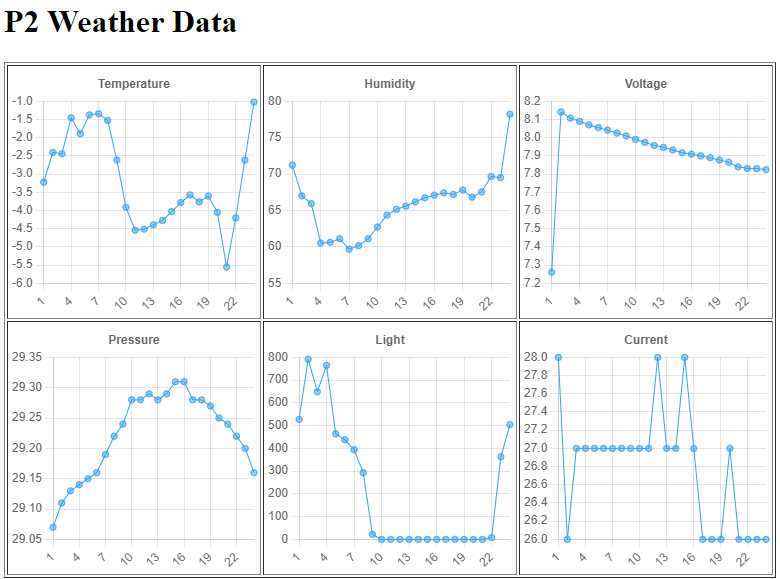
Now to get the data into HA is a little more complicated that just writing some Python code with Java Script.
To get the data in HA I used the REST full integration to define the where to get the data and how to process it.
REST.yaml
  - resource: http://101.1.1.210/weather
    scan_interval: 900
    sensor:
      - name: P2 Temperature
        value_template: "{{ (value_json.temperature * 9 / 500 + 32) | round(1) }}"
        device_class: temperature
        unit_of_measurement: '°F'
      - name: P2 Humidity
        value_template: "{{ value_json.humidity / 100 }}"
        device_class: humidity
        unit_of_measurement: '%'
      - name: P2 Pressure
        value_template: "{{ value_json.pressure / 100 }}"
        device_class: pressure
        unit_of_measurement: 'inHg'
      - name: P2 Illuminance
        value_template: "{{ value_json.light }}"
        device_class: illuminance
        unit_of_measurement: 'lx'
      - name: P2 Voltage
        value_template: "{{ value_json.voltage / 1000 }}"
        device_class: voltage
        unit_of_measurement: 'V'
      - name: P2 Current
        value_template: "{{ value_json.current }}"
        device_class: current
        unit_of_measurement: 'mA'
      - name: P2 Time
        value_template: "{{ as_datetime(value_json.time, default) }}"
        device_class: timestamp
You can see that this integration is a little complicated as you need to know the format of the data and what properties are required to make it work. I also used Templates to further format the data into readable format.
This YAML is added to the configuration.yaml file with just REST: !include rest.yaml
After restarting HA the following sensors are displayed.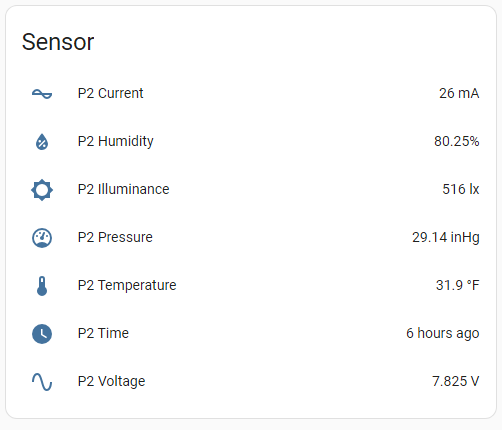
I see Parallax no longer sells Raspberry Pi's but there are many venders that supply them. In this case I had an old 3+ laying around not doing anything and just found a purpose for it.
You do need to use the whole Raspberry Pi to run HA as it has its own operating system that has to be flashed.
The weather code is written in C code and can't be done in SPIN because of the use of BME680 that uses their library functions that use a lot of floating point. Other than that, most of the code is straight forward and the integration with the WX module is very simple.
/**
 * @brief Get weather data for the web app
 * @author Michael Burmeister
 * @date April 2, 2024
 * @version 1.0
 *
*/

#include <stdio.h>
#include <propeller.h>
#include <i2c.h>
#include <ina260.h>
#include <veml7700.h>
#include <bme68x.h>
#include <pcf8523.h>
//#include <ds3231.h>
#include <esp8266.h>
#include <json.h>


#define INACLK 8
#define INADTA 9
#define PCFCLK 20
#define PCFDTA 21
#define BMECLK 36
#define BMEDTA 37
#define ESPRX 51
#define ESPTX 52
#define VEMCLK 40
#define VEMDTA 41

uint8_t BME68xRead(uint8_t, uint8_t *, uint16_t len, void *);
uint8_t BME68xWrite(uint8_t, uint8_t *, uint16_t len, void *);
void BME68xWait(uint32_t, void *);

void StartBME(void);
void StartMonitor(void);
void StartClock(void);
void StartLight(void);
int GetEnvironment(float *, float *, float *);


char Buffer[1024];
char Convert[64];
i2c_t *Bme;
time_t tm;
char Request;
int handle;
char dev_addr;
struct bme68x_dev gas_sensor;
struct bme68x_conf conf;
struct bme68x_heatr_conf heatr_conf;
struct bme68x_data data[3];
FILE *esp;


int main(int argc, char** argv)
{
    float t, h, p;
    int v, c, l, i, I;
    int T, H, P;

    _pinh(56);
    _pinh(57);

    memset(Buffer, 0, sizeof(Buffer));

    /* 20Mhz for lower power use */
    _clkset(0x010000fb, 20000000);

    _waitms(20000);

    StartLight();
    StartClock();
    StartMonitor();
    StartBME();

    esp8266_Open(ESPRX, ESPTX, 230400);

    esp8266_Check("ipaddr");

    handle = esp8266_Listen(HTTP, "/weather");
    if (handle < 0)
    {
        printf("ESPWX Error: %d\n", handle);
        _pinl(56);
    }

    GetEnvironment(&t, &h, &p);
    c = 8000;
    while (1)
    {
        i = esp8266_Wait(&Request);
        if (Request == 'G')
        {
            printf(".");
            I = GetEnvironment(&t, &h, &p);
            v = INA260_getVoltage();
            c = INA260_getCurrent();
            tm = PCF8523_SetDateTime();
//            tm = DS3231_SetDateTime();
            l = VEML7700_GetLux();
            T = t * 100;
            H = h * 100;
            P = p * 100;
            Buffer[0] = 0;
            json_init(Buffer);
            sprintf(Convert, "%d", tm);
            json_putDec("time", Convert);
            sprintf(Convert, "%d", v);
            json_putDec("voltage", Convert);
            sprintf(Convert, "%d", c);
            json_putDec("current", Convert);
            sprintf(Convert, "%d", T);
            json_putDec("temperature", Convert);
            sprintf(Convert, "%d", H);
            json_putDec("humidity", Convert);
            sprintf(Convert, "%d", P);
            json_putDec("pressure", Convert);
            sprintf(Convert, "%d", l);
            json_putDec("light", Convert);
            esp8266_Reply(i, Buffer);
        }

        if (c < 7000)
            _pinl(57);
        else
            _pinh(57);

        _waitms(1000);
    }
}

void StartLight()
{
    int i;

    i = VEML7700_Init(VEMCLK, VEMDTA);
    if (i != 1)
    {
        printf("Sensor Not Found\n");
        while (1);
    }

}

void StartMonitor()
{
    int i;

    i = INA260_open(INACLK, INADTA);
    if (i =! 0x5449)
    {
        printf("Voltage monitor not working\n");
        _pinh(57);
        while (1)
            Sleep(60);
    }

    INA260_configAveraging(7);
    INA260_configCurrent(7);
    INA260_configVoltage(7);
}

void StartClock()
{
    int i;


//    DS3231_Open(PCFCLK, PCFDTA);
//    return;
    i = PCF8523_Init(PCFCLK, PCFDTA);
    if (i < 0)
    {
        printf("Clock not Found\n");
        while (1)
            _waitms(1000);
    }
}

void StartBME()
{
    int rslt;
    float t, h, p;

    Bme = I2C_Init(BMECLK, BMEDTA, I2C_STD);

    dev_addr = BME68X_I2C_ADDR_HIGH;
    gas_sensor.variant_id = BME68X_VARIANT_GAS_LOW;
    gas_sensor.intf = BME68X_I2C_INTF;
    gas_sensor.read = BME68xRead;
    gas_sensor.write = BME68xWrite;
    gas_sensor.delay_us = BME68xWait;
    gas_sensor.amb_temp = 25;
    gas_sensor.intf_ptr = &dev_addr;
    rslt = bme68x_init(&gas_sensor);
    if (rslt != BME68X_OK)
    {
        _pinh(56);
        while (1)
            Sleep(60);
    }

    /* Set the temperature, pressure and humidity settings */
    conf.os_hum = BME68X_OS_16X;
    conf.os_pres = BME68X_OS_1X;
    conf.os_temp = BME68X_OS_2X;
    conf.filter = BME68X_FILTER_OFF;
    conf.odr = BME68X_ODR_NONE;
    rslt = bme68x_set_conf(&conf, &gas_sensor);
    if (rslt != BME68X_OK)
    {
        _pinh(56);
        while (1)
            Sleep(60);
    }

    /* Set the remaining gas sensor settings and link the heating profile */
    heatr_conf.enable = BME68X_ENABLE;

    /* Create a ramp heat waveform in 3 steps */
    heatr_conf.heatr_temp = 300; /* degree Celsius */
    heatr_conf.heatr_dur = 100; /* milliseconds */
    heatr_conf.heatr_temp_prof = NULL;
    heatr_conf.heatr_dur_prof = NULL;
    heatr_conf.profile_len = 0;

    rslt = bme68x_set_heatr_conf(BME68X_FORCED_MODE, &heatr_conf, &gas_sensor);

    /* kick off a reading */
    GetEnvironment(&t, &h, &p);
}

int GetEnvironment(float *temp, float *humidity, float *pressure)
{
    int rslt;
    int delay;
    int f;

    rslt = bme68x_set_op_mode(BME68X_FORCED_MODE, &gas_sensor);
    delay = bme68x_get_meas_dur(BME68X_FORCED_MODE, &conf, &gas_sensor) + (heatr_conf.heatr_dur * 1000);
    gas_sensor.delay_us(delay, gas_sensor.intf_ptr);
    rslt = bme68x_get_data(BME68X_FORCED_MODE, &data, &f, &gas_sensor);
    *temp = data[0].temperature;
    *humidity = data[0].humidity;
    *pressure = data[0].pressure/3386.4;
}

uint8_t BME68xRead(uint8_t reg_addr, uint8_t *data, uint16_t len, void *intf_ptr)
{
    int i;

    uint8_t dev_addr = *(uint8_t*)intf_ptr;

    i = I2C_In(Bme, dev_addr, reg_addr, 1, data, len);

    if (i > 0)
        return 0;
    else
        return -1;
}

uint8_t BME68xWrite(uint8_t reg_addr, uint8_t *data, uint16_t len, void *intf_ptr)
{
    int i;

    uint8_t dev_addr = *(uint8_t*)intf_ptr;

    i = I2C_Out(Bme, dev_addr, reg_addr, 1, data, len);

    if (i > 0)
        return 0;
    else
        return -1;
}

void BME68xWait(uint32_t period, void *intf_ptr)
{
    _waitus(period);
}
The Home Assistant product is nice in that you can setup a display screen and it keeps track of the data for you.
Next, I'm going to try and setup a switch in HA and see if I can get the P2 to respond to it.
Mike
Comments
Very cool, Mike. Well done!
@JonnyMac
Thank Jon, it took me a couple of days of hunting around to see how to interface this simple example with HA. I ended up joining their form and asking the question which got a quick response, and the solution provided.
The ESPHome product though is a real head scratcher. You build a YAML file and it writes all the code for you. Switches, Lights, BME680. It's like copilot for esp.
Mike
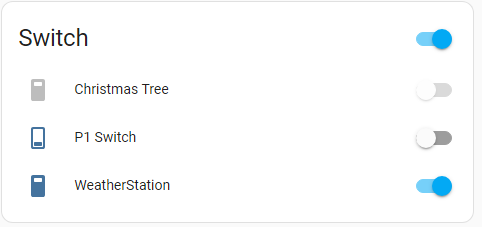
I got the switch function working in Home Assistant.
What I thought would be a simple task turned out to be a nightmare.
First off how to configure a switch in HA? The simple answer is:
The problem is if you're going to DIY it is what is actually sent and received by the WX module that you can process the request with. The docs tell you what to do but nowhere does it tell you what the request looks like or what the return values are.
The second problem was I thought I would do this on the P1 instead of a P2. This led to another problem down the road since I wanted to use Parallax's WiFi library to process the requests. It turns out it can't do it. There is no function to receive JSON text or text for that matter using their library.
No Biggy since I already had my own that I have used for years now. It was able to process the data.
Now back to the real problem of turning on and off a switch. For this I used a P1 with an LED attached to pin 0. The HA will poll the P1 and I will return the status of Pin 0. Easy enough.
The WX module will listen on path "/switch". If it receives a GET request it will get the status of pin 0 and return a JSON string "{"state": "false"}". This string in turn will tell HA what the status of the switch is. To get this to work I changed my switch config:
switch: - platform: rest resource: http://101.1.1.16/switch name: P1 Switch is_on_template: "{{ value_json.state }}"Now this data is similar to the sensor data I configured before, and sending JSON data was simple enough.
Now for the hard part. Changing the state of the switch through HA. In HA I just push the button and it sends some data to the P1. Well, what does it send?
I used some other code that allowed me to listen in on what was being sent by the HA switch. This turned out to be a POST request to the switch with the text of "ON" or "OFF". Thats it.
At this point I was still using the Parallax WiFi library, and it was not able to receive just "ON" or "OFF".
Switching over to my library I was back in business and was now able to process the "ON" and "OFF".
Here is the final C code in P1 using a Parallax WX module:
/**
 * @brief Switch integration with Home Assistant
 * @author Michael Burmeister
 * @date January 31, 2025
 * @version 1.0
 *
*/


#include "simpletools.h"
#include "JSON.h"
#include "WX.h"


#define SW1 0
#define SW2 1

fdserial *wifi;
char event;
int id;
int handle;
char Buffer[256];


int main()
{
  int i;
  int total;

  high(SW1);
  high(SW2);

  simpleterm_close();

  wifi = WX_Open(31, 30, 115200);

  pause(1000);

  WX_Listen(HTTP, "/switch");

  dprint(wifi, "Starting\n");

  total = 0;

  while(1)
  {
    handle = WX_Wait(&event);
    if (event == 'G')
    {
      total++;

      i = WX_Recv(handle, Buffer, 255);
      if (i > 0)
        dprint(wifi, "%s\n", Buffer);
      json_init(Buffer);
      if (get_state(SW1) == 1)
        json_putStr("state", "false");
      else
        json_putStr("state", "true");
      i = strlen(Buffer);
      WX_Reply(handle, Buffer);
      pause(100);
      dprint(wifi, "%d -> Get request\n", total);
    }
    if (event == 'P')
    {
      dprint(wifi, "Put request\n");
      i = WX_Recv(handle, Buffer, 255);
      if (i > 0)
      {
        if (memcmp(Buffer, "ON", 2) == 0)
          low(SW1);
        if (memcmp(Buffer, "OFF", 3) == 0)
          high(SW1);
        dprint(wifi, "%s\n", Buffer);
      }
      WX_Reply(handle, "OK");
    }
    pause(100);
  }
}
The HA screen for the Switch:
Mike
@iseries
wow! thanks for sharing how "simple" it is to integrate into HA!