Leave your P1 out in the cold and now with P2
 iseries
Posts: 1,526
This project requires several pieces and a lot of cross knowledge.
First off is the objective: To display environmental data on a web page.
This sounds simple enough, grab some data and place on a page.
Items used for this project:
Propeller 1
Power source 7.4 volts
Adafruits INA260 power sensor
Adafruits TSL2591 light sensor
DS3231 real time clock module
Parallax BME680 environmental sensor
Parallax ESP8266 Wifi module
The web page will be placed on the Wifi module and the P1 will monitor for request to send data to the web page which will intern update the weather data on the page. Easy Peasy
I will be using two languages for this project three if you count HTML. On the P1 side I will be using C and on the web page side I will be using javascript.
Once the request comes to the P1 it most grab the data and then format it so that the javascript can process the data for display. The simplest way to do that is use JSON. No not the guy that killed a bunch of people in horror. This one is used to encode data so that it can be used by other programs.
I wrote a simple JSON library that allows you to specify the data and the data value and encodes it.
This is what the json data looks like being sent to the web page for processing:
{"time":1711195290, "voltage":7423, "current":58, "temperature":2058, "humidity":3602, "pressure":2958, "light":34}
This is the web page that I will place on the Wifi module.
<!DOCTYPE HTML PUBLIC "-//W3C//DTD HTML 4.01 Transitional//EN">
<html>
<head>
<title>Weather</title>
<meta http-equiv="Content-Type" content="text/html; charset=ISO-8859-1">
<script type="text/javascript">
  function testing()
  {
    console.log("This is a test");
  }

  function gettemp()
  {
    const req = new XMLHttpRequest();
    req.addEventListener("error", err());
    req.open("GET", "/weather", true);
    req.send();
    req.responseType = "text";

    req.onload = function() {
      if (req.readyState === req.DONE)
      {
        if (req.status === 200)
        {
          console.log(req.response);
          const data = JSON.parse(req.response);
          document.getElementById('temperature').innerHTML = data.temperature/100;
          document.getElementById('humidity').innerHTML = data.humidity/100;
          document.getElementById('pressure').innerHTML = data.pressure/100;
          document.getElementById('light').innerHTML = data.light;
          document.getElementById('voltage').innerHTML = data.voltage/1000;
          document.getElementById('current').innerHTML = data.current;
          document.getElementById('dt').innerHTML = convertTimestamp(data.time);
        }
      }
    }
  }

  function err()
  {
    document.getElementById('dt').innerHTML = "No Response";
  }

  function xupdate()
  {
    document.getElementById('temperature').innerHTML = 'N/A';
    document.getElementById('humidity').innerHTML = 'N/A';
    document.getElementById('pressure').innerHTML = 'N/A';
    document.getElementById('light').innerHTML = 'N/A';
    document.getElementById('voltage').innerHTML = 'N/A';
    document.getElementById('current').innerHTML = 'N/A';
    document.getElementById('dt').innerHTML = 'N/A';
  }

  function convertTimestamp(timestamp) {
    var d = new Date(timestamp * 1000); // Convert the passed timestamp to milliseconds
    var yyyy = d.getFullYear();
    var mm = ('0' + (d.getMonth() + 1)).slice(-2); // Months are zero-based. Add leading 0.
    var dd = ('0' + d.getDate()).slice(-2); // Add leading 0.
    var hh = d.getHours();
    var h = hh;
    var min = ('0' + d.getMinutes()).slice(-2); // Add leading 0.
    var ampm = 'AM';

    if (hh > 12) {
        h = hh - 12;
        ampm = 'PM';
    } else if (hh === 12) {
        h = 12;
        ampm = 'PM';
    } else if (hh === 0) {
        h = 12;
    }

    // Format the date and time
    var formattedTime = yyyy + '-' + mm + '-' + dd + ', ' + h + ':' + min + ' ' + ampm;
    return formattedTime;
}
</script>
</head>
<body onload="xupdate()">
<h1>Weather Data</h1>
<p>Date:</p><p id="dt"></p>
<table border="0" cellpadding="0" cellspacing="1">
    <tbody>
        <tr>
            <td width="96">Temperature</td>
            <td id="temperature" width="32"></td>
            <td width="32">C</td>
        </tr>
        <tr>
            <td width="96">Humidity</td>
            <td id="humidity" width="32"></td>
            <td width="32">%</td>
        </tr>
        <tr>
            <td width="96">Pressure</td>
            <td id="pressure" width="32"></td>
            <td width="32"></td>
        </tr>
        <tr>
            <td width="96">Light</td>
            <td id="light" width="32"></td>
            <td width="32"></td>
        </tr>
        <tr>
            <td width="96">Voltage</td>
            <td id="voltage" width="32"></td>
            <td width="32">V</td>
        </tr>
        <tr>
            <td width="96">Current</td>
            <td id="current" width="32"></td>
            <td width="32">ma</td>
        </tr>
        <tr>
            <td width="96"></td>
            <td width="32"></td>
            <td width="32"></td>
        </tr>
        <tr>
            <td width="96"><input type="button" name="doIt" onclick="gettemp();" value="Update"></td>
            <td width="32"></td>
            <td width="32"></td>
        </tr>
    </tbody>
</table>


</body>
</html>
This is the C program that uses several libraries that just fit on the P1.
#include "esp8266.h"
#include "simpletools.h"
#include <sys/time.h>
#include "bme68x.h"
#include "ina260.h"
#include "DS3231.h"
#include "tsl2591.h"
#include "JSON.h"

#define LED1 0
#define LED2 1
#define INACLK 15
#define INADTA 14
#define WRx 31
#define WTx 30
#define BMECLK 18
#define BMEDTA 17
#define DSCLK 7
#define DSDTA 6
#define TSLCLK 7
#define TSLDTA 6

uint8_t BME68xRead(uint8_t, uint8_t *, uint16_t len, void *);
uint8_t BME68xWrite(uint8_t, uint8_t *, uint16_t len, void *);
void BME68xWait(uint32_t, void *);
void StartBME(void);
void StartMonitor(void);
void StartClock(void);
void StartLight(void);
int GetEnvironment(float *, float *, float *);

fdserial *esp;
int i;
char *x;
int handle;
char Buffer[1024];
char Convert[10];
char fmt[] = "%4.2f";
time_t tm;
i2c *Bme;
char dev_addr;
struct bme68x_dev gas_sensor;
struct bme68x_conf conf;
struct bme68x_heatr_conf heatr_conf;
struct bme68x_data data[3];


int main()
{
  float t, h, p;
  int T, H, P;
  int v, c, l, I;

  memset(Buffer, 0, sizeof(Buffer));

  StartMonitor();
  StartBME();
  StartClock();
  StartLight();

  esp = esp8266_open(WRx,WTx);

  x = esp8266_check("station-ipaddr");

  dprint(esp, "IP: %s\n", x);

  x = esp8266_check("cmd-events");
  dprint(esp, "events: %s\n", x);

  handle = esp8266_listen(HTTP, "/weather");

  dprint(esp, "Handle: %d\n", handle);

  GetEnvironment(&t, &h, &p);

  while(1)
  {
    i = esp8266_poll(0x1F);
    if (i > 0)
    {
      dprint(esp, "Request\n");
      i = esp8266_results();
      GetEnvironment(&t, &h, &p);
      v = INA260_getVoltage();
      c = INA260_getCurrent();
      tm = DS3231_SetDateTime();
      TSL2591_Read(&l, &I);
      T = t * 100;
      H = h * 100;
      P = p * 100;
      Buffer[0] = 0;
      json_init(Buffer);
      sprinti(Convert, "%d", tm);
      json_putDec("time", Convert);
      sprinti(Convert, "%d", v);
      json_putDec("voltage", Convert);
      sprinti(Convert, "%d", c);
      json_putDec("current", Convert);
      sprinti(Convert, "%d", T);
      json_putDec("temperature", Convert);
      sprinti(Convert, "%d", H);
      json_putDec("humidity", Convert);
      sprinti(Convert, "%d", P);
      json_putDec("pressure", Convert);
      sprinti(Convert, "%d", l);
      json_putDec("light", Convert);
      esp8266_reply(i, Buffer);
    }

    pause(1000);
  }
}

void StartMonitor()
{
  int i;

  i = INA260_open(INACLK, INADTA);
  if (i =! 0x5449)
  {
#ifdef DEBUG
      printi("Monitor not found\n");
#endif
      while (1)
        pause(1000);
  }

  INA260_configAveraging(7);
  INA260_configCurrent(7);
  INA260_configVoltage(7);
}

void StartBME()
{
  int8_t rslt = BME68X_OK;
  float t, h, p;

  Bme = i2c_newbus(BMECLK, BMEDTA, 0);

  dev_addr = BME68X_I2C_ADDR_HIGH;
  gas_sensor.variant_id = BME68X_VARIANT_GAS_LOW;
  gas_sensor.intf = BME68X_I2C_INTF;
  gas_sensor.read = BME68xRead;
  gas_sensor.write = BME68xWrite;
  gas_sensor.delay_us = BME68xWait;
  gas_sensor.amb_temp = 25;
  gas_sensor.intf_ptr = &dev_addr;
  rslt = bme68x_init(&gas_sensor);
  if (rslt != BME68X_OK)
  {
#ifdef DEBUG
    printi("BME Sensor not found\n");
#endif
    while (1)
      pause(1000);
  }

  /* Set the temperature, pressure and humidity settings */
  conf.os_hum = BME68X_OS_16X;
  conf.os_pres = BME68X_OS_1X;
  conf.os_temp = BME68X_OS_2X;
  conf.filter = BME68X_FILTER_OFF;
  conf.odr = BME68X_ODR_NONE;
  rslt = bme68x_set_conf(&conf, &gas_sensor);
  if (rslt != BME68X_OK)
  {
    high(LED1);
    while (1)
      pause(1000);
  }

  /* Set the remaining gas sensor settings and link the heating profile */
  heatr_conf.enable = BME68X_ENABLE;

  /* Create a ramp heat waveform in 3 steps */
  heatr_conf.heatr_temp = 300; /* degree Celsius */
  heatr_conf.heatr_dur = 100; /* milliseconds */
  heatr_conf.heatr_temp_prof = NULL;
  heatr_conf.heatr_dur_prof = NULL;
  heatr_conf.profile_len = 0;

  rslt = bme68x_set_heatr_conf(BME68X_FORCED_MODE, &heatr_conf, &gas_sensor);

  /* kick off a reading */
  GetEnvironment(&t, &h, &p);
}

void StartLight()
{
  int i;

  i = TSL2591_Init(TSLCLK, TSLDTA);
  if (i != 0)
  {
#ifdef DEBUG
    printi("Light Not Found\n");
#endif
    while (1)
      pause(1000);
  }

  i = TSL2591_GetStatus();

}

int GetEnvironment(float *temp, float *humidity, float *pressure)
{
  int rslt;
  int delay;
  int f;

  rslt = bme68x_set_op_mode(BME68X_FORCED_MODE, &gas_sensor);
  delay = bme68x_get_meas_dur(BME68X_FORCED_MODE, &conf, &gas_sensor) + (heatr_conf.heatr_dur * 1000);
  gas_sensor.delay_us(delay, gas_sensor.intf_ptr);
  rslt = bme68x_get_data(BME68X_FORCED_MODE, &data, &f, &gas_sensor);
  *temp = data[0].temperature;
  *humidity = data[0].humidity;
  *pressure = data[0].pressure/3386.4;
}

void StartClock()
{
  DS3231_Open(DSCLK, DSDTA);
  DS3231_SetDateTime();
}


uint8_t BME68xRead(uint8_t reg_addr, uint8_t *data, uint16_t len, void *intf_ptr)
{
  int i;

  uint8_t dev_addr = *(uint8_t*)intf_ptr;

  i = i2c_in(Bme, dev_addr, reg_addr, 1, data, len);

  if (i > 0)
    return 0;
  else
    return -1;
}

uint8_t BME68xWrite(uint8_t reg_addr, uint8_t *data, uint16_t len, void *intf_ptr)
{
    int i;

  uint8_t dev_addr = *(uint8_t*)intf_ptr;

  i = i2c_out(Bme, dev_addr, reg_addr, 1, data, len);

  if (i > 0)
    return 0;
  else
    return -1;
}

void BME68xWait(uint32_t period, void *intf_ptr)
{
  usleep(period);
}
This is a picture of the hardware setup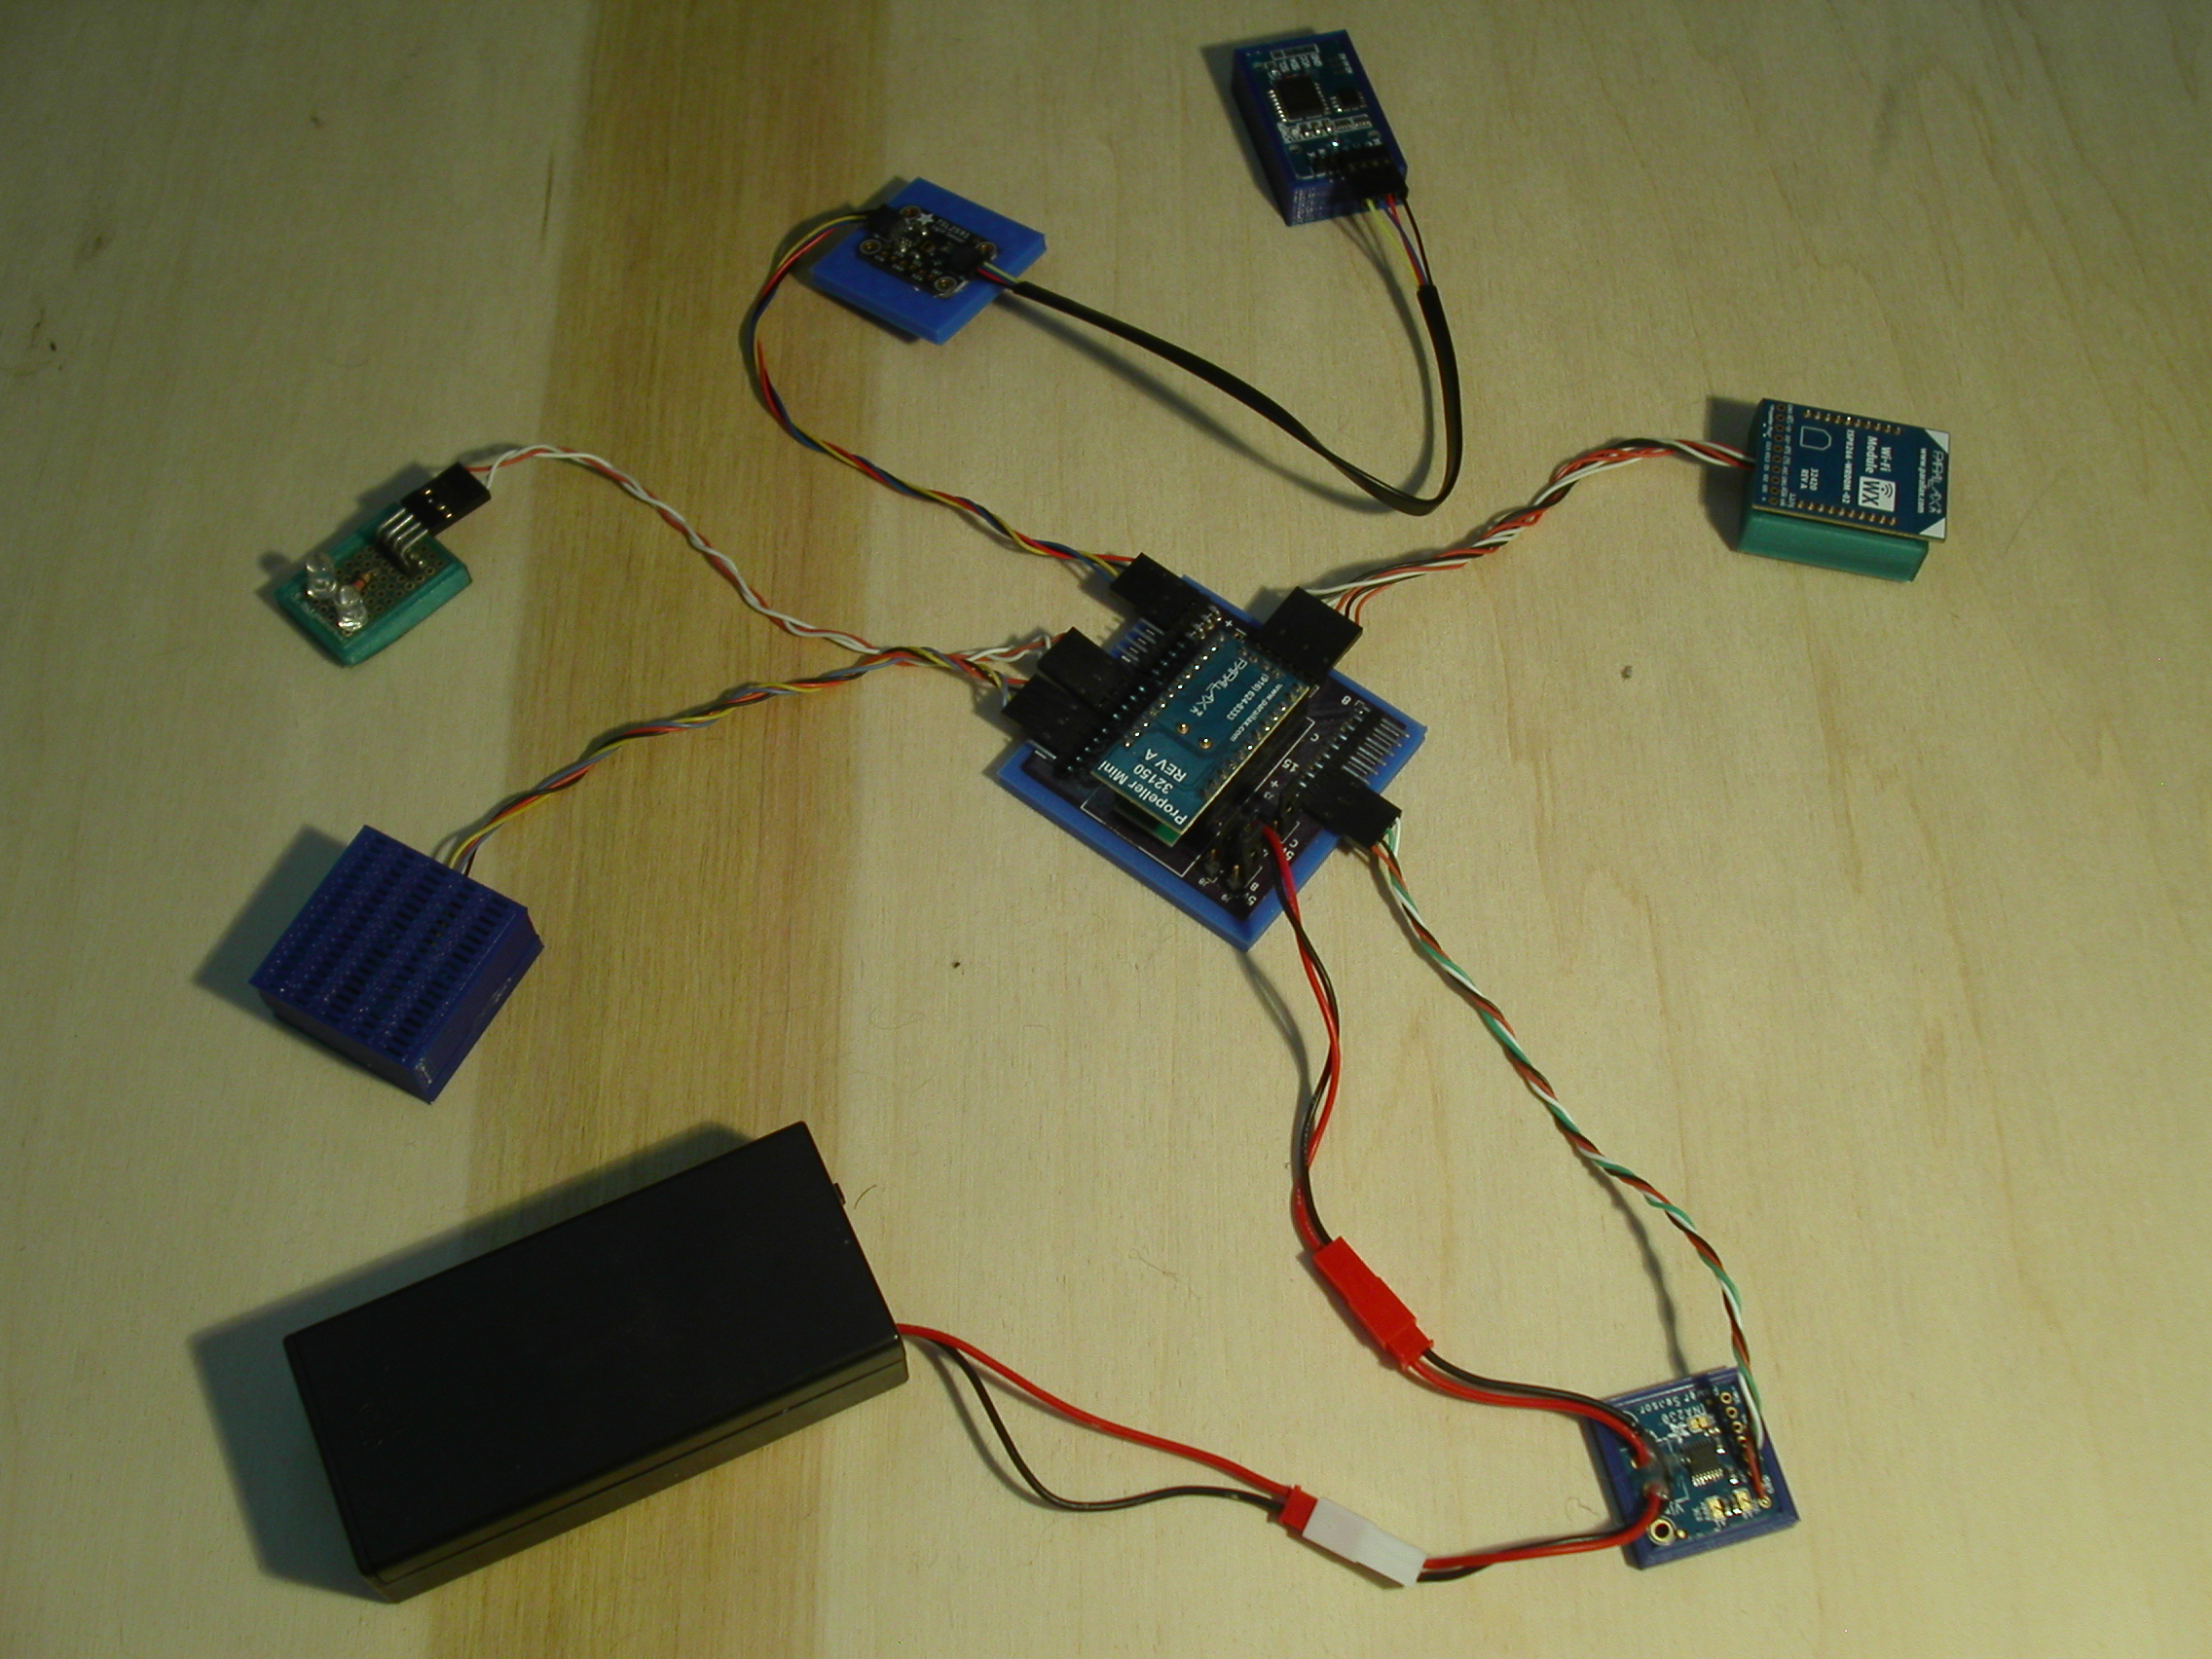
This is a picture of the web page with returned data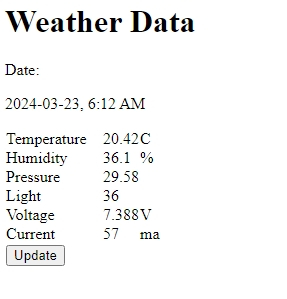
By using json data the javascript was able to process the data natively.
By placing the P1 in a plastic bag I am able to see the weather outside from the inside.
Mike


Comments
Very nice. - And thankfully not too cold yet either
Wait, This project is not done!
I need to collect this data on an hourly bases and display the information.
For this I used another language, Python, and a Raspberry Pi Zero:
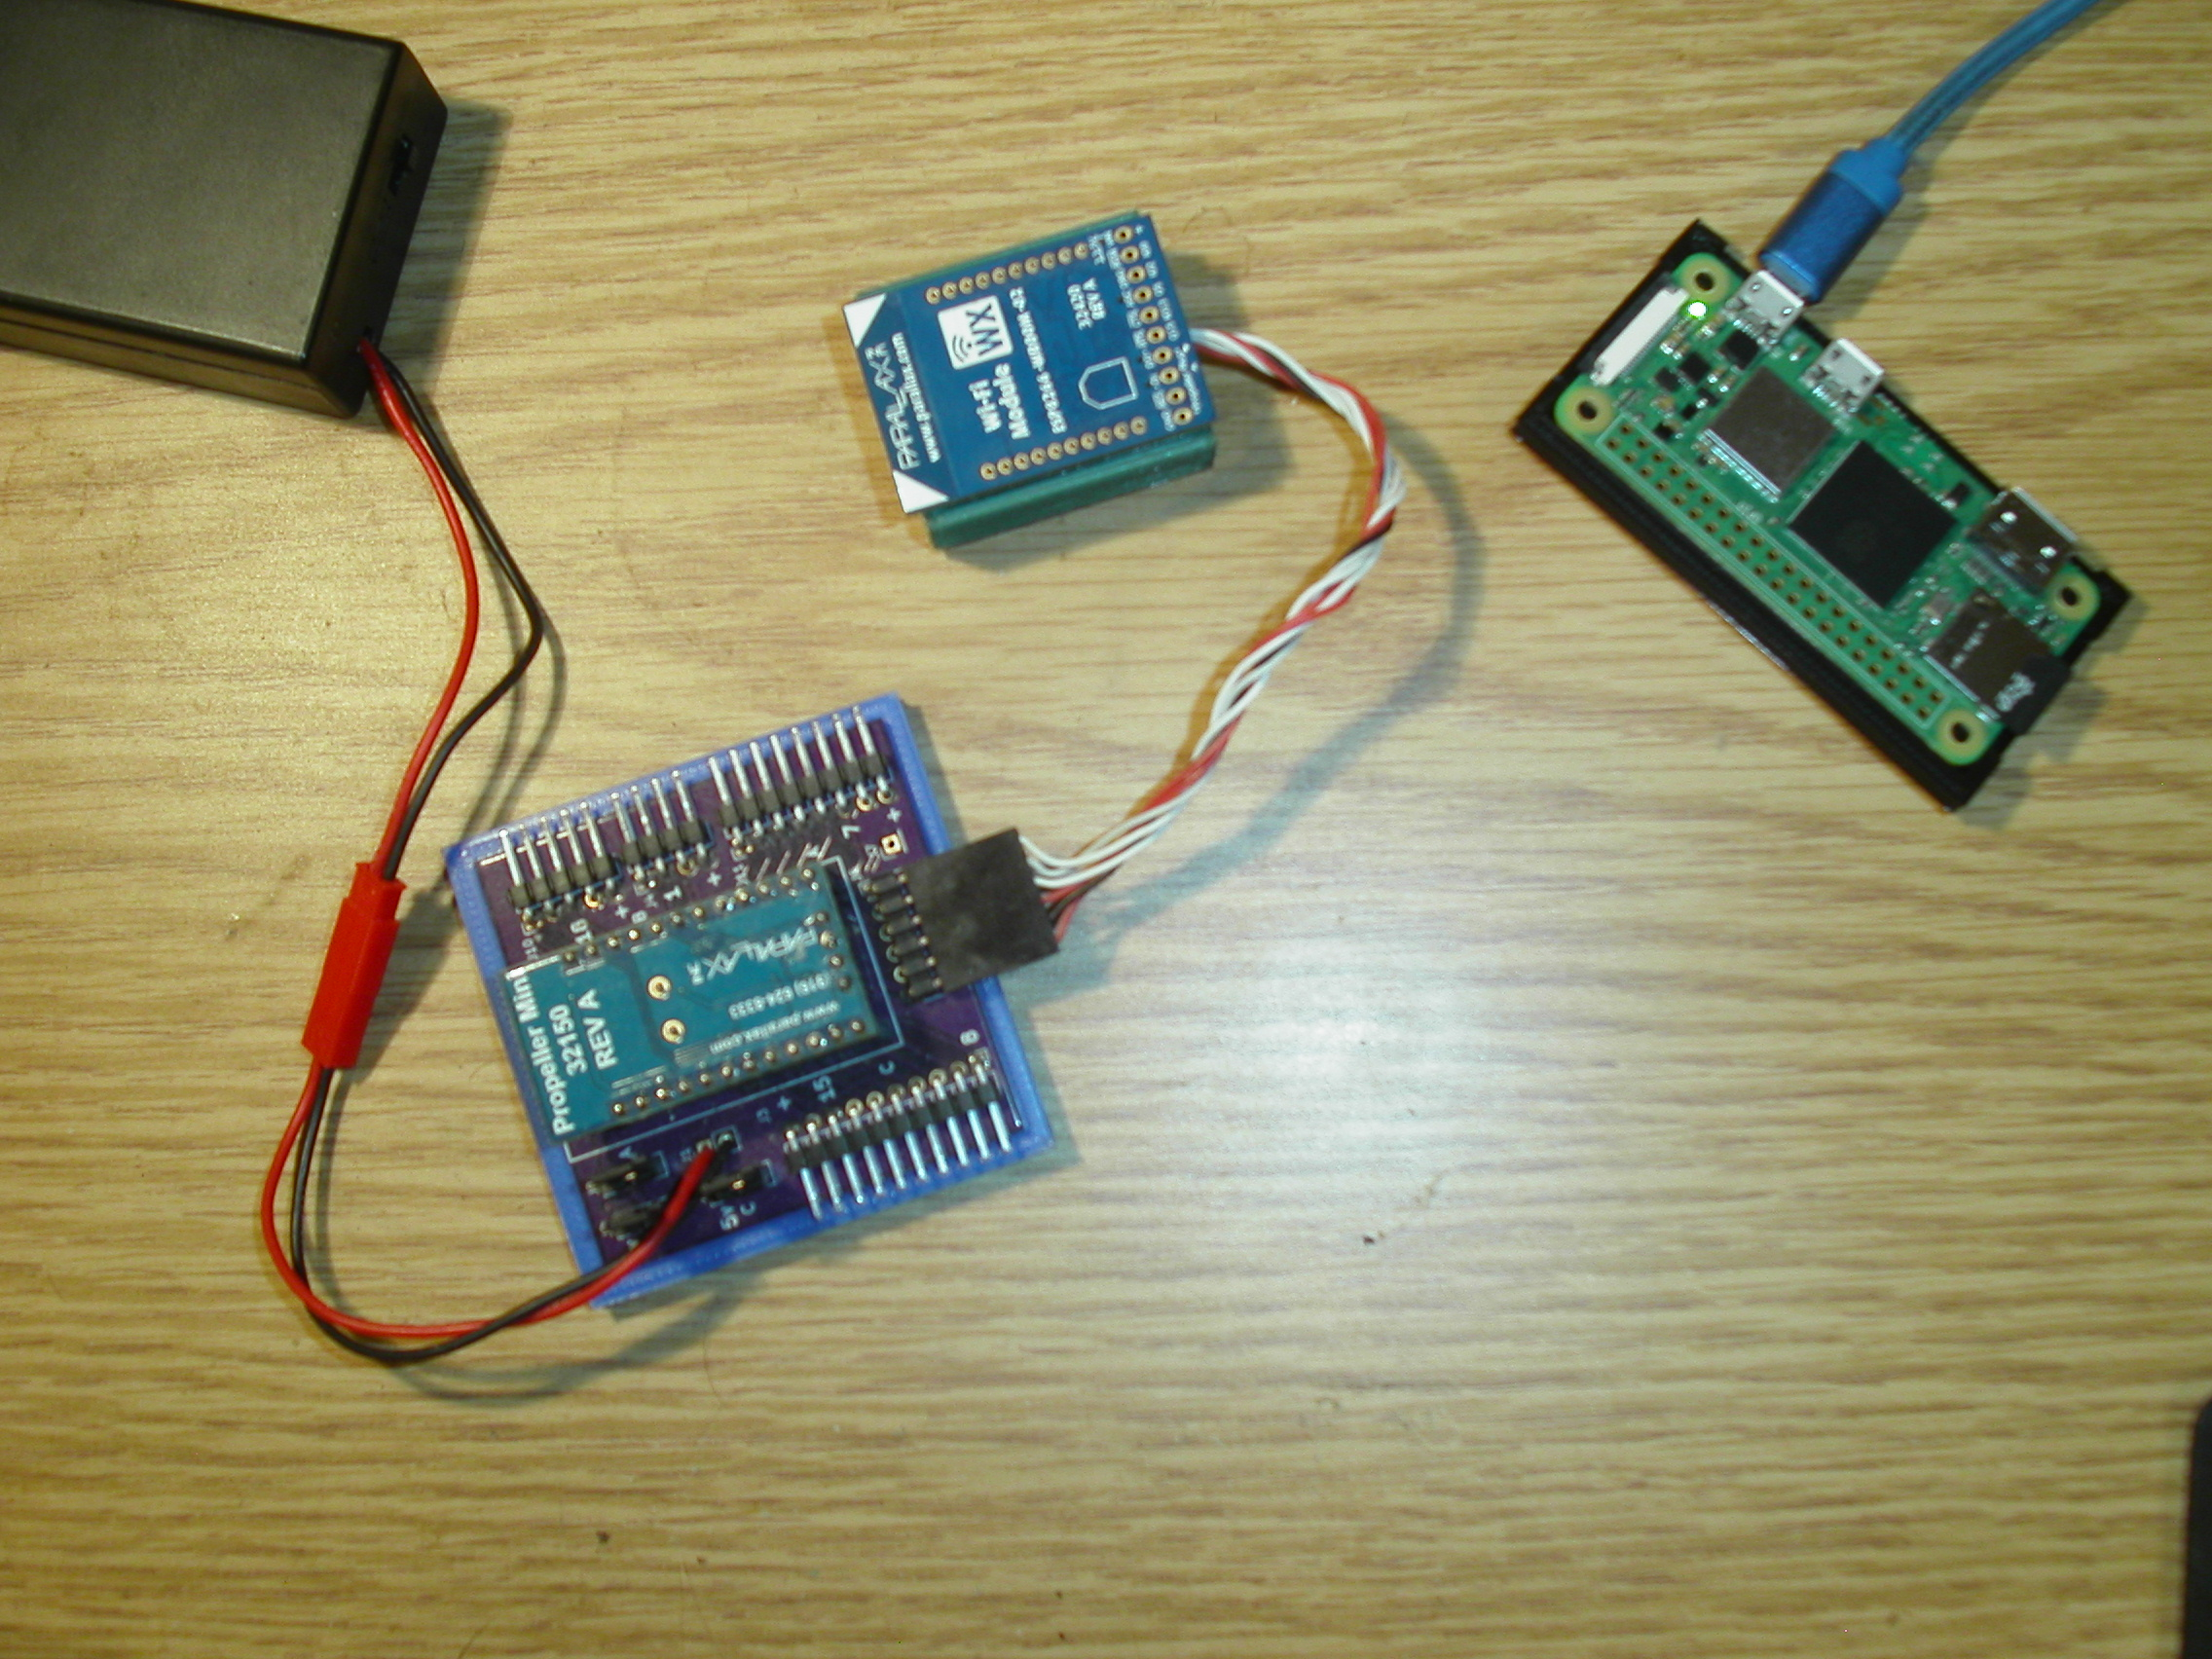
They are about the same size but one uses a lot more power.
First I need a python script to get the data off the P1 sitting in the cold:
import requests

try:
    cnn = requests.get("http://101.1.1.15/weather")
except:
    print("request errored")
else:
#    print(cnn.status_code)
#    print(cnn.content)
    file = open("/var/www/cgi/weather.txt", "a")
    file.write(cnn.content.decode('utf-8'))
    file.write("\n")
    file.close()
    print("ok")
Wow, that was easy. grab the JSON data off the P1 and save it in a file.
Then using crontab have it update every hour.
Now how to display all that data:
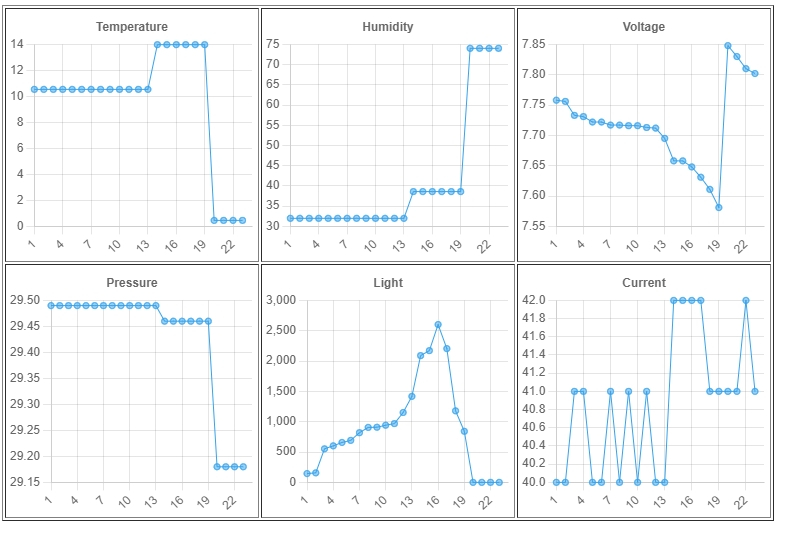
Right, let's use some dynamic graphing tool and let it rip.
On Raspberry Pi I installed Apache2 and configured it to run CGI Python scripts to grab the last 24 records from the Weather file and display the results.
To do that the Python code reads the JSON records and converts them to an array of values which intern is convert back to a JSON object to be used by the charting Javascript.
#!/usr/bin/env python
# _*_ coding: UTF-8 _*_# enable debugging

import cgitb
import json

cgitb.enable()
print("Content-Type: text/html;charset=utf-8\r\n\r\n")

weather = []
temperature = []
humidity = []
pressure = []
light = []
time = []
voltage = []
current = []


file = open("weather.txt")
for x in file:
    weather.append(x)
    if len(weather) > 24:
        weather.pop(1)

#print(weather)

for i in weather:
#    print(i)
    data = json.loads(i)
    x = data.get('temperature') / 100
    temperature.append(x);
    x = data.get('humidity') / 100
    humidity.append(x)
    x = data.get('pressure') / 100
    pressure.append(x)
    light.append(data.get("light"))
    time.append(data.get("time"))
    x = data.get('voltage') / 1000
    voltage.append(x)
    current.append(data.get("current"))

wdata = {}
wdata['temperature'] = temperature
wdata['humidity'] = humidity
wdata['pressure'] = pressure
wdata['light'] = light
wdata['time'] = time
wdata['voltage'] = voltage
wdata['current'] = current

js = json.dumps(wdata)

print(js)
On the fly it also normalized the data for charting.
This is a sample of the JSON object:
{"temperature": [10.54, 10.54, 10.54, 10.54, 10.54, 10.54, 10.54, 10.54, 10.54, 10.54, 10.54, 10.54, 10.54, 13.98, 13.98, 13.98, 13.98, 13.98, 13.98, 0.46, 0.46, 0.46, 0.46], "humidity": [31.99, 31.99, 31.99, 31.99, 31.99, 31.99, 31.99, 31.99, 31.99, 31.99, 31.99, 31.99, 31.99, 38.6, 38.6, 38.6, 38.6, 38.6, 38.6, 74.03, 74.03, 74.03, 74.03], "pressure": [29.49, 29.49, 29.49, 29.49, 29.49, 29.49, 29.49, 29.49, 29.49, 29.49, 29.49, 29.49, 29.49, 29.46, 29.46, 29.46, 29.46, 29.46, 29.46, 29.18, 29.18, 29.18, 29.18], "light": [145, 157, 553, 602, 658, 692, 819, 906, 909, 942, 969, 1152, 1418, 2090, 2172, 2602, 2205, 1179, 842, 0, 0, 0, 0], "time": [1711263652, 1711263820, 1711265647, 1711265941, 1711267190, 1711267269, 1711267731, 1711267975, 1711267996, 1711268163, 1711268246, 1711268720, 1711271615, 1711281533, 1711281654, 1711282909, 1711285204, 1711288216, 1711292122, 1711343535, 1711344420, 1711345598, 1711346302], "voltage": [7.758, 7.756, 7.733, 7.731, 7.722, 7.722, 7.717, 7.717, 7.716, 7.716, 7.713, 7.712, 7.695, 7.658, 7.658, 7.648, 7.631, 7.611, 7.581, 7.848, 7.83, 7.81, 7.802], "current": [40, 40, 41, 41, 40, 40, 41, 40, 41, 40, 41, 40, 40, 42, 42, 42, 42, 41, 41, 41, 41, 42, 41]}Ugly looking isn't it.
I didn't use the time values, but they are included.
To see it for yourself I put my Zero on the web for a little while anyway: Zero Live
Mike
you can get nice and easy graphs by putting the data into an influxdb and showing it with grafana both of which can run on the zero ( I had this up and running for my home automation, admittedly on on rpi3, but it should work on a zero aswell)
Back again with another update.
I thought it was not fair to have the P1 out in the cold so I decided that the P2 should also be there.
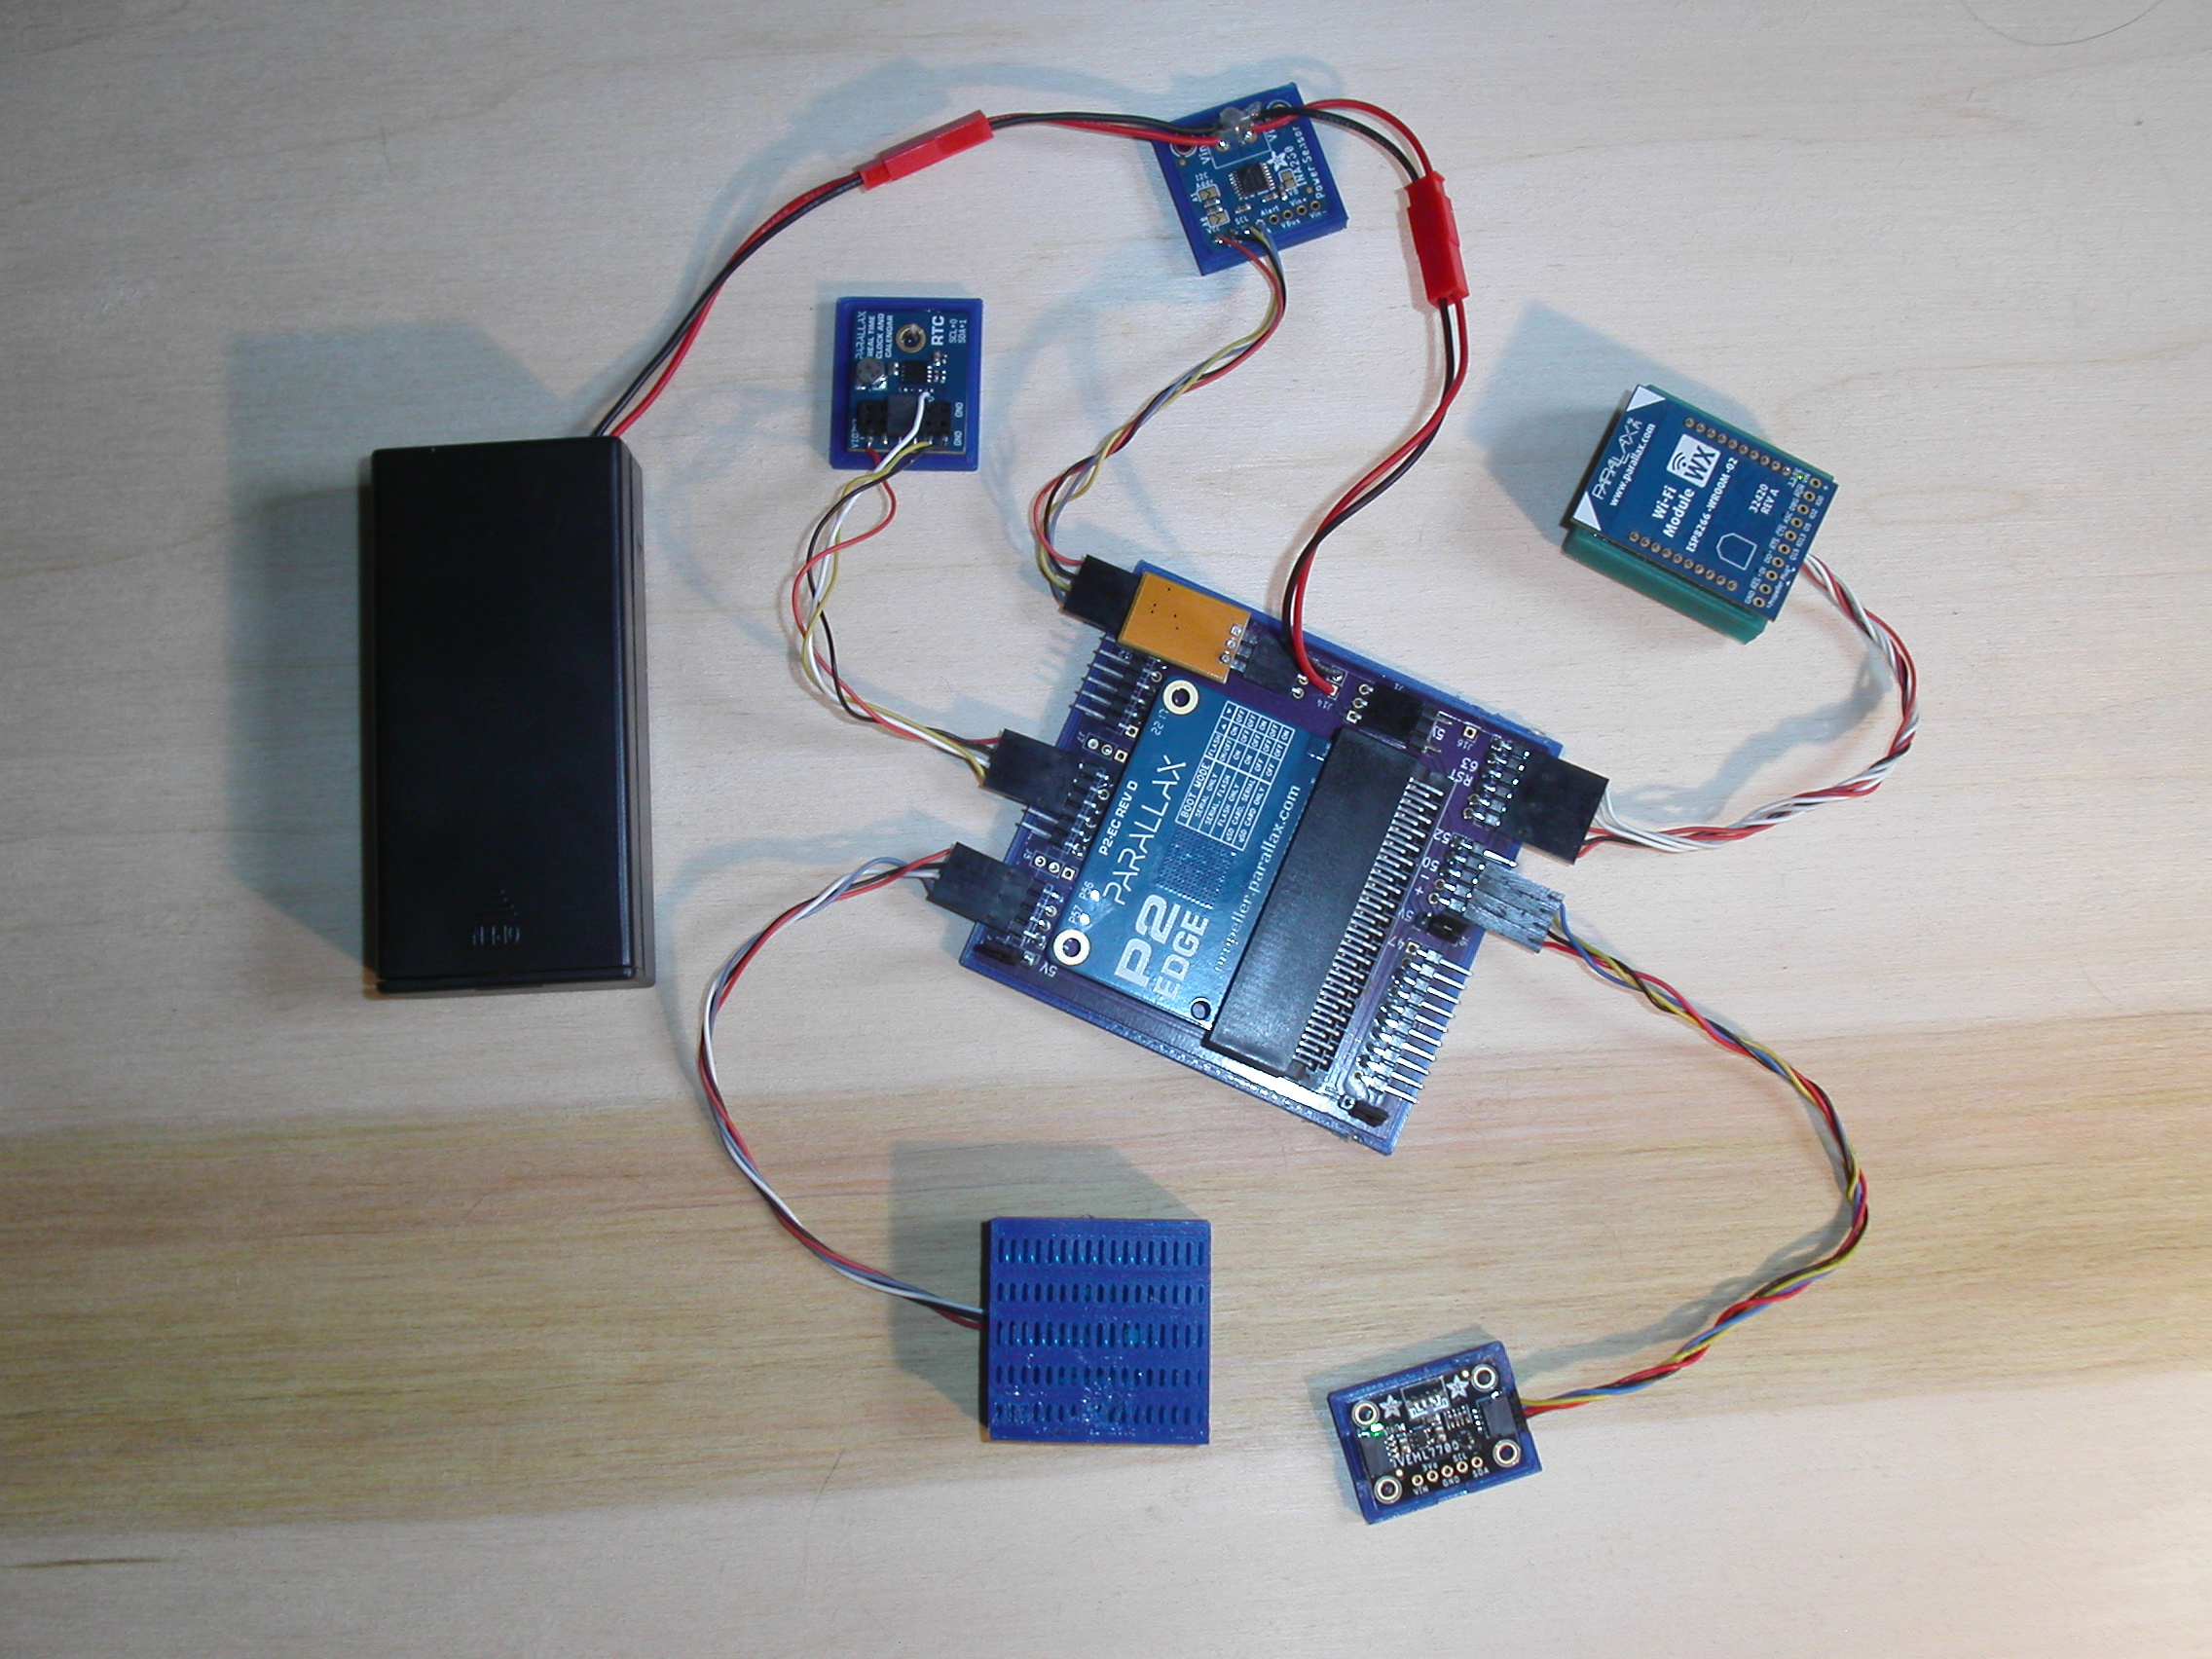
The setup was almost identical except I made some hardware changes.
I also had to write a driver for the P2 RTC board which too a little time.
The weather program procedure wise is about the same.
#include <stdio.h>
#include <propeller.h>
#include <i2c.h>
#include <ina260.h>
#include <veml7700.h>
#include <bme68x.h>
#include <pcf8523.h>
#include <esp8266.h>
#include <json.h>


#define INACLK 8
#define INADTA 9
#define PCFCLK 20
#define PCFDTA 21
#define BMECLK 36
#define BMEDTA 37
#define ESPRX 63
#define ESPTX 62
#define VEMCLK 50
#define VEMDTA 51

uint8_t BME68xRead(uint8_t, uint8_t *, uint16_t len, void *);
uint8_t BME68xWrite(uint8_t, uint8_t *, uint16_t len, void *);
void BME68xWait(uint32_t, void *);

void StartBME(void);
void StartMonitor(void);
void StartClock(void);
void StartLight(void);
int GetEnvironment(float *, float *, float *);


char Buffer[1024];
char Convert[64];
i2c_t *Bme;
time_t tm;
char Request;
int handle;
char dev_addr;
struct bme68x_dev gas_sensor;
struct bme68x_conf conf;
struct bme68x_heatr_conf heatr_conf;
struct bme68x_data data[3];
FILE *esp;


int main(int argc, char** argv)
{
    float t, h, p;
    int v, c, l, i, I;
    int T, H, P;

    memset(Buffer, 0, sizeof(Buffer));

    /* 20Mhz for lower power use */
    _clkset(0x010000fb, 20000000);

    esp8266_Open(ESPRX, ESPTX, 230400);

    StartLight();
    StartClock();
    StartMonitor();
    StartBME();

    handle = esp8266_Listen(HTTP, "/weather");
    if (handle < 0)
        _pinl(56);

    GetEnvironment(&t, &h, &p);

    while (1)
    {
        i = esp8266_Wait(&Request);
        if (Request == 'G')
        {
            I = GetEnvironment(&t, &h, &p);
            v = INA260_getVoltage();
            c = INA260_getCurrent();
            tm = PCF8523_SetDateTime();
            l = VEML7700_GetLux();
            T = t * 100;
            H = h * 100;
            P = p * 100;
            Buffer[0] = 0;
            json_init(Buffer);
            sprintf(Convert, "%d", tm);
            json_putDec("time", Convert);
            sprintf(Convert, "%d", v);
            json_putDec("voltage", Convert);
            sprintf(Convert, "%d", c);
            json_putDec("current", Convert);
            sprintf(Convert, "%d", T);
            json_putDec("temperature", Convert);
            sprintf(Convert, "%d", H);
            json_putDec("humidity", Convert);
            sprintf(Convert, "%d", P);
            json_putDec("pressure", Convert);
            sprintf(Convert, "%d", l);
            json_putDec("light", Convert);
            esp8266_Reply(i, Buffer);
        }

        _waitms(1000);
    }
}

void StartLight()
{
    int i;

    i = VEML7700_Init(VEMCLK, VEMDTA);
    if (i != 1)
    {
        printf("Sensor Not Found\n");
        while (1);
    }

}

void StartMonitor()
{
    int i;

    i = INA260_open(INACLK, INADTA);
    if (i =! 0x5449)
    {
        _pinh(57);
        while (1)
            Sleep(60);
    }

    INA260_configAveraging(7);
    INA260_configCurrent(7);
    INA260_configVoltage(7);
}

void StartClock()
{
    int i;

    i = PCF8523_Init(PCFCLK, PCFDTA);
    if (i < 0)
    {
        printf("Clock not Found\n");
        while (1)
            _waitms(1000);
    }
}

void StartBME()
{
    int rslt;
    float t, h, p;

    Bme = I2C_Init(BMECLK, BMEDTA, I2C_STD);

    dev_addr = BME68X_I2C_ADDR_HIGH;
    gas_sensor.variant_id = BME68X_VARIANT_GAS_LOW;
    gas_sensor.intf = BME68X_I2C_INTF;
    gas_sensor.read = BME68xRead;
    gas_sensor.write = BME68xWrite;
    gas_sensor.delay_us = BME68xWait;
    gas_sensor.amb_temp = 25;
    gas_sensor.intf_ptr = &dev_addr;
    rslt = bme68x_init(&gas_sensor);
    if (rslt != BME68X_OK)
    {
        _pinh(56);
        while (1)
            Sleep(60);
    }

    /* Set the temperature, pressure and humidity settings */
    conf.os_hum = BME68X_OS_16X;
    conf.os_pres = BME68X_OS_1X;
    conf.os_temp = BME68X_OS_2X;
    conf.filter = BME68X_FILTER_OFF;
    conf.odr = BME68X_ODR_NONE;
    rslt = bme68x_set_conf(&conf, &gas_sensor);
    if (rslt != BME68X_OK)
    {
        _pinh(56);
        while (1)
            Sleep(60);
    }

    /* Set the remaining gas sensor settings and link the heating profile */
    heatr_conf.enable = BME68X_ENABLE;

    /* Create a ramp heat waveform in 3 steps */
    heatr_conf.heatr_temp = 300; /* degree Celsius */
    heatr_conf.heatr_dur = 100; /* milliseconds */
    heatr_conf.heatr_temp_prof = NULL;
    heatr_conf.heatr_dur_prof = NULL;
    heatr_conf.profile_len = 0;

    rslt = bme68x_set_heatr_conf(BME68X_FORCED_MODE, &heatr_conf, &gas_sensor);

    /* kick off a reading */
    GetEnvironment(&t, &h, &p);
}

int GetEnvironment(float *temp, float *humidity, float *pressure)
{
    int rslt;
    int delay;
    int f;

    rslt = bme68x_set_op_mode(BME68X_FORCED_MODE, &gas_sensor);
    delay = bme68x_get_meas_dur(BME68X_FORCED_MODE, &conf, &gas_sensor) + (heatr_conf.heatr_dur * 1000);
    gas_sensor.delay_us(delay, gas_sensor.intf_ptr);
    rslt = bme68x_get_data(BME68X_FORCED_MODE, &data, &f, &gas_sensor);
    *temp = data[0].temperature;
    *humidity = data[0].humidity;
    *pressure = data[0].pressure/3386.4;
}

uint8_t BME68xRead(uint8_t reg_addr, uint8_t *data, uint16_t len, void *intf_ptr)
{
    int i;

    uint8_t dev_addr = *(uint8_t*)intf_ptr;

    i = I2C_In(Bme, dev_addr, reg_addr, 1, data, len);

    if (i > 0)
        return 0;
    else
        return -1;
}

uint8_t BME68xWrite(uint8_t reg_addr, uint8_t *data, uint16_t len, void *intf_ptr)
{
    int i;

    uint8_t dev_addr = *(uint8_t*)intf_ptr;

    i = I2C_Out(Bme, dev_addr, reg_addr, 1, data, len);

    if (i > 0)
        return 0;
    else
        return -1;
}

void BME68xWait(uint32_t period, void *intf_ptr)
{
    _waitus(period);
}
I like coding in Visual Studio as it looks things up for me so I can tell if I'm making a mistake.
As it turns out the P2 running at lower speed, 20Mhz, uses less power than the P1.
These two projects help me squash some bugs in my libraries that went unchecked.
Mike