@Rsadeika I take no credit for this it is a modified version from the repository of Amin Sedighfar, linked above, adapted for the microbit.
Looking at the datasheet on the side of the board that has the battery the pins are labelled VCC GND I/O nc SCLK CE, the program uses pin12 = SCLK / pin13 = I/O / pin14 = CE.
I have tested it and it works on a plain ol ds1302 with crystal, use the following 2 files on your microbit.
main.py
from microbit import *
from time import sleep
from ds1302 import DS1302

ds = DS1302(pin12, pin13, pin14)  # SCLK, I/O, CE


def set_datetime():
     ds.date_time([2023, 1, 13, 5, 2, 14, 0, 0]) # set datetime.

set_datetime()

while True:

    current = ds.date_time()
    formatted_date = "{:02d}/{:02d}/{:04d}".format(current[1], current[2], current[0])
    formatted_time = "{:02d}:{:02d}:{:02d}".format(current[4], current[5], current[6])

    print(formatted_time,"     ",formatted_date)


    sleep(1)
ds1302.py
from microbit import *

DS1302_REG_SECOND = (0x80)
DS1302_REG_MINUTE = (0x82)
DS1302_REG_HOUR   = (0x84)
DS1302_REG_DAY    = (0x86)
DS1302_REG_MONTH  = (0x88)
DS1302_REG_WEEKDAY= (0x8A)
DS1302_REG_YEAR   = (0x8C)
DS1302_REG_WP     = (0x8E)
DS1302_REG_CTRL   = (0x90)
DS1302_REG_RAM    = (0xC0)

class DS1302:
    def __init__(self, clk, dio, cs):
        self.clk = clk
        self.dio = dio
        self.cs = cs

    def _dec2hex(self, dat):
        return (dat//10) * 16 + (dat % 10)

    def _hex2dec(self, dat):
        return (dat//16) * 10 + (dat % 16)

    def _write_byte(self, dat):
        for i in range(8):
            val=(dat >> i) & 1
            self.dio.write_digital(val)
            self.clk.write_digital(1)
            self.clk.write_digital(0)

    def _read_byte(self):
        d = 0
        for i in range(8):
            d = d | (self.dio.read_digital() << i)
            self.clk.write_digital(1)
            self.clk.write_digital(0)
        return d

    def _get_reg(self, reg):
        self.cs.write_digital(1)
        self._write_byte(reg)
        t = self._read_byte()
        self.cs.write_digital(0)
        return t

    def _set_reg(self, reg, dat):
        self.cs.write_digital(1)
        self._write_byte(reg)
        self._write_byte(dat)
        self.cs.write_digital(0)

    def _wr(self, reg, dat):
        self._set_reg(DS1302_REG_WP, 0)
        self._set_reg(reg, dat)
        self._set_reg(DS1302_REG_WP, 0x80)

    def start(self):
        t = self._get_reg(DS1302_REG_SECOND + 1)
        self._wr(DS1302_REG_SECOND, t & 0x7f)

    def stop(self):
        t = self._get_reg(DS1302_REG_SECOND + 1)
        self._wr(DS1302_REG_SECOND, t | 0x80)

    def second(self, second=None):
        if second == None:
            return self._hex2dec(self._get_reg(DS1302_REG_SECOND+1)) % 60
        else:
            self._wr(DS1302_REG_SECOND, self._dec2hex(second % 60))

    def minute(self, minute=None):
        if minute == None:
            return self._hex2dec(self._get_reg(DS1302_REG_MINUTE+1))
        else:
            self._wr(DS1302_REG_MINUTE, self._dec2hex(minute % 60))

    def hour(self, hour=None):
        if hour == None:
            return self._hex2dec(self._get_reg(DS1302_REG_HOUR+1))
        else:
            self._wr(DS1302_REG_HOUR, self._dec2hex(hour % 24))

    def weekday(self, weekday=None):
        if weekday == None:
            return self._hex2dec(self._get_reg(DS1302_REG_WEEKDAY+1))
        else:
            self._wr(DS1302_REG_WEEKDAY, self._dec2hex(weekday % 8))

    def day(self, day=None):
        if day == None:
            return self._hex2dec(self._get_reg(DS1302_REG_DAY+1))
        else:
            self._wr(DS1302_REG_DAY, self._dec2hex(day % 32))

    def month(self, month=None):
        if month == None:
            return self._hex2dec(self._get_reg(DS1302_REG_MONTH+1))
        else:
            self._wr(DS1302_REG_MONTH, self._dec2hex(month % 13))

    def year(self, year=None):
        if year == None:
            return self._hex2dec(self._get_reg(DS1302_REG_YEAR+1)) + 2000
        else:
            self._wr(DS1302_REG_YEAR, self._dec2hex(year % 100))

    def date_time(self, dat=None):
        if dat == None:
            return [self.year(), self.month(), self.day(), self.weekday(), self.hour(), self.minute(), self.second()]
        else:
            self.year(dat[0])
            self.month(dat[1])
            self.day(dat[2])
            self.weekday(dat[3])
            self.hour(dat[4])
            self.minute(dat[5])
            self.second(dat[6])

    def ram(self, reg, dat=None):
        if dat == None:
            return self._get_reg(DS1302_REG_RAM + 1 + (reg % 31)*2)
        else:
            self._wr(DS1302_REG_RAM + (reg % 31)*2, dat)
It used the DS3231 RTC which is I2C (two wires), more accurate, and has an internal temperature sensor, and a small EEPROM on the module. I think this is the module @dgately demonstrating because Parallax picked them up for my I2C for the P2 presentation a couple years ago. The other advantage of I2C is that you can add more devices without giving up any additional pins. With SPI, you need a CS\ pin for every device.
I was supposed to get my package from Parallax last week, but USPS had some delays. I finally got the DS3231, micro:bit, and the Edge I/O adapter. I got it all assembled and running.
I broke out the dgately RTC code so I could get a good idea of what is going on before I start to rebuild my baseSta proj code. The one thing I did learn so far is that you have to have the RTC battery inserted in order to have the unit working.
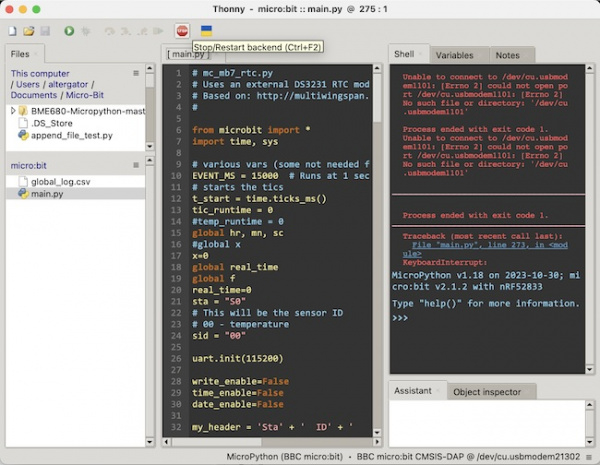
When I tried to use my new micro:bit with Thonny, I could not get a program to run. I had to fire up Python Microbit.org IDE, and run there example code, then when I started up Thonny I was able to run a program. Is there a special command in Thonny that handles the bootloader, for first time use of a new micro:bit.
Ray
from microbit import *
import time, sys, os

uart.init(115200)

addr = 0x68
buf = bytearray(7)

# convert RTC values for logging
def bcd2dec(bcd):
    return (((bcd & 0xf0) >> 4) * 10 + (bcd & 0x0f))

def dec2bcd(dec):
    tens, units = divmod(dec, 10)
    return (tens << 4) + units


# set the external battery backed-up RTC date & time
def set_time_rtc():
    global time_enable
    global hr, mn, sc

    inDay = input("Day(xx): ")
    inMonth = input("Month(xx): ")
    inYear = input("Year(xxxx): ")
    inWkDay = input("Day of the week (1-7, Sunday is 1): ")
    inHour = input("Hour(xx): ")
    inMin = input("Minutes(xx): ")
    inSec = input("Seconds(xx): ")

    hr = int(inHour)
    mn = int(inMin)
    sc = int(inSec)
    yr = int(inYear)
    mt = int(inMonth)
    dd = int(inDay)
    wd = int(inWkDay)

    # prepare & write to the external RTC
    t = bytes([sc,mn,hr,wd,dd,mt,yr-2000])
    for i in range(0,7):
        i2c.write(addr, bytes([i,dec2bcd(t[i])]), repeat=False)

    #print("%.2d:%.2d:%.2d" % (hr, mn, sc))
    #print("%.2d/%.2d/%.2d" % (mt,dd,yr))

    #date_enable==True
    #time_enable==True
def get_rtc():

    # print the current RTC data
    i2c.write(addr, b'\x00', repeat=False)
    buf = i2c.read(addr, 7, repeat=False)
    ss = bcd2dec(buf[0])
    mm = bcd2dec(buf[1])
    if buf[2] & 0x40:
        hh = bcd2dec(buf[2] & 0x1f)
        if buf[2] & 0x20:
            hh += 12
    else:
        hh = bcd2dec(buf[2])
    wday = buf[3]
    DD = bcd2dec(buf[4])
    MM = bcd2dec(buf[5] & 0x1f)
    YY = bcd2dec(buf[6])+2000
    print(str(MM) + "/" + str(DD) + "/" + str(YY) + " - " + str(hh) + ":" + str(mm) + ":" + str(ss) + " day: " + str(wday))


def menu():
    print("       System Menu")
    print("quit - End the program.")
    print("setrtc - Set external RTC date & time.")
    print("getrtc - Display external RTC date & time .")
    uart.write(">> ")


print("Sta 0 RTC")
uart.write(">> ")
menu()


while True:
    inbuff=""
    if uart.any():
        inbuff=uart.read().strip().decode()
        uart.write(">> ")
# QUIT
        if inbuff == "quit":
            #f.close()
            print("Program has ended.")
            sys.exit()
# SETRTC
        elif inbuff == "setrtc":
            set_time_rtc()
            uart.write(">> ")

# GETRTC
        elif inbuff == "getrtc":
            get_rtc()
            uart.write(">> ")
        else:
           uart.write("???")
           uart.write("\n>> ")


sleep(100)
When I tried to use my new micro:bit with Thonny, I could not get a program to run. I had to fire up Python Microbit.org IDE, and run there example code, then when I started up Thonny I was able to run a program.
>
Is there a special command in Thonny that handles the bootloader, for first time use of a new micro:bit.
Well, Yes & No... Not so much a special command (in my experience), but there are some actions that might help. Thonny appears to be less able to get the attention of the Micro:Bit at times, versus other apps, the console, etc.
1
When you program a Micro:Bit, by saving your micropython code as "main.py" on the device, that program will execute whenever the Micro:Bit is powered ON or reset. If the currently saved "main.py" executes a tight loop, Thonny may have difficulty in interrupting the running code. When I first launch Thonny with an atteched Micro:Bit, I click the STOP sign button, if it is active until the Shell window responds with micropython's REPL, and its ">>>" prompt.
2
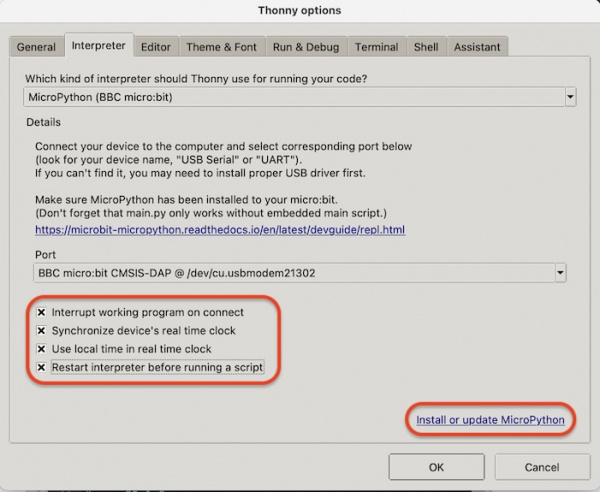
If the Micro:Bit's port is showing up in Thonny Options (from the Configure Interpreter menu), examine the checkbox options. They may have effect on how Thonny 'wakes' the device:
3
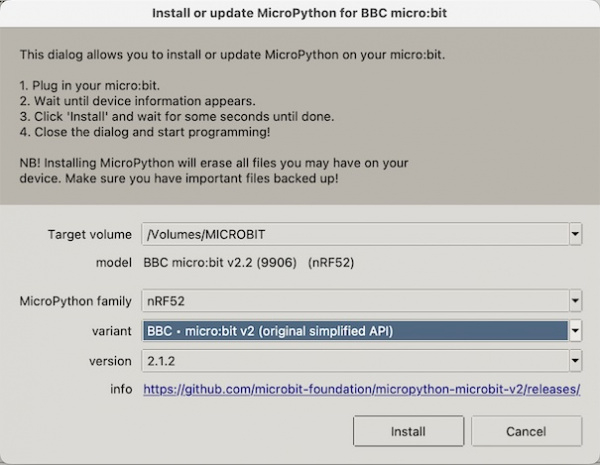
Micro:Bit's micropython version may also need an update...
I have been playing around with the micro:bit radio, checking out distance coverage in my house. It seems that I only get up to about 35 feet, that is passing through walls and things, plus the micro:bit module has to be about 5 feet above the floor.
Below is a program to see if the radio part would run with some I/O, the radio part works but the I/O part does not. Thonny shows a problem with an interrupt. Not sure how to get around this problem. I see that the '@run_every()' seems to work, but will that be a problem with other code. Anybody have any better ideas.
Ray
# test_radio.py
#
#
from microbit import *
import sys, radio

uart.init(115200)

radio.config(group=23)
radio.on()

@run_every(s=2)
def do_radio():
    radio.send("01")
    message = radio.receive()
    if message == "None":
        print("")
    else:
        display.scroll(str(message))

def menu():
    print("       System Menu")
    uart.write(">> ")


uart.write("Radio test.\n>> ")
menu()

while True:
    inbuff=""
    if uart.any():
        inbuff=uart.read().strip().decode()
        uart.write(">> ")
        if inbuff == "quit":
            sys.exit()

        else:
           uart.write("???")
           uart.write("\n>> ")


    sleep(300)
@Rsadeika said:
Below is a program to see if the radio part would run with some I/O, the radio part works but the I/O part does not. Thonny shows a problem with an interrupt. Not sure how to get around this problem. I see that the '@run_every()' seems to work, but will that be a problem with other code. Anybody have any better ideas.
When you say the I/O part does not work, what I/O specific code do you mean? What part of your code example is I/O based? What is the expected output that you are not seeing?
Here's some code that uses the radios of 2 Micro:Bits and sends temperature (in Fahrenheit) from one to the other. Press the 'A' button and the Micro:Bit shows "<<<" while it sends it's internal temperature data via radio for display on the other Micro:Bit's LED matrix. Pressing the 'B' button will display its own temperature data on its LED matrix. While the Micro:Bits are idling, they display a pulsing graphic on its LED matrix, just so you know it is alive:
# radio receive/transmit
from microbit import *
import radio

radio.config(group=23)
radio.on()

while True:
    message = radio.receive()
    if message:
        display.scroll(message)    # display the other Micro:Bit's temperature
        message = ""
    else:
        if button_a.was_pressed():         # send temperature to other Micro:Bit
            temp=(((1.8*temperature())+32)-4.5 )
            temp_string = str("%.2fF" % temp)
            radio.send(temp_string)
            display.scroll('<<<')
        else:
            if button_b.was_pressed():     # display local temperature
                temp=(((1.8*temperature())+32)-4.5 )
                temp_string = str("%.2fF" % temp)
                display.scroll(temp_string)
            else:
                display.show(Image('00300:'     # display some idle-time graphics
                                   '03630:'
                                   '36963:'
                                   '03630:'
                                   '00300'))
                sleep(200)
                display.show(Image('00300:'
                                   '03930:'
                                   '39693:'
                                   '03930:'
                                   '00300'))
                sleep(200)
                display.show(Image('00900:'
                                   '09690:'
                                   '96369:'
                                   '09690:'
                                   '00900'))
                sleep(200)
                display.show(Image('00300:'
                                   '03930:'
                                   '39693:'
                                   '03930:'
                                   '00300'))
        sleep(200)
I have another example that sends RTC data as well...
The below segment is what I refer to as I/O. When the program is running, and I type in 'quit' , the program just hangs, at least that part of the program. I think the radio part was still working.
Ray
while True:
    inbuff=""
    if uart.any():
        inbuff=uart.read().strip().decode()
        uart.write(">> ")
        if inbuff == "quit":
            sys.exit()

        else:
           uart.write("???")
           uart.write("\n>> ")


    sleep(300)
@Rsadeika said:
The below segment is what I refer to as I/O. When the program is running, and I type in 'quit' , the program just hangs, at least that part of the program. I think the radio part was still working.
I see...
There may be 2 issues with the do_radio() function that runs every 2 seconds (via @run_every(s=2)):
That function contains "display.scroll(str(message))" which takes more than 2 seconds to complete for even a single character of output to the LED matrix. The interrupt to exec the function to its completion steps on itself, as far as I can tell (I'm no expert on this, so just my $.02).
The function tries to send & receive via the radio every 2 seconds. It's possible that the interrupt has effect on the radio's send & receive operation, as well as the #1 case, above. The do_radio() function might be better off just checking radio.receive() result and setting a flag for the main loop to actually access the input buffer. Or, it may just set flags and let the main loop do all of the radio interaction on the flags being set.
Also the line: if message == "None": needs to be if message == None: ... message = radio.receive() does not return the text "None", it returns None, basically like a numeric value.
EDIT: I've fiddled with removing much of the do_radio() function content and still get an exception error on quit. This might be a Thonny issue. Unfortunately, the backend.log does not show a conclusive reason for the exception...
PROBLEM IN THONNY'S BACK-END: Exception while handling 'Run' (thonny.plugins.micropython.mp_back.ManagementError: Command output was not empty).
See Thonny's backend.log for more info.
You may need to press "Stop/Restart" or hard-reset your MicroPython device and try again.

Process ended with exit code 1.
It is back to a basic build, below the program runs, but I can only com with one micro:bit at a time. It works really well when the other micro:bit is not on. I tried different code segments, but I could not find a solution for having the baseSta talk to two micro:bits, while both were on.
I am starting to see the limitations of the micro:bit as it pertains to my concept of having a NoT solution. I might have to start looking at a different approach, maybe something like a Sparkfun MicroMod setup. To bad the MicroMod is not built to accept a P2 Edge.
Ray
# testit.py
from microbit import *
import sys, radio

uart.init(115200)

#sta_01 = (group = 23)
radio.config(group=23)
radio.on()

def sta01():
    #radio.config(group = 23)
    #radio.on()
    radio.send("1")
    message = radio.receive()
    print(message)
    #radio.off()
    uart.write(">> ")

def sta02():
    #radio.config(group=24)
    #radio.on()
    radio.send("2")
    message = radio.receive()
    print(message)
    #radio.off()
    uart.write(">> ")

def menu():
    print("       System Menu")
    print("quit - End the program.")
    print("sta01 - Reach out to Sta01")
    print("sta02 - Reach out to Sta02")
    uart.write(">> ")

print("baseSta 0")
uart.write(">> ")

menu()

############### Main I/O ###############
while True:
    inbuff=""
    if uart.any():
        inbuff=uart.read().strip().decode()
        uart.write(">> ")

# QUIT
        if inbuff == "quit":
            #f.close()
            radio.off()
            print("Program has ended.")
            sys.exit()
        elif inbuff == "sta01":
            sta01()
        elif inbuff == "sta02":
            sta02()
        else:
           uart.write("???")
           uart.write("\n>> ")


    sleep(100)
@Rsadeika said:
I am starting to see the limitations of the micro:bit as it pertains to my concept of having a NoT solution. I might have to start looking at a different approach, maybe something like a Sparkfun MicroMod setup. To bad the MicroMod is not built to accept a P2 Edge.
Don't give up on the Micro:Bit just yet... I have a 3rd on its way and I'll test some solutions, soon.
BTW: I have had success in the past using ESP32 devices, which are also cheap, work well with micropython, have WiFi built-in and many of the same attributes as the Micro:Bit. But, that's another option only if the Micro:Bit radio does not suffice...
This example uses the radios of 3 MicroBits to communicate temperature values between them...
Using Thonny as the IDE, save a version of this code on each of 3 MicroBits. You'll need to uncomment just 1 of the board options before saving on each MicroBit (see lines 9, 10, 11 in the code) after uncommenting just one of the choices per MicroBit. Save a copy of the script as "main.py" on each MicroBit, in Thonny. I use the batteries on 2 of the MicroBits and keep 1 running in Thonny to allow a view of the shell output.
The code displays an animated star-flash while idle, waiting for button presses and messages from the other MicroBits:
When the right-side button is pressed, any MicroBit will display its current temperature (the MCU's temp), and then returns to the idle animation.
When the left-side button is pressed, any MicroBit sends its board number (ex: '-1-') and temperature to the other MicroBits for their display and then returns to the idle animation.
When the MicroBit receives a message from one of the other MicroBits, it scrolls that board's number (ex: '-2-') and its temperature. It also returns to display the idle animation.
Note:All MicroBits receive 'all' messages. It's up to a receiving MicroBit to inspect the incoming message to determine which MicroBit the message came from.
# radioTranceiver.py
# Micro:Bit radio receive/transmit example
# sends & receives temperature data between Micro:Bits
#
from microbit import *
import radio

# uncomment one of the following for each MicroBit
board = 1     # MicroBit #1
#board = 2    # MicroBit #2
#board = 3    # MicroBit #3

radio.config(group=23)
radio.on()

### MAIN LOOP ###
while True:
    message = radio.receive()
    if message:      # message from other MicroBit?
        display.scroll(message)  # scroll the message
        message = ""
    else:
        if button_a.was_pressed():      # left button
            # send converted temperature to other Micro:Bit
            temp=(((1.8*temperature())+32)-4.5 )
            temp_string = str("-%d- " % board) + str("%.2fF" % temp)
            radio.send(temp_string)
            display.scroll('<<<')   # a message has been sent!
        else:
            if button_b.was_pressed():   # right button
                 # scroll converted local temperature
                temp=(((1.8*temperature())+32)-4.5 )
                temp_string = str("%.2fF" % temp)
                display.scroll(temp_string)
            else:
                # display some idle-time graphics
                display.show(Image('00300:'
                                   '03630:'
                                   '36963:'
                                   '03630:'
                                   '00300'))
                sleep(200)
                display.show(Image('00300:'
                                   '03930:'
                                   '39693:'
                                   '03930:'
                                   '00300'))
                sleep(200)
                display.show(Image('00900:'
                                   '09690:'
                                   '96369:'
                                   '09690:'
                                   '00900'))
                sleep(200)
                display.show(Image('00300:'
                                   '03930:'
                                   '39693:'
                                   '03930:'
                                   '00300'))
#                sleep(300)     # not needed?

        sleep(200)
and... Golden State just beat Phoenix, as I send this post
I still have not given up on the micro:bit. I had to solve some problems with my other project. At the moment I have the micro:bit boards scrolling the temperature where it is placed, no radio transmitting at the moment. Instead of having one of the micro:bit boards as a base station, I might try having them set up in a relay scenario. Still more to think about.


Comments
@Rsadeika it seems you might have the SKU 29125 which the docs say is a SPI interface if so you don't need an I2C connection for your rtc.
I also found a micro python library module that bit bangs the SPI using the 3 wire mode, worth checking out maybe.
https://github.com/Amin-Sedighfar/ESP-MicroPython/tree/main/Date&Time
@Rsadeika I take no credit for this it is a modified version from the repository of Amin Sedighfar, linked above, adapted for the microbit.
Looking at the datasheet on the side of the board that has the battery the pins are labelled VCC GND I/O nc SCLK CE, the program uses pin12 = SCLK / pin13 = I/O / pin14 = CE.
I have tested it and it works on a plain ol ds1302 with crystal, use the following 2 files on your microbit.
main.py
from microbit import * from time import sleep from ds1302 import DS1302 ds = DS1302(pin12, pin13, pin14) # SCLK, I/O, CE def set_datetime(): ds.date_time([2023, 1, 13, 5, 2, 14, 0, 0]) # set datetime. set_datetime() while True: current = ds.date_time() formatted_date = "{:02d}/{:02d}/{:04d}".format(current[1], current[2], current[0]) formatted_time = "{:02d}:{:02d}:{:02d}".format(current[4], current[5], current[6]) print(formatted_time," ",formatted_date) sleep(1)ds1302.py
from microbit import * DS1302_REG_SECOND = (0x80) DS1302_REG_MINUTE = (0x82) DS1302_REG_HOUR = (0x84) DS1302_REG_DAY = (0x86) DS1302_REG_MONTH = (0x88) DS1302_REG_WEEKDAY= (0x8A) DS1302_REG_YEAR = (0x8C) DS1302_REG_WP = (0x8E) DS1302_REG_CTRL = (0x90) DS1302_REG_RAM = (0xC0) class DS1302: def __init__(self, clk, dio, cs): self.clk = clk self.dio = dio self.cs = cs def _dec2hex(self, dat): return (dat//10) * 16 + (dat % 10) def _hex2dec(self, dat): return (dat//16) * 10 + (dat % 16) def _write_byte(self, dat): for i in range(8): val=(dat >> i) & 1 self.dio.write_digital(val) self.clk.write_digital(1) self.clk.write_digital(0) def _read_byte(self): d = 0 for i in range(8): d = d | (self.dio.read_digital() << i) self.clk.write_digital(1) self.clk.write_digital(0) return d def _get_reg(self, reg): self.cs.write_digital(1) self._write_byte(reg) t = self._read_byte() self.cs.write_digital(0) return t def _set_reg(self, reg, dat): self.cs.write_digital(1) self._write_byte(reg) self._write_byte(dat) self.cs.write_digital(0) def _wr(self, reg, dat): self._set_reg(DS1302_REG_WP, 0) self._set_reg(reg, dat) self._set_reg(DS1302_REG_WP, 0x80) def start(self): t = self._get_reg(DS1302_REG_SECOND + 1) self._wr(DS1302_REG_SECOND, t & 0x7f) def stop(self): t = self._get_reg(DS1302_REG_SECOND + 1) self._wr(DS1302_REG_SECOND, t | 0x80) def second(self, second=None): if second == None: return self._hex2dec(self._get_reg(DS1302_REG_SECOND+1)) % 60 else: self._wr(DS1302_REG_SECOND, self._dec2hex(second % 60)) def minute(self, minute=None): if minute == None: return self._hex2dec(self._get_reg(DS1302_REG_MINUTE+1)) else: self._wr(DS1302_REG_MINUTE, self._dec2hex(minute % 60)) def hour(self, hour=None): if hour == None: return self._hex2dec(self._get_reg(DS1302_REG_HOUR+1)) else: self._wr(DS1302_REG_HOUR, self._dec2hex(hour % 24)) def weekday(self, weekday=None): if weekday == None: return self._hex2dec(self._get_reg(DS1302_REG_WEEKDAY+1)) else: self._wr(DS1302_REG_WEEKDAY, self._dec2hex(weekday % 8)) def day(self, day=None): if day == None: return self._hex2dec(self._get_reg(DS1302_REG_DAY+1)) else: self._wr(DS1302_REG_DAY, self._dec2hex(day % 32)) def month(self, month=None): if month == None: return self._hex2dec(self._get_reg(DS1302_REG_MONTH+1)) else: self._wr(DS1302_REG_MONTH, self._dec2hex(month % 13)) def year(self, year=None): if year == None: return self._hex2dec(self._get_reg(DS1302_REG_YEAR+1)) + 2000 else: self._wr(DS1302_REG_YEAR, self._dec2hex(year % 100)) def date_time(self, dat=None): if dat == None: return [self.year(), self.month(), self.day(), self.weekday(), self.hour(), self.minute(), self.second()] else: self.year(dat[0]) self.month(dat[1]) self.day(dat[2]) self.weekday(dat[3]) self.hour(dat[4]) self.minute(dat[5]) self.second(dat[6]) def ram(self, reg, dat=None): if dat == None: return self._get_reg(DS1302_REG_RAM + 1 + (reg % 31)*2) else: self._wr(DS1302_REG_RAM + (reg % 31)*2, dat)If you decide you need more pins, consider switching to this module
-- https://www.parallax.com/product/ds3231-at24c32-real-time-clock-module/
It used the DS3231 RTC which is I2C (two wires), more accurate, and has an internal temperature sensor, and a small EEPROM on the module. I think this is the module @dgately demonstrating because Parallax picked them up for my I2C for the P2 presentation a couple years ago. The other advantage of I2C is that you can add more devices without giving up any additional pins. With SPI, you need a CS\ pin for every device.
Yes, that's the module that is supported in the code on Post #29... It was simple to set up and there was micropython sample code available.
Didn't even know about the small EEPROM... I'll have to try out some code on that, as well!
dgately
I was supposed to get my package from Parallax last week, but USPS had some delays. I finally got the DS3231, micro:bit, and the Edge I/O adapter. I got it all assembled and running.
I broke out the dgately RTC code so I could get a good idea of what is going on before I start to rebuild my baseSta proj code. The one thing I did learn so far is that you have to have the RTC battery inserted in order to have the unit working.
When I tried to use my new micro:bit with Thonny, I could not get a program to run. I had to fire up Python Microbit.org IDE, and run there example code, then when I started up Thonny I was able to run a program. Is there a special command in Thonny that handles the bootloader, for first time use of a new micro:bit.
Ray
from microbit import * import time, sys, os uart.init(115200) addr = 0x68 buf = bytearray(7) # convert RTC values for logging def bcd2dec(bcd): return (((bcd & 0xf0) >> 4) * 10 + (bcd & 0x0f)) def dec2bcd(dec): tens, units = divmod(dec, 10) return (tens << 4) + units # set the external battery backed-up RTC date & time def set_time_rtc(): global time_enable global hr, mn, sc inDay = input("Day(xx): ") inMonth = input("Month(xx): ") inYear = input("Year(xxxx): ") inWkDay = input("Day of the week (1-7, Sunday is 1): ") inHour = input("Hour(xx): ") inMin = input("Minutes(xx): ") inSec = input("Seconds(xx): ") hr = int(inHour) mn = int(inMin) sc = int(inSec) yr = int(inYear) mt = int(inMonth) dd = int(inDay) wd = int(inWkDay) # prepare & write to the external RTC t = bytes([sc,mn,hr,wd,dd,mt,yr-2000]) for i in range(0,7): i2c.write(addr, bytes([i,dec2bcd(t[i])]), repeat=False) #print("%.2d:%.2d:%.2d" % (hr, mn, sc)) #print("%.2d/%.2d/%.2d" % (mt,dd,yr)) #date_enable==True #time_enable==True def get_rtc(): # print the current RTC data i2c.write(addr, b'\x00', repeat=False) buf = i2c.read(addr, 7, repeat=False) ss = bcd2dec(buf[0]) mm = bcd2dec(buf[1]) if buf[2] & 0x40: hh = bcd2dec(buf[2] & 0x1f) if buf[2] & 0x20: hh += 12 else: hh = bcd2dec(buf[2]) wday = buf[3] DD = bcd2dec(buf[4]) MM = bcd2dec(buf[5] & 0x1f) YY = bcd2dec(buf[6])+2000 print(str(MM) + "/" + str(DD) + "/" + str(YY) + " - " + str(hh) + ":" + str(mm) + ":" + str(ss) + " day: " + str(wday)) def menu(): print(" System Menu") print("quit - End the program.") print("setrtc - Set external RTC date & time.") print("getrtc - Display external RTC date & time .") uart.write(">> ") print("Sta 0 RTC") uart.write(">> ") menu() while True: inbuff="" if uart.any(): inbuff=uart.read().strip().decode() uart.write(">> ") # QUIT if inbuff == "quit": #f.close() print("Program has ended.") sys.exit() # SETRTC elif inbuff == "setrtc": set_time_rtc() uart.write(">> ") # GETRTC elif inbuff == "getrtc": get_rtc() uart.write(">> ") else: uart.write("???") uart.write("\n>> ") sleep(100)>
Well, Yes & No... Not so much a special command (in my experience), but there are some actions that might help. Thonny appears to be less able to get the attention of the Micro:Bit at times, versus other apps, the console, etc.
1
When you program a Micro:Bit, by saving your micropython code as "main.py" on the device, that program will execute whenever the Micro:Bit is powered ON or reset. If the currently saved "main.py" executes a tight loop, Thonny may have difficulty in interrupting the running code. When I first launch Thonny with an atteched Micro:Bit, I click the STOP sign button, if it is active until the Shell window responds with micropython's REPL, and its ">>>" prompt.
2
If the Micro:Bit's port is showing up in Thonny Options (from the Configure Interpreter menu), examine the checkbox options. They may have effect on how Thonny 'wakes' the device:
3
Micro:Bit's micropython version may also need an update...
dgately
Thank you dgately. Back to working on my new baseSta application.
Ray
I have been playing around with the micro:bit radio, checking out distance coverage in my house. It seems that I only get up to about 35 feet, that is passing through walls and things, plus the micro:bit module has to be about 5 feet above the floor.
Below is a program to see if the radio part would run with some I/O, the radio part works but the I/O part does not. Thonny shows a problem with an interrupt. Not sure how to get around this problem. I see that the '@run_every()' seems to work, but will that be a problem with other code. Anybody have any better ideas.
Ray
# test_radio.py # # from microbit import * import sys, radio uart.init(115200) radio.config(group=23) radio.on() @run_every(s=2) def do_radio(): radio.send("01") message = radio.receive() if message == "None": print("") else: display.scroll(str(message)) def menu(): print(" System Menu") uart.write(">> ") uart.write("Radio test.\n>> ") menu() while True: inbuff="" if uart.any(): inbuff=uart.read().strip().decode() uart.write(">> ") if inbuff == "quit": sys.exit() else: uart.write("???") uart.write("\n>> ") sleep(300)When you say the I/O part does not work, what I/O specific code do you mean? What part of your code example is I/O based? What is the expected output that you are not seeing?
Here's some code that uses the radios of 2 Micro:Bits and sends temperature (in Fahrenheit) from one to the other. Press the 'A' button and the Micro:Bit shows "<<<" while it sends it's internal temperature data via radio for display on the other Micro:Bit's LED matrix. Pressing the 'B' button will display its own temperature data on its LED matrix. While the Micro:Bits are idling, they display a pulsing graphic on its LED matrix, just so you know it is alive:
# radio receive/transmit from microbit import * import radio radio.config(group=23) radio.on() while True: message = radio.receive() if message: display.scroll(message) # display the other Micro:Bit's temperature message = "" else: if button_a.was_pressed(): # send temperature to other Micro:Bit temp=(((1.8*temperature())+32)-4.5 ) temp_string = str("%.2fF" % temp) radio.send(temp_string) display.scroll('<<<') else: if button_b.was_pressed(): # display local temperature temp=(((1.8*temperature())+32)-4.5 ) temp_string = str("%.2fF" % temp) display.scroll(temp_string) else: display.show(Image('00300:' # display some idle-time graphics '03630:' '36963:' '03630:' '00300')) sleep(200) display.show(Image('00300:' '03930:' '39693:' '03930:' '00300')) sleep(200) display.show(Image('00900:' '09690:' '96369:' '09690:' '00900')) sleep(200) display.show(Image('00300:' '03930:' '39693:' '03930:' '00300')) sleep(200)I have another example that sends RTC data as well...
dgately
The below segment is what I refer to as I/O. When the program is running, and I type in 'quit' , the program just hangs, at least that part of the program. I think the radio part was still working.
Ray
while True: inbuff="" if uart.any(): inbuff=uart.read().strip().decode() uart.write(">> ") if inbuff == "quit": sys.exit() else: uart.write("???") uart.write("\n>> ") sleep(300)I see...
There may be 2 issues with the do_radio() function that runs every 2 seconds (via @run_every(s=2)):
Also the line:
if message == "None":needs to beif message == None:... message = radio.receive() does not return the text "None", it returns None, basically like a numeric value.EDIT: I've fiddled with removing much of the do_radio() function content and still get an exception error on quit. This might be a Thonny issue. Unfortunately, the backend.log does not show a conclusive reason for the exception...
dgately
It is back to a basic build, below the program runs, but I can only com with one micro:bit at a time. It works really well when the other micro:bit is not on. I tried different code segments, but I could not find a solution for having the baseSta talk to two micro:bits, while both were on.
I am starting to see the limitations of the micro:bit as it pertains to my concept of having a NoT solution. I might have to start looking at a different approach, maybe something like a Sparkfun MicroMod setup. To bad the MicroMod is not built to accept a P2 Edge.
Ray
# testit.py from microbit import * import sys, radio uart.init(115200) #sta_01 = (group = 23) radio.config(group=23) radio.on() def sta01(): #radio.config(group = 23) #radio.on() radio.send("1") message = radio.receive() print(message) #radio.off() uart.write(">> ") def sta02(): #radio.config(group=24) #radio.on() radio.send("2") message = radio.receive() print(message) #radio.off() uart.write(">> ") def menu(): print(" System Menu") print("quit - End the program.") print("sta01 - Reach out to Sta01") print("sta02 - Reach out to Sta02") uart.write(">> ") print("baseSta 0") uart.write(">> ") menu() ############### Main I/O ############### while True: inbuff="" if uart.any(): inbuff=uart.read().strip().decode() uart.write(">> ") # QUIT if inbuff == "quit": #f.close() radio.off() print("Program has ended.") sys.exit() elif inbuff == "sta01": sta01() elif inbuff == "sta02": sta02() else: uart.write("???") uart.write("\n>> ") sleep(100)Don't give up on the Micro:Bit just yet... I have a 3rd on its way and I'll test some solutions, soon.
BTW: I have had success in the past using ESP32 devices, which are also cheap, work well with micropython, have WiFi built-in and many of the same attributes as the Micro:Bit. But, that's another option only if the Micro:Bit radio does not suffice...
dgately
This example uses the radios of 3 MicroBits to communicate temperature values between them...
Using Thonny as the IDE, save a version of this code on each of 3 MicroBits. You'll need to uncomment just 1 of the board options before saving on each MicroBit (see lines 9, 10, 11 in the code) after uncommenting just one of the choices per MicroBit. Save a copy of the script as "main.py" on each MicroBit, in Thonny. I use the batteries on 2 of the MicroBits and keep 1 running in Thonny to allow a view of the shell output.
The code displays an animated star-flash while idle, waiting for button presses and messages from the other MicroBits:
Note: All MicroBits receive 'all' messages. It's up to a receiving MicroBit to inspect the incoming message to determine which MicroBit the message came from.
# radioTranceiver.py # Micro:Bit radio receive/transmit example # sends & receives temperature data between Micro:Bits # from microbit import * import radio # uncomment one of the following for each MicroBit board = 1 # MicroBit #1 #board = 2 # MicroBit #2 #board = 3 # MicroBit #3 radio.config(group=23) radio.on() ### MAIN LOOP ### while True: message = radio.receive() if message: # message from other MicroBit? display.scroll(message) # scroll the message message = "" else: if button_a.was_pressed(): # left button # send converted temperature to other Micro:Bit temp=(((1.8*temperature())+32)-4.5 ) temp_string = str("-%d- " % board) + str("%.2fF" % temp) radio.send(temp_string) display.scroll('<<<') # a message has been sent! else: if button_b.was_pressed(): # right button # scroll converted local temperature temp=(((1.8*temperature())+32)-4.5 ) temp_string = str("%.2fF" % temp) display.scroll(temp_string) else: # display some idle-time graphics display.show(Image('00300:' '03630:' '36963:' '03630:' '00300')) sleep(200) display.show(Image('00300:' '03930:' '39693:' '03930:' '00300')) sleep(200) display.show(Image('00900:' '09690:' '96369:' '09690:' '00900')) sleep(200) display.show(Image('00300:' '03930:' '39693:' '03930:' '00300')) # sleep(300) # not needed? sleep(200)and... Golden State just beat Phoenix, as I send this post")
I still have not given up on the micro:bit. I had to solve some problems with my other project. At the moment I have the micro:bit boards scrolling the temperature where it is placed, no radio transmitting at the moment. Instead of having one of the micro:bit boards as a base station, I might try having them set up in a relay scenario. Still more to think about.
Ray