

Remote Login to P1/P2 via WLAN, Telnet
 Christof Eb.
Posts: 1,597
Christof Eb.
Posts: 1,597
Hi,
for many this might be a trivial post. On the other hand it opens many possibilities for the propellers. So perhaps there is some inspiration.
So here instead of using a cable between your PC and the Propellor, we use a WLAN connection. Together with Forth and it's multitasking capabilities, you get a system, that you can access directly at any time remotely with PC Teraterm Terminal Program or smartphone Connect-Bot terminal app. So you can easily check status of a controller, get measurements, modify parameters, reprogram,.... To achieve the same, you could also use MQTT or use a cloud server, but P2+Taqoz can do it all alone very much simpler.
There is no additional password, so I would only use it after consideration of safety.
We are using a tiny "ESP-01" ESP-8266 module, which you can buy cheaply.
You have to use 3V3 for power supply and for signal levels!
One reason, I write this, is because there are some odd informations in the net. The picture shows the connection between a Usb-serial adapter, 3V3 regulator and the ESP-8266 module. The reason for the 3V3 regulator is, that the module needs enough current, at least my USB-serial connector is not capable to supply the module sufficiently.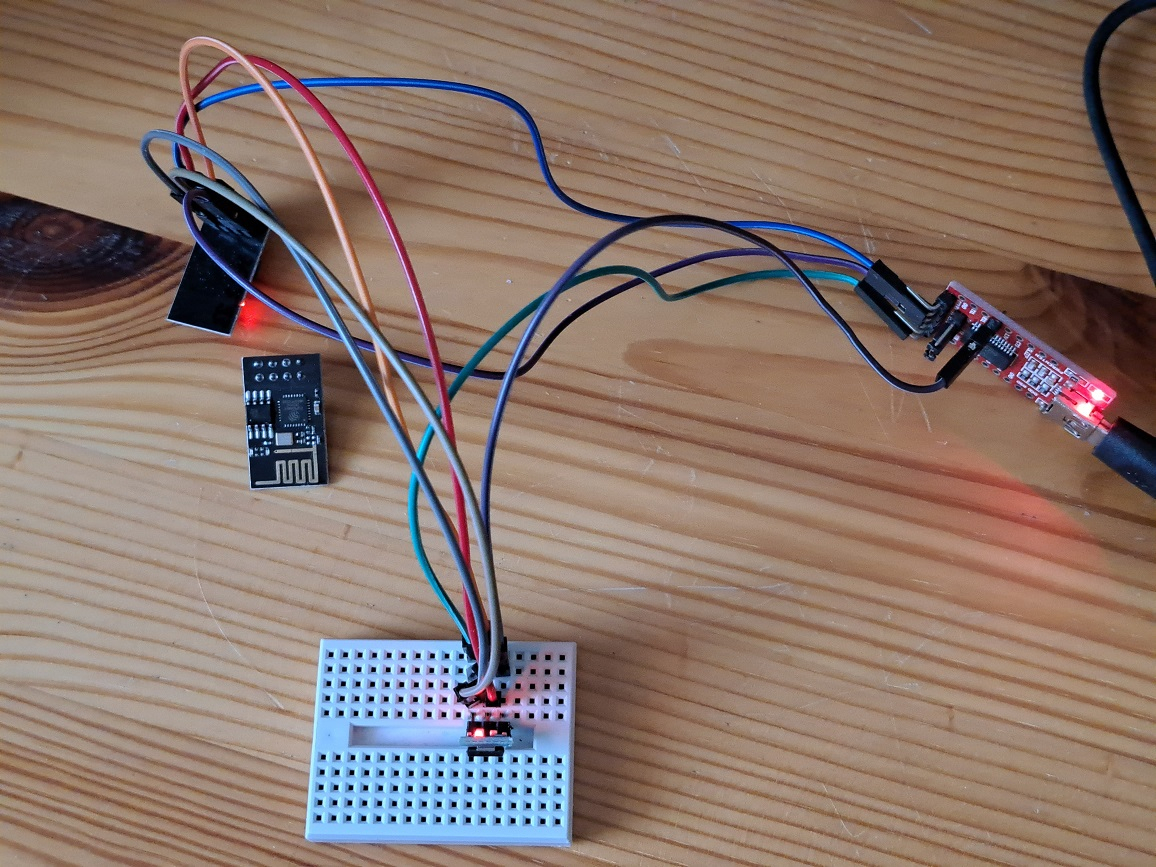
If the antenna is visible on top, then the connections of the module are:
GND GP2 GP0 RXD
TXP CH_PD RST VCC
We need to program the module with a "simple" Arduino sketch.
Installation of Arduino for ESP8266 is shown here: https://randomnerdtutorials.com/how-to-install-esp8266-board-arduino-ide/
The connection between the module and the USB-serial (without additional 3V3 regulator) is shown here: https://i0.wp.com/randomnerdtutorials.com/wp-content/uploads/2015/02/ESP8266-Flasher.png?quality=100&strip=all&ssl=1
So we need to tie CH_PD "chip enable" to 3V3 and for programming GP2 to GND. To come into programming mode 3V3 power supply has to be cut and reconnected.
As board type, I used "Generic ESP8266 Module".
Now we need the sketch.
https://blog.thesen.eu/telnet2serial-telnet-zu-rs232seriell-bruecke-mit-dem-esp8266-microcontroller/
https://usercontent.one/wp/blog.thesen.eu/wp-content/uploads/2015/08/ESP_Telnet2Serial.zip?media=1672860717
In the sketch you have to modify the
const WiFiMode wifi_mode = WIFI_STA; (instead of WIFI_AP)
your WLAN access data
const int iSerialSpeed = 921600;
In the following version, I have added some output lines, which start with backslash as Forth comments.
/*--------------------------------------------------
Telnet to Serial AccessPoint for ESP8266
for ESP8266 adapted Arduino IDE

by Stefan Thesen 08/2015 - free for anyone
http://blog.thesen.eu
https://blog.thesen.eu/telnet2serial-telnet-zu-rs232seriell-bruecke-mit-dem-esp8266-microcontroller/

Creates an accesspoint or network client which can
be connected by telnet; e.g. telnet 192.168.4.1
Telnet input is sent to serial and vice versa.

Serial output can e.g. be used to steer an attached
Arduino or other serial interfaces.
Please take care for levels of the serial lines.

Code inspired by a post of ghost on github:
https://github.com/esp8266/Arduino/issues/307
--------------------------------------------------*/

#include <ESP8266WiFi.h>

////////////////////////////////////
// settings for Telnet2Serial Bridge
////////////////////////////////////

// max number of clients that can connect
#define MAX_NO_CLIENTS 5
//const WiFiMode wifi_mode = WIFI_AP;     // set WIFI_AP for access-point or WIFI_STA for WIFI client
const WiFiMode wifi_mode = WIFI_STA;     // set WIFI_AP for access-point or WIFI_STA for WIFI client
const char* ssid = "xxx";   // Name of AP (for WIFI_AP) or name of Wifi to connect to (for WIFI_STA)
const char* password = "yyy";      // set to "" for open access point w/o password
//const int iSerialSpeed = 115200;
const int iSerialSpeed = 921600;          // speed of the serial connection
const bool bSuppressLocalEcho = true;   // shall local echo in telnet be suppressed (usually yes)

//const char* host = "E8266-1"; // wird nicht benuetzt
// ESP-B86D5D ESP-B85BC9 ESP-755593


// Create an instance of the server on Port 23
WiFiServer server(23);
WiFiClient pClientList[MAX_NO_CLIENTS];

void setup()
{
  // start serial
  Serial.begin(iSerialSpeed);
  delay(5000);
  Serial.println("\\ ESP8266 Wifi Serial Bridge");

  //WiFi.setHostname(hostname.c_str()); //define hostname

  if (wifi_mode == WIFI_AP)
  {
    // AP mode
    WiFi.mode(wifi_mode);
    WiFi.softAP(ssid, password);
    server.begin();
    server.setNoDelay(true);

    Serial.print("\\ ");
      while (WiFi.status() != WL_CONNECTED)
    {
      delay(500);
      Serial.print(".");
    }
  Serial.println(WiFi.localIP());
  }
  else
  {
    // network cient - inital connect
    WiFi.mode(WIFI_STA);
    WiFiStart();
  }

}


void WiFiStart()
{
  // Connect to WiFi network
  WiFi.begin(ssid, password);

    Serial.print("\\ ");
    while (WiFi.status() != WL_CONNECTED)
  {
    delay(500);
    Serial.print(".");
  }
  Serial.println(WiFi.localIP());

  // Start the server
  server.begin();
  server.setNoDelay(true);
}


void loop()
{
  int ii;

  ////////////////////////////////////////////////
  // if network client: check if WLAN is connected
  ////////////////////////////////////////////////
  if ((wifi_mode == WIFI_STA) && (WiFi.status() != WL_CONNECTED))
  {
    WiFiStart();
  }

  /////////////////////
  // handle new clients
  /////////////////////
  if (server.hasClient())
  {
    bool bFoundPlace=false;

    // search a free spot
    for(ii = 0; ii < MAX_NO_CLIENTS; ii++)
    {
      if (!pClientList[ii] || !pClientList[ii].connected())
      {
        // remove old connections
        if(pClientList[ii])
        {
          pClientList[ii].stop();
        }

        // new client
        pClientList[ii] = server.available();
        if (bSuppressLocalEcho)
        {
          pClientList[ii].write("\xFF\xFB\x01", 3);
        }
        pClientList[ii].write("Welcome to Telnet2Serial Adapter - S. Thesen 08/2015 - https://blog.thesen.eu\r\n");
        bFoundPlace=true;
        break;
      }
    }

    //no free spot --> sorry
    if (!bFoundPlace)
    {
      WiFiClient client = server.available();
      client.stop();
    }
  }

  /////////////////////
  // Telnet --> Serial
  /////////////////////
  for(ii = 0; ii < MAX_NO_CLIENTS; ii++)
  {
    if (pClientList[ii] && pClientList[ii].connected())
    {
      if(pClientList[ii].available())
      {
        while(pClientList[ii].available())
        {
          Serial.write(pClientList[ii].read());
        }
      }
    }
  }

  /////////////////////
  // Serial --> Telnet
  /////////////////////
  if(Serial.available())
  {
    size_t len = Serial.available();
    uint8_t sbuf[len];
    Serial.readBytes(sbuf, len);

    for(ii = 0; ii < MAX_NO_CLIENTS; ii++)
    {
      if (pClientList[ii] && pClientList[ii].connected())
      {
        pClientList[ii].write(sbuf, len);
        delay(1);
      }
    }
  }

}
To connect with P2 you need VCC 3V3, 3V3 to CH_PD, GND
RXD of module to 4th pin of prop plug P63
TXD of module to 3rd pin of prop plug P62
To connect with Teraterm find out the module host name, which is something like "ESP-xxxxxx", Port is 23, Protocol is Telnet, while "Other" seems to work too.
I hope, this might be useful. Anything missing? Comments?
Have fun, Christof
Comments
Possibly a blunt question but is there a reason (besides perhaps having an esp8266 at hand) for not using an esp32 ?
I ask this because I happen to have some esp32c3 modules that I could dedicate for that purpose.
Hi Maciek,
If there are the same libraries available and fast hardware serial, there should be no bigger problem? Esp32c3 is riscV, while esp8266 is tenisilica core as far as I know.
Good luck, Christof
Hi Christof,
The whole Arduino IDE with all the libraries that I do not fully follow how they work exactly, is a hostile environment to me. My fault entirely but still...
So I read your answer to my question as saying 'because there were already libraries within the Arduino environment that only needed some changes to serve the purpose'. Fair enough. Thank you.
Well, this little bit of sketch gives over 200 KB of code. Without the Wifi libraries , which I do not follow either, it would be very difficult to write such sketch.....
Actually the history at my side was a little bit different. These ESP-01 modules come preprogramed with a serial AT-command program. I had thought, that they would be usable directly with that program for the purpose here, like those HC-05 Bluetooth modules. It took me a while to find out, that this is not true, because the documentation of this original code is unclear. At the beginning the module did not work at all, until I found out, that I need the enhanced power supply. I even had mixed up the pins very badly, it is quite astonishing, that the module survived that....
I just checked, if I can compile the code for ESP32-C3, which was not the case, because this board is not in my setup. Adafruit has some instructions for that cpu variant. I mostly use ESP-32S dual core modules.
Christof