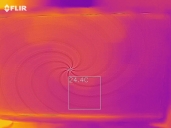
P2 Edge - Thermal image
 Bob Lawrence (VE1RLL)
Posts: 1,720
in Propeller 2
I received my P2 Edge module & a JM P2 Edge Module Breadboard yesterday. I decided to fire it up today, to see if it all works. I ordered a new prop plug with it but it wasn't in the package. Luckily my old prop plug still works (the cable is bad on it) the P2 module & Breadboard are both excellent. Great designs.
I used a Flir One Pro camera - Android C connector version.
The second picture is the HDMI Spiral program running on the P2 Edge module and displayed on my HDMI monitor.
So far everything is working great!
I used a Flir One Pro camera - Android C connector version.
The second picture is the HDMI Spiral program running on the P2 Edge module and displayed on my HDMI monitor.
So far everything is working great!


Comments
I am really curious to see a thermal image of the back side of the P2 Edge. The ground plane is split, so I expect there is going to be a hot portion and a cool portion. On the next revision, the ground plane is solid, so the heat should be very slowly wicking away from the center.
Thanks, Chip. I sent sales an email yesterday, I'm sure they will look after it. The invoice did not indicate that it was out of stock. I will use a glue gun on the old Prop Plug to enhance its longevity, for now. It's only the outer casing that is frayed. I added a picture of it
I added a picture of the P2 Edge from the back. The one thing I thought of since the first image was taken is that I did not time how long the chip was powered on before I took the image. I waited for 5 minutes, of warm-up time before I snapped this image.
Run this attached program. It's a benchmark I made a while back for testing power consumption. I've got it preset for the hungriest program but at 100 MHz so it shouldn't overload the power supply.
EDIT: Forgot it was still forced to RCFAST. Corrected.
Ok, thanks, I'll try it
Front View - P2 Edge Module - I ran the program for 30 minutes before capturing the image.
Back View - P2 Edge Module - I ran the program for 30 minutes before capturing the image.
Oscilloscope Output on Pin 16
Thanks! I'm using a brand new camera and haven't had time to even read the instructions yet. However, it does look good to me too. I wonder what options I have to enhance it a bit? LOL
I have a flir C3 that I'll try doing the same thing on. We did take some MicroPython current measurements the other day, it'd be good to tie that back to temperature rise
One thing I noticed with the C3 is that if you take the photo kind of upside down, it narrows the distance between the optical and infrared cameras, so you don't get as much 'offset' in the image. Well, it does when taking photos on a bit of an angle, rather than directly overhead. I don't know whether your camera would do the same.
It won't be too long before we have the melexis grid (90640/641?) and hope to get this running with the P2, and Rayman has the Flir Lepton talking already
Feel free to notch the clock frequency up further for higher temperatures. At that 100 MHz it will be drawing around 650 mA on Vdd, which translates to 1.17 Watts. 180 MHz should push past 2.0 Watts.
All you need do is edit the XMUL = 10 constant on line 110, and change it to 18.