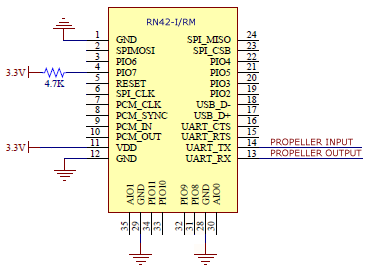
The Propeller And IC RN42-I/RM... Will This Work?
 idbruce
Posts: 6,197
Hello Everyone
I want to be able to communicate with the Propeller through Bluetooth using the RN42-I/RM, but I am looking for minimal circuitry. I believe this should work with direct connections to (2) Propeller IO pins, with perhaps some resistors inline, but I could be wrong
Did I mention that I am not an electronics genius?
Pin #4 (GPIO7) sets the baud rate to 9600.
As asked in the title, will this work as shown? The datasheet is attached below.


Comments
You are forcing GPIO4 high for 9600 baud but why such a slow baud rate when the default is 115200? However, there is no problem allowing for a resistor there since you can then decide to place it or not.
Allow for those LEDs as they may be useful when you are testing the prototype. If you allow for components you don't have to load them in production but you can load them during prototyping.
If your pcb will allow for it I would place the SPI header as per the example application circuit which btw is a terrible example. I wish sometimes they would show examples that are at both extremes, so a minimal use case. I notice too that although the module has USB capabilities, that they use an FT232R for serial!!!
So go ahead with the minimum but make sure the smd pads extend out enough, maybe more than they recommend since this makes it easier for you to access with the soldering iron. I probably would only solder up those pads you are using and maybe a couple of others, just enough to secure it to the pcb, but not too many so that you can't remove it. At least for the prototype.
Yes, it will work!
P.S. If you terminate every connection to a small through-hole pad where you have room, then you can use this for testing or mods. Check what I did in the P2PAL for the ESP32 module.
Thank you very much for taking the time to answer my question
I went that route, because the Parallax module has that set as the default baud rate and it worked perfectly for my application, but as you say, I can leave it out. I will probably test without the resistor and see how well it works for my application.
That is very good advice
I just sold some car parts
THANK YOU PETER
Here's one tiny little tip to designing pcbs: fix the positions of your connectors where they need to be and then place and orient parts so that it is almost lining up as much as possible, especially the critical routing. If necessary revisit any fixed positions and optimize. If your signals are having to via to other layers and back again too often then this is a sign that it could be optimized more.
When everything is placed optimally then routing is a pleasure although the 90/10 rule still applies, that 90% of the work will take 10% of the time, and 10% of the work will take 90% of the time.
LOL.... So what you are telling me is that I should buy some wine instead of beer
That holds true for most of the work that I get into, not just PCBs.
That darned 90/10 rule rules. No way around it.
I prefer white wine, but mostly a good Chardonay.
Only problem is that this place is really hopping....loud music, people dancing around and young women who insist on speaking to me...one more pint and I'm outta here...says he
you may want to consider connecting the reset lines and the status, in case you can't get what you need through the serial interface.
my schematic reflects the XV version of the module, so the pinout is different.
All of the 100 ohms can be eliminated or just some?
Peter's advice is great. We chat regularly and he knows what he's talking about!
Since the RN42 is operating at 3V3 there is no need for series resistors between the tx/rx and p32/31 on the prop.
Put a 1-10uF ceramic bulk capacitor and a 100nF (0.1uF) ceramic bypass capacitor as close to the power and ground pins of the RN45 chip. Use MLCC X7R or X5R ceramic capacitors, not Z5U or Yxx! The voltage needs to be at least 6V but at these capacitances 16V or more are readily available.
I trust his input and I trust yours as well
I am always forgetting about those pesky little capacitors
We have used the Propeller in conjunction with the RN42 with and without CTS/RTS. (ie, those signals have not been necessary for our purposes). Reset lines are highly advantageous, however.
I don't have any experience with connecting the RN42 modules to an iOS device so can't comment there.
@publison - 100ohm resistors are not necessary anywhere - they were in my posted schematic for a special purpose, but are not required for a typical connection from Propeller to RN42.
It definitely works with an Android and I bet it can work with an iPhone also. Please refer to this thread: http://forums.parallax.com/discussion/172024/combining-2-threads-into-1-the-parallax-propeller-rn-42-bluetooth-and-android-apps#latest
I haven't been able to find a sample program for the Propeller like the one for the Basic Stamp, but you should be able to translate it into C or Spin. Note that the RN-42 won't work with an iPhone, but should work with others like Android phones.[/quote]