New robot arm with BlocklyProp (documents online)
 Phil Pilgrim (PhiPi)
Posts: 23,514
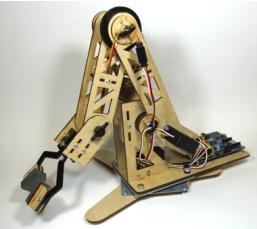
I was tasked by the local high school to design a robot arm for their robotics class. The idea was that all the custom parts for it could be cut out on the class laser cutter and assembled by the students using stock fasteners, motors, and controller. Here's a photo of the completed prototype:

Constructed of 1/8" MDF and acetal copolymer, it has has three controllable axes with a manually-adjustable wrist joint. The controller is a Parallax Activity Board. The three axes are driven by Parallax Servo 360s, which are externally geared down to provide more torque. The gripper, which can be removed to allow other kinds of end effectors, is driven by a cheap 9G servo from HobbyKing. The Z-axis bearing is a cheap 4" lazy-susan ball-bearing unit from McMaster-Carr. The arm bearings consist of acetal sleeves riding on shoulder screws. There is no friction against the MDF to cause wear. Once I was happy with the design, I wrote an assembly manual (too big to attach, unfortunately) so the students could assemble their own arms from parts they cut on the laser. The CAD files for the arm parts are in Rhino3D format, although I actually designed them in CorelDraw.
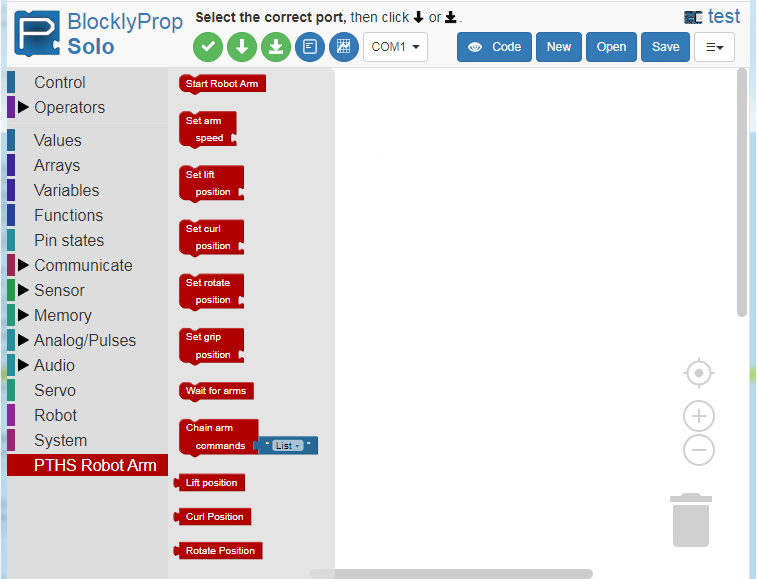
Once I had an operational arm, I had to come up with some driver software for it. Since the class has been using BlocklyProp, that was an easy choice of platform. But, boy!, was I in for a learning adventure! I had never really used Blockly, so had to learn that (which was really easy). But I wanted custom blocks just for the robot, and that's where things began to get complicated. However, thanks to some amazing and incredibly patient and generous support from Matt Matz, along with some custom Blockly internals he provided, I was able to create custom blocks and get them into the toolbox. The driver software is written in C -- not my favorite language by a long shot, but more than adequate for the job -- and ported to my Blockly Solo repository on github, from which it runs -- another learning adventure. Here's a screen shot of BlocklyProp with the robotic arm tool flyout from the toolbox:

I still have some servo driver issues to fine tune, but the arm looks like it will perform well in the class (assuming classes in Washington State start up again before June). Once it has been proven in the classroom, I'll post the CAD files, a bill-of-materials, and other documents here in the forum.
-Phil

Constructed of 1/8" MDF and acetal copolymer, it has has three controllable axes with a manually-adjustable wrist joint. The controller is a Parallax Activity Board. The three axes are driven by Parallax Servo 360s, which are externally geared down to provide more torque. The gripper, which can be removed to allow other kinds of end effectors, is driven by a cheap 9G servo from HobbyKing. The Z-axis bearing is a cheap 4" lazy-susan ball-bearing unit from McMaster-Carr. The arm bearings consist of acetal sleeves riding on shoulder screws. There is no friction against the MDF to cause wear. Once I was happy with the design, I wrote an assembly manual (too big to attach, unfortunately) so the students could assemble their own arms from parts they cut on the laser. The CAD files for the arm parts are in Rhino3D format, although I actually designed them in CorelDraw.
Once I had an operational arm, I had to come up with some driver software for it. Since the class has been using BlocklyProp, that was an easy choice of platform. But, boy!, was I in for a learning adventure! I had never really used Blockly, so had to learn that (which was really easy). But I wanted custom blocks just for the robot, and that's where things began to get complicated. However, thanks to some amazing and incredibly patient and generous support from Matt Matz, along with some custom Blockly internals he provided, I was able to create custom blocks and get them into the toolbox. The driver software is written in C -- not my favorite language by a long shot, but more than adequate for the job -- and ported to my Blockly Solo repository on github, from which it runs -- another learning adventure. Here's a screen shot of BlocklyProp with the robotic arm tool flyout from the toolbox:

I still have some servo driver issues to fine tune, but the arm looks like it will perform well in the class (assuming classes in Washington State start up again before June). Once it has been proven in the classroom, I'll post the CAD files, a bill-of-materials, and other documents here in the forum.
-Phil


Comments
I'm looking forward to seeing this arm in action. I noticed you built in some really nice design concepts with geared-down motion control and Feedback360 servos. I'd like to put one on my laser cutter, too.
Ken Gracey
The Blockly Solo software can be accessed from my repository on github. I'll email you the address so you can play with it if you like.
-Phil
What I like second most (because the thing I like most is that kids are going to learn some really cool stuff from this) is that this is a really great example of how the fact that BlocklyProp is open-source, which means it can be remixed and leveraged in some very cool ways. As Parallax moves from the original version of BlocklyProp to the new version called Solo (solo.parallax.com), making a fork of the project and putting it up on a website of your own isn't actually that hard to do. The code runs entirely in the user's browser (Chrome, Firefox, or the newest version of Edge, and I think even Safari works), so you don't even need advanced features for that hosting. Just put up the files and let it go.
Phil is right in that the learning curve is pretty steep, but if you're up for the challenge, there are some great resources out there. If there is enough interest, I could even do a video that would be like a "tour" of the codebase for BlocklyProp.
Because it's open-source, there are opportunities (and a need) for power users to contribute. One of the biggest needs is actually propeller c libraries for devices - for example, we don't have a prop-c library for a real-time-clock (RTC) module/chip, or for one-wire devices like Dallas thermometers, or "DotStar" RGB LEDs. There is a good tutorial written by Andy Lindsay on how to create a propeller c library on learn.parallax.com, and it's something we could really use some help on.
Incredible work Phil - You never fail to amaze me with your creativity and innovation. I wish I lived close enough to be in your class!
Hope you are well. Stay safe.
You likewise.
-Phil
http://pthsrobotics.org/blockly/docs
To use the special version of Blockly:
http://pthsrobotics.org/blockly
To access the svg files referenced in the docs:
http://pthsrobotics.org/blockly/svg
The format is totally 1990s primitive, but the stuff is all there. I'll try to prettify things later.
Enjoy!
-Phil