Row-bot
 Phil Pilgrim (PhiPi)
Posts: 23,514
This semester my students are designing model boats. As team projects they have been tasked with designing an RC paddlewheel catamaran. They have to design and loft the pontoons, make sure the volume displacement is adequate, align the center of gravity with the center of buoyancy, cut the hull, deck, fin, and paddlewheel pieces out on the laser cutter and assemble everything. At the end of the semester, they will race them in the local marina. Here's a video of the prototype I made as a feasibility study:
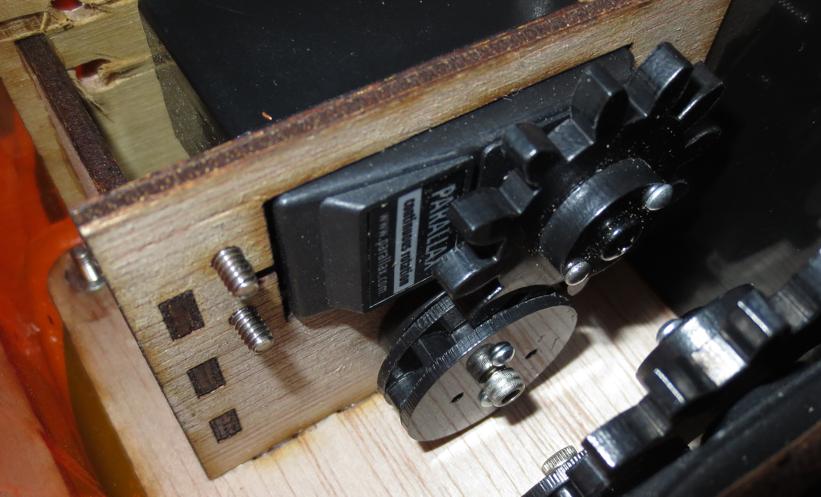
It uses a pair of Parallax continuous-rotation servos, and RC receiver, some gearing, and an aluminum shaft to drive the paddlewheels. Here's a photo of the innards of the sealed electronics box:

After doing this, I thought it might be fun to replace the paddlewheels with oars. Here's a video of the "Row-bot" in action:
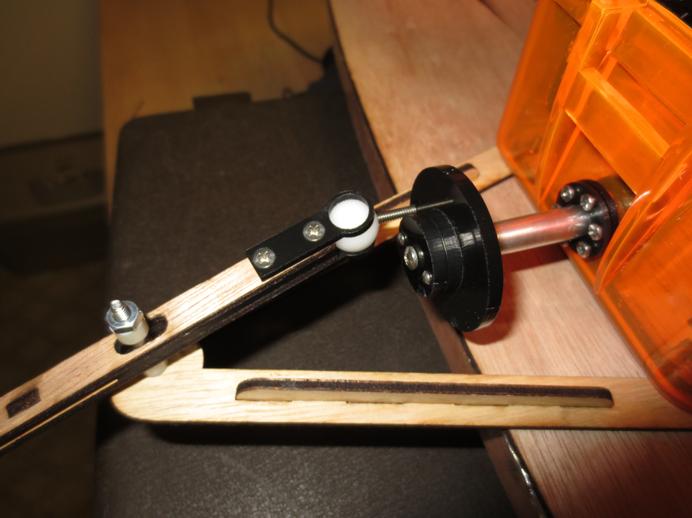
The oars operate via a homemade ball-joint drive, illustrated here:

I told the kids they could do a Row-bot in lieu of the paddlewheel variety, if they wanted to. It might be fun to pit paddlewheels against oars in the race. We'll see what they choose ...
-Phil
It uses a pair of Parallax continuous-rotation servos, and RC receiver, some gearing, and an aluminum shaft to drive the paddlewheels. Here's a photo of the innards of the sealed electronics box:

After doing this, I thought it might be fun to replace the paddlewheels with oars. Here's a video of the "Row-bot" in action:
The oars operate via a homemade ball-joint drive, illustrated here:
I told the kids they could do a Row-bot in lieu of the paddlewheel variety, if they wanted to. It might be fun to pit paddlewheels against oars in the race. We'll see what they choose ...
-Phil


Comments
Sorry, man. D*** forum software! I wish Parallax would prioritize fixing what's still broken after -- how many months has it been now?
Here are the links:
Please let me know if this works better.
-Phil
Not sure which I would pick, The Row Bot for speed, or the Paddle Wheel for the coolness factor.
I want to sign up for Phils class.
I think if you eliminate a couple of paddles from your wheel, you could gain some speed. strange but true.
At high speed, too many paddles will cavitate and slow the craft down, it's weird science, check it out.
Angle of attack, depth of paddle, length of stroke, all kinds of engineering involved in a paddle wheel.
Way more than I thought when I started messing with them.
-Tommy
Like Tommy, I'd love to be in your class. For extra credit, I'd make a one servo/motor boat!
Interesting observation. I once tried to make an anemometer with six cups. It didn't work -- perhaps for the same reasons. I'll give it a try with fewer blades. The paddlewheels are super easy to make. They're just laser cut from doorskin and Gorilla-glued together, with a Delrin hub tacked on to mate with the shaft.
-Phil
-Phil
I'm sketching up a one-servo, non-cavitating silent magneto-hydrodynamic caterpillar drive catamaran right now.
A Yuloh or sculling oar should work pretty well with a one servo boat.
I predict that a lot of them will choose the row boat because it looks so much more interesting. e.g. if you took that and the paddlewheel to MakerFaire which one would people want to control?
Nice job!
More interesting and also more work to construct. Many students are slackers (McFly!) and will choose the "least work" option.
Normally, a model boat builder would then employ epoxy and phenolic powder to fill the external voids between hull pieces, add further coats of epoxy to seal everything, followed by several coats of varnish. This presents a problem for a classroom situation in terms of time and toxicity. So I came up with a quicker, safer way to seal the pontoons: skin-packing. You've probably experienced -- and cursed at -- products that are skin-packed. Basically a heated plastic film is sucked down over the product onto a porous card that's coated with a heat-sensitive glue. I have a friend who has one of those skin-pack machines and was able to get some of the glue that the film sticks to.
Once the kids are done gluing their hulls, they will coat it with this glue, which is a totally benign, water-soluble product. When the glue dries, I'll take their hulls out to my friend's machine and seal them with the plastic film. BTW, this is the reason for using veneer instead of plywood. Veneer is porous, allowing the vacuum to pull though it; plywood is not.
So far, I've been happy with the results this process has yielded. The kids just need to make sure they employ enough bulkheads to keep the hull pieces from collapsing in the vacuum.
-Phil
It's an interesting mechanism, and Probably not difficult to build, if you have a little skill with a laser cutter...
Not that a "one-servo, non-cavitating silent magneto-hydrodynamic caterpillar drive", would be hard to build either, but
You will probably want to have a Drill Press, and maybe some chisels, or at least a good hammer... Tool up! is my motto.
-Tommy
The drive is sold at http://www.austinkayak.com/products/18199/Hobie-Mirage-Drive-GT-ST-Fins.html
Edit: I see a bike-type chain there... in salt water?
Photo attached next, cannot add here by edit.
My problem to, looks like a cool project Phil.
Stemming from your concept is a solution to one of my self-made idea challenges. I have always wanted to make a "hull adapter" that enables a Scribbler S2 to be used as the core of a watercraft. This way, a Scribbler and the Scribbler GUI can be used for a water robot. Your design would completely allow for that! Drop a scribbler into a waterproof enclosure and mate it's wheels to your sealed paddlewheel shafts and you are good to go!
Great project, how did the kids do? I am curious what did you use for the water sealed through hull fitting for your electronics box?
Jim
None of the kids opted for an oar-powered craft. Most used three- or four-blade paddlewheels. We held a five-team tournament at a local marina. Each race between two teams consisted of a round-trip from the starting line: a 30-yard straightaway, then around a dock piling, and back. It was windy, and the tide was receding, but the kids' crafts performed quite well, on the whole.
One of the reasons for my insisting on a twin-hull design was to avoid stability issues, which went beyond the scope of the class. As a consequence, none of the resulting designs had roll-stability problems. However, one team chose to make their pontoons short and deep, which produced a pitch-stability issue so pronounced that their craft could flip upside-down and backstroke through the water.
The shaft seals on the box consisted of laser-cut rubber washers squeezed between the black Delrin ring shown in one of the above photos and the housing, via six screws. It protected against incidental splashing but leaked a tiny bit when submersed by the upside-down craft.
Here are some photos from the race:
-Phil
That's quite inspiring, Phil. I wish I some kids around here would be in to the same. They all seem to be into air,(quads), instead of water.
Could it be that air is more redily available than water?
Jim
In fact, two of my students from last semester (brothers) own, with their dad (one of my T-bird sailboat partners), a small rowing/sailing dinghy named "Water Strider," named after this beastie:
https://en.wikipedia.org/wiki/Gerridae
One of the brothers loosely modeled his paddlemaran deck after said insect. But an actual robotic water strider would be very cool. (Now you're making me wish I were teaching again next school year, instead of taking a one-year break!)
-Phil
Is there a document where I could get more details about how you built them?
It's not very detailed, though, because I wanted the students to be creative in their designs. Most used three- or four-bladed paddlewheels. And I think that's probably the most efficient design.
-Phil
Thank you. I'm a big fan of drones which can move in any direction in any orientation. I'm trying to imagine a radio controlled floating watercraft with those capabilities. The 'ideal' craft would have those abilities even in a gently moving stream.