Scribbler Taillight and Pen Port Light (Added)
We've been having a lot of fun over on the Nikos Fibonacci Spiral Thread scribbling with LED light by using long exposure photos.
Here is a project - "No Warranty Void" hack for the Scribbler and the S2. I call it the Scribbler Taillight. I was playing with the idea for following purposes. This could work great for LED scribbling too. I am developing a pen port mount also.
Power (9 volts) and ground come right from the programming port - not case opening is required for this hack (and thus your Warranty remains! ;-)
Photos show the following:
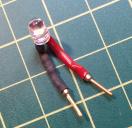
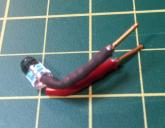
How an LED is fitted with pin connectors. Under the heat-shrink wrap around the Ground Leg (cathode - marked by the flat spot on the LED lense) is a resistor of the appropriate size for 9 volts and the color of the LED and its properties (Google it!) - two views. You can see the resistor under the black heat-shrink tubing.
Diagram for programming port pinout from Parallax (S2 and Scribbler are the same)
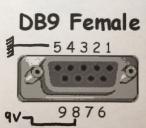
Diagram for a DB9 female pinout (show how the pins are numbered). This is marked to reflect the Scribbler and S2 power and ground. Pin 5 is ground and Pin 8 is 9 volts.
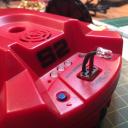
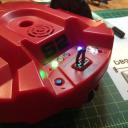
And photos of the Scribbler Taillight inserted - LED off and on.
Obviously the LED could be pointed straight up for LED scribbling, or mounted in the pen port and powered in the same way.
Give it a try and have some hacking fun!



Comments
I shaped a wooden plug - make a hole to mount the LED and run the wires - resister again is in line (470 ohm in this case). wires are twisted and shrink tube wrapped. See attached photos and the photos. More "scribbles" over at the Nikos Fibonacci Spiral Challenge thread.
You would have 5 LEDs running across a bread board or mounted (width of robot) for the column,, Light the first column, turn off, advance forward a column width, light the second column and so fourth - "Serial style." A long exposure photo or composite photo (per zanadu's post over on the Nikos Fibonacci Spiral Challenge thread) and voila! - Dot matrix printing!
A nice update on the S3 from Ken can be found here - https://www.parallax.com/news/2016-03-01/s2-robot-“scribbling-dark”-art-project-carol-hazlett-and-update-scribbler-3
Try this link:
https://www.parallax.com/news/2016-03-01/s2-robot-“scribbling-dark”-art-project-carol-hazlett-and-update-scribbler-3