

[Simple - tutorial] Using parallax RFID Read/Write module with Arduino + EM-4100 tags
 johnone
Posts: 9
johnone
Posts: 9
I could not find a tutorial for the Read and Write module, so i figured i would make one.
I will not go into detail with anything really.
[0x01] - What is the parallax R/W RFID module and and what is a tag?
The parallax R/W RFID module, is a cheap way of reading and writing passive transponder RFID tags. It ranges ~10 cm, depending on angle.
The EM-4100 world tags (also from parallax), which i will be using in this tutorial. The tags can store up to 116 bytes of data, and a unique arbitary 8 character ID. The dimensions are pretty close to a bottlecap in width(30mm), and pretty thin.

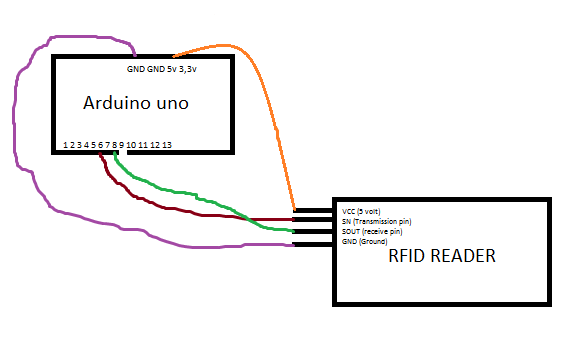
[0x02] - schematic
The parallax RFID R/W module has 4 pins:

[0x03] - Arduino code
This code will read and display 2 characters at the time and print them out. The code is pretty well commented, so i will not explain it myself.
The following code writes 4 bytes of data (first, second, third and fourth) to a specific adress defined by withespaces. It print's if successful.
The last example shows how to read EM4x50 Tags (not the tags mentioned in this thread).
Credit for the code goes to vgrhcp, uberdude, sebflippers and sixeyes.
If you're having trouble with the arduino reading the tags twice, (e.g. using it for a security system or alike), do something like this in void loop after "if(mySerial.available() > 0) {":
[code]// stop reading twice!!! while ( val == prevval )
{
val = 0;
val = mySerial.read();
val = mySerial.read();
val = mySerial.read();
val = mySerial.read(); // vi l
I will not go into detail with anything really.
[0x01] - What is the parallax R/W RFID module and and what is a tag?
The parallax R/W RFID module, is a cheap way of reading and writing passive transponder RFID tags. It ranges ~10 cm, depending on angle.
The EM-4100 world tags (also from parallax), which i will be using in this tutorial. The tags can store up to 116 bytes of data, and a unique arbitary 8 character ID. The dimensions are pretty close to a bottlecap in width(30mm), and pretty thin.
[0x02] - schematic
The parallax RFID R/W module has 4 pins:
- VCC = 5 Volt input.
- SIN = Output/transmission pin
- SOUT = Input/receive pin
- GND = ground
[0x03] - Arduino code
This code will read and display 2 characters at the time and print them out. The code is pretty well commented, so i will not explain it myself.
[COLOR=#4F4E4E][FONT=TyponineSans Monospace Regular 4]/Code to read data from Parallax RFID reader/writer 28440 via Arduino[/FONT][/COLOR]
//Program reads data from the old EM4100-based tags and prints their value in the serial monitor.//Writen by vgrhcp, uberdude, sebflippers and sixeyes#include <SoftwareSerial.h>#define txPin 6#define rxPin 8#define RFID_LEGACY 0x0FSoftwareSerial mySerial(rxPin, txPin);int  val = 0; char code[11];     //Note this is 11 for the extra null char?int bytesread = 0;void setup(){  Serial.begin(9600);  mySerial.begin(9600);  pinMode(2, OUTPUT);  pinMode(4, OUTPUT);  pinMode(txPin, OUTPUT);     //pin 6  pinMode(rxPin, INPUT);      //pin 8  Serial.println("RFID Read/Write Test");}void loop(){  mySerial.print("!RW");  mySerial.write(byte(RFID_LEGACY));  //mySerial.print(32, BYTE);  if(mySerial.available() > 0) {          // if data available from reader     if((val = mySerial.read()) == 10) {   // check for header       bytesread = 0;       while(bytesread<10) {              // read 10 digit code         if( mySerial.available() > 0) {           val = mySerial.read();           if((val == 10)||(val == 13)) { // if header or stop bytes before the 10 digit reading             break;                       // stop reading           }           code[bytesread] = val;         // add the digit                     bytesread++;                   // ready to read next digit          }       }       if(bytesread == 10) {              // if 10 digit read is complete         Serial.print("TAG code is: ");   // possibly a good TAG         Serial.println(code);            // print the TAG code       }       bytesread = 0;      delay(500);                       // wait for a 1/2 second     }   }  [COLOR=#4F4E4E][FONT=TyponineSans Monospace Regular 4]}[/FONT][/COLOR]
The following code writes 4 bytes of data (first, second, third and fourth) to a specific adress defined by withespaces. It print's if successful.
[TABLE="width: 80%, align: center"]
[TR]
[TD]//Code to write data to Parallax RFID reader/writer 28440 from Arduino//Program writes to one of the 29 user-defined addresses (3-31) as define by whichSpace//The four bytes to be written are defined by first, second, third, and fourth//Coded by vgrhcp, adapted to arduino 1.0 by sebflippers #include <SoftwareSerial.h> #define RFID_WRITE 0x02 #define txPin 6 #define rxPin 8 #define whichSpace 4 #define first 1                 // first, second, thrid, and fourth are four arbitrary values which will be written to the RFID tag at address whichSpace #define second 26 #define third 3 #define fourth 27SoftwareSerial mySerial(rxPin, txPin);void setup(){  Serial.begin(9600);  Serial.println("RFID Write Test");  mySerial.begin(9600);  pinMode(txPin, OUTPUT);       pinMode(rxPin, INPUT);      }void suppressAll()                                      //Keeps error code & the "write confirmation" codes from being printed in the serial monitor       {    if(mySerial.available() > 0)    { mySerial.read();      suppressAll();    }}  void loop(){  int val;  mySerial.print("!RW");  mySerial.write(byte(RFID_WRITE));  mySerial.write(byte(whichSpace));  mySerial.write(byte(first));  mySerial.write(byte(second));  mySerial.write(byte(third));  mySerial.write(byte(fourth));if(mySerial.available() > 0) {            val = mySerial.read();    if (val == 1)                                        //If data was written successfully      { Serial.println("Data written succesfully!");        suppressAll();      }    else suppressAll();                                  //If an error occured during writing, discard all data recieved from the RFID writer    }delay(250);}[/TD]
[/TR]
[/TABLE]
The last example shows how to read EM4x50 Tags (not the tags mentioned in this thread).
[COLOR=#4F4E4E][FONT=TyponineSans Monospace Regular 4]#include <SoftwareSerial.h>[/FONT][/COLOR]
#define RFID_READ 0x01#define txPin 6#define rxPin 8SoftwareSerial mySerial(rxPin, txPin);int val;int runs = 0;void setup(){  Serial.begin(9600);  Serial.println("RFID Read/Write Test");  mySerial.begin(9600);  pinMode(txPin, OUTPUT);      pinMode(rxPin, INPUT);      }void suppressAll()                                //suppresses the "null result" from being printed if no RFID tag is present{    if(mySerial.available() > 0)    { mySerial.read();      suppressAll();    }}void loop(){ int val;  mySerial.print("!RW");  mySerial.write(byte(RFID_READ));  mySerial.write(byte(32));  if(mySerial.available() > 0)  {          val = mySerial.read();                        //The mySerial.read() procedure is called, but the result is not printed because I don't want the "error message: 1" cluttering up the serial monitor      if (val != 1)                                   //If the error code is anything other than 1, then the RFID tag was not read correctly and any data collected is meaningless. In this case since we don't care about the resultant values they can be suppressed       {suppressAll();}                                }       if(mySerial.available() > 0) {          val = mySerial.read();    Serial.print("1st:");    Serial.println(val, HEX);    }if(mySerial.available() > 0) {            val = mySerial.read();    Serial.print("2nd:");    Serial.println(val, HEX);    }if(mySerial.available() > 0) {          val = mySerial.read();    Serial.print("3rd:");    Serial.println(val, HEX);    }if(mySerial.available() > 0) {              val = mySerial.read();    Serial.print("4th:");    Serial.println(val, HEX);    Serial.println("-----------------");    }  delay(750);}
Credit for the code goes to vgrhcp, uberdude, sebflippers and sixeyes.
If you're having trouble with the arduino reading the tags twice, (e.g. using it for a security system or alike), do something like this in void loop after "if(mySerial.available() > 0) {":
[code]// stop reading twice!!! while ( val == prevval )
{
val = 0;
val = mySerial.read();
val = mySerial.read();
val = mySerial.read();
val = mySerial.read(); // vi l

1000 x 1000 - 651K
585 x 342 - 10K