Shop OBEX P1 Docs P2 Docs Learn Events
S2 Scribbler - Pimping My Ride - 3D printing "Mini Skirts" now with Gripper Arm — Parallax Forums

S2 Scribbler - Pimping My Ride - 3D printing "Mini Skirts" now with Gripper Arm

GarethGareth Posts: 278
edited 2014-03-11 19:29 in Robotics
With all the S2 Hackering I have applied to my S2 Chassis.... Its time to spice things up a bit to add some space and "Extras* :-
S2_Pimping_My_Ride_000.png

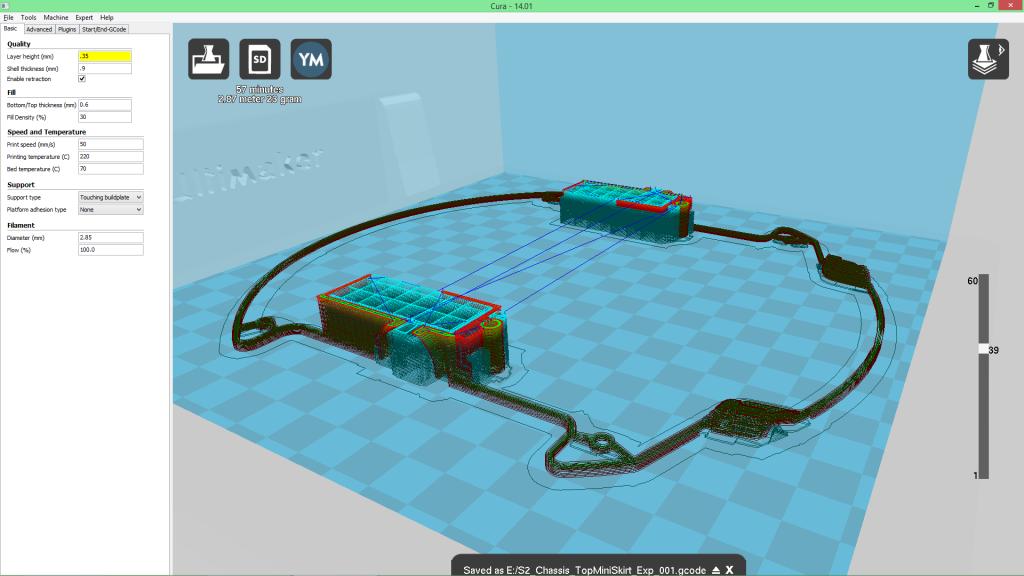
This is just a "Mini Skirt" I altered in "Blender" to test/check for 3D print alignment, wheel clearance and motor housings.

It took 57 mins to print as I choose a very rough 0.35mm Z axis step as measurements are more important than looks at momo...
Its "Spliced" in Cura to produce the G-Code... and saved to an SD card
S2_Pimp_MyRide.jpg


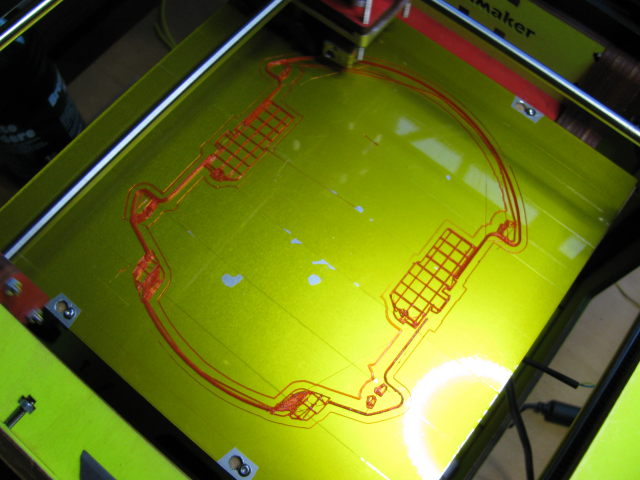
The Ultimaker prints the S2s carrosserie.
IMG_0870.png
IMG_0872.png
960 x 540 - 608K
1024 x 576 - 61K
640 x 480 - 443K
640 x 480 - 457K
«1

Comments

  • WhitWhit Posts: 4,191
    edited 2014-02-11 09:15
    WAY Cool! I want one!
  • mindrobotsmindrobots Posts: 6,506
    edited 2014-02-11 09:31
    Brilliant!! A "topless" S2.....that's still suitable for kids!! :smile:

    I want one too.....could be real hard to ship, though. :frown:
  • GarethGareth Posts: 278
    edited 2014-02-13 02:23
    Whit wrote: »
    WAY Cool! I want one!
    I think there will be more than one variant,,,,,,,,
  • GarethGareth Posts: 278
    edited 2014-02-13 02:25
    mindrobots wrote: »
    .....could be real hard to ship, though. :frown:
    8P The only shipping I envisage is via .STL file (YAY) ..... and 3D Print your own... (Boo)..
  • GarethGareth Posts: 278
    edited 2014-02-16 04:25
    As the "Open Source"!!!???!!! scribbler (.easm) files appear to be only available for the S1 .... I have had to redesign the Motor casing and positioning.
    It was not so straightforward and what you see below is a 3rd 3Dprint of a simple motor securing clamp I came up with. (neat thing it prints without support material YAY)
    Next stage is to secure the mini skirt to it and then it will form a good base to build upon.
    ( Will probably "Key" it so it can be slotted together like a jigsaw.."Thats the plan Dan" ).
    IMG_0874.png

    IMG_0876.png
    640 x 480 - 517K
    640 x 480 - 485K
  • mindrobotsmindrobots Posts: 6,506
    edited 2014-02-16 06:12
    Well! Aren't those the cutest little accessory for the S2 that has everything.....except a top case! :lol:

    Well done, good sir!
  • NikosGNikosG Posts: 705
    edited 2014-02-17 09:42
    Very nice Gareth!!!
  • ajwardajward Posts: 1,129
    edited 2014-02-17 12:10
    Pretty darned slick Gareth!
  • GarethGareth Posts: 278
    edited 2014-02-17 12:57
    Tnx NikosG.....
    Current Plan is to make a skirt with ultrasonic cut_outs to try and improve the range of forward detect & object location.
    ...still a long way to go......

    BTW :- ...I noticed in one of the other blogs you were wanting to import to Google sketch... there is a plug_in that allows for import of .STL files.
  • NikosGNikosG Posts: 705
    edited 2014-02-18 01:08
    Gareth,

    Have you thought to share the models on Thingiverse.com?
    In this site you can also find a model for pen lifter kit.
    Is a good idea to create a grup of accesories for the S2 and the upcoming s3.
    BTW. my 3d printer remains out of operation(the damage was serious). Fortunately Leapfrog promissed to send me a new one in order to replace it.
    This period I feel that I can't do nothing.........
  • GarethGareth Posts: 278
    edited 2014-02-18 01:50
    NikosG wrote: »
    Have you thought to share the models on Thingiverse.com?
    .... Yes I have a Thingiverse channel .... >> Chiprobot <<
    NikosG wrote: »
    Is a good idea to create a grup of accesories for the S2 and the upcoming s3
    ... agreed....
    NikosG wrote: »
    BTW. my 3d printer remains out of operation(the damage was serious).
    ... If I can print a replacement part for you let me know , I can easily do that...

    Regards Gareth
  • GarethGareth Posts: 278
    edited 2014-02-18 07:29
  • GarethGareth Posts: 278
    edited 2014-02-19 02:46
    Gareth wrote: »
    Ping >>
    Pong<<
    Test piece to check for alignment (looks good.... however Ultrasound holes need to expand by 0.2mm ... and I forgot to put mounting posts on the back)
    Yellow is good choice (Think S3)
    IMG_0877.png
    480 x 640 - 483K
  • KMyersKMyers Posts: 433
    edited 2014-02-19 09:15
    I like...ALOT!!!
  • PublisonPublison Posts: 12,366
    edited 2014-02-19 09:21
    Lookin' good!

    Will it fit a can of hair spray for erco? :)
  • mindrobotsmindrobots Posts: 6,506
    edited 2014-02-19 09:33
    Great! Now the S2 has eyes, a nose, ears and a really cool hat with light sensors!!
  • GarethGareth Posts: 278
    edited 2014-02-20 02:40
    Anyone for the "RoboCop" look.... I hope my 3W RGB Led rig will fit inside....
    S2_Pimping_My_Ride_001.png

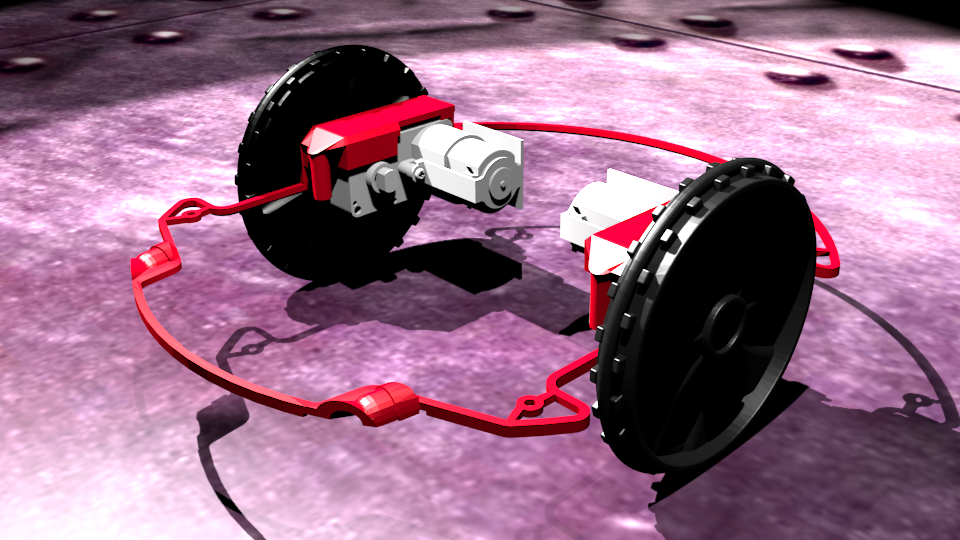
    PS:- as the S" is symetrical..... I only have to Blender Half the "Rig" and stitch a mirrored opposite side when finished...(that why the image is weird above)
    770 x 538 - 371K
  • ercoerco Posts: 20,255
    edited 2014-02-20 19:38
    Gareth: You are an amazing resource, a talented and tireless one-man development tour de force. Wherever do you find the time & energy to do all the wonderful things you do?

    Are you hiring? :)
  • GarethGareth Posts: 278
    edited 2014-02-21 04:40
    erco wrote: »
    Are you hiring? :)

    Yes I'm hi(gh)ring over 2.5cm (does that make me a ruler)
  • GarethGareth Posts: 278
    edited 2014-02-21 04:47
    Not sure about "RoboCop" however as the Light system is behind I reckon its more like the "Millennium Falcon" doing a "MoonMeBaby" escaping the Wrath of Daft Vader.....
    IMG_0890.png


    Seems to fit very well .... except astute readers will notice the bicycle spoke.... they gotta go .. I am working on Magnetic fastenings.
    640 x 480 - 595K
  • NikosGNikosG Posts: 705
    edited 2014-02-21 08:36
    Gareth,

    Perfect 3d printing......!!!!!!!!!
    Say something about the material you use.

    The yellow I suppose ABS the transparent...?
  • GarethGareth Posts: 278
    edited 2014-02-21 10:21
    NikosG wrote: »
    Say something about the material you use.

    I have used mostly PLA including the semi transparent (ABS is pain for shrinking and not sticking to base plate) :-

    Print Parameters..... (these are really settings I used for fast print as I want to get just the "Feel" of what design is possible)

    Print Temperature 220°C
    Bed Temperature 70°C
    Print Speed 50mm/sec
    Fill Density 20%
    Layer Height 0.25mm For the final version I will take this down to 0.1mm
    Shell thickness 0.9mm
    Bot/Top fill 0.6mm

    What I do know is I will print separate bits... and either glue or (see below) ... this will mean that i can easily interchange bits or modules to help with any future projects...

    My magnetic mount system is under-way .......printing...printing.....
  • GarethGareth Posts: 278
    edited 2014-02-22 05:46
    Millennium Falcon !! RGB appears to be working.... however I need a Sponsor for some NeoPixle strips......
    IMG_0900.png

    Take_in shape
    IMG_0902.png


    I have allowed for 2 sets of 5mm holes for the S2s power/indication leds which I will be porting off the main board.
    IMG_0903.png


    Here is my "Magnetic Quick Release" mount system .
    It uses a 5mm Magnetic stand_offs from the S2 shell.
    The Skirt snaps into place to bottom of S2 .... then the S2s lid will snap onto the Skirt Magnetic mounts.
    IMG_0904.png
    IMG_0906.png
    IMG_0907.png
    640 x 480 - 163K
    640 x 480 - 135K
    480 x 640 - 574K
    480 x 640 - 459K
    640 x 480 - 424K
    480 x 640 - 500K
    640 x 480 - 437K
    640 x 480 - 412K
  • mindrobotsmindrobots Posts: 6,506
    edited 2014-02-22 06:01
    Gareth, this is really looking good!!

    You should make robots!! :lol:

    Or sell 3D printers because you're really showing a bunch of reasons I might NEED a 3D printer!
  • ercoerco Posts: 20,255
    edited 2014-02-22 09:28
    @Parallax, I want all of this in the S3. Just do it!

    @Gareth: I've never seen a Scribbler or S2 WALK. Yet. That would probably be far too complicated for 3D printing. No way the BoeBot crawler kit could be adapted for the S2. Simply not possible. http://www.parallax.com/product/30055
  • GarethGareth Posts: 278
    edited 2014-03-01 14:07
    NeoPixels arrived "tout de suite" and with help from Duanes coding :-
    IMG_0917.png
    IMG_0918.png
    IMG_0919.png
    IMG_0920.png
    IMG_0921.png
    IMG_0922.png
    IMG_0923.png
    IMG_0924.png
    IMG_0925.png

    Some awesome lights light combos are now flashing behind ... plan is to have 10 as indication panel ...ie for battery level / or distance to object / or direction / or simple coolio Robocop look and/or Kitt-Car scanner lights....
    640 x 480 - 139K
    640 x 480 - 185K
    640 x 480 - 149K
    640 x 480 - 184K
    640 x 480 - 234K
    640 x 480 - 215K
    640 x 480 - 208K
    640 x 480 - 188K
    640 x 480 - 192K
  • GarethGareth Posts: 278
    edited 2014-03-01 14:11
    erco wrote: »
    S2 WALK.[/video]
    I would settle for nothing less than Theo legs .... heres one I made earlier :- Osaka50
    OrdisSolarisKapacitusBankus_060.jpg
  • WhitWhit Posts: 4,191
    edited 2014-03-01 18:58
    Great work Gareth. Love the Miller engine walker too!
  • ercoerco Posts: 20,255
    edited 2014-03-02 08:05
    Wow, Gareth. I'm late to the party with TheoBot! This ain't your first rodeo, huh?

    Great work and great body of work!
  • GarethGareth Posts: 278
    edited 2014-03-04 05:54
    Latest addition :-
    S2_Gripper_Arm.png

    5 Servo Gripper Arm...
    One more bit to print .... a larger base servo with mount for S2 chassis.
    At the back of the S2 you can see that I have already installed 10 NeoPixel LEDs onto a custom 3D printed removable mount.
    640 x 480 - 508K
Sign In or Register to comment.