

Panoramic Time Lapse Tripod Head (iOS version)

Some time ago I had built a two angle time lapse rig for a GoPro camera.
This time, we're using an iPhone 4's Panorama feature. With the iPhone you press the shutter button, pan up to 180 degrees and then press the shutter button again. This gives you one extremely wide picture. This project automates the process with an adjustable delay, hence the time lapse.
Parts List:
iPhone with latest iOS
External battery pack for iPhone (if you want to shoot all day)
3.5mm headphone jack with bare leads
Tripod
Parallax Touch Sensor (or tin foil)
Basic Stamp 2 Homework Board and 9v power source
Standard Servo
Standard Servo Bracket
10k ohm 1/4 watt resistor
2N2222 transistor (or some other NPN)
6"x6" sheet metal w/ non-conductive covering
0.2" ePVC
Some nuts and bolts
Small perf board
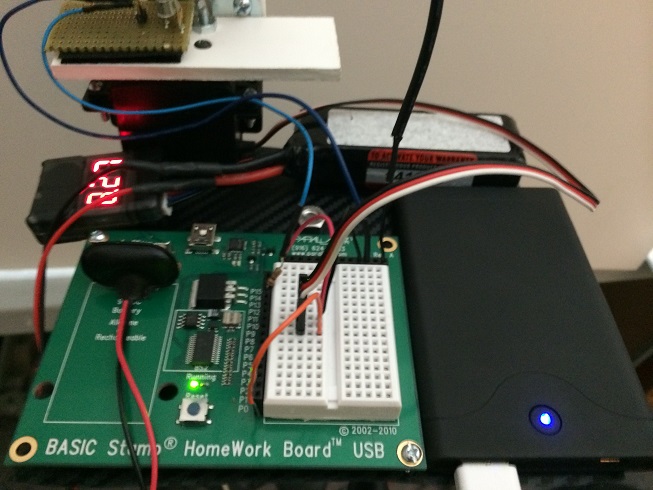
There are plenty of parts you can substitute here, be creative. The first thing you'll want to do is mount everything to a platform you can attach to a tripod.

Above you can see how a 6"x6" area fits everything well.

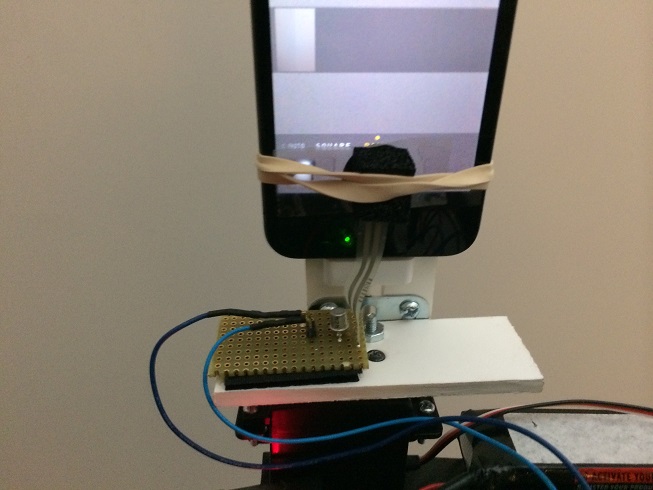
Here you can see the 2N2222 transistor, this must be mounted very close to the screen or it will false trigger. I used a rubber band, small foam block, and tape to hold the touch sensor in place. If you use foil the part that contacts the screen will need to be the size of a finger tip.
Here is a video:
[video=youtube_share;a20qcyl6GRo]
This time, we're using an iPhone 4's Panorama feature. With the iPhone you press the shutter button, pan up to 180 degrees and then press the shutter button again. This gives you one extremely wide picture. This project automates the process with an adjustable delay, hence the time lapse.
Parts List:
iPhone with latest iOS
External battery pack for iPhone (if you want to shoot all day)
3.5mm headphone jack with bare leads
Tripod
Parallax Touch Sensor (or tin foil)
Basic Stamp 2 Homework Board and 9v power source
Standard Servo
Standard Servo Bracket
10k ohm 1/4 watt resistor
2N2222 transistor (or some other NPN)
6"x6" sheet metal w/ non-conductive covering
0.2" ePVC
Some nuts and bolts
Small perf board
There are plenty of parts you can substitute here, be creative. The first thing you'll want to do is mount everything to a platform you can attach to a tripod.
Above you can see how a 6"x6" area fits everything well.
Here you can see the 2N2222 transistor, this must be mounted very close to the screen or it will false trigger. I used a rubber band, small foam block, and tape to hold the touch sensor in place. If you use foil the part that contacts the screen will need to be the size of a finger tip.
Here is a video:
[video=youtube_share;a20qcyl6GRo]
653 x 490 - 110K
653 x 490 - 83K
Comments
Code:
' {$STAMP BS2}
' {$PBASIC 2.5}


'250 servo reset position (far right)
'1000 servo end position (far left)
'Servo end positions will vary


'constants
servo  PIN 0            'servo pin
spin   PIN 13           'shutter pin is connected to 2N2222 transistor base w/ 1k ohm resistor


'variables
pos    VAR Word         'variable servo position for panning right 250 to 1000
rpos   VAR Word         'sets the far right panning position
rcount VAR Word         'counter variable to allow the servo time to reach the reset position


'initialize variables
pos  = 250              'initiate the pos varibable at 250 (far right position)
rpos = 1000             'initiate the rpos varibable at 1000 (far left position)


'begin main program
DO                      'start of main program loop
 GOSUB reset            'calls reset subroutine
 PAUSE 1000             '*delay between pictures* change this to whatever you want
 GOSUB shutter          'calls shutter subroutine
 GOSUB scan             'calls scan subroutine
 GOSUB shutter          'calls shutter subroutine
LOOP                    'go back to beginning of loop


'subroutines
reset:                  'reset subroutine pans the camera quickly

  FOR rcount = 1 TO 25  'for/next counter to give servo time to move to reset position
  PULSOUT servo, rpos   'pulse servo pin rpos value
  PAUSE 20              'standard pause for controlling servo
  NEXT                  'loop until rcount reaches 25
  RETURN                'go back to main program when above loop complete


scan:                   'scan subroutine pans the camera slowly

  pos = rpos            'update the position counter to match servo position
  DO UNTIL pos < 250    'loop until servo moves to far right
  PULSOUT servo, pos    'pulse the servo pin with pos variable
  PAUSE 20              'standard pause for controlling servo
  pos = pos - 1         'reduce the pos var by increment, change to adjust speed
  LOOP                  'loop until pos less then 250
  RETURN                'go back to main program when above loop complete


shutter:                'emulates a finger pressing capacitive screen

  HIGH spin             'turns on shutter pin
  PAUSE 500             'waits half a second
  LOW spin              'turns off shutter pin
  PAUSE 500             'waits half a second
  RETURN                'goes back to main program loop