

Building Stingray, really need other owners to tell me if this is wrong.
 rwgast_logicdesign
Posts: 1,464
rwgast_logicdesign
Posts: 1,464
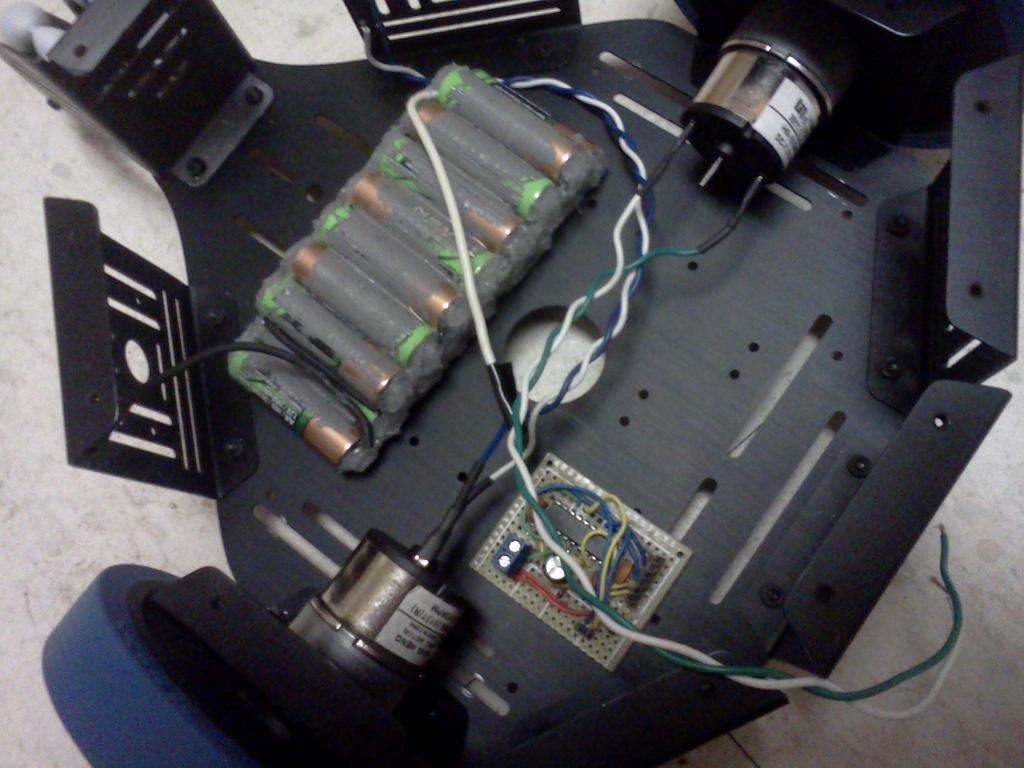
I wanted a stingray with blue wheels, and was emailed by a parallax employee telling me they still had one in there ebay stock that was brand new, so I went ahead and ordered it. The sting ray I recived has some minor issues which lead me to believe it is not totally new. I have contacted parallax and hope they will help me out here, im just going to keep this one. But i started building it tonight and I was reading the PDF, I mounted the motor panels as shown in the document. I also followed the directions for installing the motors to the tee. Here is a pic

Heres the deal the two motors arent mounted at the same angle. You can see the the one on the right is at a 90 degree angle from the one on the left. This is really no big deal but it makes adding things to the back shaft a bit harder. I have looked at various drawing and pics of the sting ray and none of them have the motor leads at diffrent angles. The motors seem to only fit one way in to the plate. Does anyone else have a sting ray like this? Also if you follow the PDF the motors spin in different directions, that is a given for any robot (becuase one is usually "upsidedown" from the other) but I would thing parallax would have you wire them to spin the same way. The reason im asking is becuase im wondering if some how my motors are somehow mounted wrong and just want to verify the motors spin in the opposite direction when wired according to the manual and tested with a battery.
Heres the deal the two motors arent mounted at the same angle. You can see the the one on the right is at a 90 degree angle from the one on the left. This is really no big deal but it makes adding things to the back shaft a bit harder. I have looked at various drawing and pics of the sting ray and none of them have the motor leads at diffrent angles. The motors seem to only fit one way in to the plate. Does anyone else have a sting ray like this? Also if you follow the PDF the motors spin in different directions, that is a given for any robot (becuase one is usually "upsidedown" from the other) but I would thing parallax would have you wire them to spin the same way. The reason im asking is becuase im wondering if some how my motors are somehow mounted wrong and just want to verify the motors spin in the opposite direction when wired according to the manual and tested with a battery.
1024 x 768 - 89K
Comments
I too wish they could be turned 90 degrees, cuz it does make it a little more difficult to add encoders and such.
I think MattG came up with a way to take the gear head off the motor, so you could put the wires where you want them.
Not sure it was a good idea or not, I did not try it.
-Tommy
As far as it being a bit of a pain to build encoders to fit the back shaft, due to having to account for the wires in different places when you build the board there is a simple answer. Clip down the motor leads, clip the crimps off the wires, then solder them as flush as you can to the housing, these motors also need some filter caps installed on them so you should be soldering to them any ways might as well fix this issue while your at it
It looks like you have a custom battery pack for the robot. Instead of adding all the extra stuff on the edges as an insulator you may want to check with your local hobby shops. Many carry large shrink wrap that us used to make custom battery packs. A piece of heat shrink covering the pack can really help.
-MattG
What kind of issues? We don't like it when our customers have "issues".
-MattG
Thanks for the tip about the motors matt, I thought about doing this but looking at the motors gear head and screw pattern I was not sure if that would work, now that I do I will do that when I take the motors out to install filter caps! While im in there do you recommend putting some white lithium on the gears, I know some manufactures do not use the best lubes.
Maybe someone knows Matts original post, or better yet can explain how to reclock.... I searched the forums via the search function, and the google site:forums.parallax.com trick, I cant find the original post anywhere, I tried reclocking, reclocking stingray motors, and just stingray.
For any of you who also think this is kind of a pain and want your motor terminals to line up here is how you reclock the gearbox. Remove top cover, leave all gears in place. Unscrew the two screws you see holding the bottom of the gear box on, then twist the bottom platform of the gearbox to where it needs to go.