Capacitive Multi-Touch example code
Here's an example of how to interface to the Newhaven 5" capacitive touch touchscreen.
I'm using our DVI Graphics shield along with the touchscreen plugin.
But, this can also work with our NH4 adapter, Newhaven's adapter or your own adapter.
Should work with the 4.3" capacitive screens too with required changes to the display portion of the demo.
The interface is I2C, so it's was really easy to write the driver.
It tracks up to 5 fingertips, so it's kinda cool.
Also, it can detect the zoom in and out gestures all by itself.
5p0_CapTouchTest1 - Archive [Date 2012.07.15 Time 15.36].zip
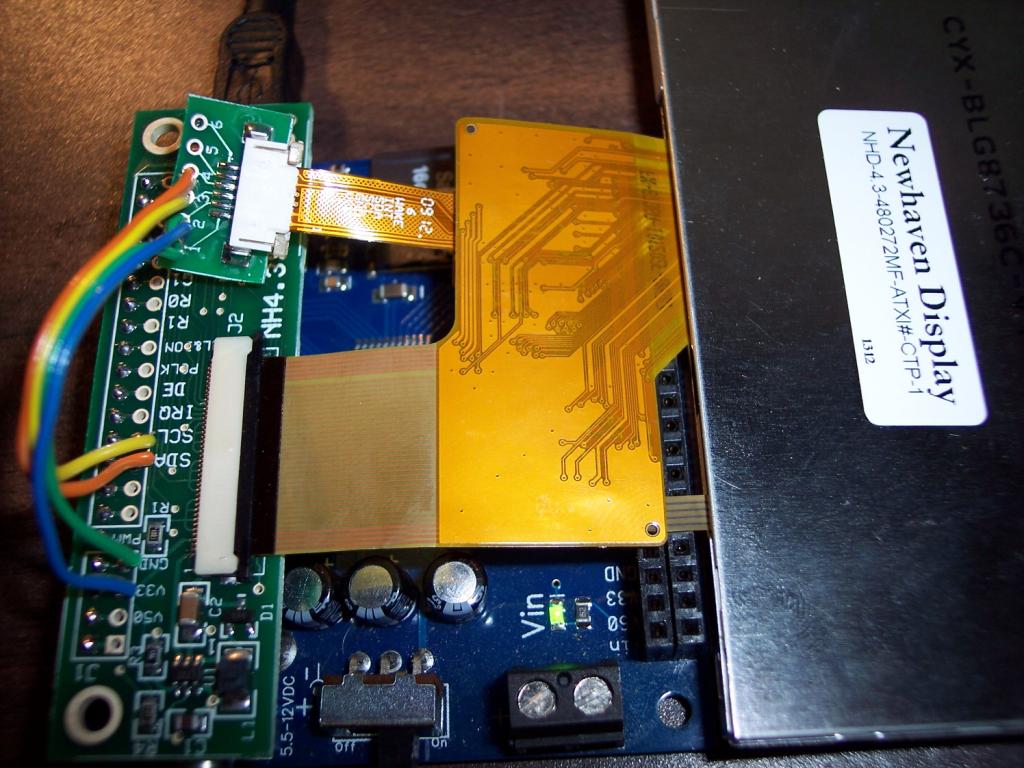
Update: Now have it working with the low cost NH4 adapter and have a $3 breakout for the capacitive touch connector:

You just have to run 4 jumper wires as shown in the photo above...
Update2: Now demonstrated to work with Newhaven 5" LCDs...
I'm using our DVI Graphics shield along with the touchscreen plugin.
But, this can also work with our NH4 adapter, Newhaven's adapter or your own adapter.
Should work with the 4.3" capacitive screens too with required changes to the display portion of the demo.
The interface is I2C, so it's was really easy to write the driver.
It tracks up to 5 fingertips, so it's kinda cool.
Also, it can detect the zoom in and out gestures all by itself.
5p0_CapTouchTest1 - Archive [Date 2012.07.15 Time 15.36].zip
Update: Now have it working with the low cost NH4 adapter and have a $3 breakout for the capacitive touch connector:

You just have to run 4 jumper wires as shown in the photo above...
Update2: Now demonstrated to work with Newhaven 5" LCDs...


Comments
Just be careful because pins 3&4 are reversed between board and 6-pin connector...
Do you by chance offer a standing subscription service where we can just sign up, and you send us these goodies + bill as you get each device/chip up and running?
The 5" multi-touch screens are little pricey, but I now see that multi-touch is really nice and probably worth the extra expense.
You also don't have to calculate and judge Z (how hard you're pressing), the chip does all this for you...
I unzipped the parts and put them into my prop folder. I get two errors that state:
PSB2_i2cdriver relocation pointer error 0228
PSB2_i2cdriver fatal unable to locate object to fix up 40
This is on 2 different computers, the object is in the folder as I can load it. I was trying to test on the 4.3. Any thoughts?
Ok that was BST, Proptool loads.
You may have different versions of PSB2_i2cdriver now... Maybe try renaming this new one to something else...
What you might try is replace the PSB2_i2cdriver in that one with this new one.
Then, copy the touchscreen example code from here into the paint program.
Next, you could either have the code set pixels in the graphics area or draw text on the text area...
BTW: How are you connecting to the I2C touchscreen 6-pin tail connector?
I will try that idea in a few minutes, thanks.
Been putting it off for a long time, so thanks for asking for it...
Let me know if this doesn't work for you:
NH4_Paint3_CT - Archive [Date 2012.08.16 Time 20.26].zip
It actually works better than I expected...
The driver works just like the VGA driver. You can find apps to make 1 and 2-bit bitmaps on my website. There is also a very long thread around about the Samsung version of this driver... (actually the drivers are almost identical, it's mostly just the backlight circuit that is different).
The goal is to create some white icons, logos, text, arrows, etc, then position on the screen in a horizontal or vertical manner.
Thanks for all the hard work putting those apps together.
This is done at the beginning of the code...
But, in some earlier versions of code, you need to manually specify how many tiles worth of graphics need to be moved. I think it was usually called "nuchars".
If you have the wrong number there, bad things will happen.
In newer codes, I have it automatically do this...
This uses up a lot of memory, but you can save room by making it single buffered instead of double buffered...
You can start from the NH4 Paint example to do it this way...
EDIT Nevermind, dumb question.
This is defined by the first two longs under "vgacolors"
Try changing the numbers here and see if that helps:
DAT
vgacolors               long
                        long    $F00CF00C       'blue background with yellow letters
                        long    $F0F00C0C
BTW: I have a vga colors app on my website that might help decipher these values...
All zeros should be black on black...
This was a quick mod, but kinda fun.
You can see by how small the graphics area looks, how much bigger resolution and DPI you get with the 5" screen:
EDIT you said to run in single buffer to save memory but I cannot find what that means or where to change it from dual.
The "Paint" example is single buffered and these values have the same addresses.
But, even with single buffering, I don't think there's enough HUB RAM to cover the whole screen with graphics. But, you can do most of it.
The Paint example saves memory by using 2-bit bitmaps for buttons.
display_base = $8000-GraphicsBytes'$5000
This is what I have that was the original, I never changed it. There are only several graphic parts to display, but they are from one end to the other with large sections of black in between. Instead of declaring one large area for graphics, can I call several sections only where the graphics need to live?
I just took a quick look for an example, but didn't see one...
As I recall, you just create several instances of the "Graphics" object and treat them all individually...
Memory allocation might be the hard part... You might need something like this: