

Scratch built Hydra game system clone in a CD Spindle case - Full Featured
 RobotWorkshop
Posts: 2,307
RobotWorkshop
Posts: 2,307
Here is a project that I hope you find interesting. This is a fully functional Hydra game system clone built within a CD Spindle case. It has made appearances at the UPENE shows and I expect to bring it to the next one. Since the Hydra Schematics and code are in the Hydra book I will just focus on the construction details here. During the construction several recycled parts were used to help reduce the cost of the project.
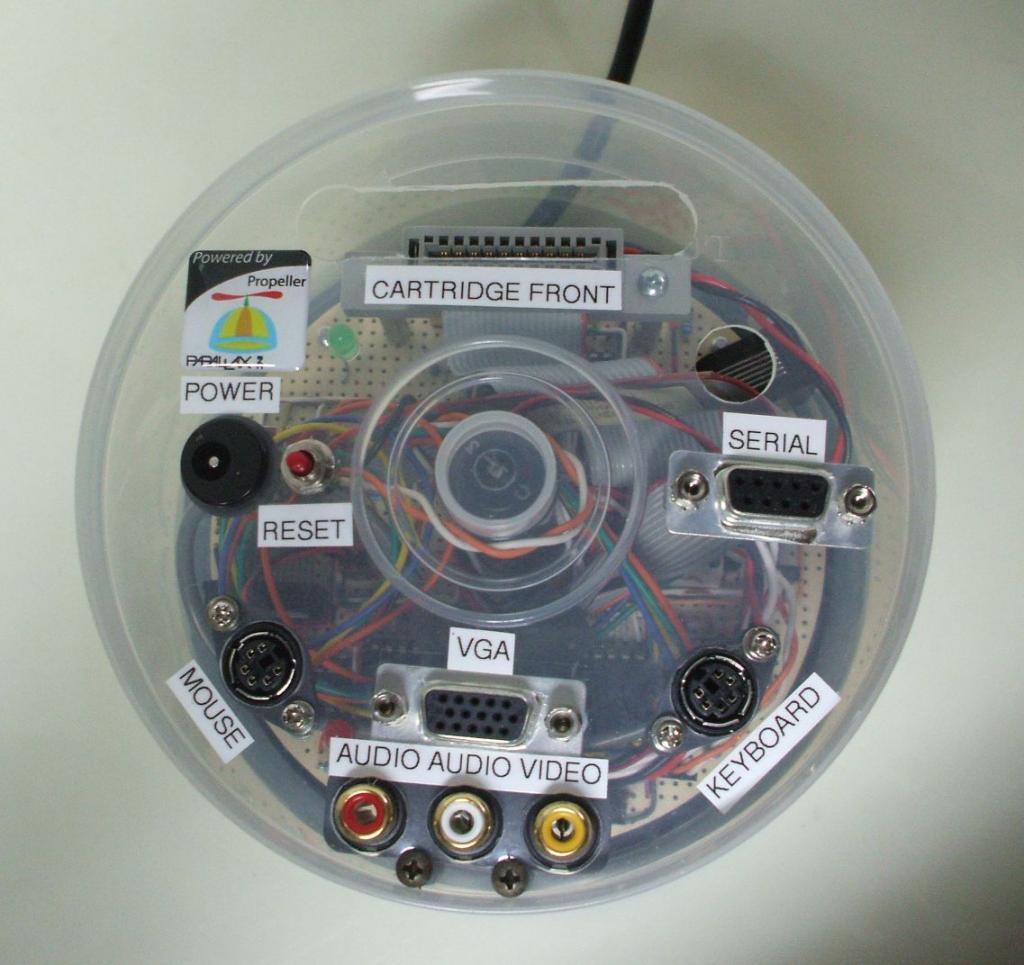
This originally started out as the Propeller DEMO board built in a CD Spindle case but when I was learning more about the Propeller processor I bough the Hydra Book and CD. There was a lot of interest in the Hydra at the time and since you could only buy it as the whole set with another book, etc I decided to rebuild the project and instead make it a complete Hydra system within a CD case. There was a lot to pack in there since I wanted to use all the features and have a nice finished look when it was done. The only differences between a real Hydra and this clone is that I left off the 4-pin USB2SER port and used a MAX3232 in place of the onboard FTDI USB adapter for programming. Other than that all the features are present:
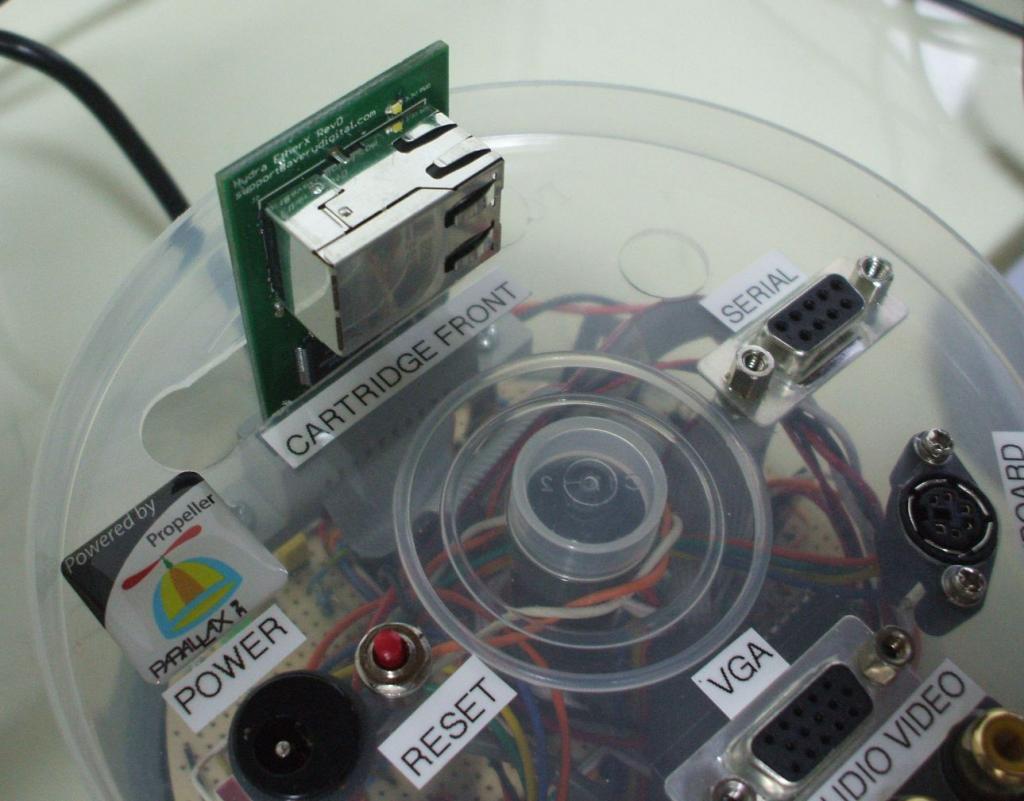
- VGA port
- Composite video port
- Audio port
- Mouse port
- Keyboard port
- Reset Button
- Cartridge adapter
- Debugging LED
- Power LED's
- Cartridge LED
- 8 LED's on VGA port
- Tri-State buffer w/jumper on VGA port
- Hydra NET port
- Serial Programming port (instead of USB)
- Two NES ports for Gamepads, etc
- On board 5V and 3.3V regulators
- Connector for external wall wart PS
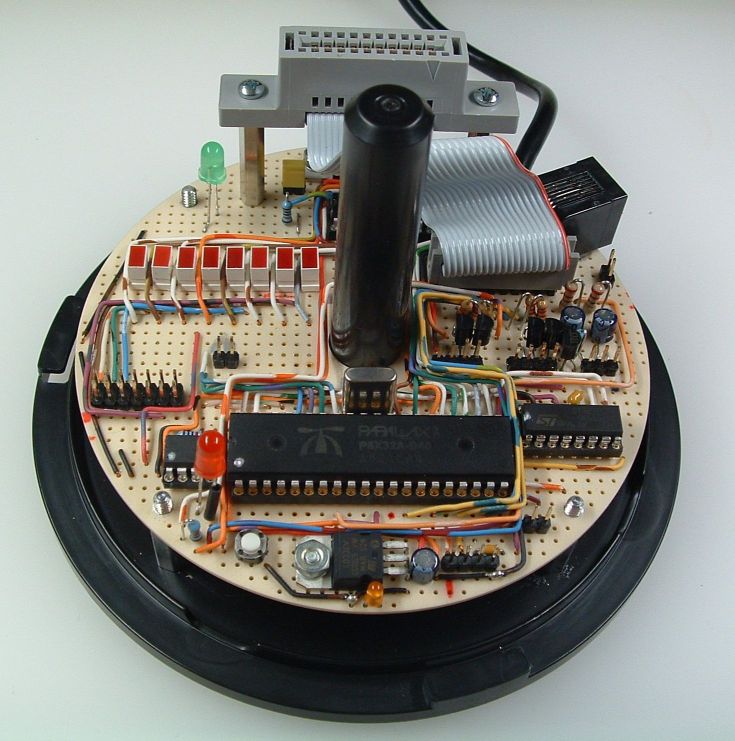
The entire project is housed within a standard 50 CD/DVD Spindle case. This gives the completed game system a nice finished look and the status LED's are visible through the case.
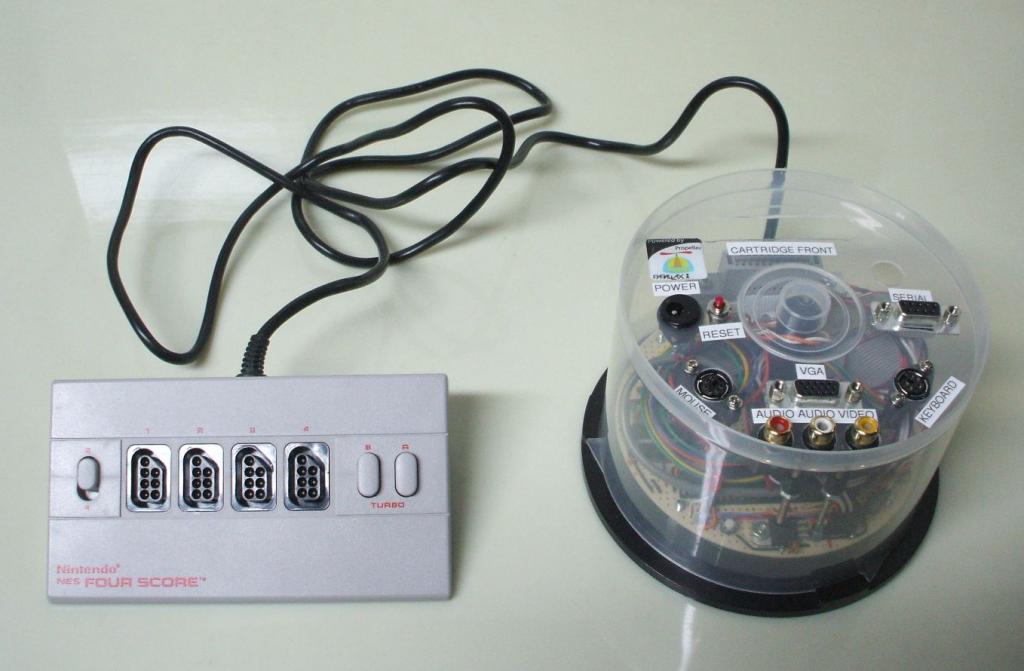
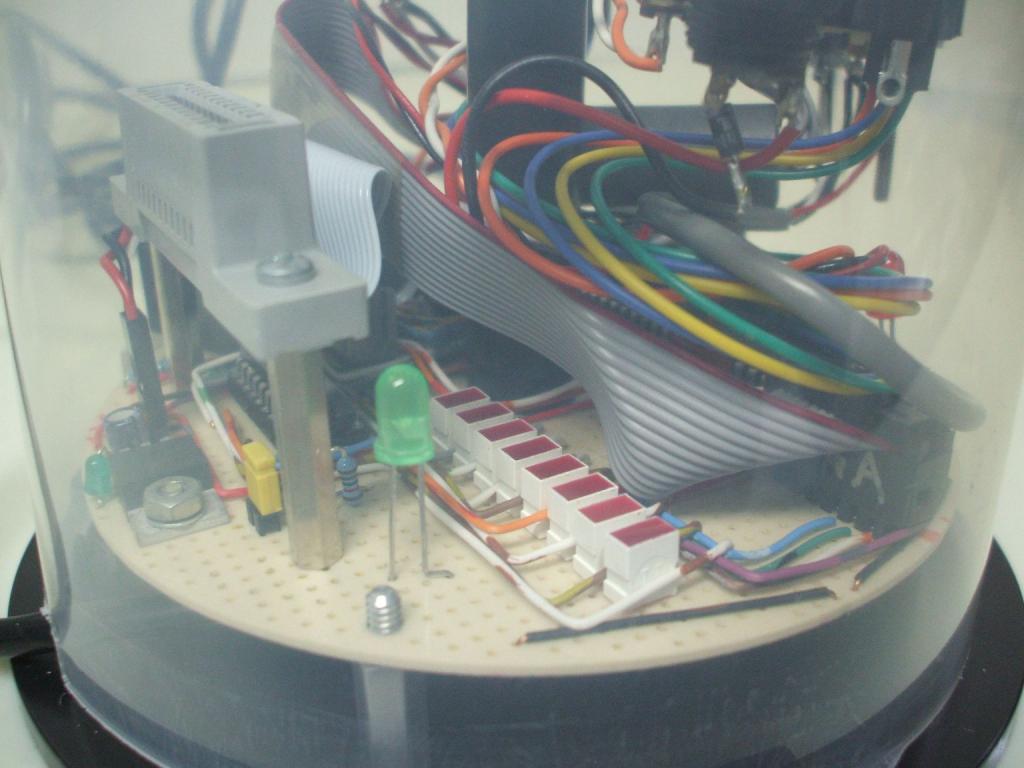
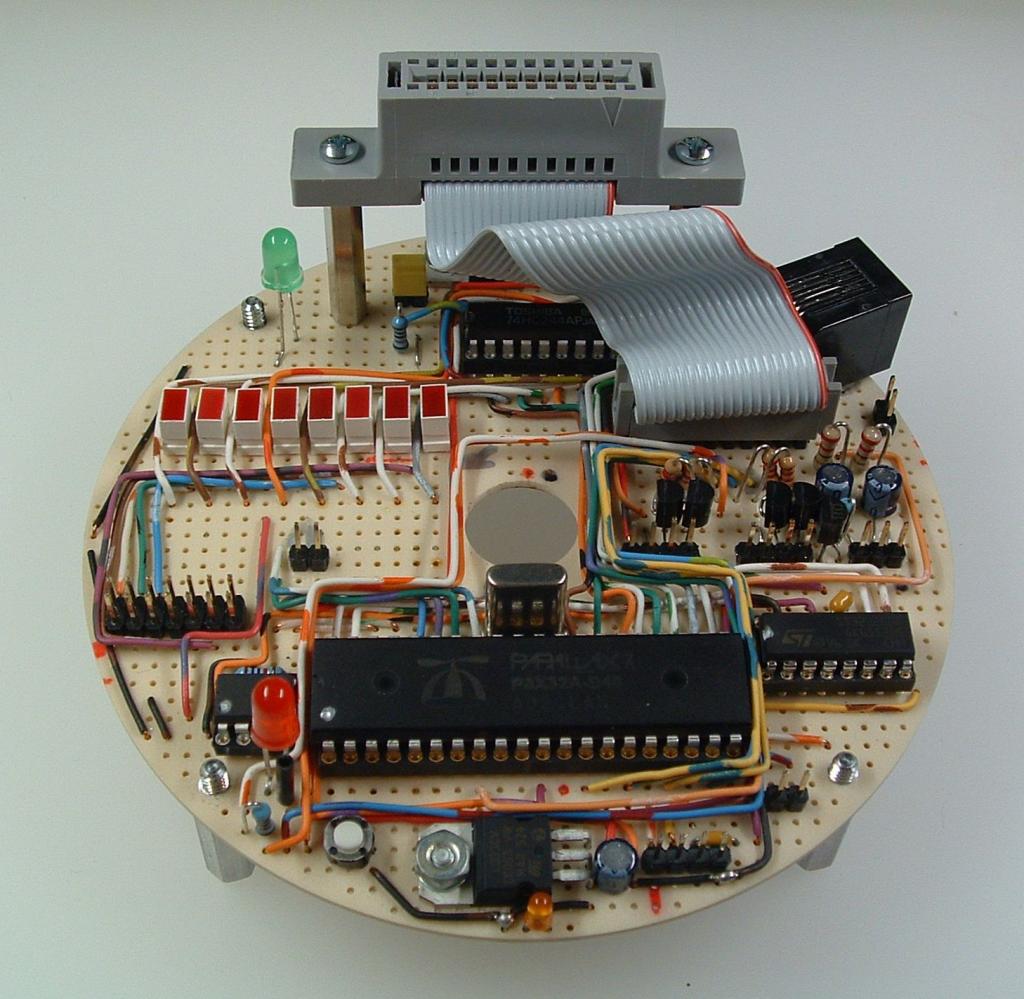
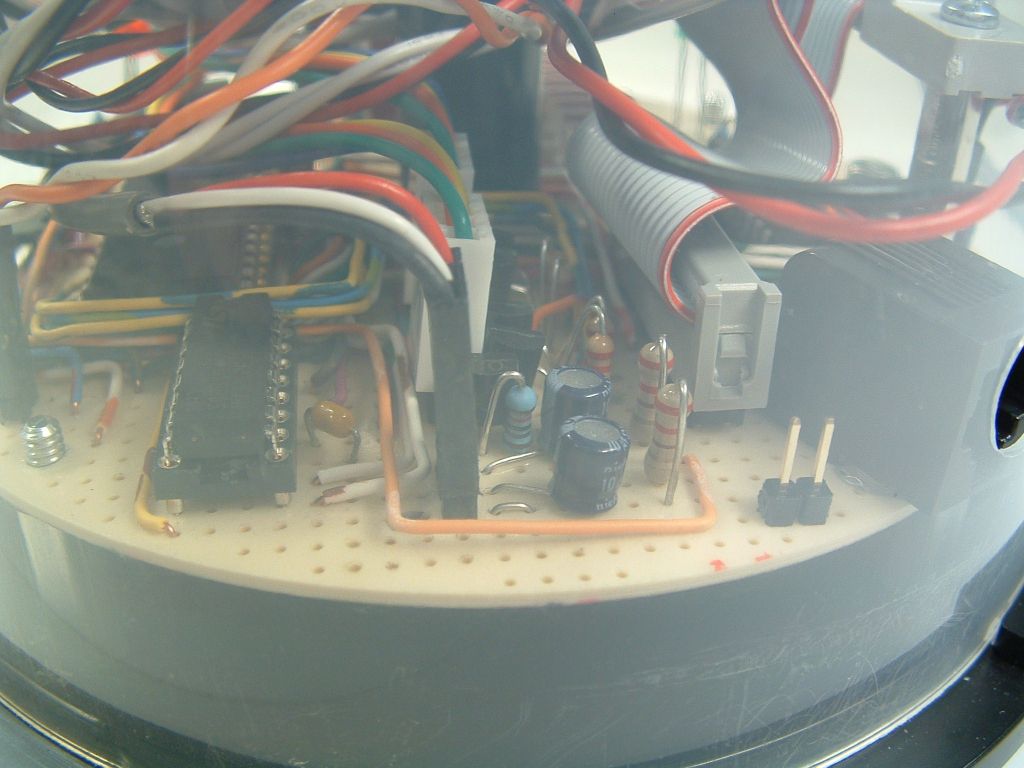
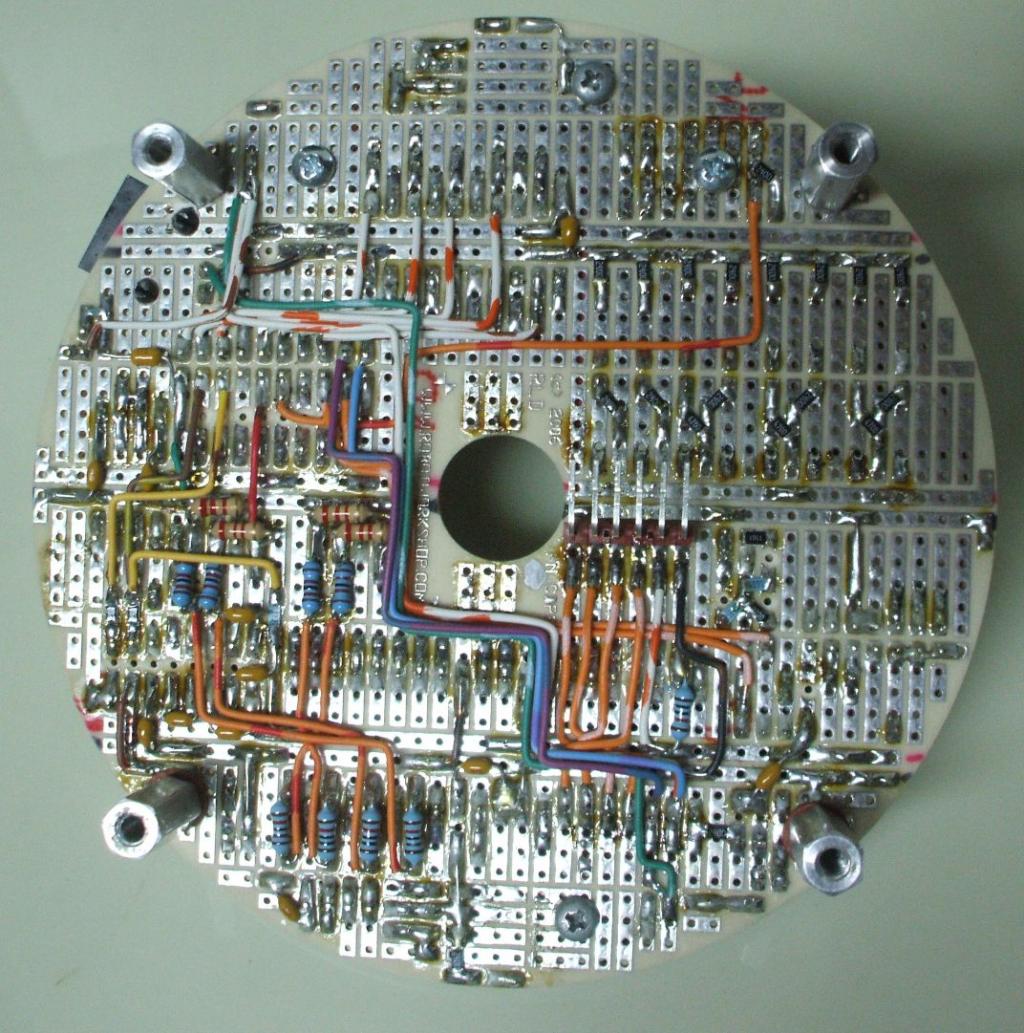
It is tightly packed in the case but everything fits! One reason is the use of the CD PCB that I made for the SpindleBot robots. These protoboards let me use all the available space to install components. It has parts and wiring on both sides of the board. To make the project work one of the main features needed was the cartridge port. I didn't want to use a standard PCB mount 20-pin edge card connector since that would be too low in the case and I'd never be able to insert or remove the cartridges with the case on. The solution ended up being an easy one. I found a 20-pin edge card connector for ribbon cable with mounting ears. These connectors were ones that I had used in other projects and thought they would apply here. With a couple of metal standoff's to raise it up the connector is at an ideal height to allow the cartridges to be used with the cover in place. A short ribbon cable connects this to the main board.
When I built this clone game system the NES connectors were hard to come by. At first I was going to buy some NES extension cables then cut off and end to attach to the main board. Instead I came across an NES option called the FOUR SCORE (NES-034A) which has the NES connectors mounted in a nice case and adds a TURBO feature. I just cut the end off that and then installed a new .100" connector so I can plug it onto the bottom of the PCB. One little notch in the back of the cover gives room for the cable to pass through.
In regards to "re-cycled" parts there is the CD/DVD spindle case, power connector, Wall Wart power supply, Audio/Video RCA plugs (salvaged from a dead piece of video gear being scrapped, VGA Status LED's (from an old HVAC control board), VGA connector and ribbon cable, Misc caps, and most of the wiring. Even the solid cable used as the wiring for the board was recycled from the installation of a new PBX. When I build one off and odd projects I try to use what I have on hand.
I recently picked up a used Hydra board so now I have a real one to compare it to. Now with two working systems I can experiment with the Hydra NET and some other features.
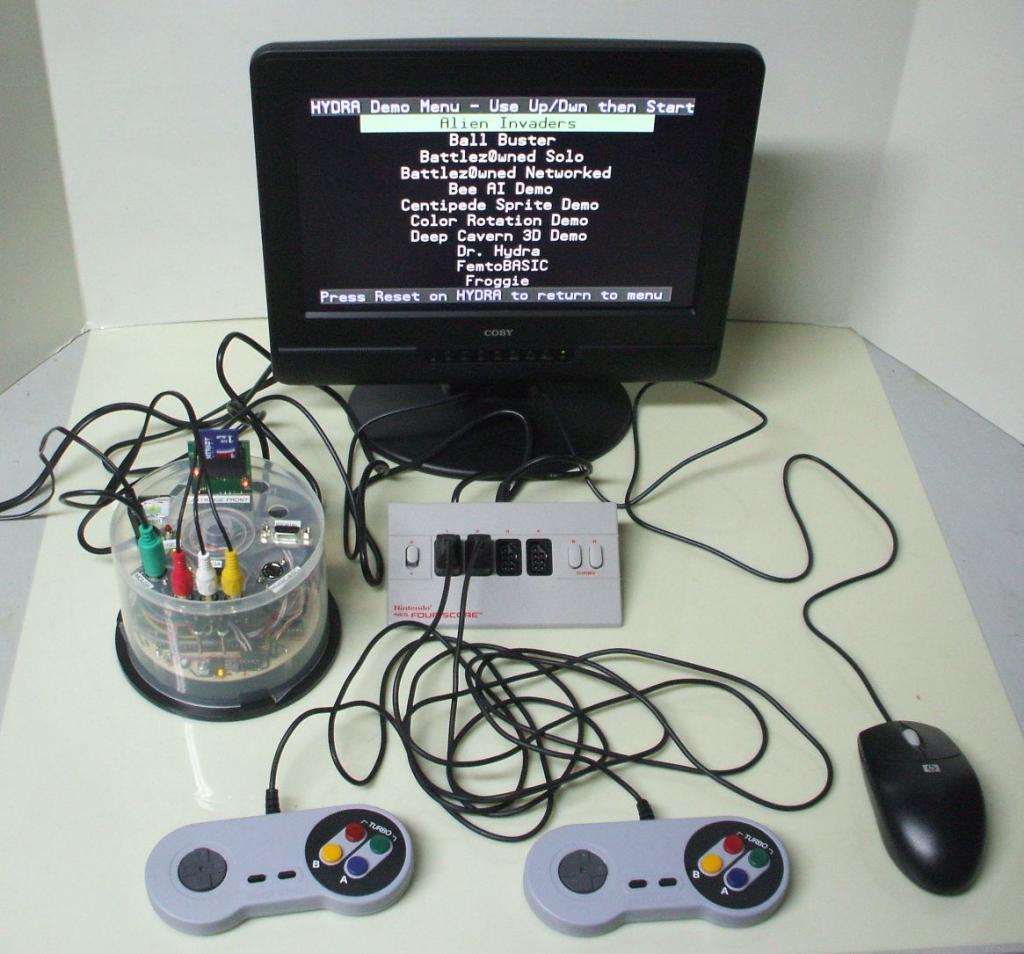
Pictures of the finished project are shown below.


If anyone wants to build a project like this let me know. I still have blank boards available which makes the project much easier.
Robert
This originally started out as the Propeller DEMO board built in a CD Spindle case but when I was learning more about the Propeller processor I bough the Hydra Book and CD. There was a lot of interest in the Hydra at the time and since you could only buy it as the whole set with another book, etc I decided to rebuild the project and instead make it a complete Hydra system within a CD case. There was a lot to pack in there since I wanted to use all the features and have a nice finished look when it was done. The only differences between a real Hydra and this clone is that I left off the 4-pin USB2SER port and used a MAX3232 in place of the onboard FTDI USB adapter for programming. Other than that all the features are present:
- VGA port
- Composite video port
- Audio port
- Mouse port
- Keyboard port
- Reset Button
- Cartridge adapter
- Debugging LED
- Power LED's
- Cartridge LED
- 8 LED's on VGA port
- Tri-State buffer w/jumper on VGA port
- Hydra NET port
- Serial Programming port (instead of USB)
- Two NES ports for Gamepads, etc
- On board 5V and 3.3V regulators
- Connector for external wall wart PS
The entire project is housed within a standard 50 CD/DVD Spindle case. This gives the completed game system a nice finished look and the status LED's are visible through the case.
It is tightly packed in the case but everything fits! One reason is the use of the CD PCB that I made for the SpindleBot robots. These protoboards let me use all the available space to install components. It has parts and wiring on both sides of the board. To make the project work one of the main features needed was the cartridge port. I didn't want to use a standard PCB mount 20-pin edge card connector since that would be too low in the case and I'd never be able to insert or remove the cartridges with the case on. The solution ended up being an easy one. I found a 20-pin edge card connector for ribbon cable with mounting ears. These connectors were ones that I had used in other projects and thought they would apply here. With a couple of metal standoff's to raise it up the connector is at an ideal height to allow the cartridges to be used with the cover in place. A short ribbon cable connects this to the main board.
When I built this clone game system the NES connectors were hard to come by. At first I was going to buy some NES extension cables then cut off and end to attach to the main board. Instead I came across an NES option called the FOUR SCORE (NES-034A) which has the NES connectors mounted in a nice case and adds a TURBO feature. I just cut the end off that and then installed a new .100" connector so I can plug it onto the bottom of the PCB. One little notch in the back of the cover gives room for the cable to pass through.
In regards to "re-cycled" parts there is the CD/DVD spindle case, power connector, Wall Wart power supply, Audio/Video RCA plugs (salvaged from a dead piece of video gear being scrapped, VGA Status LED's (from an old HVAC control board), VGA connector and ribbon cable, Misc caps, and most of the wiring. Even the solid cable used as the wiring for the board was recycled from the installation of a new PBX. When I build one off and odd projects I try to use what I have on hand.
I recently picked up a used Hydra board so now I have a real one to compare it to. Now with two working systems I can experiment with the Hydra NET and some other features.
Pictures of the finished project are shown below.
If anyone wants to build a project like this let me know. I still have blank boards available which makes the project much easier.
Robert

1024 x 671 - 65K
1024 x 965 - 99K
1024 x 768 - 74K
1024 x 954 - 107K
1024 x 801 - 85K
1024 x 999 - 130K
735 x 741 - 103K
1024 x 768 - 95K
1024 x 1033 - 191K
Comments
-Phil
It looks like I still have one open issue left to resolve on this. It works great with the SD expansion cartridge but for some reason it isn't initializing the 512K SRAM card and it fails those tests. That card works ok on the real Hydra. After going through the docs it may have something to do with the reset or USB/RX lines that go to the expansion port and need to double check those. I want to make sure all the cards work perfect in it. I think I may take one of the black experimenter boards and build a diagnostic card with LED's on all the lines so I can write a small exercise/test program to check each one.
All of the other features are working and it has been reliable. At the UPENE it is usually powered up the whole day and it has been popular with the kids that show up at the event and gives them something to play. I want to use this and the real Hydra to help introduce my son to game programming with the examples in the book as a starting point.
Robert
Have you tried one of the EEPROM type game cards? I know the Hydra uses some trick to see if there's a card in the slot or not so it will boot from a game card before the onboard EEPROM.
I'm not sure if the EEPROM detect circuit is realated to your SRAM problem or not.
That's a beautiful project. Thanks for posting it.
When the test program for the 512K SRAM card runs I notice that is doesn't set any of the configuration LED's when it starts which was pointing me back toward the lines used to initialize the card. I'm sure I'll get to the bottom of it. I won't be satisfied until I have it done right and working 100 percent.
I need to find my other pictures since the resistor network for the composite is pretty interesting on this. I did that with all surface mount parts soldered to the pads on the bottom of the PCB. When building this I wanted to to look as good as it works.
Robert
Robert
And featured on the Parallax homepage this week!
I need to build on of these. I've got the last of remaining new NES connections on my shelf. Without excuse!
Still got a spare board you want to part with?
OBC
BTW Parallax must have brought more NES connectors, they have more than 4000 in stock.
http://www.parallax.com/StoreSearchResults/tabid/768/txtSearch/nes/List/0/SortField/4/ProductID/522/Default.aspx
I still have quite a few boards left. They were $9.95 each plus a little for shipping. Just send me a PM if you'd like one.
Robert