

ELEV-8 Quadcopter Build
 CowboyCoder
Posts: 33
CowboyCoder
Posts: 33
Hello all.
I just received a new ELEV-8 Quadcopter and, with the approval of the 'boss', I am going to post a quick build here for other users. I hope you find it helpful in your build of the ELEV-8, it can be a bit tricky.
First, let me say that the ELEV-8 Quadcopter is not a build for the faint of heart. There are a lot of parts and pieces that make up this flying contraption, and their proper and secure attachment is CRITICAL to success. Additionally, the ELEV-8, although cool as hell, is not intended for a brand new flyer. Not without an experienced trainer on a buddy box. Ok, all that being said... let's have some fun.
I better tell ya'll right now that I live on a cattle ranch in the middle of no where. I am on dial up (somedays I am sure it is still telegraph...) and it is hard to post many large pictures at once. If it is ok with you, I will post one step with 1 or 2 explanatory photos.
So here we go.
The ELEV-8 arrived on my doorstep as a very complete kit. Everything was organized and bagged well, with no shipping damage. The first thing that I noticed while unpacking is that everything you need to build the bird is in that one small box. Sure, you have to add a battery and radio system, but thats it. Parallax provides a generous amount of bullet connectors, EC3 connectors and wire for hooking up all of the various electronics. Way more than enough if you are not a bonehead (Kevin, I apologize and get it now). Did I mention that I am a gas passer flyer, this is my first trip into the confusing land of sparkys.
The ELEV-8 does not ship with instructions in the box at this time. They are available on the ELEV-8 web page located here --> http://www.parallax.com/Store/Robots/AllRobots/tabid/755/ProductID/799/List/0/Default.aspx?SortField=ProductName,ProductName . A little note about the instructions. The ELEV-8 is a community designed product and that means changes may happen frequently. When changes happen, there may be confusion in the assembly process because the instruction downloads are a bit behind due to the time necessary to correct, update and upload them. Check the downloads often to save bothering Kevin on Superbowl Sunday (I apologize again Kevin. If your keeping score, thats 2).
Tools - The staff at Parallax has put together a nice tool list and posted it in the ELEV-8 section of this Forum. Get them all, you will use them. Where it says heat gun, they did not mean the blow dryer you ripped from your wife, they mean heat gun. The heat shrink tubing included is the heavy duty stuff, not what you may be used to using in light duty robotics applications.
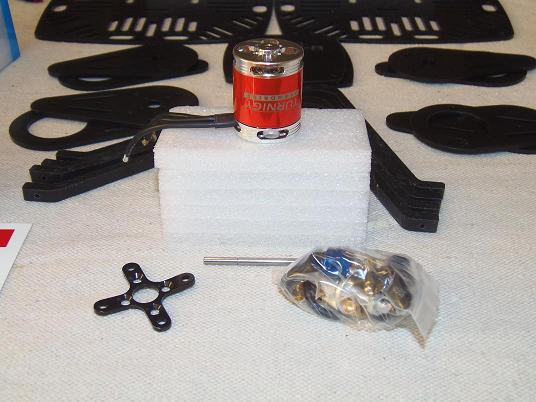
STEP 1 - BUILD MOTOR ASSEMBLIES X4
I followed the assembly instructions ont he first page of the .pdf document and its accompanying written instructions.
About the only thing I did here is make a motor jig out of the semi rigid foam that the Turnigy motors are packaged in. (see pic)
Make sure to do this step first as thread lock needs to setup some before use. Also note that the little set screw inside the cans are PRE INSTALLED but they are not tight and do not have thread locker on them. Carefully remove the set screws, treat them and reinstall. Watch out for the magnets, they will try to steal this little sucker from you... don't ask...
Another good point about pre-assembled products, NO FASTENER IS TIGHT UNTIL YOU HAVE TESTED IT, EVER! That is a critical rule in flying hardware, especially a quad. It is just not flyable without one prop.
That brings up a good point. I always work with a painters canvas on my table and under my feet. It is the perfect color for showing off a tiny screw that gets dropped. If it falls in carpet, it is a goner for sure. Again, don't ask...
MOTOR IN JIG -

COMPLETED MOTORS -
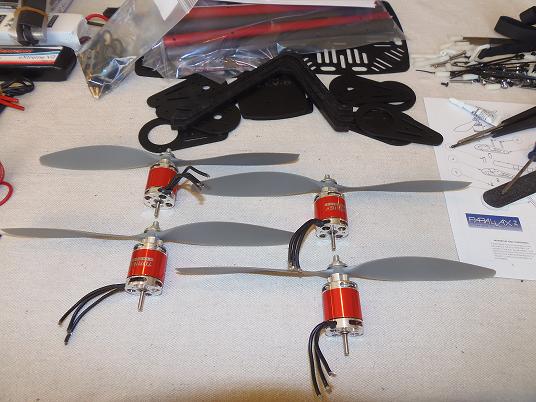
NOTE - I have never been a fan of APC props... they usually have a lot of excess flashing that needs to be cleaned up before installation. Clean and balance your props carefully. Balancing is mandatory and can be accomplished using an economy balancer from Hobby King.
Time elapsed: 20 minutes.
My next post will be STEP 2 - BOOM ASSEMBLIES (maybe tonight, probably tomorrow)
Thanks for reading everyone.
I just received a new ELEV-8 Quadcopter and, with the approval of the 'boss', I am going to post a quick build here for other users. I hope you find it helpful in your build of the ELEV-8, it can be a bit tricky.
First, let me say that the ELEV-8 Quadcopter is not a build for the faint of heart. There are a lot of parts and pieces that make up this flying contraption, and their proper and secure attachment is CRITICAL to success. Additionally, the ELEV-8, although cool as hell, is not intended for a brand new flyer. Not without an experienced trainer on a buddy box. Ok, all that being said... let's have some fun.
I better tell ya'll right now that I live on a cattle ranch in the middle of no where. I am on dial up (somedays I am sure it is still telegraph...) and it is hard to post many large pictures at once. If it is ok with you, I will post one step with 1 or 2 explanatory photos.
So here we go.
The ELEV-8 arrived on my doorstep as a very complete kit. Everything was organized and bagged well, with no shipping damage. The first thing that I noticed while unpacking is that everything you need to build the bird is in that one small box. Sure, you have to add a battery and radio system, but thats it. Parallax provides a generous amount of bullet connectors, EC3 connectors and wire for hooking up all of the various electronics. Way more than enough if you are not a bonehead (Kevin, I apologize and get it now). Did I mention that I am a gas passer flyer, this is my first trip into the confusing land of sparkys.
The ELEV-8 does not ship with instructions in the box at this time. They are available on the ELEV-8 web page located here --> http://www.parallax.com/Store/Robots/AllRobots/tabid/755/ProductID/799/List/0/Default.aspx?SortField=ProductName,ProductName . A little note about the instructions. The ELEV-8 is a community designed product and that means changes may happen frequently. When changes happen, there may be confusion in the assembly process because the instruction downloads are a bit behind due to the time necessary to correct, update and upload them. Check the downloads often to save bothering Kevin on Superbowl Sunday (I apologize again Kevin. If your keeping score, thats 2).
Tools - The staff at Parallax has put together a nice tool list and posted it in the ELEV-8 section of this Forum. Get them all, you will use them. Where it says heat gun, they did not mean the blow dryer you ripped from your wife, they mean heat gun. The heat shrink tubing included is the heavy duty stuff, not what you may be used to using in light duty robotics applications.
STEP 1 - BUILD MOTOR ASSEMBLIES X4
I followed the assembly instructions ont he first page of the .pdf document and its accompanying written instructions.
About the only thing I did here is make a motor jig out of the semi rigid foam that the Turnigy motors are packaged in. (see pic)
Make sure to do this step first as thread lock needs to setup some before use. Also note that the little set screw inside the cans are PRE INSTALLED but they are not tight and do not have thread locker on them. Carefully remove the set screws, treat them and reinstall. Watch out for the magnets, they will try to steal this little sucker from you... don't ask...
Another good point about pre-assembled products, NO FASTENER IS TIGHT UNTIL YOU HAVE TESTED IT, EVER! That is a critical rule in flying hardware, especially a quad. It is just not flyable without one prop.
That brings up a good point. I always work with a painters canvas on my table and under my feet. It is the perfect color for showing off a tiny screw that gets dropped. If it falls in carpet, it is a goner for sure. Again, don't ask...
MOTOR IN JIG -
COMPLETED MOTORS -
NOTE - I have never been a fan of APC props... they usually have a lot of excess flashing that needs to be cleaned up before installation. Clean and balance your props carefully. Balancing is mandatory and can be accomplished using an economy balancer from Hobby King.
Time elapsed: 20 minutes.
My next post will be STEP 2 - BOOM ASSEMBLIES (maybe tonight, probably tomorrow)
Thanks for reading everyone.
536 x 402 - 72K

536 x 402 - 77K
Comments
Step 2 is pretty simple and is clearly detailed on page 2 of the .pdf instructions. I came up with a neat trick for applying the checkerboard stickers that I will share and make sure you follow the text directions and DO NOT install the motors in the boom as shown unless you have extended the wires by 13 inches. Don't over think this, just use 13 inches, it's perfect.
My trick for wrapping the booms with the checkerboard sticker is as follows:
1 - Trim the excess white off the stickers and square up the edges using scissors, hobby knife or my favorite, the paper cutter. No, the stickers are not square.
2 - Cut each sticker panel exactly in half lengthwise.
3 - Line a plastic motor mount and the plastic base up with the appropriate mounting holes on the boom and make a pencil mark where the boom intersects them on each end.
4 - Peel the sticker and lay it PRINT SIDE DOWN on a soft work surface. Mine is folded painters canvas.
5 - Here is the tricky part. Hold the boom over the sticker and line up the pencil marks with the stickers edges. They will not be exact, only a guide. Use your judgement to proportion the amount of overrun on each end while trying to keep it equal. Next, lay the boom carefully down on the sticker, leaving just a bit of sticker showing on the top. You can use the line of the sticker and the edge of the boom as a straight edge. Now roll the boom donw the sticker nice and slow and you will get a nice clean fit. (see pics)
BOOM STICKERS -
Now we can install the upper and lower motor mounts to the boom, following the diagram. Again, unless your motors have been prepared by adding 13 inches of the red wire, skip installing them. **SCREW NOTE - Pay attention to the little screws that hold the motor to the motor mount (number 11 in the assembly diagram). These screws look nearly identical to 8 black 4-40 screws that are part of a later base assembly. Your best bet is to count out and match up screws into piles prior to starting. The secret is in the head. The 4-40 screws have a thinner, more rounded head while the 3mm motor mount screws have a thicker, sharper head. There will be 8 of the 4-40 and 16 of the 3mm.
Pay attention the the orientation of the landing gear, the short side points to the outside of the quadcopter while the long edge points to the center.
BOOM ASSEMBLIES -
If you have followed the written directions, go ahead and install the motors as shown on page 2 of the direction. Otherwise, cut 12, 13 inch pieces of the red wire and solder one piece to each motor lead. Cover with 3/4 inch of the small black heat shrink tubing and install as shown. Do not put the bullet connectors on until the wires are passed through the boom. Of course, you can pre wire the motors, mount them to the lower motor mount and attach to the boom. If you chose the latter method, be very careful of running a screw through a wire. I did suggest to Parallax that it might be a good idea to increase the booms from .5 to .625 to make servicing wires easier in the future. The weight gain would be minimal.
MOTORS IN THE BOOMS -
If you have the motors in the booms, now is as good of tima as any to solder on the bullet connectors and protect with heat shrink tubing. (see pic) When it comes to bullet connectors, pick a direction and stick to it. I chose Male to Motor and Female to ESC.
INSTALLED MOTOR CONNECTORS -
That wraps up step 2. I hope the information presented was helpful.
Elapsed Time: About 1.5 hours
There is not much to do here... install the 4 standoffs to the top chassis plate as shown on page 3 of the intructions.
STEP 4 - BOOM / CHASSIS ASSEMBLY
For this step, the instructions call for attaching the booms to the bottom chassis plate and the attaching the top chassis plate. Yea, NO! Go ahead and install the bottom chassis plate as shown but stop there. If you install the top chassis plate at this time, it is going to make electronics installation difficult later on.
Take a break from turning screws after you get the bottom chassis plate attached to the booms. Trust me, you are going to need it. The long screw that passes through the landing gear is a pain, the hole is a tad small and it is a force turn all the way. I did suggest a change to Kevin about this very item, but he had beat me to it. Look for this to be easier in the future.
Let's call this STEP 4A - WIRING
Since we are resting our hand, why not solder up the remaining connections on the ESCs and Battery. I attached my schematic for those who are newer to electric flight. Parallax does not publish a schematic at this time, but will in the very near future I am told. This is MY schematic and it my differ from what Parallax publishes.
NOTE - Not shown in the picture is an arming switch that I am adding today. It seems to me, sticking my hands in the middle of 4 high power electric motors with friggin sharp propellers, to plug in a battery is somewhat well... stupid. Please, put an arming switch between the battery and the ESCs on the positive or red wire. This way, in case of mistake, you don't have to worry about eliminating tissue from its much favored location. I will add the switch to my schematic and follow with some photos later today.
WIRING -
After all of the connections are made, you can install them on the bottom chassis mount as shown. Remember, balance is fairly critical. Try to locate everything in the same location around the chassis.
SHOOT - BAD PICTURE. I will add one later today.
STEP 4B - FINAL BOOM / CHASSIS ASSEMBLY
Once the electronics are installed on the bottom chassis plate we can go ahead and install the top chassis plate as shown in the diagram page 4.
SUB ASSEMBLIES -
Thats enough for this post. I hope you find this helpful.
Elapsed Time: Approx. 4 hours.
Thanks for reading.
There is no mystery here... Page 6 of the instructions shows you haw to mount the HoverFly Control board to the control board mounting plate and Page 7 shows you how to mount the top control board cover. The only thing even close to tricky is getting the LED light pipe installed. The hole for it is very tight tolerance and it took me a few taps with the handle of a screw driver to get it installed. DON'T go too far, you risk running the light pipe right through the surface mount LED.
CONTROL ASSEMBLY -
NOTE - The HoverFly board is clearly marked with "FRONT" and it is critical that it indeed does face front. See page 5 of the instructions.
I also added lables to make sure I remembered which side was which so that I get the rest of the wiring correct.
ASSEMBLED -
All that is left is to velcro the receiver down, plug in the ESC and Battery wires and setup up the ESCs!
Elapsed Time: Approx. 5 hours.
Thanks for reading.
NEXT - FLY THIS SUCKER!
I love this flying contraption. Parallax, and the user community, did a wonderful job of designing this product. It seems a little sketchy and flimsy during the build process, but becomes surprising rigid and strong as the last screws are installed. It is an involved and slow build process that is not really geared to those with little or no RC hobby experience. Be prepared to solder, solder again and solder some more! Soldering probably accounted for half the build. None of the soldering was tricky at all, there is just a ton of it.
During final assembly, if you have the props installed, wear your safety glasses. I was twirling the bird around in the air trying to tighten a few last screws and took a prop to the eyelid.
There are quite a few fasteners to install and this is a flying machine... Tighten the screws down, use Locktight where indicated and then, check every screw one more time. After the first flight, recheck every fastener. You will also want to periodically check the fasteners after every few flights. Ten minutes of inspection with a screwdriver is better than replacing a 600 dollar bird. DO NOT OVERTIGHTEN!
Things that I would change.
I would like to see a schematic and photos / drawings of the wiring process. It is just not very clear in the text instructions.
There needs to be an arming or safety switch.
The booms could stand to be a little larger for servicing wires etc.. (Kevin beat me too this...)
The hole on the inner side of the landing gear needs to be a bit larger. (Kevin beat me too this...)
These are minor details, with the exception of the safety switch, that don't affect the final product or performance.
All in all, a great quadcopter that uses quality components and very tight tolerences. All parts self align due to thread through screw holes. The plastic is neither to brittle or too soft and there is little risk of stripping a screw hole unless you just horse on a screw. Don't do that and you are 'all good'.
I can't wait for some of the planned changes, such as the HoverFly Open Board. I have dreams of my ELEV-8 becoming a BoeBot of the sky, out bringing in the herd for me!
ONE MAJOR FLAW - Parallax only sent me one!!! How can I take over the world with just one?
Due to a major battery failure (not related to this project) I had to order in some new batteries from Hobby King. They should be here tonight and I fly tomorrow.
Thank you Ken G., Kevin C., Parallax and the User Community.
Thanks, Ken Gracey
Will your ELEV-8 talk? If so, what would be the allophones for "I am a Parallax ELEV-8"?
-- Gordon
Ken - Waiting on new batteries, should be in hand first thing tomorrow, then we fly, then we start taking over the world!
Gordon - Thank you Gordon. It's all your fault ya know... Had that dinging book since '84. oooh I never thought about that... YES INDEED. " I AM THE PARALLAX ELEV-8. GIVE ME YOUR HEARTS AND YOUR MINDS OR I'LL...." Well, you know the rest.
Keep your fingers crossed tomorrow around noonish...
Thanks again guys.
Just to say it, I'm learning to fly on an ELEV8 having never flown anything more than a simple Airhogs-type R/C helicopter previously. So far, I'm finding the learning process to be quite manageable, provided one takes it step by step...start out by learning to hover, then gradually expand from there. The platform itself is reasonably forgiving and stable enough that a neophyte can get the hang of it in short order. I admit I've had a few hard landings so far but I still have the original props (knock on wood).
I gather that the consequences of a crash are much less severe than a typical R/C helicopter.
I'm going to go out on a limb and say that anyone with the wherewithal to build the kit is likely to have the patience and aptitude to learn to fly it...
EDIT: I will comment that one aspect of the design that's less suited to beginners is the landing gear, which isn't really made for taking the abuse of new pilots like me. I'm contemplating how I might build a set of "training gear" I could use when I want to try something new.
Too funny. My first thought on seeing the ELEV-8 assembled was "hmmm, how can I make this thing roll?" then "ya know, I could make a rover under the quad..."
Let me know what you come up with.
I can't wait to see how the flight testing goes!
Soon, Maybe in the morning. UPS due in an hour. All may be well but Ken makes me doubt it due some info on a vendor... crud!
The ELEV-8 and I are both SO READY!
OH, Ken mentioned arming the speed controls but I can't find a text on such? Could you please email me something on this topic?
Thanks Kevin.
Apologies for not getting back to you yesterday afternoon.
Kevin pointed out the process that I mentioned about arming the HoverFly SPORT board.
Ken Gracey
Note the labeling on the ends of the booms and on the ESCs. This was a definate help in getting the right motor connectoed to the right ESC and then to the right location on the HoverFly Sport board.
Sorry for the weather delay everyone, you just can't out play mother nature.
Today was bright blue, very sunny and a balmy 25 degrees F so I got out the ELEV-8 and, with Nicks help (Parallax Tech Support) got it in the air.
The maiden was totally uneventful and went without hitch. The ELEV-8 flew as advertised and in my humble, less than experienced opinion, was very stable. NOTE I did use the AP version of the firmware instead of the SPORT version. (Thanks Nick).
Is the ELEV-8 for the newbie? Hmmm, in my article I said no, not without an instructor. I am going to revise that a bit... I now say the almost newbie could handle the ELEV-8 usings Nicks 'leap frog' approach.
KEVIN - HAHAHA Three flights and all of the factory parts are were they belong and undamaged.... LOL.
Ken/Kevin/Nick and all of Parallax - VERY FLIPPIN' COOL!!
More after my radio and camera recharge.
As you progress try mounting a FLIP or some low-cost camera on the ELEV-8. Once you start collecting video you'll be hooked.
Ken Gracey
Thanks Ken. I am so hooked now it's not funny... all your fault too! LOL.
As soon as I get proficeint, on goes the cams and of course, AUTONOMOUS!
Well, the daily total was four flights and all is still well, but it was close to not being well... I lost the ELEV-8 in the setting sun, and with my limited stick time, I kind of paniced. I cut the throttle while executing a spin and lets just say I found it again... racing towards the earth while listing hard to the left. I managed just a few clicks of throttle before impact, mostly to the left, and survived the landing. I did 'thin' the ends of the left side props, but heck, thats why they sell spares.
Todays lesson - Same as RC planes, don't fly into the sun! Part II - Don't fly the ELEV-8 too close to you, it gets difficult to follow the drift when the bird is 20 feet up and only 20 feet away.
Last flight was in a 7mph steady breeze which had no noticable ill effects on the craft.
Good flying all.
I assume you already have spare propellers. I could send you some more if need be - just let me know. The more experience you have before you submit the second article, the better. We gotta keep ya in the air!
Nice job getting in the air!
The landing gear, and all fo the other delrin for that matter, are in perfect shape. I am quite impressed with the ability of the landing gear to withstand my suspicious flight skill. In one 'landing' (for lack of a better term) I basically did a 15 foot freefall and nothing broke. I was even able to keep flying after powering out of the bounce trying to prevent a flip.
I will say that it is very odd 'flying' the throttle along with the other three axisis... I am used to more or less setting a comfy flying throttle on my planes (glow) and then forgetting that that axis exists until I need to land or perform some stunt.
Thanks Kevin.
LOL I LOVE IT - EXPERIMENTAL LANDING. OH that so describes all of my flying skills...
Ted, that's pretty good that it survived a 15 ft fall with nary a scratch. Was it on turf/pasture? My only crash (so far) was a 5 ft fall onto concrete and I broke a single gear. Easily fixed...and I'm thinking maybe I was just unlucky in that it landed at an angle on this single gear...worst case impact on a single part. I should've known better than to fly over concrete in the first place, at least until I had more experience.
I think I just got really lucky... I did manage to 'experimentally land' in the frozen turf around the edges of the frozen barnyard, so that helped I am sure. I am moving out to a wheat field as soon as it clears up again.
Good flying!