

Attempt to build a CNC machine out of old printer parts. (Video)

This project started out as an attempt to build a linear actuator out of a spare GM-8 motor, some left over threaded rod, and some parts from an old junked printer. With an assist from Phil Pilgrim I got that working as detailed in this thread:
http://forums.parallax.com/showthread.php?136319-GM8-Motor-Output-Shaft-Coupling-(Video)
But the project took a major change in direction when I began fiddling with the stepper motors that were also in the old printers and a driver chip suggested by Bruce. I also saw some online videos of the Mantis CNC machine and thought "Hey I'm 1/3 of the way there!" and made this video:
[video=youtube_share;F1sF2BvbkNw]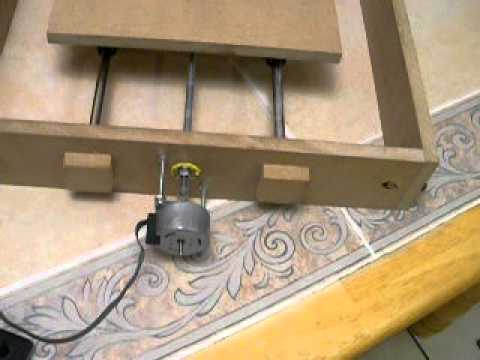
Well one death march later and I am deluding myself into thinking I'm 2/3 of the way there with this video:
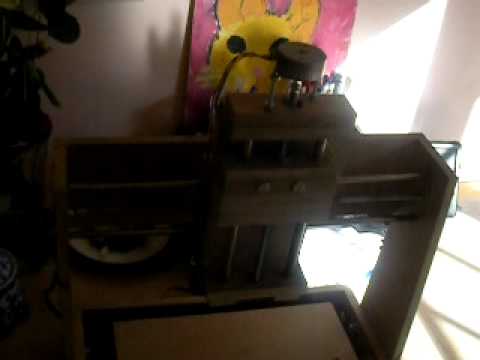
Sorry about the video quality, I got bit by the automatic gain control due to sunlight coming in the window. I also have the Z axis completed, so I will test that shortly. My goal after that is building the full control electronics using three stepper drivers and an open source 3 axis g code interpreter written in C. I then want to try to draw a circle using a sharpie, and if I do I will consider the project a smashing success.
http://forums.parallax.com/showthread.php?136319-GM8-Motor-Output-Shaft-Coupling-(Video)
But the project took a major change in direction when I began fiddling with the stepper motors that were also in the old printers and a driver chip suggested by Bruce. I also saw some online videos of the Mantis CNC machine and thought "Hey I'm 1/3 of the way there!" and made this video:
[video=youtube_share;F1sF2BvbkNw]
Well one death march later and I am deluding myself into thinking I'm 2/3 of the way there with this video:
Sorry about the video quality, I got bit by the automatic gain control due to sunlight coming in the window. I also have the Z axis completed, so I will test that shortly. My goal after that is building the full control electronics using three stepper drivers and an open source 3 axis g code interpreter written in C. I then want to try to draw a circle using a sharpie, and if I do I will consider the project a smashing success.
Comments
What kind of work do you want the machine to be able to do? I'm assuming the sharpie test isn't your end goal?
Do what to use it to hold a router of some sort of 3D print head?
My understanding is that 3D printers use belts or the coarse thread lead screw to increase head speed. This draws the plastic filament thin and increases resolution. So a slow machine with torque is good for milling, but bad for printing. Good thing to because the extruder on a 3D printer looks hard to make.
One thing about a slow CNC and expanded PVC: they don't go together. You need to maintain cutting speed or the bit will melt the PVC because of friction. I've found a cutting speed of 0.5"+/sec is best (on my machine I keep it at 1.2" to 1.3" ips).
The problem will be more prevalent with black PVC, because it retains heat more readily (so cut with white, yellow, or some other light color). The speed in the video demo would be too slow for 6mm PVC without the risk of remelting the plastic back into the cut (I'm not sure those size <17 steppers will be strong enough for 6mm in any case). You could help that somewhat by using only a 2-flute bit, only using super-sharp bits, using a vacuum or blower to remove the plastic from the cut, etc.
One thing you'll definitely be able to cut is foamcore. That's nice stuff for very quick protos.
-- Gordon
Much easier than it looks, probably easier for you than most.
Hot end : http://www.makergear.com/products/operators-pack
Extruder assembly: http://reprap.org/wiki/Wade%27s_Geared_Extruder
http://www.thingiverse.com/thing:12986
I made one work from a kit, now I could build from harvested parts. The only secrets are 6 ohm per foot nichrome wire and 100k thermistor. I say go for it!
It is definitely a start in the right direction. Before you know it, you will have a nice CNC machine, just remember to keep improving that areas that give you the biggest problems.
Oh yeah, and I just love the surplus parts that can be acquired from old printers. I have parts from about 15 different printers
Keep up the good work, keep learning, and keep improving.
Bruce
I didn't think you could use the printer motors for anything and now I will start saving the motors for future projects.
@Gordon - thanks for the information on heating problems when cutting expanded PVC. I've had Plexiglas fuse behind my scroll saw blade when I move too slow, so I can see this happening to epvc. I figure when I transition from drawing to milling I'll run up against limits in this machine. At that point I'm willing to swap out printer steppers for NEMA 17 or 23 steppers. I may also switch to threaded rod intended for this purpose with anti-backlash nuts.
@prof_braino - I may yet try building an extruder. Once I get past drawing with a sharpie, that might be less strain on the machine than milling. I plan to build 4 axis control electronics, but leave the 4th axis unused initially. If I go the 3D printer route I'll only need to build an extruder. Since I'm keeping my MCU separate from my control electronics, I can use any that supports 3D printing firmware when I get to that point.
@Bruce - I learned my lesson after my first linear actuator flop. This machine's design is modular and bolts together (with plenty of lock washers), so I can rebuild any sub-assembly and swap it out if it gives me trouble. The X axis is solid, the Z Axis a close second, but I am a bit concerned about the Y axis. It has the longest rods, is carrying the Z axis, so it has the greatest loads. Any vibration from the tool on the Z axis may cause problems in the Y axis.
@bsnut - definitely save the motors from old printers. As Bruce points out the smooth rods and bearings are worth some real dough. In a separate project I am using printer limit sensors for wheel encoders, but that's not far enough along to document yet. Free used printers are easy to come by in my neighborhood. It would also be a piece of cake to build an egg bot CNC from this stuff.
Bruce
(At least that goes for most A4/Letter flatbeds. Older HPs, though... )
you don't need to mess about with Nichrome wire on a hot-end unless you want to. Many designs now use a hefty power resistor instead.
http://reprap.org/wiki/J_Head_Nozzle
A much cleaner design.
This is true, you certainly cannot move more than a couple pounds with them, however they are definitely worth salvaging, because you may need them someday. Let me give you an example:
I saw that but didn't try it yet, does having the resistor on one side still heat the nozzle evenly? I don't recall seeing 6.8 ohm 100 watt (?) resistors in any harvesting sessions, are these common? Do they still qualify as "old parts"?
Bill
That good news is that the salvaged stepper was strong enough to raise and lower the Dremel, so it is looking good for the sharpie test. The bad news is that the video includes a demo fail when a lock washer failed to hold a bearing in place. I also ordered my other stepper drivers, but they haven't arrived which puts this project on hold until they arrive hopefully early next week.
-- Gordon
In the J-Head design and some others, too, the resistor is EMBEDDED in the head.
http://reprap.org/wiki/J_Head_Nozzle
They drill a hole that's a snug fit with the resistor straight through the heater and mount the resistor in it.
It helps to fill with thermal compound around the resistor, and of course, wrapping everything in Kapton or similar tape.
I don't think they're that common in old equipment, and if they are, you're usually left with way too stubby ends.
The resistor used in the J-Head is listed as 5.6ohm, 1%, 5W, but a 6ohm or even slightly larger won't matter too much. Tolerance doesn't matter that much, either(just stick with 5% or better, or at the very least test it with a good meter)
The head is very small, so it needs less heat than some older designs.
5W resistors aren't too expensive, so it's not a part I'd work too hard on scavenging.