

Low-cost, build-it-yourself robot for 4-H
 Ken Gracey
Posts: 7,420
Ken Gracey
Posts: 7,420
Hello,
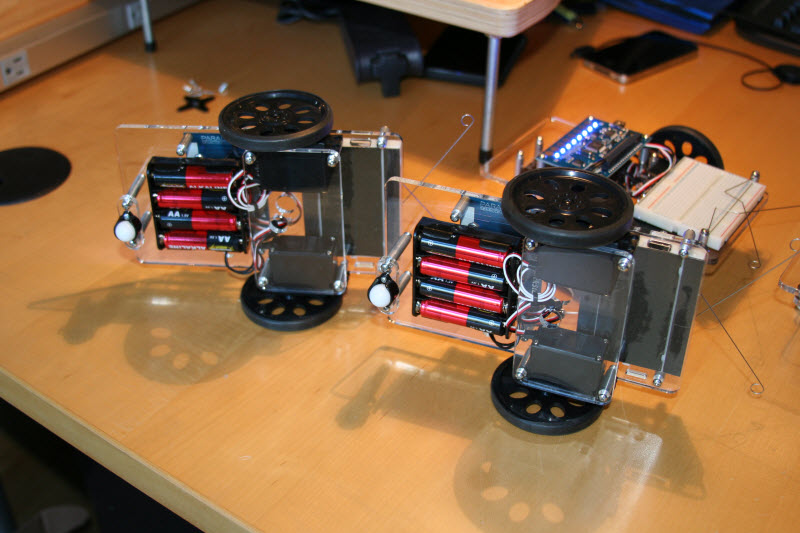
One of our customers (John Raffensperger, AKA Raffy who runs the UPE A/V setup for Jeff Ledger) is presenting to 25 4-H leaders at their February conference in Wisconsin. 4-H has a robotics educational program but it doesn't include Parallax at the moment. The direction from Raffy was that we would train the 4-H leaders with a robot resembling the following goals:
The design is totally free for anybody's use - educational or even commercial. We'll get the drawings posted and see that they're stamped with a Creative Commons 3.0 license.You can put any processor on it of your choice, too.
We sincerely appreciate what Raffy is doing for the 4-H organization, for Parallax and our customers. Thank you, Raffy!
Ken Gracey
Parallax Inc.


One of our customers (John Raffensperger, AKA Raffy who runs the UPE A/V setup for Jeff Ledger) is presenting to 25 4-H leaders at their February conference in Wisconsin. 4-H has a robotics educational program but it doesn't include Parallax at the moment. The direction from Raffy was that we would train the 4-H leaders with a robot resembling the following goals:
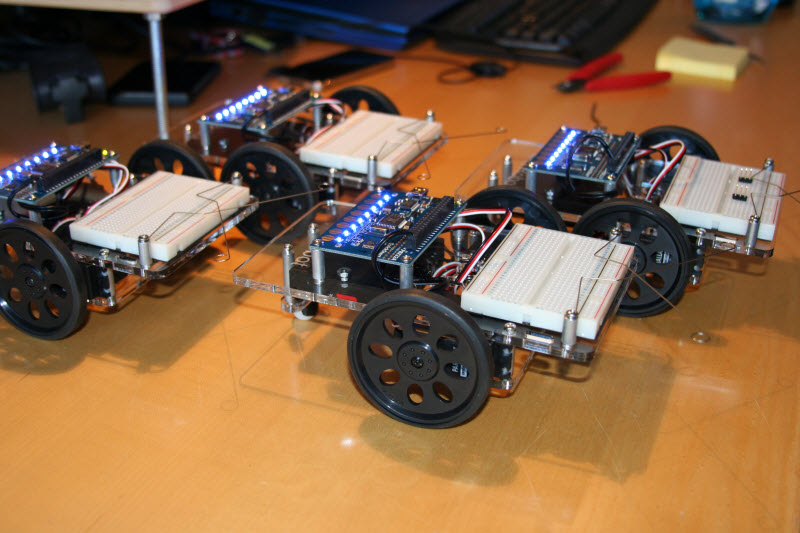
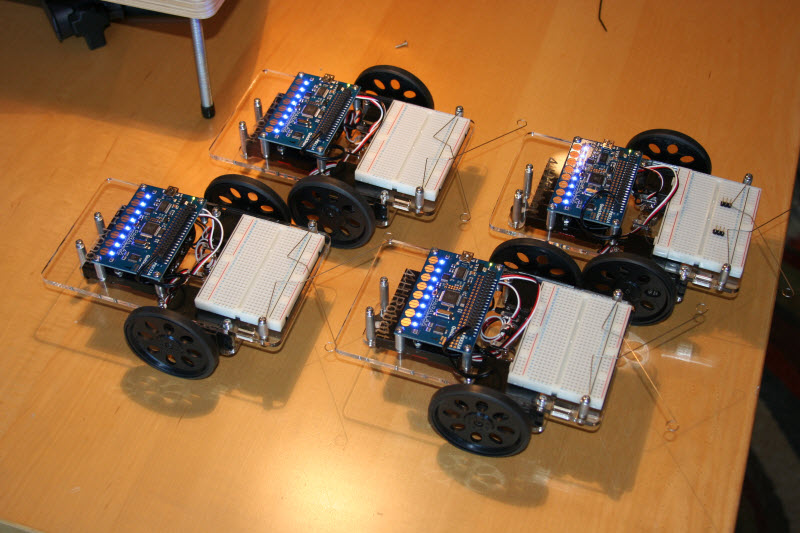
- Very low-cost, so that they could be put in the hands of students (a robot per student). We think this could sell for $79.00.
- Intentional non-finished style. Show the modular components (microcontroller, breadboard, power supply, motors) but leave the door open for the 4-H student to toss the acrylic base and cut their own from plywood or other materials using tools of their choice.
- Minimal Bill of Materials. Few parts.
- Minimize or eliminate the use of manufactured parts in the chassis. It needn't be too commercial - no money spent on fancy packaging - just put it in a bag! Boring is better in this case.
The design is totally free for anybody's use - educational or even commercial. We'll get the drawings posted and see that they're stamped with a Creative Commons 3.0 license.You can put any processor on it of your choice, too.
We sincerely appreciate what Raffy is doing for the 4-H organization, for Parallax and our customers. Thank you, Raffy!
Ken Gracey
Parallax Inc.

800 x 533 - 96K
800 x 533 - 86K
800 x 533 - 99K
800 x 533 - 94K

800 x 533 - 112K
Comments
I have been working for several years with the Columbia County, Wisconsin 4-H organization to present robotics. Up until now, we've been using Lego NXT Mindstorms. We typically meet once a week for between 1-1/2 to 2 hours.
The NXT system works GREAT for late elementary and middle school kids. Lego makes it very easy to succeed, and very hard to fail.
The NXT robots have limitations, and after a couple of sessions (we run Beginning/Intermediate/Advanced) the youth start to outgrow the capabilities of this system.
Other options available tend to head towards expensive kit robots, advanced team based competitions and/or "junk drawer" robotics. Many counties do not have the resources in terms of expertise, time and/or money to make these programs viable. I have also seen that even with "pairs" and "forced turns", there still ends up being a dominant member that does all the thinking/doing, and all the learning. In the worst case scenario, the "non-dominant" youth bails or doesn't return for the next series. At best, they are frustrated, and don't have as much fun, or learn as much.
This program (I'll have more over the weekend), is targeted to be a one to one ratio of robots to kids, and also be something where you can do something meaningful in a 2 hour session. This keeps the kids engaged, and if they are engaged, you have a situation where they can actually learn! (Don't tell the kids that, you need to sneak the learning in while they are having fun.)
I'll have more in this thread, on my experiences with 4-H, the NXT robots, this robot, and what my presentation if February is all about.
Lastly, if you have an interest in robotics, and might want to work with kids, pay attention! This stuff is VERY rewarding. I promise you that there are tons of opportunities available for you to get involved.
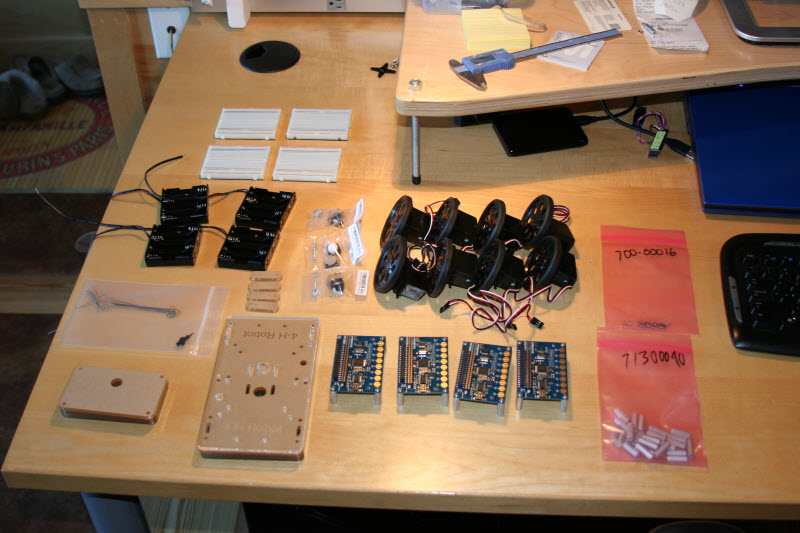
I have attached the step by step wiring instructions.
This is very exciting news. My wife and I are starting a Robotics Activity Group for our county 4-H this year. In past years, individual kids have worked through the State 4-H organizations curriculum as individual projects. This year, we're going to try it as a group. The 4-H curriculum at the state level is Lego Mindstorm based. When we were talking with the 4-H educational staff at the extension office, the cost of the Lego set ($250-350 per kid) was a barrier we are faced with. While cheaper than a horse, the entry cost to participate is a bit on the high side.
The state 4-H organization sponsors a team robot contest/project at the state fair. It's always been Lego based as far as I know. I can see where they do that to present a level playing field and standard components for the kids to build from but it also means that each club needs to purchase a Lego kit to participate. Non-Lego robots need not apply. While the Lego tools are impressive and there is a lot of support for Legos in educational environments once again, cost is a barrier to entry and participation.
At the national level, there are two curriculum paths. One is Lego based and the other is titled "junk drawer" robotics. The Lego path is obvious with all the pros and cons mentioned above, the junk drawer path is interesting in that it gets more into the making of the components, understanding the mechanics and electronics behind robotics. I have the three books for the junk drawer curriculum and they are full of some very interesting exercises and experiments for the kids to try....most are based on inexpensive items you may already have around the house or can find easily (arms and catapults built from paint stirrers, robot chassis from popsicle sticks, logic gates from groups of kids, etc.). I could see this curriculum being lots of fun with a group of kids.
The one thing that I've seen with my short 4-H experience is that the politics and the organization often seem to take precedence over the kids. What John is doing is great by showing the leaders there are alternatives at a more affordable price. The problems may come from finding 4-H volunteers that can work with the kids through a non-Lego curriculum. There is a lot of support and momentum behind the Lego Mindstorm efforts (Carnegie Melon, Tufts University, Lego Education, First Lego League, etc.) It's all good stuff but it's all expensive stuff from the kits through to the Educator/Leader training programs. A foothold for a more grass roots, more affordable program would certainly be a good thing.
Let me know if I can be of any help. We're new at the 4-H thing this year and are probably committed to Lego for at least this year in our club but I have no qualms about backing a Parallax horse in this race. I was planning on "introducing" a variety of robots to the kids during the monthly meetings as we talked about their individual Lego projects and worked on their team entry. Who could resist and already built S2 running around the floor or one or two of Chad & Hanno's tBots playing with each other and demonstrating 12Blocks?
You beat me to it! I liken this to the Cub Scout's pinewood derby that could have as wide appeal. Keep the form factor very simple & general, make it so that a 4H club or cub scout troop leader could table-saw/band-saw 50-60 rectangular chasses out of a 2' square piece of 1/4" plywood or equivalent. Kids could also use servo tape to mount servos on a cigar box, clipboard, or juice can. And source the battery box and as many parts as possible from Radio Shack, which will help availability and their DIY movement.
Capital idea!
Last year I gave a keynote talk at the Robotics Conference on the work I'm doing getting robots into NZ schools to bring abstract concepts into the real world. The key is to hide the complexity and make things "just work". Kids using the 12Blocks language go very far very quickly because they don't have to worry about syntax or language, they just drag blocks together and press "run". Teachers like the TBot because it's simple enough that 5 year olds have successfully competed with it at a national RoboCup competition yet flexible enough to be used by college students. I'm now working with NZ teachers and my local university on a Robot Curriculum built around TBot and 12Blocks that satisfies NZ's National Standards- this will allow school principals and politicians to spend real money on robotics for education.
There are several Google Tech Talk videos at the onerobot site: http://onerobot.org and some content I presented at the recent Google-sponsored "Computer Science for High School" event:
http://nzacditt.org.nz/article/updates-from-google-cs4hs
Let me know how I can help with the 4-H effort.
Hanno
The main difference with Parallax material is that customers are not required to buy a kit. Its true that we put kits together to make things easier for customers and easier for us to generate some support and documentation. We need a specific kit while we document how to use the parts.
But customers can also roam through the website and buy some parts and use other parts they have. We have some experience putting together custom kits for different schools and universities where educators can tweak the material their students will get and which parts they will have to do themselves.
Some schools use our Robotics with the Boe-Bot hardware but they make their own curriculum with theory and labs. Others use our book (free pdf) but put together a different kit that is still supported by the book. This is even stronger in other countries with distributors putting together kits for local audiences with different parts and translated and modified material (Spain with their HomeWork bot, for example).
It all depends on the goals and budget for each program.
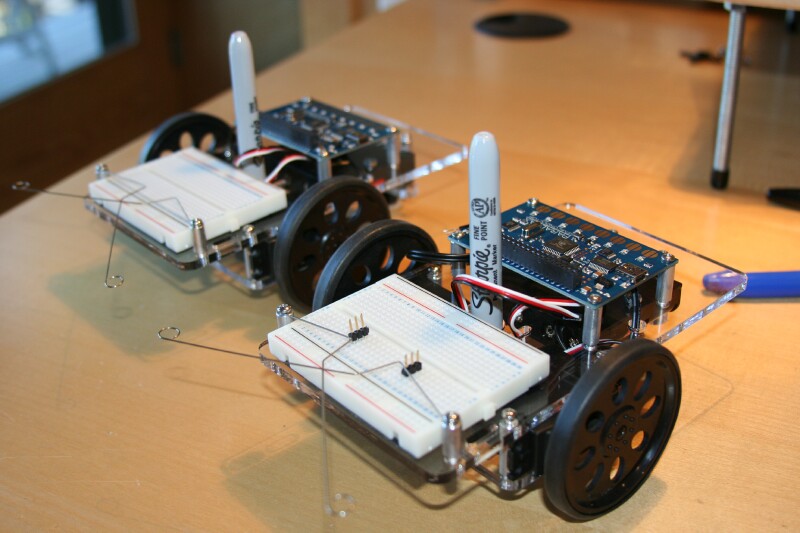
Normally, the whiskers are mounted on a stand off that's on the corner of one of the BOE type boards. The corner pads are "Ground" (meaning VSS).
In this case, the Whiskers are mounted to a standoff to the side of our breadboard, but these posts are very much isolated. Trying to include a wire with the screw that holds the whisker wire is not a good deal, as this connection is where the whisker gets aligned, and needs to be kept "pure" if possible.
For now, I've got some salvaged standoffs, and have a pair with a "male/female" configuration. I'll use these to hold the whisker wires, and do a ground connection into the top.
I may also try just sending a ground wire underneath, and getting the ground connection on the bottom side of the acrylic "chassis". That would be probably be cleaner, at the cost of having the connection on the bottom (no big deal...)
I just happened to have a Boe-bot set up with whiskers and tried inserting a second pair of 3-pin headers between the mounting post and existing header position. If placed properly, it will contact the whisker just before it touches the first whisker, providing a contact location for Vss.
Ken Gracey
I have a couple of sheets of clear polycarbonate I was going to use for a "similar" project. I like the idea of the clear chassis.
Amanda
That may also be an option, but our bread board will be "hand placed" and we don't know if we can count on it lining up right with the posts accurately enough to do this.
Long range, we may be able to have an alternate whisker configuration where the end of the whisker that is held by the post would just plug into the breadboard.
In the case of this presentation, that would require me (actually Lana) to pre solder them ahead of time. I also am not sure how well the spring/music wire would solder.
Definitely an option.
The double stand off keeps the electrical connection above the chassis, but if you need to adjust the whisker, you need to loosen/remove the electrical connection first.
The yellow wires are output to the servo wheels, the Blue are input from the whiskers.
Pins were selected on the Quick Start board that leave the buttons and LEDs available for use (and in a position where they will not interfere with things the user may try).
Schematics and better pictures will be up after some testing/programming.
Do you happen to have drawings and dimensions for the acrylic baseplate parts? I'd like to try building one of these out of "alternative materials" that rhyme with "good".
This look like a great education platform you got in the works!
This project will be entirely "open source". Currently, I would call these "prototypes", and there are possibly a couple changes we'll be making. Once finalized, we should have everything available.
In a "youth" setting, one option is also to specifically NOT provide drawings for the base, and let the kids figure things out. This does several things:
The attached file is a short piece of test code for this project.
The code starts a new cog to monitor the whiskers, and turns an LED on when a whisker is activated.
That all works fine. After a waitcnt of 5 seconds, the cog is supposed to get shut down. That doesn't seem to be working, and I can tweak whiskers all day long, and the LEDs keep indicating.
The section of code involved is this:
  WhiskerCog := cognew(WhiskerMonitor(WhiskerR, WhiskerL, 22, 23), @WhiskerStack)

  PST.Str(string("Whisker Cog: "))
  PST.Dec(WhiskerCog)

  'stay alive for 5 seconds
  waitcnt(clkfreq * 5 + cnt)

  cogstop(WhiskerCog)
The Serial Terminal shows as Cog 1, but there are "Start" commands for Servo32, PST and Buttons (for the Quick Start Board).
Any thoughts or suggestions?
The problem was that I did not have enough stack space for the WhiskerMonitor stack. I found this by playing around with the order of things in the VAR section, as well as incrementing the stack size.
It was weird for a bit, as If I got things in the right order, and used a LONG for the WhiskerCog variable, it would work, and then change the order, and not...
I guess this is what they mean by:
Your thread just dies off into another subject. If Mr. John Raffensperger wants to have kits made for him, he can drop me a note. The price depends on how much work the person wants to do himself. Ex: You can buy a servo for $5 and make it continues turn yourself or you can spend $20 for one that is made that way. I could made a good teaching kit for less than $79 with lesson on programming. I could also make kits with robotic arms and more for a higher price.
I am retired and have time to work with him.
Al
page 2: missing closing quotation mark on "black rail"
page 4: says "battery back" instead of "battery pack"
page 5: says "3.3 Vots" instead of "3.3 Volts"
page 15: says "ping D18" instead of "pin D18"
page 17: says "Make sure the white wire is on pin C3" instead of "Make sure the white wire is on pin C2"
Overall, though, very clear and easy to follow.
Roy
Roy, thanks for the proofing, I'll have a corrected version up latter shortly. - It's up now.
I'm interested in your TBot/12Blocks combination for a mobile robotics lab for schools and other organizations. I tried going through your website but haven't heard anything. Could you contact me offline?
TIA
Todd
todd@christell.com
Hello Al, I'm all for whatever arrangement Raffy wants to use with this project. Of course, getting Parallax out of the picture can lower the costs of providing the commodity type of parts. Somebody still has to procure, kit and manage the project and this can't get done for free in a business. I'm Raffy's helper at the moment, and Parallax won't be taking much of a lead until we get some feedback from Raffy at his training in a couple of weeks. I'm all for widening our team to include yourself, mindrobots, and anybody else who can help achieve the goal.
Ken Gracey
Parallax has proven to be an unrivaled partner to work with, doing far more than I could have hoped for. This project is purely a "demonstration" of what can be done. This kit, as it is being developed, probably wouldn't go very far in the overall 4-H system. One big item missing: encoders. On the other hand, encoders could easily be added with two or four IR sensors aimed at the wheel spokes (you would only need two for driving to a position, as you know direction, four if you wanted to "record movement by hand").
The main purpose of this particular presentation is to show that for minimum cost (about 1/4 of an NXT setup, and 1/10 of a VEX) you can get going with a "real" robot that can be used as a foundation for more advanced activities.
Where this heads is largely up to the community of 4-H educators and volunteers across the country. This is a project to initiate discussions, and open possibilities for youth.
Thanks for writing. It doesn't seem like everyone wants to go in the same direction on this project. I am not for laser cut bases, high price encoders, etc. Are high price encoder nice to have, yes. You can buy a $20 encoder or you can buy a 20 cent paper jam sensor and count paper targets on the servo hub. Will it work as well, NO. Will it teach the kids how an encoder works, yes. I am for cheap as you can make it. There is nothing wrong with a 4 cog chip but it just over kill for a project like this.
Thank you for the offer to be on the team but it just would not work for me. I do drop in often, so if Raffy would like to talk to me; he can leave me a message here.
Al