

Printed a base for a Gadget Gangster USB board on a 3D printer
 yingster
Posts: 17
yingster
Posts: 17
Ordered a Gadget Gangster USB board earlier this week and patience got the better of me while I wait for the board to come in.
Looking around gadgetgangster.com I found the layout dimensions for the shortboard
http://gadgetgangster.com/working_files/referencedesign/ggpp/shortboard.png
Being a 3D printer tech, building a plastic base sounded like a fun project.
Mostly to have something to mount feet to and keep the pins off the table.
Designed it up in solid works and printed it out on a Stratasys Dimension Elite.
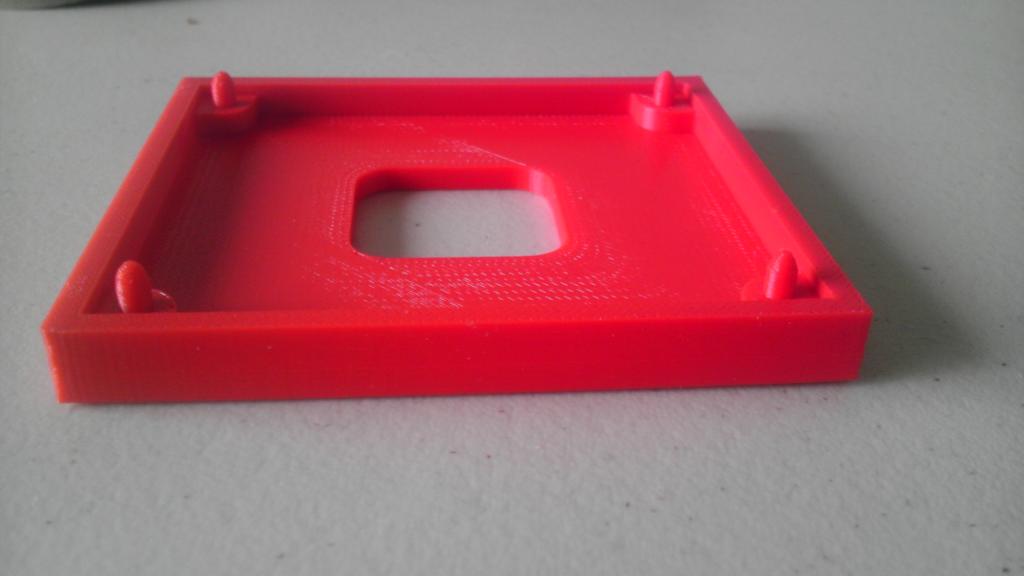
It was printed at 0.007 resolution and in red just because that was what was in the machine at the time.
The bottom hole is to push out the board if it gets stuck. Not sure how hot these get but the hole should help with airflow.
The board should drop right on top of the posts and sit flush with the top of the base.
This is just version 1 and any design thoughts or changes are welcome.
Pictures of the base

Looking around gadgetgangster.com I found the layout dimensions for the shortboard
http://gadgetgangster.com/working_files/referencedesign/ggpp/shortboard.png
Being a 3D printer tech, building a plastic base sounded like a fun project.
Mostly to have something to mount feet to and keep the pins off the table.
Designed it up in solid works and printed it out on a Stratasys Dimension Elite.
It was printed at 0.007 resolution and in red just because that was what was in the machine at the time.
The bottom hole is to push out the board if it gets stuck. Not sure how hot these get but the hole should help with airflow.
The board should drop right on top of the posts and sit flush with the top of the base.
This is just version 1 and any design thoughts or changes are welcome.
Pictures of the base

1024 x 576 - 41K

1024 x 576 - 35K
Comments
http://www.gadgetgangster.com/news/46-builder-news/513-3d-printed-propeller-platform-base.html
OBC
I would like to see how the fit is and make some changes before claiming it to be production ready.
If it looks good, some simple changes are all that is needed for the long board.
I honestly wouldn't pay more than $10 for this and the material cost alone is about that much. If my company sold them to me as a customer it would be at least a $50 part.
Not to mention the possibility of losing my job.
So that was the bad news.
The good news is I can release the files for if people want to build their own.
Making the drawing for the long board is still not an issue.
Of course if anyone has a question about the file (or 3D printing in general) feel free to ask. I'll help any way possible.
Could you make it an open source design on ponoko.com ?
There are some commercial enclosures that are close to the GG footprint for 2 holes,
The unsecured holes would need standoffs or some other solution.
That is a really nice base. What type of 3D printer did you use and in particular, what type of hot-end (extruder)?
Have you seen the two prong posts done on 3D printers? My 3D printer project is a very slow wip. However I did design a post like I am referring to here http://forums.reprap.org/read.php?4,57039,page=2 post #113. My intended use for it was to capture a pully, but could be used with different dimensions to cature a pcb.
If the idea is appealing we could create a cheaper and easier to print version (X shaped for instance?).
Depending on the machine and on the material I guess we can have a cheap and functional support.
For instance I print with a FDM using Orbi tech PLA. They have little warp, and the cost is reasonable, but the color is white.
One softens at 45°C while the other softens at 90°C. Both are quite good. I prefer printing with the PLA45 because it is less brittle and the finish is shiny. Colored PLA is available, the finish can be terrific, but the material is not so good.
If the design is warp tolerant it could be printed also in ABS, so we have the best of both worlds.. cheap and mechanically good in black and white, a little bit more expensive with other colors..
If you are interested I can try to print a couple of test parts. Then it could be printed almost anywhere.
Full enclosures are probably not worth the money considering also laser cut acrylic boxes.
Massimo
If anyone is interested, I'd be happy to whip up a batch and send them out for the cost plus shipping. That little plastic won't be but about $1 or so. The design is simple enough that it'd only take a few minutes each to print.
Yingster, if you could post the design to Thingiverse, that'd be great, that way anyone could download it and print their own as well.
Bill
I'd be willing to pay a reasonable price for a couple +shipping.
OBC
It was quite snug, especially on the posts. They were made at exatcly 1/8in so next go round I'll have to make them narrower.
Also when it was stuck pressing up on the center hold didn't help much. It did allow a dental pick to get in one of the corners so I could press it up a little.
The board was a little tight on the side with the USB connector but that was just due to the way it was cut. 2 minutes and a small file will fix that in no time.
So making a "X" design is sounding more interesting, Got a couple ideas brewing on that one.
Back to the drawing board, I'll let you know what comes out of the machine next.
I attached also the STL file.
I made 3mm dia pillars, so I had the same fit issue. The advantage is after filing them they are now "snap on".
Massimo
with FMD machine small features like the 3mm pins are a problem.
The first base it was printed a 0.007in so it should have been one of the weaker parts. As I was prying on the board to get it off the base, the post felt quite strong. This could have also been due to the material I was using. It was ABS+ as opposed to regular ABS which Stratasys says is 70% stronger.
In other news, the base version 2 is finished and in the wash tank now. Pictures should be coming soon.
What I do not understand is how the "wash" gets rid of bits that are nominally support structures and yet leaves the wanted bits.
I couldn't sort out how it knew the difference, I thought it might have been some sort of temperature thing on the head.
Thanks for the reply.
Alan
So, I get home last night eager to test out the board, sanded and filed everything so it goes in and out ok, then went to connect the usb and it wouldn't fit. The connector sat below the base, so I had to file out a notch about 1/16in deep to get it to fit. So that is now on the change list.
The X design came out of the wash tank looking good this morning. But looking at it I'm not sure if it will work. It was made to flex open to allow it to grip the board. I made some design changes (but not yet printed) to make one of the corners with a post. We will soon see how they all fit.
But, a little bit of "melted plastic" and everyone jumps on it.
Actually, I like the original "box" design above. An H might be nice, too. With the cross-bar of the H aligned with the long axis of the board it would provide clearance for the bottoms of the connectors.
CPLDs, or FPGAs if you can afford the boards, were the internal imaginations (which the Prop isn't too far from) and then 3D printers come along.
When CAD/CAM came along in the '70s the place my father worked at got virtually anything they wanted, the operators soon found out that the machines could mill out perfectly acceptable 50 Pence coin blanks, for the cigarette machines.
Back in the days when 50p could get you a substantial part of a packet, and people were content with 1KB of working ram ...
Fill in that hole in the centre, on the original design, and it could become almost coffee/tea proof (as long as you could print an umbrella).
Have you thought about putting it up on thingiverse so we don't lose it and can make mods to it?
regardless thanks!!!
Glad it worked for you.
yingster's idea to put a support below the board is terrific!
I have the same problem with bits, solder splats, bolts, resistors and anything else below the board mentioned by Toby, but the idea didn't occur to me.
I'm going to create a thingiverse account, I also have a couple of nice Christmas trees worth an upload.. :-)
Massimo
So I created a thingiverse account and uploaded it there.
http://www.thingiverse.com/thing:14391
Play with it, change it, mod it, all I ask is that you don't sell it.
My site for those interested http://www.xyinnovations.com
Anyone?
OBC
PM me your address.
Bill
Thanks! PM sent