

TV Driver color issue
 Vega256
Posts: 197
Vega256
Posts: 197
The application is a tile renderer built over a tile engine and a TV driver.
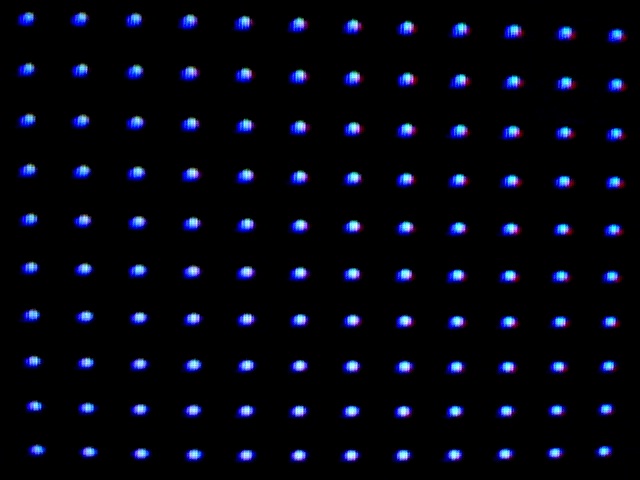
The issue is that when I start up the Prop, I never get the same colors; that is, the colors have one of two tints. Sometimes, the colors are tinted reddish and sometimes, bluish. Also, the colors are just not as accurate as I would like them to be. These are supposed to be white dots.


Is there something that can be edited in any of the objects?
demo_3.spin
gfx_renderer_test_c.spin
tv_drv.spin
The issue is that when I start up the Prop, I never get the same colors; that is, the colors have one of two tints. Sometimes, the colors are tinted reddish and sometimes, bluish. Also, the colors are just not as accurate as I would like them to be. These are supposed to be white dots.
Is there something that can be edited in any of the objects?
demo_3.spin
gfx_renderer_test_c.spin
tv_drv.spin

Comments
-Phil
The issue persists on a much noticeable scale.
There was a problem with this driver, and I'm assuming you are using a derivative of SIMPLE_NTSC, written by CardboardGuru, where the left porch, or overscan needs to be a multiple of the PLLA or "clocks" / pixel value. Try dividing that porch value by your ("clocks" / pixel), and if there is a decimal remainder, round that border to the nearest value. Offset this change with a equal value change to the other border, so the "clocks" per scan line remains unchanged.
eg:
Say your clocks per pixel is 10, which it would be for a 256 pixel display, with 2560 clocks in the active scan area. Say your left border is 319 clocks. You would perform the division (319/10) = 31.9 Closest value is 320, so you add one clock. Subtract one from the right border value.
The color counter, internal to waitvid, which is also known as the phase counter, starts up with some value that may or may not be in sync with the PLL generating the color burst. This tends to shift the pixel clock reference some, depending on what that phase error is. On that driver, artifacts are very easily seen because there is no color phase change on alternating scan lines. That shift will be seen as a tint, depending on the display.
Having the even multiple tends to minimize this, though it does not completely eliminate it. (Jasper_M highlighted this early on when we all were working with this driver)
I am concerned about the bigger pixels though. In the photos shown, it's as if the red component is entirely missing from the lower photo! Have you tried this on other display devices and or a PC capture device. The tinting effects are not normally that pronounced. I suspect some display trouble to be honest.
If this is a older CRT television, try the following adjustments:
1. Turn the color drive completely off.
2. Display your dots and examine the display closely. You will see the registration issue, which will be most easily seen on anything with a red component, and to a lesser one blue, from what I see in the photos.
3. Turn the contrast control to it's minimum setting.
4. If the set has a sharpness control, adjust it to the minimum also.
5. Turn the brightness down, with the lights dim in the room, to the point where the black background can just be seen. On a scale of 0 being not seen, and 10 being really bright, shoot for .05. Just barely seen.
6. Adjust your sharpness control for the best overall definition on the shape of the pixels. Turned too low, and they will smudge into the background, leaving them indistinct, exacerbating the registration issues. Turn it up watching for improvements in the shape, but not extra artifacts, such as ghosts, or a hard, brighter edge. Be conservative on this, as you get another shot later.
7. At this point, your set is operating at it's maximum resolution condition, with "blooming" effects (changes in the size and position of things depending on image bias to the CRT), and registration will be the least contrast. You should see a faded, but fairly sharp monochrome image overall.
8. Advance the contrast control, until you either reach a nice brightness of dots you can live with, or they start to change position, spreading out or their shape degrades, both of which are blooming effects seen in CRTs, and both of which will highlight the registration, or convergence errors. Roll back to the best balance, alternating with the sharpness control for a balance of contrast and shape coherency.
9. This is now the highest contrast ratio / resolution setting for the display.
10. Increase the color. It should "fade" in nicely, not impacting the overall image contrast. Adjust to taste, watching for color noise inside of solid objects. Standard Propeller graphics are fairly low saturation. Boosting that will degrade the image and add noise, just FYI.
That's probably as good as it gets.
If you want, note those settings, and run a video linearity test.
Plot swatches of the various greys, then do one with a nice green color, red color, blue color, all on screen at once. Adjust your tint control for best differentiation on those.
1. Turn the color off again, and examine the grey swatches, varying the contrast and brightness controls. Do they stay grey, or do they tint with brightness changes? If they tint, you have non-linear color drives, and there are usually controls for this inside the TV. Be careful, and that's all I can put here.
2. If they stay grey, advance the color control, keeping a eye on all the swatches. Do they tint, and or are the colors pure on the screen? Red is always red, not red with other colors mixed in?
If so, the display is more or less operating well in terms of color generation. And that's about as far as I can go with this description as fixing convergence is a fine art on older sets.
Once you've done these things, run your dot patterns again, and check connections, and make the various adjustments. Power cycling the Propeller should not result in the two photos you've got just above this post. The artifacts from the driver are not that significant. I suspect some variation in the set, and maybe you can isolate it with the rough adjustments I've put here.
If you do find that, then it's a repair problem. My first reaction would be to pull the set covers and re-heat the joints in the video driver circuits, as well as the chroma circuits.
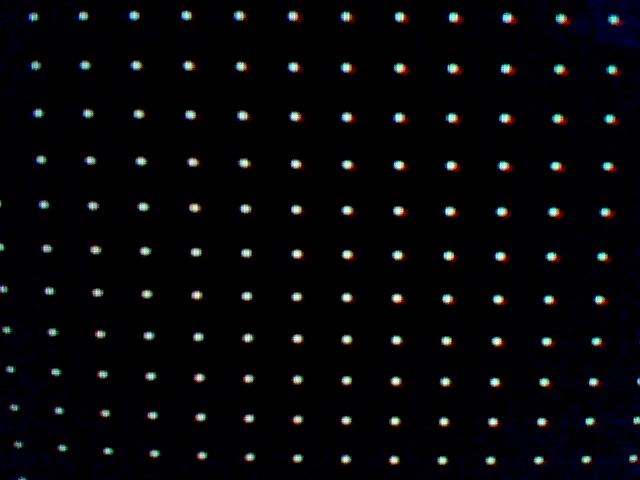
Edit: In the smaller dot photos, the red component can be seen on both sets of dots, with your pixel size close to the registration error on the display. Color won't be very consistent in that case, but it's normal other wise.
The lower photos, with the big dots are the worry, because red simply isn't there in the more tinted photo. Can't explain that, but it tells me there is some problem not related to the propeller, or the dots are not actually white.
I provided the basic adjustment text here, just because that's handy on any CRT display. The order you do those things matters for the best overall performance balance on a CRT.
If you decide to attempt a convergence, prepare a set of bar graphs, and dots. And do the convergence at the balanced setting you arrive at above. Do not do it at the minimums, because the blooming is non-linear in nature, and will change with brightness.
Finally, your set may have a "picture" or "focus" adjustment. Consider manipulating this, concentrating on the balance between screen center and edges. A picture control is a like a overall screen bias. Running this one at a lower setting will limit the overall brightness of the display, but will generally improve registration errors and overall resolution. A focus control may help registration errors considerably, and if the set has aged, might make a big difference. Again, balance between screen edge and center. Getting both right is a long day with a mirror, and tweaks to lots of adjustments in older sets.
You may find you have to iterate with the adjustments a couple of times to find the best overall balance.