

XBEE Robot Controller 32 Channel

I'm still working on this project but wanted to share my progress. Its an on going project.
Its currently an xbee controller with a prop at its core. It has 32 possible channels going thru 4 MPC3208. Besides that the general pieces and bits to make a prop work and a 24lc256 as an eeprom.
The first video is my bread board setup and all outputs are display thru a rca output.
It's an older vid that I posted on another forum.
http://www.youtube.com/watch?v=onoO8u4yZoc&feature=player_embedded
Since then I have it communicating via a dummy robot which is just a prop with an xbee and led's as outputs.
And a current picture of a rough case design. Materials I had on had at the shop yesterday.
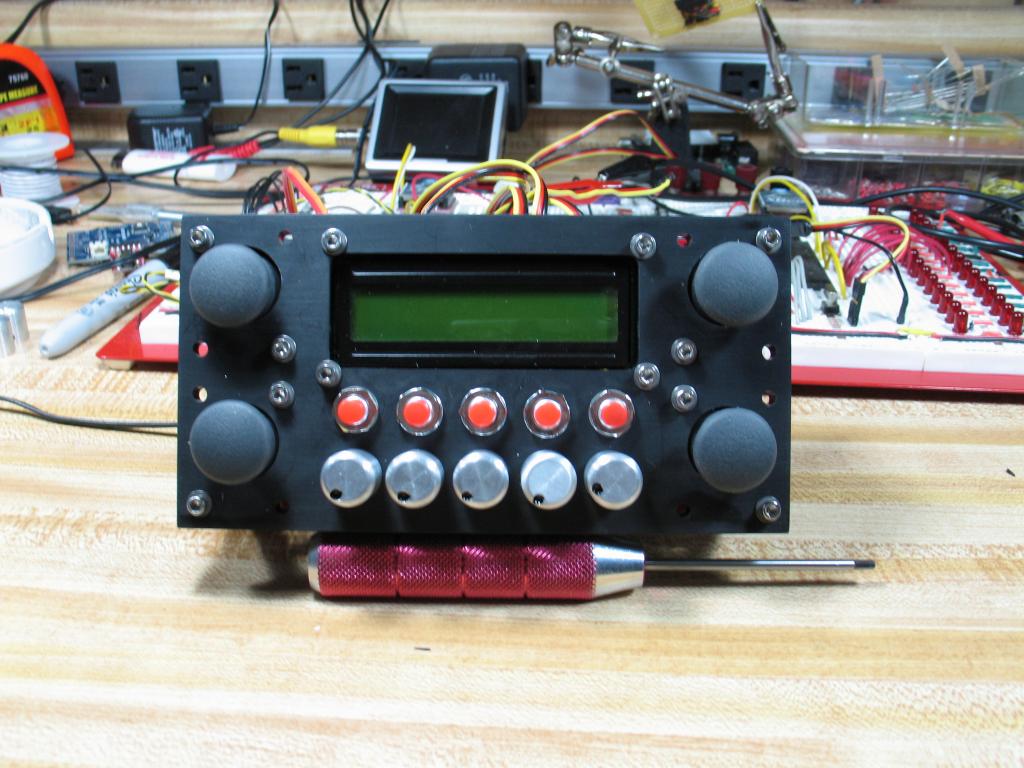
1024 x 768 - 112K
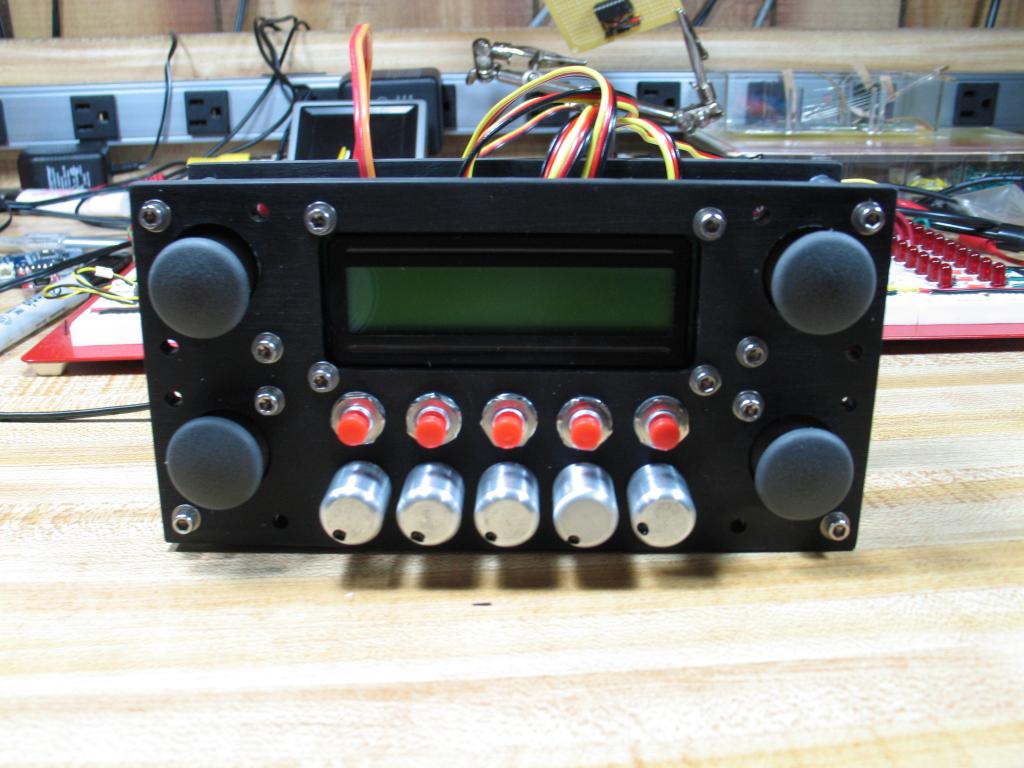
1024 x 768 - 98K
Comments
So here's another update.
I'm finishing the circuit boards and will be ready to have them made in the next few days.
The case has a new look and feel to it. Currently made from some type of fiberglass I had at the shop. Really not sure what it is, its been sitting in the shop for the last 8+ yrs. So I chopped it.
Final design will be from carbon fiber.
I need to make a few changes to the current case. Design change, but kept rolling in the project.
The values in the pic are for 6 outputs that are 12bit hex format. A small test program I had running.
Around 32 channels might have a few more. Some needing to be added still.
But now you have a real dilemma: your robot must always be one step cooler than the controller, so you'll be busy for a long time!
@Paul: Did you ever finish/ start selling your Propeller control board? Also, were you going to make the hexapod drawings available?
But my all-time favorite hexapod is here
Thanks,
Al
The controller is pretty much done just some minor header changes and I made the text to small on the silkscreen.
I have been taking pictures of progress thru the whole process.
I've been slacking on updating the post.
This first group show's the bird nest version. Once I figured it all out I had a small run of boards made from Gold Phoenix. It was the 155 sq in. special which was $110.
Since I had a multiple board order 4 different designs it came out to around $150. I got way more than I figured.
A x-acto knife could even drill a hole in this stuff by just spinning it around like a drill. It makes adding boards/sensors easier with out having a drill press..
I could even swap some spacers out to let me put more stuff beneath it on the aluminum plate using double sided tape. A little more work involved in that process.
At the moment its a 3/16 gap to hide the wiring harness. These pics don't show the harness just jumpers but the final boards will have the headers for the harness.
I also have to fix a missing ground. You'll see it in one of the pics below.
I used diptrace as my program to design these. Great program.
I power the remote using a 500mah LiPo. That's about the biggest battery I found to fit. I could go down to a 180mah, which would free up close to half the space in the battery bay. That's enough room for a battery monitor something like this http://www.hobbyking.com/hobbyking/store/__7224__Hobby_King_Battery_Monitor_2S.html. The controller draws around 13Ma so either way the battery would last more than an hour.
A 9V standard battery could fit in that slot.
The push button cluster is getting a few more headers added. I forgot about the pots in the first set of boards.
All the machining is done at my shop. I route the parts on a self designed machine.
I cut the AL at a rpm higher than 22,000 rpm. Leaves a knife edge that the brushing process cuts down.
Beside tweaking the boards and the endless options of programming I would call it almost complete for that reason.
I'll post some spec details by this weekend as I'm still testing all that info. And a few videos/threads with some robots being controlled by it.
I have tested all 32 channels running and it takes the xbee 42ms to send all the info from all the channels.
That's a beautiful controller.
Is this fast enough for you? I think this is approaching a delay that might be noticable as one controls a robot.
Have you changed the XBee's baud? I know the default is 9600 bps; I don't know what the fastest baud rate is. If you're using the XBee's at 9600 bps, changing the baud might be a quick way of speeding up the transmission.
XBees are easy to use but they kind of cost a lot. I still have a few XBees but I really like the Nordic nRF24L01+ modules you can get them for less than $2.50 on eBay. Two XBees will cost almost as much as the servos (the cheap HobbyKing servos) in a mini hexapod. With the Nordic modules you can afford to make all sort of projects wireless. I've written a driver for these modules to use them with the Propeller. The main down side to these modules is the number of pins they require. My current object requires six IO pins. I think this could be reduced by one or two pins.
I'm pretty sure the Nordic transceivers are lot faster than XBees.
I was running at 38440 I since changed over to 57600 and big difference its at 28 ms now.
I plan to run a quadcopter only send 6 signals total. Thats about 5.22ms to send the control data and about the same to recieve it on the copter.
The pin requirement for the Nordic transcievers is a bummer as I dont have the extra pins available.
http://www.kickstarter.com/projects/1757054094/xbee-handheld-controller?ref=recommended
I just need to finish the final schematic drawing and code(add descriptions and make it easy to follow) in spin.
I want to make a GCC version of the software as well.
Its not a complicated piece of code so hoping to knock this out in the up coming week. Then post everything in this thread.
Really impressed and hoping one day to be at your level of design
Do you think you will start up the QLite DIY Handheld Controller again:
https://www.kickstarter.com/projects/1757054094/qlite-diy-handheld-controller?ref=users
I think it has a lot of merits since a lot of the guys around here are using XBEE's now.
Jim