Shop OBEX P1 Docs P2 Docs Learn Events
My Current Prop Based CNC - Photos — Parallax Forums

My Current Prop Based CNC - Photos

idbruceidbruce Posts: 6,197
edited 2012-03-20 08:28 in Propeller 1
Hello Everyone


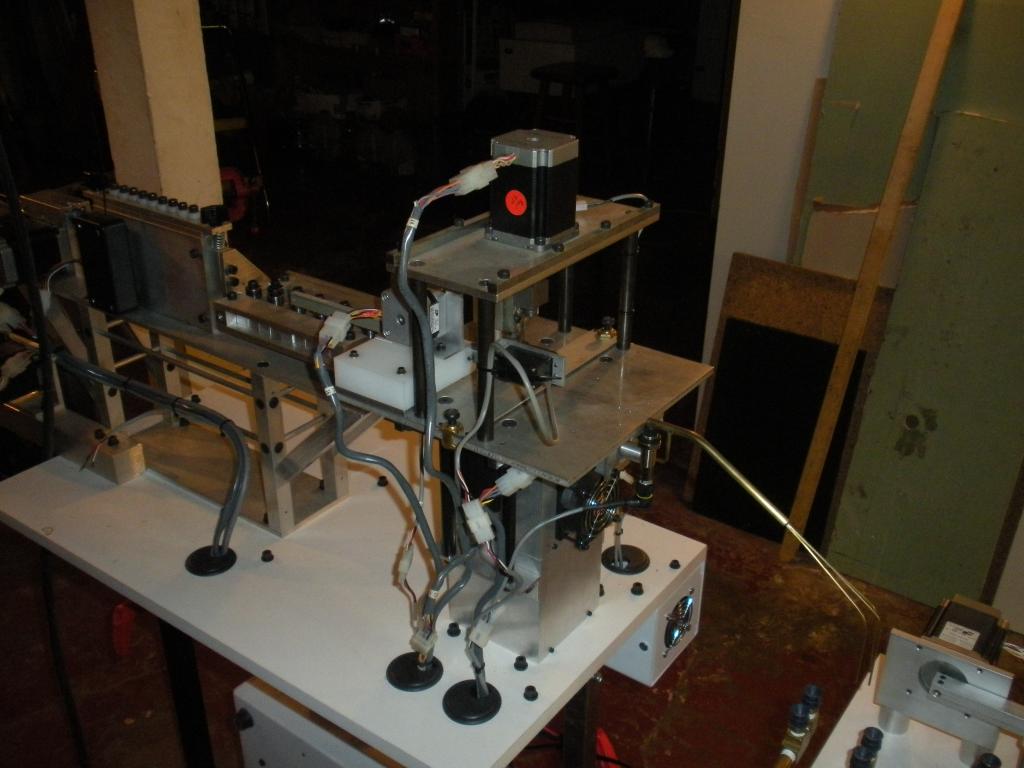
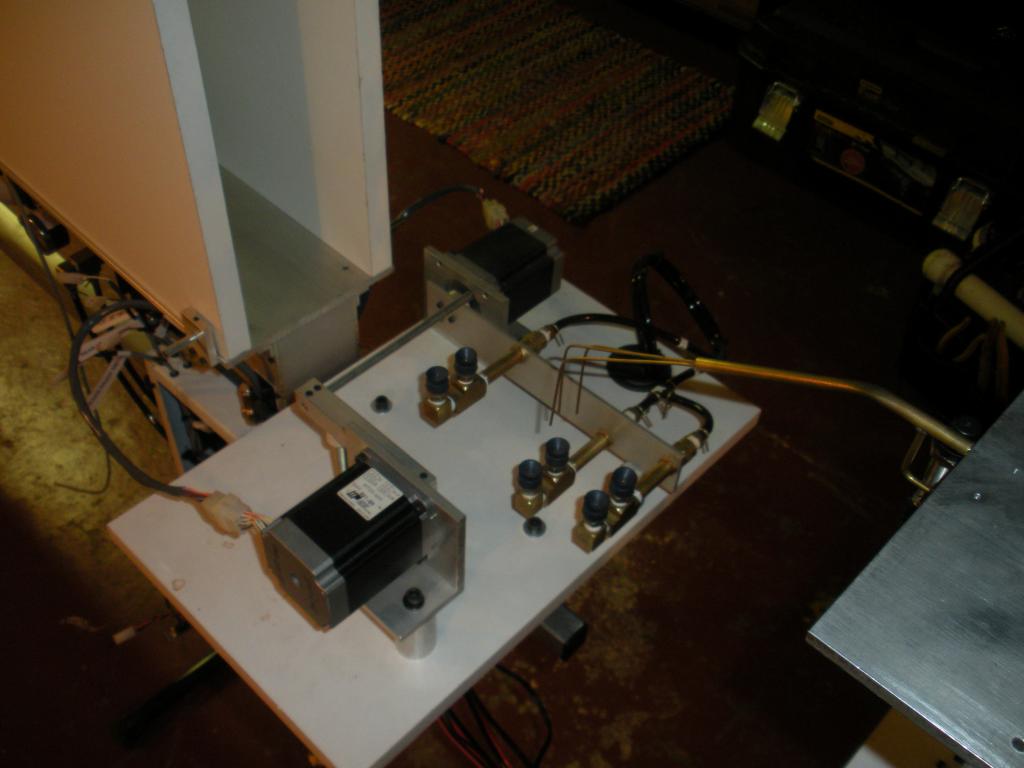
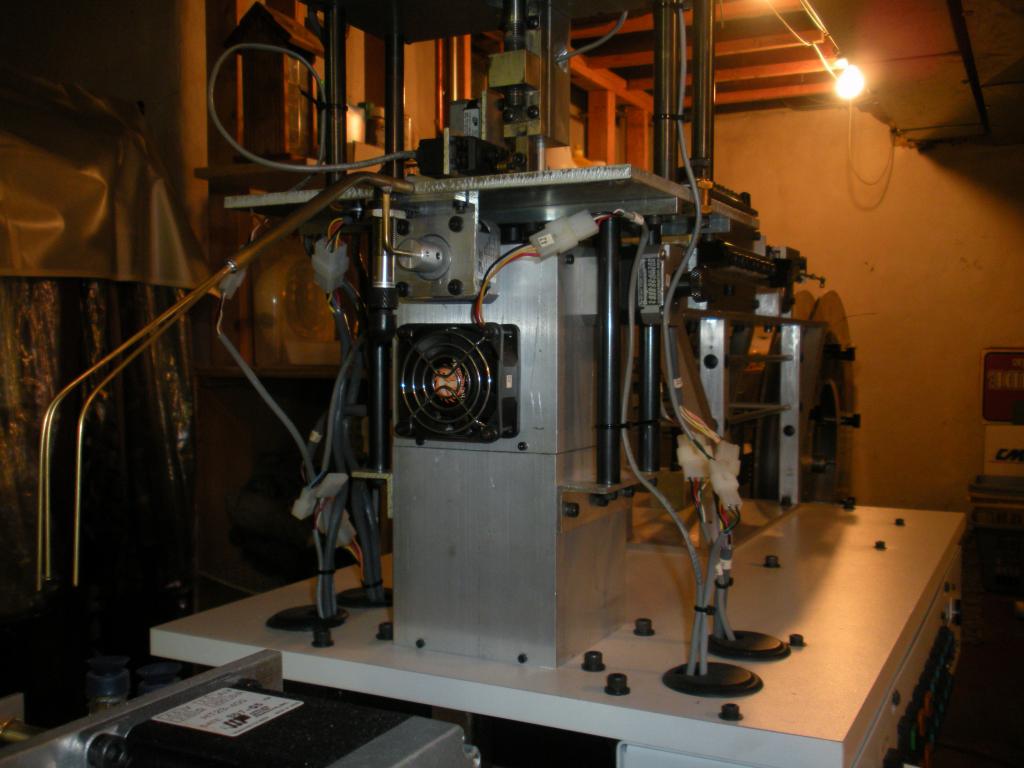
I finally got around to taking some photos of my current project. It consists of two CNC machines.
  1. Wire Bending CNC
  2. Packaging CNC
Between the two machines, there are three Propeller Proto Boards and eleven stepper motors. I am not the best photographer, and these photos do not do the machines justice. However, I will be replacing these photos with better ones as time permits.

Additionally, some of the photos did not upload, so I may delete some and upload others. Please be patient, and eventually I will have some nice photos here. In the near future, I will also make a video of the machines in action.

The wire bending CNC is ready for production, and it will bend 10,800 wire forms in a 24 hour period. It was averaging 12,000, but I had to cut back on the speed due to inaccuracies.

The packaging CNC needs about another weeks worth of work.

Bruce

EDIT: The machine now bends over 25,000 wire forms per day.
EDIT: The packaging machine is currently on hold
EDIT: For those that may be interested, I have attached a PDF to show what the wire bending CNC produces.
1024 x 768 - 75K
1024 x 768 - 69K
1024 x 768 - 71K
1024 x 768 - 59K
1024 x 768 - 72K
1024 x 768 - 58K
1024 x 768 - 64K
1024 x 768 - 82K
1024 x 768 - 74K
«1

Comments

  • ElectricAyeElectricAye Posts: 4,561
    edited 2011-02-14 20:54
    Nice looking piece of equipment. It's what every laundry room needs these days. :)
  • Graham StablerGraham Stabler Posts: 2,510
    edited 2011-02-15 02:54
    Very nice, do you think you would be able to post a video? It would be very cool to see it in operation!

    Graham
  • Chris_DChris_D Posts: 305
    edited 2011-02-15 03:54
    Very neat looking machines. How do they work? What do they do? What does the controller board look like? How do you program them? Where is the keypad and monitor? How fast do they move?

    A picture is worth a thousand words, except when it comes to motion control, a picture leads to a thousand questions :-)

    Chris
  • idbruceidbruce Posts: 6,197
    edited 2011-02-15 05:30
    @Everyone - Thanks for the nice comments

    @ElectricAye - Funny you should mention that! Several years ago, I had the machine mounted to a wooden cabinet, and there was a laundry basket underneath to catch the packaging. Someone said, "Neat looking machine. Does it fold your laundry?" I have posted that photo below to show how the machine has changed and why that question was raised. It is funny that laundry is always associated with it somehow.

    @Graham Stabler - The pictures just don't capture the essence of the machine. I just wish I had better lighting and more room around the machine to take better photos. Anyhow, I probably won't do a video until I get the packaging machine complete. But I will have a video soon.

    @Chris_D - There are 16 lighted pushbutton switches that make up a multi-function keyboard and a 2X20 backlit LCD for the monitor. The main programming is of course loaded into each Propeller, however, clock setup, machine setup, production setup, and the production run are all programmed with those 16 buttons. There are six different production sizes to choose from. Wire is threaded from the back spool through the wire straightners (the wire has a curvature which must be straightened) and through the cutting head. The bending head is situated below the plane of the wire, as the machine is running, the bending head raises and makes either a CW or CCW bend, sometimes there there are several bends without lowering the bending head. When all bending operations are complete, the wire is cut, and the wireform is pushed off the table, utilizing a stepper motor, a rack gear, and a Parallax servo. The wireform then slides down that brass tube and into the packaging. When the proper quantity has been achieved, the package is closed and flipped from the working area.
    1024 x 768 - 91K
  • Graham StablerGraham Stabler Posts: 2,510
    edited 2011-02-15 07:16
    Classy cabinet! And keeping the laundry theme :) (that's where the parts land isn't it). I'm really interested in seeing the bending in action, I've seen quite a few machines on youtube and they are extremely cool.

    I have to get out more!

    Graham

    p.s. I covered the roof of my garage in strip lights for reasons of light, works well. If I owned the place I'd also paint the ceiling/walls white.
  • idbruceidbruce Posts: 6,197
    edited 2011-02-15 07:23
    Graham

    Yea there are a lot of cool bending machines on YouTube! Some of those machines are really flying. If I had the money, I would have liked to build it with servos for more speed, but I think I will go with pneumatic cylinders for version two. I should have gone that way in the first place, I think it would have been done a long time ago, it would be much faster, and I think I could have done it for a fraction of the price. One of those live and learn things.

    However, I must say the bending head on this machine zips around pretty fast :)

    Bruce
  • bsnutbsnut Posts: 521
    edited 2011-02-15 09:01
    We now can see what your project is all about. Great job.
  • Graham StablerGraham Stabler Posts: 2,510
    edited 2011-02-17 10:18
    Pneumatics are simple but I would guess that your machine is more reconfigurable to match design changes etc.

    May I ask what it is actually making?

    Graham
  • $WMc%$WMc% Posts: 1,884
    edited 2011-02-17 14:52
    Hello Bruce
    '
    Nice machines. I really like all the aluminum in their construction.
    '
    Is the wire Spring Steel?
  • Invent-O-DocInvent-O-Doc Posts: 768
    edited 2011-02-17 15:05
    Nicely designed and constructed. Thanks for sharing!
  • Chris_DChris_D Posts: 305
    edited 2011-02-17 16:58
    idbruce wrote: »
    @Everyone - Thanks for the nice comments

    @Chris_D - There are 16 lighted pushbutton switches that make up a multi-function keyboard and a 2X20 backlit LCD for the monitor. The main programming is of course loaded into each Propeller, however, clock setup, machine setup, production setup, and the production run are all programmed with those 16 buttons. There are six different production sizes to choose from. Wire is threaded from the back spool through the wire straightners (the wire has a curvature which must be straightened) and through the cutting head. The bending head is situated below the plane of the wire, as the machine is running, the bending head raises and makes either a CW or CCW bend, sometimes there there are sevral bends without lowering the bending head. When all bending operations are complete, the wire is cut, and the wireform is pushed off the table, utilizing a stepper motor, a rack gear, and a Parallax servo. The wireform then slides down that brass tube and into the packaging. When the proper quantity has been achieved, the package is closed and flipped from the working area.

    That is interesting. I see there are no labels on the buttons so I am assuming that location of the button causes some sort of event relative to the length of the wire?
    Chris
  • idbruceidbruce Posts: 6,197
    edited 2011-02-17 18:59
    @Walt - Thanks for the kind comment. Yes, that is 0.032" spring wire (music wire) on the back spool. I completely underestimated the tensile strength of that wire and it cost me a lot of time and money to get it right. All I can say is WOW :(

    @Invent-O-Doc - And thank you for the nice comment.

    @Chris_D - The buttons do in fact have labels, but you just can't see them due to my photography :) Just in case you are truly interested, here are programmed instructions:
    START         = 0
      YES           = 0
      RESUME        = 1
      ENT           = 1
      SIZEINC       = 2
      SPEEDINC      = 2
      GANTRYCW      = 3
      CWBEND        = 4
      RBENDER       = 5
      RCUTTER       = 6
      FEEDWIRE      = 7
      STOP          = 8
      NO            = 8
      PAUSE         = 9
      CLR           = 9
      SIZEDEC       = 10
      SPEEDDEC      = 10
      GANTRYCCW     = 11
      CCWBEND       = 12
      LBENDER       = 13
      LCUTTER       = 14
      CUTWIRE       = 15
    

    And
    NumericKeypad LONG INVALID, INVALID, INVALID, 0, 1, 2, 3, 4, INVALID, INVALID, INVALID, 5, 6, 7, 8, 9
      FunctionKeypad LONG INVALID, INVALID, INVALID, GANTRYCW, CWBEND, RBENDER, RCUTTER, FEEDWIRE, STOP, INVALID, INVALID, GANTRYCCW, CCWBEND, LBENDER, LCUTTER, CUTWIRE  
    

    A forum member dropped by yesterday just to shoot the breeze and check out my efforts. He curiously asked, "Is that a car part?"

    The answer to that question is an emphatic YES! That is 350 Chevrolet flywheel being utilized to turn the wire spool. Additionally, a starter gear was removed from a 350 Chevy starter and was machined to adapt to a NEMA 23 stepper motor to turn the flywheel. :)
  • $WMc%$WMc% Posts: 1,884
    edited 2011-02-17 20:09
    Bruce
    '
    My BS2 brush hog uses flywheels and Bendix gears to help get the gear reduction needed for the big flotation tires.
    '
    153 teeth and 7 teeth and a little grease.
    '
    Can't wait to see the video!
  • Cluso99Cluso99 Posts: 18,069
    edited 2011-02-17 20:40
    Nice Photos Bruce :) Thanks for sharing.
  • idbruceidbruce Posts: 6,197
    edited 2011-02-17 23:20
    @Clusso99 - Thanks for the compliment. I think I will try to take some better photos of the machine sometime soon, or perhaps I should just concentrate on getting it running and posting a video.

    Bruce
  • idbruceidbruce Posts: 6,197
    edited 2011-05-11 17:09
    I told you guys that I would provide an update, so here it is!
    1. I abandoned the automatic packaging temporarily due to R&D time constraints, and made a bolt on attachment for the front of the wire bending CNC for manual packaging.
    2. Since my last post in this thread, I have been working on machine speed and timing issues. I am proud to say that I can now bend one of my special springs every 5 seconds, that's over 17,000 units a day. However, my goal is 20,000, and I believe I can achieve it.
    3. I still have not made a video, but I will.
    Cheers Bruce
  • ctwardellctwardell Posts: 1,716
    edited 2011-05-11 18:35
    Bruce,

    Thanks for the update.

    I know your goal is 20k/day, but 17k/day sounds impressive to me.

    C.W.
  • idbruceidbruce Posts: 6,197
    edited 2011-05-12 02:08
    @C.W. - It is all about the benjamins :) I intend to market my little springs at $0.25 each.
    • Back in February the machine was averaging 10,800 springs per day. 10,800 * 0.25 = $2700 of product.
    • The machine currently averages 17,200 springs per day. 17,200 * 0.25 = $4300 of product.
    • As for the goal of 20,000 springs per day. 20,000 per day. 20,000 * 0.25 = $5000 of product.
    I anticipate and am hoping that the demand for my product will be higher than I can produce, so the faster the machine goes, the more money I could possibly make. Of course these figures do not include the cost of marketing, materials, packaging, labor, etc... Which of course must all be subtracted from gross sales.

    Thanks for your interest C.W.

    Bruce
  • M. K. BorriM. K. Borri Posts: 279
    edited 2011-05-12 02:13
    I love the old timey look of the whole setup, super classy! Looks like something from a Fallout game.
  • idbruceidbruce Posts: 6,197
    edited 2011-05-12 08:16
    @M.K. Borri - Thanks for the compliment. It looks old time because it was made by an old timer :) Never heard of the Fallout game.
  • idbruceidbruce Posts: 6,197
    edited 2011-06-05 18:08
    Update

    I was wrong about my last projections. It looks as though the machine is going to settle in by producing one unit every 5.5 seconds (15,709 per day).
  • prof_brainoprof_braino Posts: 4,313
    edited 2011-06-06 09:10
    Have you started selling your product yet? Are you using a distributor?
    Or do you have to wait for patent stuff?

    After a couple days, seems you'd have enought to stock Lowes
  • idbruceidbruce Posts: 6,197
    edited 2011-06-06 12:54
    @prof_braino

    Hey there prof_braino what's happening? Long time no see. The machine has changed quite a bit since you seen it, because I have done quite a few modifications for packaging and to make it faster.
    Have you started selling your product yet?

    I have not started selling yet, however I do have the materials and packaging for 2,000 packages of 20. I still have very little tweaking to do and then I am going to set up an appointment to talk with SCORE (Service Corps of Retired Executives), and see if they have any advice about marketing my product. I also have to get a business phone, etc... before I start selling. But it won't be long now. However a little more investment capital sure would come in handy.

    How is your projects coming?

    Bruce
  • ManAtWorkManAtWork Posts: 2,174
    edited 2011-06-08 03:52
    idbruce wrote: »
    If I had the money, I would have liked to build it with servos for more speed, but I think I will go with pneumatic cylinders for version two.

    Very nice machine! I'd also be interested in a video. But don't say stepper motors are slow. Watch this videos:
    http://benezan-electronics.de/forum/videos/Demo-macro.AVI
    http://benezan-electronics.de/forum/videos/Demo-micro.AVI
    This is a NEMA34 stepper motor driving a 30mm pitch ballscrew. As you can see in the second video with the dial indicator the motion is very smooth in spite of the coarse screw pitch. BTW the current version of my stepper drivers also have a propeller inside.
  • idbruceidbruce Posts: 6,197
    edited 2011-06-08 11:30
    @ManAtWork - Thanks for the compliment. Considering all the movement that must take place to make my product, I think the steppers are doing quite well. In fact, I don't think my steppers have reached their full potential just yet. At this point in time, I believe most of them are running at approximately 13.34 revs per second, which I believe is pretty fast. In the future, I will do more experimenting to increase the speed. I am glad you found a solution to your problem. Good luck with your endeavors. It looks like a nice product.

    Bruce
  • idbruceidbruce Posts: 6,197
    edited 2011-06-10 12:36
    In my strides to make my machine the best that it can be, I changed one of my lead screws from a 1/4-20 to an acme thread, approximately 5/8-8, I believe it is metric though. Anyhow, by doing so, I created some significant backlash in my gantry travel. All I have to say is this, when you have a 5/8 inch lead screw that is 1/2 inch long and only 3/8 inch room in which to remove the backlash, you sure have to be creative and it is an "expletive". I think I finally have a solution that can be accomplished with the parts I have, and hopefully it will work.

    MASSIVE FRUSTRATION

    Bruce
  • JasonDorieJasonDorie Posts: 1,930
    edited 2011-06-10 13:12
    Bruce - I'm not sure if this is realistic for your application, but it's possible to make an anti-backlash nut by taking a chunk of HDPE and drilling a hole that's about the diameter of the rod at the depth of the threads. Then you heat the rod just hot enough to soften the plastic, thread the plastic onto the rod, and wait for it to cool. The thread mating should be very tight at that point, and HDPE has very low friction.

    Failing that, you could also check out http://DumpsterCNC.com to see if they make (or can make) an anti-backlash nut that's compatible with your lead screw. They're cheap, and the backlash is very low.
  • idbruceidbruce Posts: 6,197
    edited 2011-06-10 13:42
    @Jason - I did not try that one, but I spent the entire morning trying to make my own tap and putting some threads into plastic. I got some fairly decent threads into some UHMWPE, but the threads were just to tight, and then I had just enough acetal to make a nut, but when I tried threading that, I split the nut. So I gave up on the plastic for now.

    I am currently trying a double nut setup with a shim. I just need to shave a little more off one of the nuts and I should have it. Of course this setup will wear the threads quickly, but all the parts came from a couple $5 clamps. Eventually I will change it for one of those Haydon Kerk NEMA 17 linear stepper actuators.

    And funny you should mention dumpstercnc, I was just there this afternoon, nosing around a little.

    But hey, thanks for the tip and the interest.

    Bruce
  • JasonDorieJasonDorie Posts: 1,930
    edited 2011-06-13 13:16
    I suggested HDPE because it's fairly well suited to this kind of application - The friction coefficient of the material is lower than ice which is why it's often used as a "self lubricating" material for places where actual lubricants or loose fits aren't an option, but you need something cost effective. Ballscrews are ideal, but pricey. The double-nut setup will work, but the friction will be very high, so your drive mechanism has to be significantly stronger to overcome the static friction, and you may lose accuracy if you're micro-stepping, since the micro-step torque may not overcome it. You probably know all this, but just in case... :)
  • idbruceidbruce Posts: 6,197
    edited 2011-06-13 14:25
    Jason

    I have not researched a comparison based upon the coeffiency of friction between HDPE and UHMWPE, but I know they are both pretty slippery stuff. :) I will get it all dialed in later tonight. I made a couple jigs for aligning my shafts, and my leadscrew is dead center aligned. so I should be in much better shape than yesterday or the day before. My goal is to eliminate any unnecessary friction or binding before I try adjusting the backlash. I am hoping that my product can survive a little backlash in the production process. I will know shortly. If not, I might try heating the screw as you suggested earlier.

    Bruce
Sign In or Register to comment.