

Build Your Own SMD Microscope

Build a Simple DIY SMD Microscope
Now Upgraded with BASIC Stamps
and servo motors!
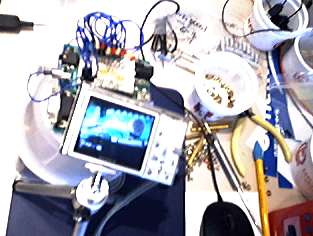
This concept uses any camera with a magnifier mode
for closeup work with Parallax boards and components.

Typical color image captured with the author's
home-made SMD microscope showing a modification
to the Parallax Propeller Proto Board. Without the
home-made SMD Microscope, the mod would be
next to impossible.
Camera
Take one camera which has a magnifying mode
(for example, a SONY Cyber-Shot) and one six-inch
tripod and some recycled food containers - put it
all together and you have a working SMD microscope
viewer for assembly and mod of SMD boards.
Operations Key
The key is in the operation. Use the view screen,
which can operate in real time as the imager is scanned
across the tiny images of traces, chips, resistors, etc.
Wear reading glasses if you need them, and
engage the magnifier mode.
Details
The Cyber-shot has a Carl Zeiss Vario-Tessor Optical
3X lens which can be additionally zoomed to increase
magnification. Another key to success is using VGA
mode because it allows the creation of a larger
microscopic image which equals more magnification.
Image Processing
Import the image into Google's PICASA 3 and enhance.
Enhancements should include zooming, sharpening,
contrast, color with light and dark adjustments.
Uses
Sometimes you cannot see the markings on SMD
components. This setup shows everything you need to
see. It works in hands free mode and in real time
imaging. It will also capture images at the press of a
button. It works well for identification of traces and
components, determining board and connection
conditions.
Work in Real Time
It also allows you to work in real time, as in soldering
tiny components and wires or adjusting traces and
inspecting work. To do this, adjust the imager on the
tripod for no hands operation.
Setup
Since the imager is hands free, the board can be connected
or merely set on the recycled kitchen container. Adjust the
6-inch tripod so the imager can scan laterally across the board
in the X-axis or adjust in the Y-direction. This will make centering
objects you cannot see with the human eye more easy.

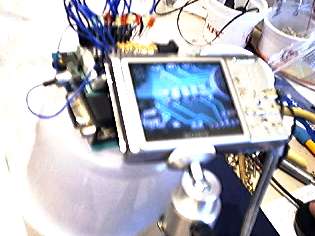
This setup image was captured with a computer
cam, showing an active microscope screen.

Note the tripod positioning and the adjustments
that are easily made manually in the XY-axes.
Now Upgraded with BASIC Stamps
and servo motors!
This concept uses any camera with a magnifier mode
for closeup work with Parallax boards and components.
Typical color image captured with the author's
home-made SMD microscope showing a modification
to the Parallax Propeller Proto Board. Without the
home-made SMD Microscope, the mod would be
next to impossible.
Camera
Take one camera which has a magnifying mode
(for example, a SONY Cyber-Shot) and one six-inch
tripod and some recycled food containers - put it
all together and you have a working SMD microscope
viewer for assembly and mod of SMD boards.
Operations Key
The key is in the operation. Use the view screen,
which can operate in real time as the imager is scanned
across the tiny images of traces, chips, resistors, etc.
Wear reading glasses if you need them, and
engage the magnifier mode.
Details
The Cyber-shot has a Carl Zeiss Vario-Tessor Optical
3X lens which can be additionally zoomed to increase
magnification. Another key to success is using VGA
mode because it allows the creation of a larger
microscopic image which equals more magnification.
Image Processing
Import the image into Google's PICASA 3 and enhance.
Enhancements should include zooming, sharpening,
contrast, color with light and dark adjustments.
Uses
Sometimes you cannot see the markings on SMD
components. This setup shows everything you need to
see. It works in hands free mode and in real time
imaging. It will also capture images at the press of a
button. It works well for identification of traces and
components, determining board and connection
conditions.
Work in Real Time
It also allows you to work in real time, as in soldering
tiny components and wires or adjusting traces and
inspecting work. To do this, adjust the imager on the
tripod for no hands operation.
Setup
Since the imager is hands free, the board can be connected
or merely set on the recycled kitchen container. Adjust the
6-inch tripod so the imager can scan laterally across the board
in the X-axis or adjust in the Y-direction. This will make centering
objects you cannot see with the human eye more easy.
This setup image was captured with a computer
cam, showing an active microscope screen.
Note the tripod positioning and the adjustments
that are easily made manually in the XY-axes.
Comments
Combine two projects for more functions
Add servos and BASIC Stamps (BS1s) from the 3DSC project to drive your SMD Microscope. The SMD Microscope project now incorporates the 3DSC project. The 3DSC has two movable servo driven platforms. In this application, only the top platform is needed for the specimen. The platform can move alone a short arc in one plane to position and reposition viewing for no-hands operations. More on the 3DSC is found here.
http://forums.parallax.com/showthread.php?112082-World-s-1st-3-Dimensional-Stamp-Computer-%283DSC%29.-Upgrade-4D-Morphing-Computer
This idea merges two projects into one new.
By combining the 3DSC Morphing Computer
with the SMD Microscope, a more useful servo
driven project emerges.
The 3DSC Morphing Computer can accomplish several new
functions when combined with the SMD microscope.
Posing some sample images
Looking inside the Prop Plug holes to see what's in there!
You can squeeze more information out of your DIY
SMD Imager by following a few good tips.
Work those Penguin Boards!
One application for the SMD Microscope is in regard to the Penguin Offer.
The repair involves the soldering of SMD components on the
black CPU Penguin mother-board which is already very small.
http://forums.parallax.com/showthread.php?129018-The-March-of-the-Penguins-Closed!