

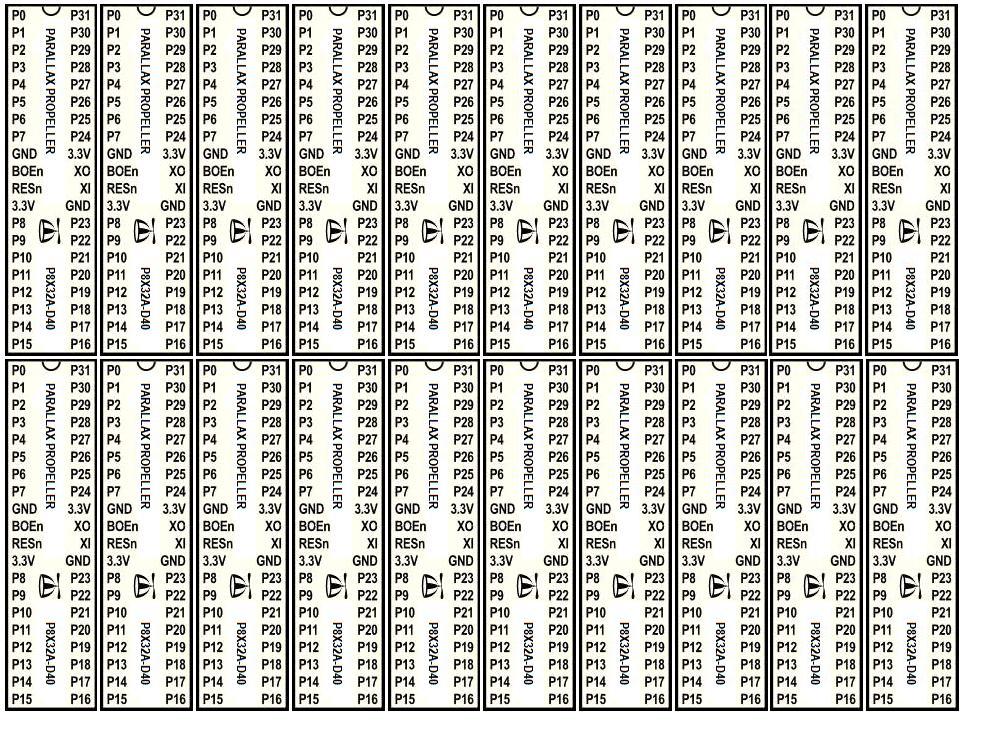
New Prop Sticker
 Humanoido
Posts: 5,770
Humanoido
Posts: 5,770
A New Prop Sticker
Since many of us are building Propeller machines with larger and larger numbers of Propeller chips, this 20-block label sheet will come in handy for home printing. This is a new re-mastered Propeller chip sticker using PAINT, saved as jpg, then fed into Google’s Picasa 3.6.0 for printing. I have made a set of new instructions to follow, listed below. The label now includes the part number as Parallax will introduce other Propeller chips in the future. I find it preferable to affix the label with a couple pieces of rolled tape at each end, to facilitate easy removal. The sticker image is black text on white background to get the greatest mileage from your inkjet cartridge. It may be vision personal preference but I find it easier to read black text on a white background.

Printing the New Sticker at Exact Size
For paper, use a good 24-pound bond. Semi-matt surfaces can absorb the ink and give a nice professional look to the sticker. Fan the paper before loading the printer. To print using Picasa 3, double click on the image in Library View, then File, Print…, select Shrink to Fit, click on Printer Setup, Effects, and type in 54% of Normal Size. You may need to make minor adjustments based on the type of printer. Close the menu box and select print. To print more than one copy, in the print information window, select copies per photo by clicking on the + repeated times. In my setup, the printed label is the exact size and the designations line up exactly with the pins. Just cut these out with a scissors and affix using small pieces of rolled tape. As always, use proper precaution around hot components when using flammable paper labels. Paper labels are not designed for chips running hot. When prototyping and wiring is completed, the labels easily remove. For printing, use the file LABEL5.jpg.
Since many of us are building Propeller machines with larger and larger numbers of Propeller chips, this 20-block label sheet will come in handy for home printing. This is a new re-mastered Propeller chip sticker using PAINT, saved as jpg, then fed into Google’s Picasa 3.6.0 for printing. I have made a set of new instructions to follow, listed below. The label now includes the part number as Parallax will introduce other Propeller chips in the future. I find it preferable to affix the label with a couple pieces of rolled tape at each end, to facilitate easy removal. The sticker image is black text on white background to get the greatest mileage from your inkjet cartridge. It may be vision personal preference but I find it easier to read black text on a white background.
Printing the New Sticker at Exact Size
For paper, use a good 24-pound bond. Semi-matt surfaces can absorb the ink and give a nice professional look to the sticker. Fan the paper before loading the printer. To print using Picasa 3, double click on the image in Library View, then File, Print…, select Shrink to Fit, click on Printer Setup, Effects, and type in 54% of Normal Size. You may need to make minor adjustments based on the type of printer. Close the menu box and select print. To print more than one copy, in the print information window, select copies per photo by clicking on the + repeated times. In my setup, the printed label is the exact size and the designations line up exactly with the pins. Just cut these out with a scissors and affix using small pieces of rolled tape. As always, use proper precaution around hot components when using flammable paper labels. Paper labels are not designed for chips running hot. When prototyping and wiring is completed, the labels easily remove. For printing, use the file LABEL5.jpg.
1000 x 756 - 248K
304 x 226 - 30K
Comments
Do you use colors? For some reason, mine all have to be colored; brownout is brown, ground is black, Vdd is red, EEPROM is light green (TX has a purple dot) , serial is light blue, clock is purple with green dashes. Since I see those colors for each connection anyway, I make the wires the same color. I always wonder if other folks think with colors as symbols, or only as attributes. I guess everybody has there own colors in their head, so for the time being I will use highlighters on the black text.
I did some experimenting with my printer to see if legible numerical printing could be achieved at the same density of the forthcoming Propeller II chip. Using the Propeller I surface mount chip from a Parallax Proto Board as a guide, the pin density was matched. In the final printout, alphanumerics became mottled and the numbers bled together, and although tiny, overall they were indistinguishable and illegible. All is not lost however as I came up with a solution that I'd like to share. To print a legible label for the Prop II, use the entire surface of the chip with inward pointing lines source emanating from pins. The lines can lead back to a larger type font that's readable.
Printing color can be a tricky business. For example, a pure yellow font or line won't show well and similar light colors are almost invisible. What you can see well on the screen may not show up on a printout. Magazine ink publishers print fonts with light colors and make the characters legible by surrounding the character with a dark outline or dark background. You could try printing lighter color fonts in outline or shadow mode to see if it works well with your printer. Higher densities of color show up better but start to look too dark and wash out in color. You can also get more fancy with PhotoShop or other high end software designed to deal with these issues, even take a design to a publishing house for printing on a high end Linotronic imagesetter.