

beginner graphics ...µOLED-128-GMD1 Object Image method--help needed
 mickal
Posts: 75
mickal
Posts: 75
I have been enthusiastically looking into a small display as sold by parallax. This would be my first attempt
at any kind of graphics output so felt very daunting until reading the manual and the excellent readymade µOLED-128-GMD1 Object .
However I am stuck on one method..... maybe I need to stare longer at it but I have given it a good go and I am putting my hand up.!
Please any help appreciated about how I use this method to display an image.
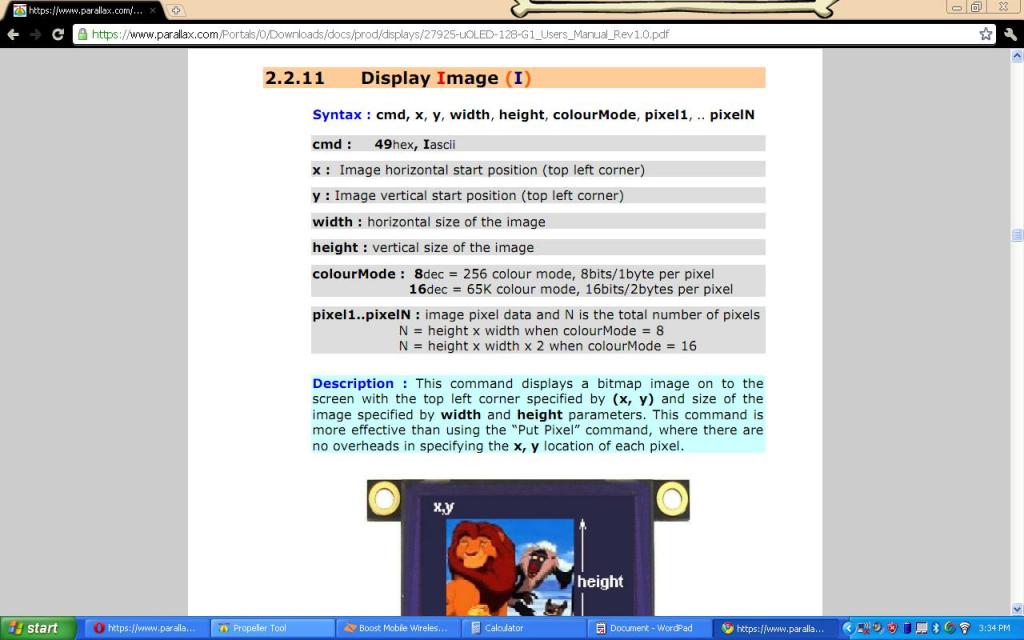
2.2.11 Display Image (I)
After looking at this I am no wiser as to how to display an image. I have included the code and relevant manual screenshot.
I have yet to read up on uSD Card read/write methods but I think understanding this first is a pre-req.
seems not be using the parameter passed called 'Char' value 0 to 31, to store a possible 32 user defined bitmaps.
PUB ADD_BITMAP (Chr,Data1,Data2,Data3,Data4,Data5,Data6,Data7,Data8)
' Chr# : 0 to 31
' Data1 - Data8 (8 hex bytes for 8x8 char cell)
SERIAL.tx ("A")
SERIAL.tx (Data1)
SERIAL.tx (Data2)
SERIAL.tx (Data3)
SERIAL.tx (Data4)
SERIAL.tx (Data5)
SERIAL.tx (Data6)
SERIAL.tx (Data7)
SERIAL.tx (Data8)
WAITACK
https://www.parallax.com/Portals/0/Downloads/docs/prod/displays/27925-uOLED-128-G1_Users_Manual_Rev1.0.pdf
http://obex.parallax.com/objects/195/
at any kind of graphics output so felt very daunting until reading the manual and the excellent readymade µOLED-128-GMD1 Object .
However I am stuck on one method..... maybe I need to stare longer at it but I have given it a good go and I am putting my hand up.!
Please any help appreciated about how I use this method to display an image.
2.2.11 Display Image (I)
After looking at this I am no wiser as to how to display an image. I have included the code and relevant manual screenshot.
I have yet to read up on uSD Card read/write methods but I think understanding this first is a pre-req.
PUB IMAGE (X, Y, WIDTH, HEIGHT, COLOUR_MODE, PIXEL) | CCNT                      ' "T"
  ' COLOUR_MODE : 8 -> 256 colour mode, 1 byte per pixel
  '              16 -> 65K colour mode, 2 bytes per pixel
  SERIAL.tx ("I")
  SERIAL.tx (X)
  SERIAL.tx (Y)
  SERIAL.tx (WIDTH)
  SERIAL.tx (HEIGHT)
  SERIAL.tx (COLOUR_MODE)
  CCNT := 0
  REPEAT WIDTH * HEIGHT * (COLOUR_MODE / 8)
    SERIAL.tx (BYTE[CCNT++ +PIXEL])
  SERIAL.tx (0)
  WAITACK
((on a real tangent from this question the Spin Object code method for ""2.2.1 Add User Bitmapped Character (A)""seems not be using the parameter passed called 'Char' value 0 to 31, to store a possible 32 user defined bitmaps.
PUB ADD_BITMAP (Chr,Data1,Data2,Data3,Data4,Data5,Data6,Data7,Data8)
' Chr# : 0 to 31
' Data1 - Data8 (8 hex bytes for 8x8 char cell)
SERIAL.tx ("A")
SERIAL.tx (Data1)
SERIAL.tx (Data2)
SERIAL.tx (Data3)
SERIAL.tx (Data4)
SERIAL.tx (Data5)
SERIAL.tx (Data6)
SERIAL.tx (Data7)
SERIAL.tx (Data8)
WAITACK
https://www.parallax.com/Portals/0/Downloads/docs/prod/displays/27925-uOLED-128-G1_Users_Manual_Rev1.0.pdf
http://obex.parallax.com/objects/195/
1024 x 640 - 80K
Comments
As nobody answers so far, here is my answer, even if I don't have this display.
First of all you have to store the image(s) somewhere. 128x128x2 is 32kB of memory you need for one full image, so a full image won't fit into the propeller RAM because you need some code as well. For your first experiments you could use a smaller image and directly write the bytes into a DAT section.
I guess the description of the display also contains the coding of the 16 bits. The 2 bytes contain the Red Green Blue value for one pixel. As 16 bits can not be devided by 3 the coding is something like 5 bits for red, 6 bits for green and 5 bits for blue - as far as I remember the specs of the display I used. So, one pixel can be defined by %rrrrr_gggggg_bbbbb where you replace the letters by 0 or 1
dat
myImg
word %00000_000000_00000, %00000_000000_00000, %00000_000000_00000 ' 3 black pixels
word %11111_000000_00000, %11111_000000_00000, %11111_000000_00000 ' 3 red pixels
word %00000_111111_00000, %00000_111111_00000, %00000_111111_00000 ' 3 green pixels
word %00000_000000_11111, %00000_000000_11111, %00000_000000_11111 ' 3 blue pixels
word %11111_111111_11111, %11111_111111_11111, %11111_111111_11111 ' 3 white pixels
Hand the code to write the "image" to the display:
IMAGE( 0,0, 3, 5, @myImg)
When you tried that and found out how the image has to be coded, you need a program that converts a real image to this format. Easiest is to convert images to BMP -because its an easy to understand format- and then write a little program that converts these to the display format. (I have a Java program which is converting BMPs) It could also be done in by the propeller.
If you have the images for example stored on SD card, you have to read em block-wise. For example read 16 lines into a buffer, then send the 16 lines to the display, read the next 16 lines .....
Something like that would read a full image.
import java.io.FileInputStream;
import java.io.FileOutputStream;

public class Conv24to16 {

    /**
     * @param args
     */
    public static void main(String[] args) {
        // TODO Auto-generated method stub
        if (args.length < 2) {
            System.out.println( "Please specify inFile and outFile!" );
            return;
        }

        String inFile=args[0];
        String outFile=args[1];
        byte[] pixelIn=new byte[3];
        byte[] pixelOut=new byte[2];

        try {
            FileInputStream fin=new FileInputStream(inFile);
            FileOutputStream fout=new FileOutputStream(outFile);

            fin.skip(54);

            while( fin.available()>0 )
            {
                fin.read(pixelIn);
                pixelIn[0]=(byte)(pixelIn[0]&248 );
                pixelIn[1]=(byte)(pixelIn[1]&252 );
                pixelIn[2]=(byte)(pixelIn[2]&248 );

                pixelOut[0]=(byte)( pixelIn[0] | ((pixelIn[1]>>5)&7) );
                pixelOut[1]=(byte)( ((pixelIn[1]<<3)&56) | pixelIn[2]>>3);

                fout.write(pixelOut);
            }
        } catch( Exception ex) {
            System.out.print( ex );
            ex.printStackTrace();
        }
        System.out.println("Done!");
    }

}
Should be easy to convert it to SPIN.
You will need to hook your display up to the PC using a prop plug (rearranging the pin order and adding +5v from the USB port or another source).
The FAT controller helps you assemble all the commands (script) you need, including storing images to uSD and retrieving them. You won't need detailed uSD knowledge because from memory it uses RAW mode and just writes to physical sectors (ie you won't be able to use the uSD card with anything else, including PCs).
Once you have your screens ready and saved to uSD card, hooking up to the Prop instead of PC will be easy...
good luck
tubular
edit: well best check your model.