Nikos 4WD Rover
Hello everybody,
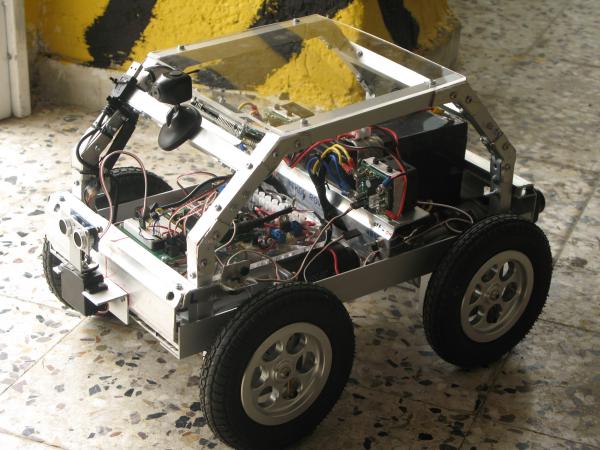
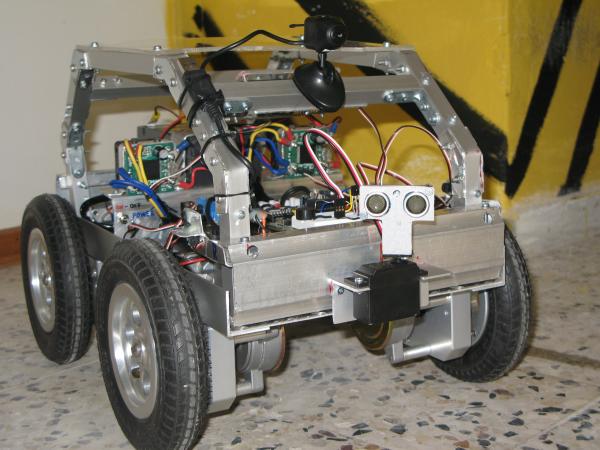
I’m here to share with you my new project “Nikos 4WD Rover”.
I would also ask for your help, your advice, your suggestions and your feedback!
My inspiration for this project basically was the “Motor Mount and Wheel Kit with Position Controller”.
and the "HB-25 Motor Controller". ”. I have also spent a lot of time looking at "Madeusa - Robot Base Full Kit” and I was trying to understand more details for this robot and take some ideas. The major help however comes from the project:"TOBI - The Tool Bot ”. This project really gave me a lot of useful information and helped me to overcome my hesitations.
So I decided to buy two “Motor Mount and Wheel Kit with Position Controller”.
because I had a crazy idea. I had decided to create a mini 4wd rover. Actually deep in my mind I had an ambition. I had dreamed of building a robot similar to " Propeller QuadRover Robot ”! The little brother of " QuadRoverRobot” was something beyond the imagination but similarities based on the external appearance of this robot were practicable.
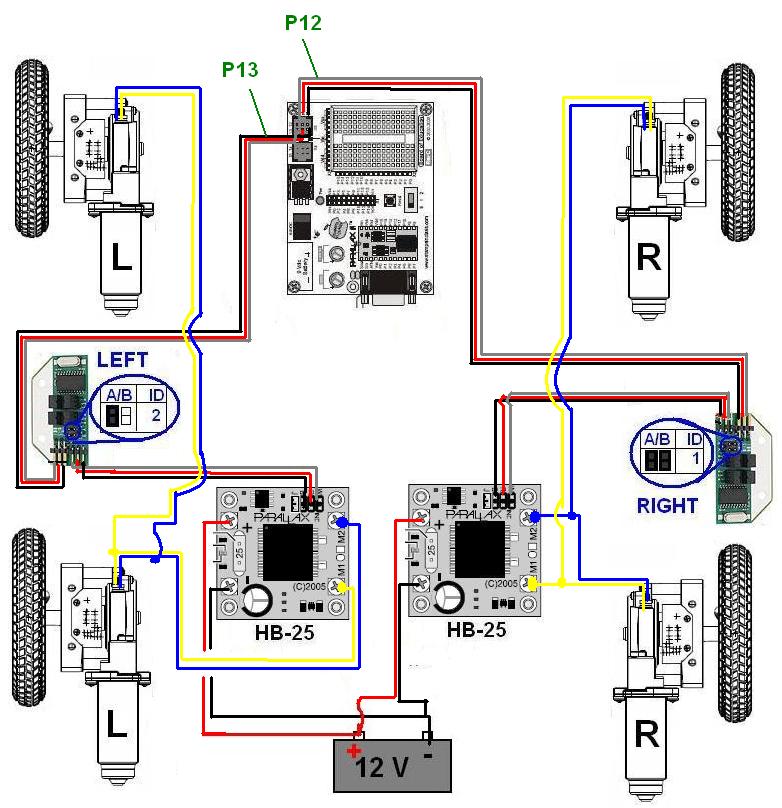
At first I had no Idea If I could control 4 wheels using only two HB25. So I asked help from the Parallax support team. I’m thankful because they answered my question about the connection topology. (Thank you Dave!!!) (But now I have a lot of new questions!)
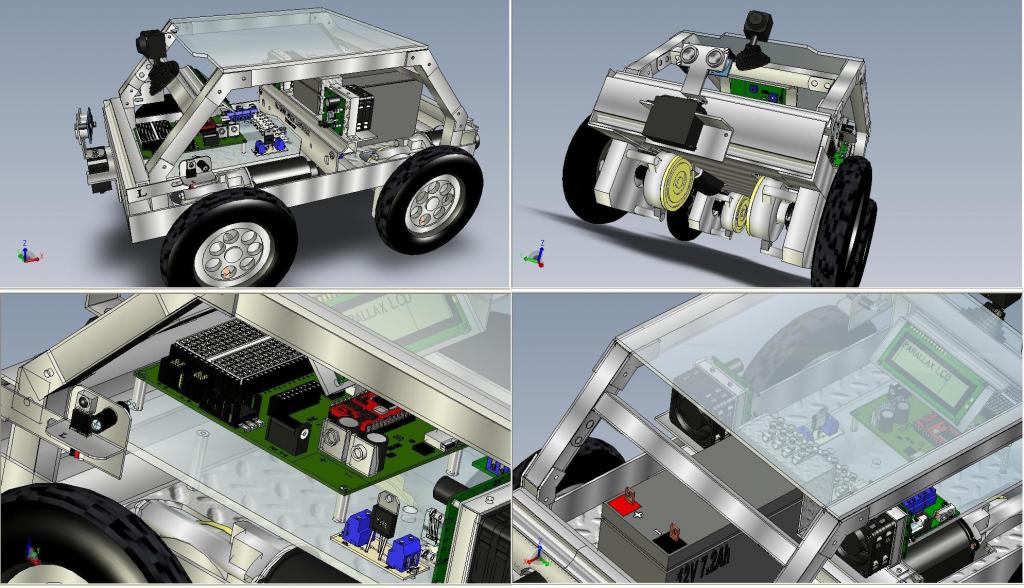
I have also done the 3d Model of this Robot using the Google SketchUP software. So I provide you the eDrawing model to share with you all the details. "(Download the viewer to view 3D files)”
Here are the electronic parts I used and the cost:
1) (1) [URL=" http://www.parallax.com/Store/Microcontrollers/BASICStampDevelopmentBoards/tabid/137/CategoryID/12/List/0/SortField/0/Level/a/ProductID/126/Default.aspx"]" Board of Education Development Board ”[/URL] (USB)$69.99
2) (1) " BASIC Stamp 2e Module ” $54.00
3) (2) "HB-25 Motor Controller". ”. 2X $49.99=$99.98
4) (2) “Motor Mount and Wheel Kit with Position Controller”.
2x $279.99=$559,99
5) (1 ) [URL=" http://www.parallax.com/Store/Sensors/ObjectDetection/tabid/176/CategoryID/51/List/0/SortField/0/Level/a/ProductID/563/Default.aspx "]" PING))) Ultrasonic Sensor + FREE Mounting Bracket ”[/URL] $29.99
6) (1) " Parallax 2x16 Serial LCD (Backlit) ” $29.99 (optional)
7) The chassis is homemade. The cost for me was almost $50
Total cost= $750 - $900 (if you have already a "boe-bot” you can save $150)
You can also see the 3d eDrawing

Nikos_4WD_Rover_3d_eDrawings.zip
but first you must"Download the 3D eDrawing Viewer.”
At this point I haven’t connected the position controllers yet. I run the robot without their help. I feel that I have a very big "BOE-BOT” with extremely power.
Here is the scematic and my first Bs2 Code.
You can also see a video of the rover here: http://www.youtube.com/watch?v=4OQ5ML0nngkFeel free to ask me if you have any question.
I’m here to share with you my new project “Nikos 4WD Rover”.
I would also ask for your help, your advice, your suggestions and your feedback!
My inspiration for this project basically was the “Motor Mount and Wheel Kit with Position Controller”.
and the "HB-25 Motor Controller". ”. I have also spent a lot of time looking at "Madeusa - Robot Base Full Kit” and I was trying to understand more details for this robot and take some ideas. The major help however comes from the project:"TOBI - The Tool Bot ”. This project really gave me a lot of useful information and helped me to overcome my hesitations.
So I decided to buy two “Motor Mount and Wheel Kit with Position Controller”.
because I had a crazy idea. I had decided to create a mini 4wd rover. Actually deep in my mind I had an ambition. I had dreamed of building a robot similar to " Propeller QuadRover Robot ”! The little brother of " QuadRoverRobot” was something beyond the imagination but similarities based on the external appearance of this robot were practicable.
At first I had no Idea If I could control 4 wheels using only two HB25. So I asked help from the Parallax support team. I’m thankful because they answered my question about the connection topology. (Thank you Dave!!!) (But now I have a lot of new questions!)
I have also done the 3d Model of this Robot using the Google SketchUP software. So I provide you the eDrawing model to share with you all the details. "(Download the viewer to view 3D files)”
Here are the electronic parts I used and the cost:
1) (1) [URL=" http://www.parallax.com/Store/Microcontrollers/BASICStampDevelopmentBoards/tabid/137/CategoryID/12/List/0/SortField/0/Level/a/ProductID/126/Default.aspx"]" Board of Education Development Board ”[/URL] (USB)$69.99
2) (1) " BASIC Stamp 2e Module ” $54.00
3) (2) "HB-25 Motor Controller". ”. 2X $49.99=$99.98
4) (2) “Motor Mount and Wheel Kit with Position Controller”.
2x $279.99=$559,99
5) (1 ) [URL=" http://www.parallax.com/Store/Sensors/ObjectDetection/tabid/176/CategoryID/51/List/0/SortField/0/Level/a/ProductID/563/Default.aspx "]" PING))) Ultrasonic Sensor + FREE Mounting Bracket ”[/URL] $29.99
6) (1) " Parallax 2x16 Serial LCD (Backlit) ” $29.99 (optional)
7) The chassis is homemade. The cost for me was almost $50
Total cost= $750 - $900 (if you have already a "boe-bot” you can save $150)
You can also see the 3d eDrawing
Nikos_4WD_Rover_3d_eDrawings.zip
but first you must"Download the 3D eDrawing Viewer.”
At this point I haven’t connected the position controllers yet. I run the robot without their help. I feel that I have a very big "BOE-BOT” with extremely power.
Here is the scematic and my first Bs2 Code.
You can also see a video of the rover here: http://www.youtube.com/watch?v=4OQ5ML0nngkFeel free to ask me if you have any question.





Comments
As they told me from Parallax the above schematic is wrong. They told me that I could chain the "Position Controllers" together with one I/O pin.
Does anyone know how to do this? (Could you send a schematic?)
Thank you "logan996",
Actually my intention is to replace the BasicStamp Board with the new prospective PropBOE.
I am waiting this new ProbBOE to start with propeller! I have visited Hanno's pages. This person have done amazing job! (hardware and software) I have downloaded the 12-block programming environment. I think this is the most appropriate way to introduce the propeller in a class. It is very similar with the "Scratch" environment. Personally I have the propeller demo board but the most activities I found were spreaded in various propeller manuals. Although I have successfully performed many of these ativities I have a "phobia" to start create spin code by myself. I expect from Parallax an "educational packet" with activities (something like the Boe bot kit) to start. I hope that the new PropBOE will have a complete set of activities with all the amazing examples (like camera you mentioned above).
Anyway do you think that I could start with the propeller demo board? (I have also the book "Programming the propeller with spin A Begginner's guide to parallel processing"
I have bought the battery years ago for my first motorbyke from a local store Here in Patras. It is a common battery 12V 7,2AH. Finally I bought a new motorcycle and the battery had left in my garage. So I decided to use it in this project!
Unfortunately I don't have any link for this battery but as I told you it is a very common battery.
You can see the thread: Robot Base Kit - eDrawings and sample images. In this tread the official team of Parallax engineer use the appropriate battery for the Robot Base Kit.
After the help and the precious suggestion from the Parallax support team I finally succeed to have a full
controll of the Position Controller Kit using the UART comunication.
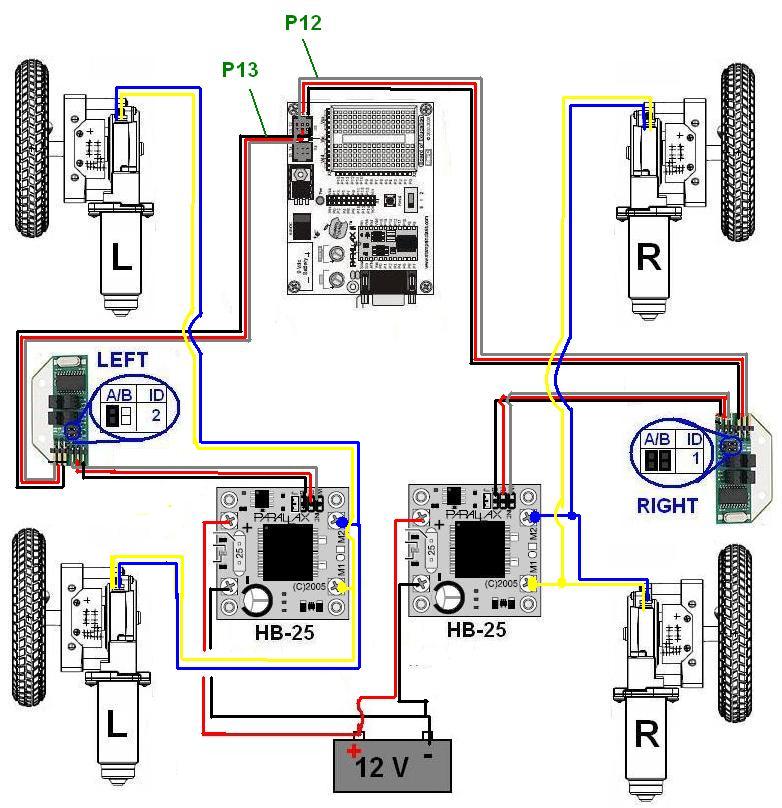
The corect wiring diagram for the rover is the follow:
(as you can see I use two Motor Mount and Wheel Kits )
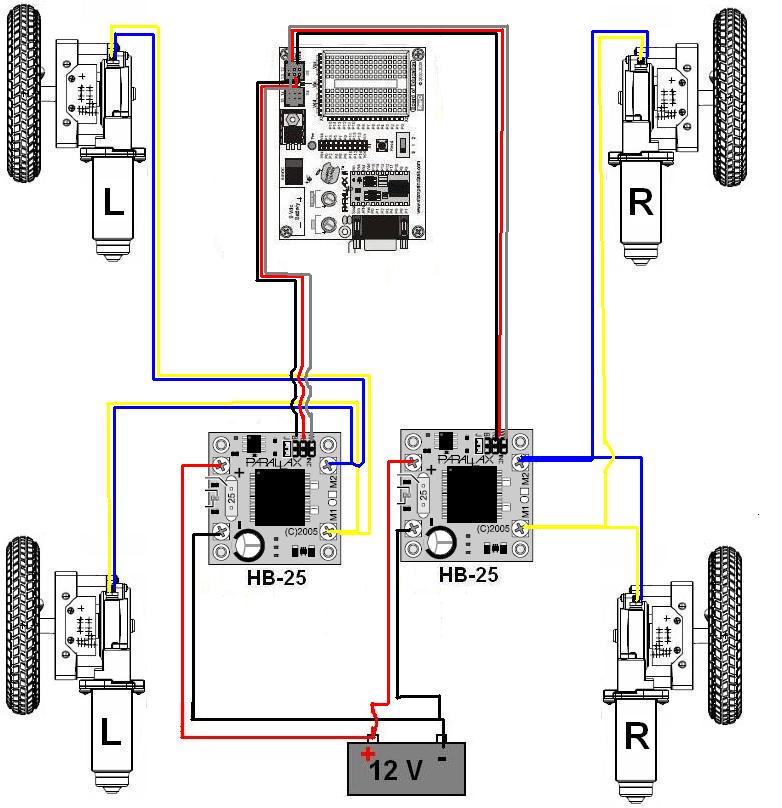
If anyone use only one Motor Mount and Wheel Kit the wiring diagram is the following:
You must chain the Position Controllers together with one I/O pin
(PIN 12). This wiring runs successfully with the code Position Controller
Test Interface (v1_2).bs2. This code is located to the "Motor Mount" Documentation:.
Many thanks to Dave Andreae from Parallax suport Team.
Although I was confused with all these hardware and manuals Dave patiently helped me where to focus on!
Actually whole the answers are written on the manuals!
Congratulation "Logan996". Take into account that you are able to controll a LED using the Propeller board, I can predict that you will have a brilliant future on computers!
Personally I'm 40 and I first used a computer at 20 as a university student on Mathematics department! I also started robotics 10 years ago.
I believe that your generation have made a great progress!
Thank you for your suggestion. I aggree with you Propeller programing is the future!
keep studying. Robotics is the future of education.
Thank you P!-Ro,
If you remember something about this "piggy" Bot please send it to me.
P.s. instead of "piggy" was it something like "hog"?
Είναι όμορφο ! Great job!
erco
Ευχαριστώ erco ! ! !
Χρόνια Πολλά & Ευτυχισμένο το 2011 ! ! !.
Best wishes
Nikos Giannakopoulos
If you like my rover here is an illustrative video of its construction:
All the dimensions are given (I use cm units) and also all the steps of the construction.
If you want to build a rover like this, and you have any question about, feel free to ask.
Great job. I'm trying to build my version of Nikos 4wd. I'm having issues with stoping the motors with the Trvl 0 command.
Did you use the position controllers? If so can you give me guidance to smooth stopping the motors?
It is great that you try to build this rover!!,
You can't stop the motors?
I'm sending you a new piece of code with the four basic movements of the robot : Forward, Right turn , left turn, (for Backward you must put negative distance). You can also change the value of the variable "distance" inside the code in order to change the duration of the rotation!
The code is based on "Position Controller Test Interface (v1_2_1)" file from Parallax position controller manuals.
The robot moves exactly as you can see on the video. Try this code using The Parallax board of education and a BS2 Microcontroller.
Keep in mind that the corect scematic (if you use 4 motors) is the 1st image in the post #6.
Althought we use 4 motors we need only 2 position controlles to controll the robot.
Feel free to ask if you have any more question.
P.s. if you have any photos fron your robot please post in the forum
Would love to see you come to Seattle and compete or just visit. Robothon 2015 will be on Oct. 10th this year.
Congratulations on a very complete design and presentation.
Hmm. Wonder if we could combine a bit of Propeller 2 Early Adopter Seminar around the same time as Robothon 2015, inviting Nikos to join us.
Carol, I'll get myself up to Robothon this year.
Ken Gracey
I love the idea to meet you Ken, as well as all the rest team of the propeller seminar, but I'm afraid that October is a very difficult period for me due to my job. However nothing isn't imposible!
Erco, crop circles are amazing! It is one of my dreams to work with.....
However my 4wd Rover became an "organ donor" and now is "rest in peace".
With its two wheel kits, gave life to the "Artist" and his twin brother.....
Now,only the chassis recalls something from its previous glory...
Ken. please dispatch the Parallax jet to pick up Nikos in Patras to take him to Robothon.
Nikos, please bring your big fat Greek robot. Opa!
Erco it is not necessary,!
I'll ask Greek minister Yanis Varoufakis to take me with him is his next visit in USA !
Rich, I don't think that the 50ld limit is a problem for the rover. Each wheel set is 3.2 lbs per wheel assembly. So 4*3.2=12.8 lbs.
The Chassis is about 2 libs.
If you choose a "light" battery I think you II have enough available weight for the erectronics...
Probably not. I have an Eddie based robot that is about 80lbs and another wheelchair based one that is almost 300lb. The big one of mine would be ideal for the RoboMagellan, if not for the weight limitation. Just one of it's batteries breaks the limit.