

My Saturday PCB-fab adventure
 Oldbitcollector (Jeff)
Posts: 8,091
Oldbitcollector (Jeff)
Posts: 8,091
About noon I started on actually attempting an item that has been on my list for a long time.
Anyone who hasn't tried this should give it a whirl.
Attached are board #4, before adding the parts and then running on the bench.
This is my Atari interface to NES for the Propeller Arcade Mini's I'm starting on.
I'll write up more details on Propellerpowered later.
OBC
▔▔▔▔▔▔▔▔▔▔▔▔▔▔▔▔▔▔▔▔▔▔▔▔
Propeller Feature Projects: PropellerPowered.com
Visit the: PROPELLERPOWERED SIG forum kindly hosted by Savage Circuits.
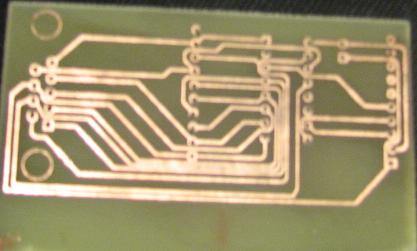
417 x 251 - 16K
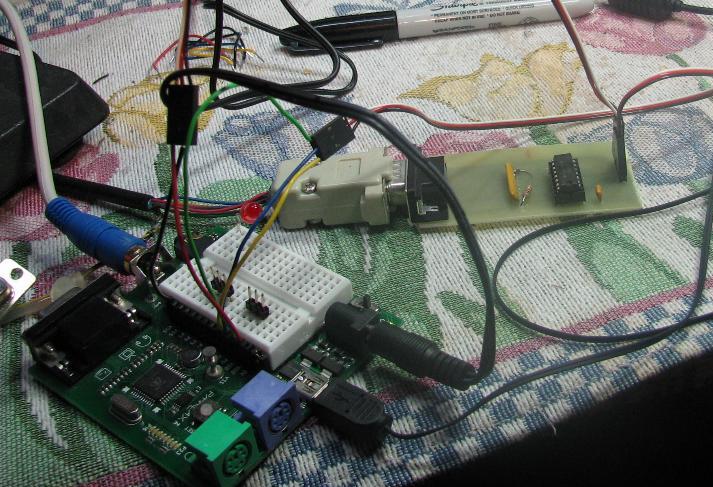
713 x 487 - 86K
Comments
Today was a first for me too.· I assembled my first board that I sent out for manufacting.· The darn thing had too many vias and traces too close together to try either toner transfer or photo processing.· I only had time to test the two props on the board, tomorrow I fire up the two Atmega chips.
Any, congrats on your first board!
Chris
Those bits work like a champ! I didn't have a dremel press *yet* so I've got my dremel strapped into an old/new
Craftsman "drill" press. (Hardware store find that they still had in the box after many years)
Worked perfectly.
Smoke? No Smoke.. [noparse]:)[/noparse] Got some re-work issues to handle, found some minor issues to straighten out in the next board...
Like add an LED... [noparse]:)[/noparse]
OBC
▔▔▔▔▔▔▔▔▔▔▔▔▔▔▔▔▔▔▔▔▔▔▔▔
Propeller Feature Projects: PropellerPowered.com
Visit the: PROPELLERPOWERED SIG forum kindly hosted by Savage Circuits.
I also like to use Eagle, but I've never taken one of it's designs and shipped them off to a fab shop.
BTW... I was very proud of myself, I was able to do a single sided board that incorporated two serial interfaces and one of Ray's 4.3" lcds (60pin connector + backlight/touch drivers) on a single sided board with only three jumper wires on the backside.
One question I have for everybody, does anyone else actually tin the entire copper side after you create it? I have a habit of doing that, but don't really know if it's necessary. (I simply flux the entire side and take a large ball of solder and move it over the entire surface.) It makes attaching components by hand a lot easier because all you have to do is place the component with a touch of flux and simply heat it and it'll fall into place in the liquid solder under it.
Bill
▔▔▔▔▔▔▔▔▔▔▔▔▔▔▔▔▔▔▔▔▔▔▔▔
Leon Heller
Amateur radio callsign: G1HSM
BTW, I don't make my own boards anymore. The etchant was an absolute mess to work with, stained everything it came in contact with, was impossible to dispose of safely*, and the fumes rusted all my exposed shop tools. (* One bottle of ferric chloride I got from Radio Shack suggested disposing of it by flushing it down the toilet. I kid you not. I can just imagine the effect all that dissolved copper would have on a sewage treatment plant that relies on bacterial decomposition.)
-Phil
The amount of copper is very small when disposing of etchant, I think that more comes from copper pipes and tanks.
▔▔▔▔▔▔▔▔▔▔▔▔▔▔▔▔▔▔▔▔▔▔▔▔
Leon Heller
Amateur radio callsign: G1HSM
Post Edited (Leon) : 7/12/2010 5:14:52 PM GMT
I can tell you that muriatic acid is nasty stuff to work with and anyone using it should take safety precautions.
(Gloves, well marked glass jar, safety glasses, and work outside.) Don't try this stuff in the house! Ventilation!
A mixture of 2/3 HCI and 1/3 H2O2 does a good job within 5 to 10 mins.
OBC
▔▔▔▔▔▔▔▔▔▔▔▔▔▔▔▔▔▔▔▔▔▔▔▔
Propeller Feature Projects: PropellerPowered.com
Visit the: PROPELLERPOWERED SIG forum kindly hosted by Savage Circuits.
Post Edited (Oldbitcollector) : 7/12/2010 5:43:09 PM GMT