Basic Stamp Kite Camera
I have seen posts and websites about kite cameras and aerial photograhy and decided I wanted to try it. I bought a cheap 5.0 megapixel camera at savers and decided to connect it to the Basic Stamp.
First I had to make the Stamp talk to the camera. After taking the camera apart I found the connections to the 2 buttons I needed. (on/off and shutter)
With a multimeter I found that these were always off with 3v across them. I soldered wires to their connections and put the camera back together.
Now with batteries in the camera if I touched the on/off wires together the camera turned on and if I touched the shutter wires it took a picture.
Now how to interface it with the Stamp? After some research I decided the best easiest way was to use a relay since the camera and the stamp used 2 different power supplies (batteries).
The relays I used were simple reed type that I got from Radio Shack Model: 275-232· |· Catalog #: 275-232
Now that the stamp and camera are connected I had to program the stamp to operate the camera. I decided that since it took a little time to connect the camera to the kite I would use a simple button interface to start the process. The process goes as follows.
1. Push Button
2. Turn camera on
3. Take 50 pictures
4. Turn camera off
5. Wait for button push to start again.
This took some trial and error since it takes a few seconds for the camera to boot and be ready to take photos and it took some time after the shutter was pressed to save the picture to the SD card and be ready for the next picture.
See Basic Stamp Code.
I did not want to keep turning the camera on and off and taking pictures to refine the program so I used the LabCenter VSM program to emulate the camera, relays and stamp.
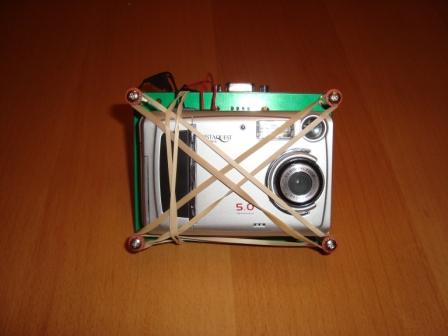
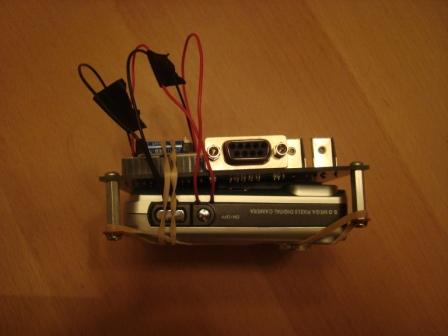
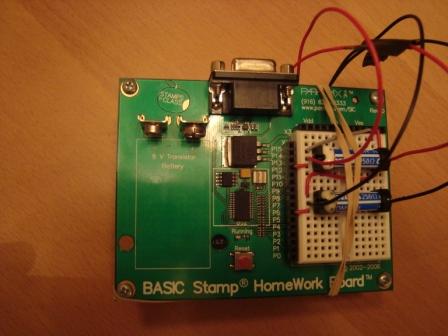
I connected the stamp to the back of a Basic stamp home work board with risers and rubberbands and it was ready for the first flight.
I had a small parafoil kite I got from costco and needed to see if it had the lift to fly the camera. I did not want to break or ruin my setup so I first weighed the camera rig which weighed 8oz exactly. I then found a round lead fishing weight that weighed 8oz.
I gathered everything up and took it to a local park. First I flew the kite to make sure it was stable. After establishing stability I connected the lead ball to the kite string about 10 feet below the kite and flew that. My son and I call it "flying the ball". Ater esablishing that the kite could lift the ball and that it was stable I removed the ball and connected the camera rig.
I pushed the button on the homework board and set the rig aloft. It worked exactly as expected. The only problem was I dangled the rig from one string and it spun while taking the pictures so the first pictures did not come out well. I found a way to stabilize the camera and now the pictures are much better.
You can see some of them at:
·http://www2.snapfish.com/thumbnailshare/AlbumID=257532490/a=161554654_161554654/otsc=SHR/otsi=SALBlink/COBRAND_NAME=snapfish
I have also found this rig to be very flxible in other ways. For instance I connected the PIR sensor and changed the code a little and now I have a motion sensing camera. When it detects motion it turns on and takes pictures. When no motion is detected it turns the camera off. I also found the connection in the camera that enables video so it can take video or still.
Also you can program the Basic Stamp camera rig for time lapse photography.
I'm sure there are many other uses for it.
Mike


Comments
▔▔▔▔▔▔▔▔▔▔▔▔▔▔▔▔▔▔▔▔▔▔▔▔
When the going gets weird, the weird turn pro. -- HST
1uffakind.com/robots/povBitMapBuilder.php
1uffakind.com/robots/resistorLadder.php
-Phil
Reminds of the time I had a 5 foot wingspan glider that had a small, mechanically timed camera. The glider was sent aloft via a 25 foot rubber band streched out to 75 feet. The resulting pictures were a bit grainy, but, it worked.
Yes, um, yeah...it worked until those beautiful styrofoam wings challenged the towering strength of a telephone pole.
So, so sad.
DJ
▔▔▔▔▔▔▔▔▔▔▔▔▔▔▔▔▔▔▔▔▔▔▔▔
Instead of:
"Those who can, do.· Those who can't, teach." (Shaw)
I prefer:
"Those who know, do.· Those who understand, teach." (Aristotle)
·
Mike
▔▔▔▔▔▔▔▔▔▔▔▔▔▔▔▔▔▔▔▔▔▔▔▔
When the going gets weird, the weird turn pro. -- HST
1uffakind.com/robots/povBitMapBuilder.php
1uffakind.com/robots/resistorLadder.php
▔▔▔▔▔▔▔▔▔▔▔▔▔▔▔▔▔▔▔▔▔▔▔▔
When the going gets weird, the weird turn pro. -- HST
1uffakind.com/robots/povBitMapBuilder.php
1uffakind.com/robots/resistorLadder.php
Were those shots taken in the San Fransisco south bay area? It looks alot like Twin Peaks baseball/recreation area of north Sunnyvale.
DJ
▔▔▔▔▔▔▔▔▔▔▔▔▔▔▔▔▔▔▔▔▔▔▔▔
Instead of:
"Those who can, do.· Those who can't, teach." (Shaw)
I prefer:
"Those who know, do.· Those who understand, teach." (Aristotle)
·
Yes, They were taken in the bay area. Several at shorline park. If you look closely at the one with the bright sunlight that is the shorline amptheater under the bright spot. The other side is the bay towards fremont. The others were taken at a park near my house.
Mike
What was the cost of the camera? Any pics of
the kite? How high does the kite reach? Is any
special string required, i.e. a stronger test/pound
pull?
humanoido
Nice One, now that's one item off my wishlist!
Great one!
▔▔▔▔▔▔▔▔▔▔▔▔▔▔▔▔▔▔▔▔▔▔▔▔
BWIN ON DA POWAH WIFIN U!!!
(This means the Plutonium Isotope Nuclear Fission And Fusion Reactor Battery Pack you've been hiding inside your jacket!!!)
Roger - understood. I live in south-ish San Jose and work in Fremont (@ 880 & Dixion Landing).
BTW - any idea of the height the kite reaches?
DJ
▔▔▔▔▔▔▔▔▔▔▔▔▔▔▔▔▔▔▔▔▔▔▔▔
Instead of:
"Those who can, do.· Those who can't, teach." (Shaw)
I prefer:
"Those who know, do.· Those who understand, teach." (Aristotle)
·
I beleive the camera cost around $35-$40
I used about 500ft of 20lb kite string. Parafoil kites tend to fly at a steep angle especially with weight on them. I figure the kite flew at about a 45 degree angle (as you can see from the pictures). So 500ft at 45 degrees should come out to about 350ft.
The stronger the wind the higher the angle. I could use more string to get higher but if you reel it out you gotta reel it back in. There are other kites that have more lifting power and fly at a steeper angle but that starts getting expensive.
I'll take a picture of the kite and post it.
Mike
BTW: Here's a video of LabCenters VSM basic stamp simulator
To gain higher altitude, going to Army Surplus parachute twine is beneficial. It has greater test pull and is lighter weight. I had purchased a mile of this stuff and flew kites as high as they would go. The maximum altitude was defined by the weight of the string. The string was picking up weight from atmospheric moisture. As a solution, to make kites go higher, I waxed the string to keep it dry - the weight of the wax was minimal. Another necessity when flying kites this high is a good pair of binoculars, just to see the kite!
My camera was not as good as yours, and I had to develop the film - one shot at a time! Its only redeeming feature was almost no weight - due to its all plastic body and lens. Last week, I saw a penguin flying in the sky. It had a black & white body, swept back wings, and two orange dangling feet in the wind. It gets my vote as the cutest kite in the sky.
humanoido
Post Edited (humanoido) : 2/27/2009 2:43:19 AM GMT
Have you tried a Picovet suspension for the camera? They're supposed to minimize the effects (e.g. blurring) of kite motion.
-Phil
I hope none of the flightless variety confined to earth and water witnessed this. Their envy would've been matched only by certain psychological trauma!
I'm not trying to be a smart alec, negative or anything.
The flying penguin photo is fake. Have a close look and the wall is actually a horizontal surface.
I figured out the trick. So the bat-penguin just like the bat-man, he can't fly without special equipment.
▔▔▔▔▔▔▔▔▔▔▔▔▔▔▔▔▔▔▔▔▔▔▔▔
BWIN ON DA POWAH WIFIN U!!!
(This means the Plutonium Isotope Nuclear Fission And Fusion Reactor Battery Pack you've been hiding inside your jacket!!!)
The flying Penguin was a real kite, and was really flying in the air.
The feet were stabilizers, like a kite tail. There are special kite designs that
provide extra payload capability, especially the multiple deck leveled Dragon
kites, whose designs are centuries old. The man that flies these kites has become
my friend because I continue to admire his work. The only problem is he
speaks only a Chinese dialect, so getting some information is a little slow which
is my fault. I think his kites could actually loft some the heavier cameras with Basic
Stamp payloads. Another of my Chinese friends is very supportive about
attaching one my cameras to one of the kites. However, I doubt my results
would be as good as the project posted here.
It's not a Penguin Robot. [noparse]:)[/noparse]))) I did not have my camera so there is no photo.
The photo you saw was Penguin Robot with the Jet Pack on.
The Bat Penguin is a project that reads the battery voltage on the
Penguin Robot. While Bat Penguin (robot) was not seen flying (recently),
you will soon read about a Penguin Robot that does fly (in some
sort of inspirational way).
...er... on second thought, the Bat Penguin can fly,
just when you're not looking... and I do suppose you are right - the
use of extended mini grappling hooks and tech strengthened corbomite
cables would be necessary.
humanoido
Another of my "project pile" projects is a trail camera for my dad's property. He sees a lot of animals where he lives and would like to keep track of the deer/mountain lion sightings. I have an older Sony digital camera and found the stage 1 service manual on a European website. It has enough detail for me to get to the power and shutter buttons in the same way you have.
▔▔▔▔▔▔▔▔▔▔▔▔▔▔▔▔▔▔▔▔▔▔▔▔
Andrew Williams
WBA Consulting
IT / Web / PCB / Audio
A friend sent this guy's link to me and sniffing around his site, I stumbled on this:
http://scotthaefner.com/kap/equipment/
Mr. Haefner is into kite photography also.
Regards,
DJ
▔▔▔▔▔▔▔▔▔▔▔▔▔▔▔▔▔▔▔▔▔▔▔▔
Instead of:
"Those who can, do.· Those who can't, teach." (Shaw)
I prefer:
"Those who know, do.· Those who understand, teach." (Aristotle)
·
Kite aerial photography seems to be a fairly popular activity.· There is a Flickr group that contains thousands of pictures.· It is located at http://www.flickr.com/groups/kiteaerialphotography/·.· Some of the pictures are pretty amazing.· I recall one picture where someone walked along a beach taking several pictures.· He then stitched the pictures together to produce one long panaramic picture of the beach.
Heres a few pictures I took from the kite.· One problem with the pencam is that the image is distored when the camera is moving.· I had to write a program to undo the distortion caused by the camera swinging under the kite.
Dave
My digital camera takes a while to "reload" after it takes a picture so did you program a delay into your code, or do you somehow manually snap a photo and then wait to do the next one?
As I stated my camera I actually tried a few takes a few seconds the be ready for the next photo, and my big problem is its never the same time even with fresh batteries I can not rapid fire pictures
and if it uses the flash its even worse??? I have a cannon -S70 and a coolpix any recomendations??
Thank you.
·
humanoido
I wrote a program to shift each line by a certain amount to compensate·for the motion.· If the camera were spinning around it's vertical axis at a constant speed there would be a constant shift in each line.· This is caused by the fact that the camera reads the image out of the sensor one line at a time, so the bottom lines capture a later point in time than the top lines.
There are some image processing programs that will perform a linear deskewing of the image.· However, the motion of the camera was more complex than just a simple rotation.· I had to write a program to correct for the more complicated motion.
Dave
▔▔▔▔▔▔▔▔▔▔▔▔▔▔▔▔▔▔▔▔▔▔▔▔
Signature space for rent!
Send $1 to CannibalRobotics.com.
humanoido
Dave
humanoido
Great Job,
Maybe you can put the camera in movie mode...· Then get a trick/stunt kite..· We did this a few years ago and used here is the result.
Walt
http://www.youtube.com/watch?v=CASZsq3mbBY