

Propeller Based Paste Gun.
 TJHJ
Posts: 243
TJHJ
Posts: 243
So I made this a while ago, and decided that if anyone wants to make their own paste gun for under $100 well here it is.
What it does.
It is a pressure regulated paste gun with 2 modes of operation.
Mode 1.
Metered Shot mode- Delivers a burst of .1 second of paste every time you step on the pedal. Changing the pressure changes how much paste you get per step.
Mode 2.
Continuous. As long as the pedal is depressed you will squirt paste out.
Why use it?
Its a hell of a lot cheaper than a paste station and works damn near as well, and makes surface mount a joy instead of a headache.
Parts List.
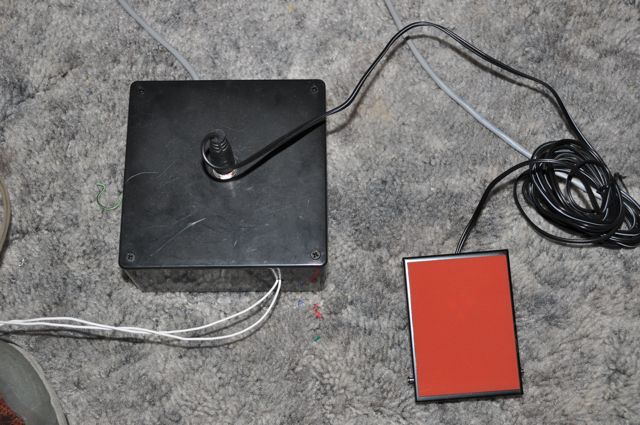
1 ProtoBoard.
1 9v regulator.
1 4.7uf 15v capacitor.
2 4.7k resistors.
1 470 ohm resistor
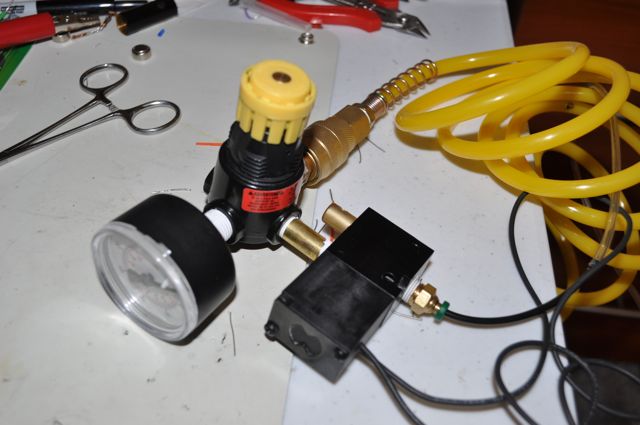
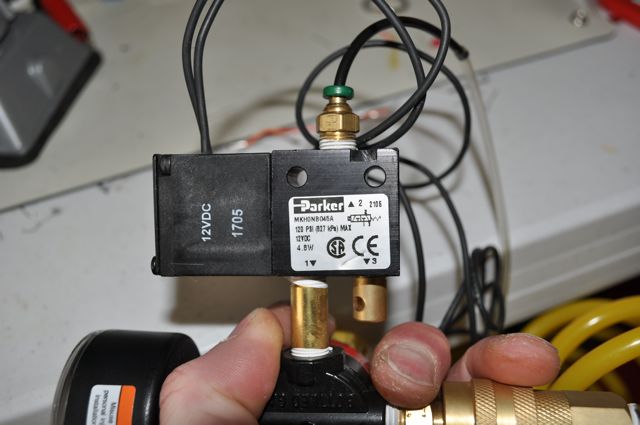
1 Parker 2 way solenoid PN : MKH0NBG45A
1 Air Regulator, I used a Parker 14R118FC (OPTIONAL)
1 Toggle Switch
1 Momentary Switch or Pedal Swich, The one in the picture is made by Philmore.
1 Paste Tube adapter of your choice
You can use this to drive the solenoid
1 NPN 2N3904
1 1N4004
or
a UNL2803 Array.
A compressor.
If you don't have one, Kragen auto parts had a cheap one that I bought for 29.99, it is small and sits nicely under the desk... Loud as hell though.
The solenoid can be any 12v 2 way air solenoid. I got mine at a local hydraulics supply shop.
How to make it.
Step 1.
Take your proto board and fill out it according to the schematic.
Step 2.
Connect Your air system as shown. In the AirFlowSch image.
Step 3.
Adjust and enjoy
Notes.
The toggle switch selects the mode of operation.
If you use the optional regulator 2. It must be set lower than than regulator 1. I useally have mine at about 15psi to stop paste dripping out the end of the tube.
About 50 psi on regulator #1 works out to be a good paste amount for most SMT pads.
Yeah the propeller is overkill for this, but I had it laying around [noparse]:)[/noparse]. In the pictures of the board in the box there is a large cap, a SCR and extra diode. This is from a failed experment and how I had the extra board laying around.. You do not need these.
Hope someone gets some use out of this.
TJ
Code and schematics coming in post 2.
Post Edited (TJHJ) : 1/3/2009 9:49:56 PM GMT
What it does.
It is a pressure regulated paste gun with 2 modes of operation.
Mode 1.
Metered Shot mode- Delivers a burst of .1 second of paste every time you step on the pedal. Changing the pressure changes how much paste you get per step.
Mode 2.
Continuous. As long as the pedal is depressed you will squirt paste out.
Why use it?
Its a hell of a lot cheaper than a paste station and works damn near as well, and makes surface mount a joy instead of a headache.
Parts List.
1 ProtoBoard.
1 9v regulator.
1 4.7uf 15v capacitor.
2 4.7k resistors.
1 470 ohm resistor
1 Parker 2 way solenoid PN : MKH0NBG45A
1 Air Regulator, I used a Parker 14R118FC (OPTIONAL)
1 Toggle Switch
1 Momentary Switch or Pedal Swich, The one in the picture is made by Philmore.
1 Paste Tube adapter of your choice
You can use this to drive the solenoid
1 NPN 2N3904
1 1N4004
or
a UNL2803 Array.
A compressor.
If you don't have one, Kragen auto parts had a cheap one that I bought for 29.99, it is small and sits nicely under the desk... Loud as hell though.
The solenoid can be any 12v 2 way air solenoid. I got mine at a local hydraulics supply shop.
How to make it.
Step 1.
Take your proto board and fill out it according to the schematic.
Step 2.
Connect Your air system as shown. In the AirFlowSch image.
Step 3.
Adjust and enjoy
Notes.
The toggle switch selects the mode of operation.
If you use the optional regulator 2. It must be set lower than than regulator 1. I useally have mine at about 15psi to stop paste dripping out the end of the tube.
About 50 psi on regulator #1 works out to be a good paste amount for most SMT pads.
Yeah the propeller is overkill for this, but I had it laying around [noparse]:)[/noparse]. In the pictures of the board in the box there is a large cap, a SCR and extra diode. This is from a failed experment and how I had the extra board laying around.. You do not need these.
Hope someone gets some use out of this.
TJ
Code and schematics coming in post 2.
Post Edited (TJHJ) : 1/3/2009 9:49:56 PM GMT
640 x 425 - 42K
640 x 425 - 39K
640 x 425 - 65K

640 x 425 - 45K

640 x 425 - 51K
Comments
TJ
▔▔▔▔▔▔▔▔▔▔▔▔▔▔▔▔▔▔▔▔▔▔▔▔
Prop Tools under Development or Completed (Index)
http://forums.parallax.com/showthread.php?p=753439
cruising][noparse][[/noparse]url=http://www.bluemagic.biz]cruising[noparse][[/noparse]/url][/url]
This is a [noparse][[/noparse]b]bold[noparse][[/noparse]/b] test.
▔▔▔▔▔▔▔▔▔▔▔▔▔▔▔▔▔▔▔▔▔▔▔▔
Timothy D. Swieter, E.I.
www.brilldea.com - Prop Blade, LED Painter, RGB LEDs, uOLED-IOC, eProto for SunSPOT, BitScope
www.tdswieter.com
Tim as far as needing a compresor, I put together the monster of all cheap compresors. I bought one of those 12 V bike ones they actually build quite a bit of pressure but have no capacity so I bought a soda maker the ones that use CO2 cartridges to make carbonated water, attached the 12 dollar bike compresor to it used a cheapy cutoff valve and Wala it will hold 75PSI and work quite well for small stuff, Warning do not exceed 75 PSI on the soda bottle they are made out of aluminum,,.. I·called company they said never exceed 75 PSI so you have to use cutoff valve becuase the bike pump as cheap as it is will easily crank 150 PSI
whole thing cost less than 25 bucks add the TJHJ's project and you can use gun to squirt anyhting you want ,,, thanks again TJHJ
▔▔▔▔▔▔▔▔▔▔▔▔▔▔▔▔▔▔▔▔▔▔▔▔
Timothy D. Swieter, E.I.
www.brilldea.com - Prop Blade, LED Painter, RGB LEDs, uOLED-IOC, eProto for SunSPOT, BitScope
www.tdswieter.com
Now someone needs to combine this with a CNC machine, then a robotic arm to place in a pick and place machine, then finally into one of Timothy's reflow toaster ovens! you can just sit back and watch!
▔▔▔▔▔▔▔▔▔▔▔▔▔▔▔▔▔▔▔▔▔▔▔▔
Brian
uController.com - home of SpinStudio - the modular Development system for the Propeller
PropNIC - Add ethernet ability to your Propeller! PropJoy - Plug in a joystick and play some games!
SD card Adapter - mass storage for the masses Audio/Video adapter add composite video and sound to your Proto Board
Its a co2 nail gun air supply.
www.lowes.com/lowes/lkn?action=productDetail&productId=166441-61735-J-6901-100&lpage=none
They had the bottles there and it was just an exchange setup. If I had to guess one bottle would do a lot of boards.
Or a co2 setup for beer would work... and are a bit cheeper.
www.beveragefactory.com/draftbeer/regulator/single/economy_single_gauge_beer_co2_regulator.shtml
Now just keeping it hooked to the paste gun could be the issue.
TJ
Post Edited (TJHJ) : 1/4/2009 6:37:35 PM GMT
This is a really intriguing app. Paste dispensing by hand is so terribly inexact that I spend more time sucking up solder bridges and filling voids than I do pasting and placing. But I'm curious whether you've experienced either of the following with your setup:
1. Different settings required, depending on solder paste temperature. (When syringing by hand, paste right out of the fridge requires more plunger force.)
2. Oozing from the tip after dispensing.
Thanks,
-Phil
Post Edited (Phil Pilgrim (PhiPi)) : 1/4/2009 9:07:31 PM GMT
Graham
Can you point me to an example of one of those augers? With no loss of respect for TJ's considerable accomplishment, a stepper-controlled auger appeals to me a bit more than a compressed air-driven piston.
Thanks,
Phil
Not signifigant enough to notice, but this may be due to how I do it. Generally I only do 2-3 boards, I lay out the boards, turn the compressor on. Then I go to the fridge get the paste,·adjust for the shot size I want, and paste away, A typical board with 200 pads takes me about 3 minutes. The paste doesnt seem to change much in tempature over the corse of application. But I have devolped a kind of wag per pad size, 40 psi for a small pad, 50 for a larger one ect.
The only time I ever get oozing is if I have the second regulator set way to high. Like 30psi, The only reason for this is to hold some small pressure in the line so that when you go for your shot there is less time from pedal press to paste out of the tube. If you do not have this regulator in place there is no pressure held in the line. Remember that because there air force is much higher than we can achive by hand you can use much narrower tips. I use one the size of a fine point needle. From when I did it by hand, I went down about 5 sizes in tip size when I went to the paste system. I wish they were labeled, I just have a big bag of tips. If I had to guess I would say about .5mm ID on the tip.
Does the paste you use ooze out of the tube with no pressure on it? Like if you just hold it upright?
I am using kester Type: R500 Alloy : SN63/PB37 Visc/PS.: 830-1170
I am not sure if the type has much effect on the oozing relationship.
I think Graham is refering to a similar system of how an old milkbottler worked. In stead of using pressure you have a metered volume.
It would be like a twin seringe system. Part one is preserizied and holds the majority of the paste, Part two is fed from part 1. And is a much smaller seringe holding enough for one shot. The motor drives the shot seringe giving the complete volume per appication. The probelm is reload time, for the motor to reset and tube 2 to refill.
Not to sure.
I couldnt find any specs but I remeber reading somewhere that solder paste's coefficent of expanshion is linear to tempature, as well as proponal to viscosity. So I am not sure if you would get any different results using a volume meter system versus a pressure system. As the amount of solder in the paste changes with tempature.
Hope this clears some things up.
TJ
Thanks: that clears up one major misconception for me. I had assumed that there was always pressure on the plunger and that, to dispense a little more paste, you added a little more pressure. But that's apparently not the case. If I'm reading you correctly, you pulse the plunger with the same pressure each time, then release it completely. Right?
BTW, I use plastic tips, which are color-coded as to gauge. The blue ones I use (and cycle through at an alarming rate when they clog) have a 0.016" (0.4mm) orifice. Like Brian, my thumb gets quite sore from the pressure required to extrude the paste.
-Phil
Either way it will work. If you dont use the second regulator to hold the pressure, There is a small delay, like Click-Click, not long enough to change bother me really.
In the 1st model.·You could tap your foot·fast enough that all the pressure would not be out of the line and·you would get a wierd mis metered shot.Where it didnt release all the pressure out of the line. This is affected by total line length. So a shorter run makes the system respond faster. ·I cant aim and tap my for that fast, but just to make sure there is a part in the code, that the pedal must be released for 1/10 of a second, My·WAG, that works in order to make sure all the line pressure is released before pressureizing it back up again. So the applied pressure is always for the same duration.
So setup 1. No 2nd regulator.
System idel - Line Pressure-·0psi
Pedeal Depress- Line Pressure - High Pressure (1/10) of second - 50psi.
1/10 second later - Line Pressure - 0psi - Line pressure is dumped to Atm through port 2 of selanoid.
Pedal Release - Line Pressure - 0psi. No change.
Return to system Idel state.
Setup 2. Optional 2nd Regulator.
System idel - Line Pressure-·10-15psi (set by regulator 2)
Pedeal Depress- Line Pressure - High Pressure (1/10) of second - 50psi.
1/10 second later - Line Pressure - 10-15psi psi (Set by regulator 2)
Pedal Release - Line Pressure - 10-15 psi. No change.
Return to system Idel state.
I made a movie. Ill have it uploaded shortly.
Post Edited (TJHJ) : 1/5/2009 10:36:28 PM GMT
http://www.youtube.com/watch?v=Y5L2QJFuubk
After droping my camera 5x trying to get it to sit somewhere that it could see it the quality is fair, sorry.
TJ
Look for diaphragm compressors by Gast. Make sure to check the voltage, as some models run off 12 VDC for automotive use (adjustable air shocks), rather 120 VAC. Also make sure it is a compressor and not a vacuum pump, as they are optimized differently. You'll also want it to be oil-less.
Diaphragm pumps are really small and quiet, and a fish-tank pump level of noise. Rocking-piston pumps are significantly louder, but can produce higher pressure / vacuum. Resevoir tanks are optional, but help keep the noise down when used with a pressure switch.
I think I paid $47 USD, including shipping, for a rocking-piston pump, factory new condition, off E-bay. I've seen diaphragm pumps go for as low as $7 USD. I also got two SMC digital pressure switches for $20 USD.
Post Edited (Andrew E Mileski) : 1/5/2009 11:35:18 PM GMT
▔▔▔▔▔▔▔▔▔▔▔▔▔▔▔▔▔▔▔▔▔▔▔▔
Timothy D. Swieter, E.I.
www.brilldea.com - Prop Blade, LED Painter, RGB LEDs, uOLED-IOC, eProto for SunSPOT, BitScope
www.tdswieter.com