

Open propeller EggBot
 NikosG
Posts: 705
NikosG
Posts: 705
Hello everybody,
Easter comes, and what could be better than an EggBot?
The answer is: a Propeller EggBot!
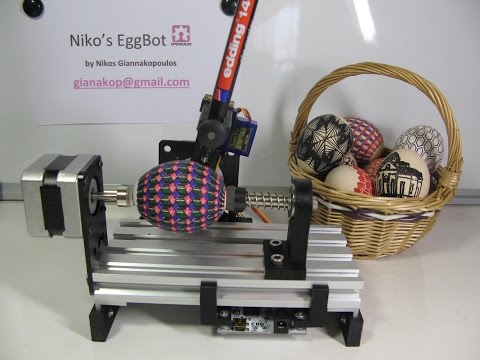
I have already make a very cool design for Eggbot using OpenBuilds parts, 8 3d printed parts from my 3d printer, and the original EggBot's electronics.
I could say that the robot is perfect! However my ambition is to replace the original EBB Driver Board with the Parallax Quickstart board in order to make much more powerful that mini CNC machine.
I have in mind this:

So, can anyone contribute in this effort?
I ask help in order to drive 2 NEMA 17" bipolar stepper motor with Propeller and also comunication with Inkscape software.
Yes or not you can use my design in conjunction with the original EggBot electronics for a cheaper and very professional EggBot.
You can see the project on OpenBuilds and on Thingiverse
Fell free to ask any detail.
Nikos Giannakopoulos
Easter comes, and what could be better than an EggBot?
The answer is: a Propeller EggBot!
I have already make a very cool design for Eggbot using OpenBuilds parts, 8 3d printed parts from my 3d printer, and the original EggBot's electronics.
I could say that the robot is perfect! However my ambition is to replace the original EBB Driver Board with the Parallax Quickstart board in order to make much more powerful that mini CNC machine.
I have in mind this:
So, can anyone contribute in this effort?
I ask help in order to drive 2 NEMA 17" bipolar stepper motor with Propeller and also comunication with Inkscape software.
Yes or not you can use my design in conjunction with the original EggBot electronics for a cheaper and very professional EggBot.
You can see the project on OpenBuilds and on Thingiverse
Fell free to ask any detail.
Nikos Giannakopoulos

908 x 686 - 146K
Comments
very nice design of an EggBot!
I build one with a very simple frame out of wood. Yours looks much more professional.
Your Eggbot is drawing really quick.
How did you manage to eleminate play in the pen's arm? There is quite some inertia in the arm which causes my arm to oscillate at high speeds.
here's a link to somebody who ported it to arduino
https://github.com/cocktailyogi/EggDuino
here's the documentation of the protocol
http://www.schmalzhaus.com/EBB/EBBCommands.html
I guess for this year easter you would have to work 10-12 hours each day to finish right in time.
So my suggestion for this easter is to enjoy your hardware with the original EiBotBoard
and start working on a propeller-chipversion.
For driving the steppermotors you could use
A pololu 4988 driver. I haven't checked if 3.3V from the propeller-chip is enough to drive step/dir-inputs of this pololu-board
http://www.ebay.com/sch/i.html?_from=R40&_trksid=p2050601.m570.l1313.TR0.TRC0.H0.XPololu+A4988+.TRS0&_nkw=Pololu+A4988+&_sacat=0
best regards
Stefan
Another idea for next Easter.... the new Parallax 10A Dual Motor Controller, announced by Ken at these links....
https://twitter.com/ParallaxKen/status/571361676034879489
https://twitter.com/ParallaxKen/status/573252498070241281
This is a dual motor controller, with onboard Propeller! The firmware code will be opensource, so you could extend that code to power your EggBot directly!
The board size is 77x65mm, so not much bigger than the QS you are using now.
(Of course, you could also use the QS to control the new motor controller with simple serial commands- that will be the default configuration I suspect - or even PWM)
Watch the forums for an announcement date- I know Ken is pushing to get this squeezed into the production plans ASAP, and pushing us to get the driver code and docs ready for launch too
Could be another possible solution for you.
Michael.
ps. LOVE the design of your EggBot. Really really nice.
does the H-Bridge on the motorcontroller support microstepping?
The motors on the robot-platform on the twitter-pictures look like DC-motors. So I guess not.
16V for steppermotors would be a bit low. (High Ampere stepperdrivers with 5-10A go up to 80-160V)
best regards
Stefan
Hi Stefan,
The H-bridge is an A4940 from Allegro. The datasheet does not mention microstepping, nor will that be supported out-of-the-box by the supplied propeller code.
That said... this is an opensource effort, so the propeller code will be published and can be modified / extended as you experiment. As this is a dual channel board, perhaps you could drive one stepper motor. Would be an interesting thing to see if you can get something going.
Incidently, the VIN max is 24V as I recall. And the design will likely keep going (for careful hackers with usual care, precautions and no guarantees!) around 35V. The H-bridge controller could go higher, but I suspect the propeller LDO will start to creak under the strain much over 35V
This will all be specified properly before product launch of course.... keep your eyes on the forum from time-to-time for an announcement!
I guess your subscribed to this thread... so I will post a link to this thread too when something more official happens!
All the best, Michael.
I had to make some changes on the project's name on thingiverse and openbuilds sites.
The name Eggbot is NOT allowed because is a trademark! So I ghanged the project's name to "Egg- painter robot"
the real speed of the robot is the first 14 sec of the video.....
Then I increased the of the viveo's speed in order to save time.....
I hope the next image can help...
This is realy cool!!!
I'll stay tuned ....
I also love the QuickStart option due to the on-board keyboard. I intent to make a full autonomous robot with SD-cart, able to print without computer connection ........
Maybe I'm too ambitious ......
-Phil
yeah that's one of the amazing details about the eggb....
Hi Phil,
From my experience in order to paint successfully different-shaped eggs, I must have the pen motor to the right position.
On the EggBot Pro you adjust the different=shaped eggs (From ellipsoid to round eggs) moving up or down the pen-motor.
Using the OpenBuilds parts acording to my design, we can achieve exactly the same functionality with the original EggbotPro.
No everything is ok! I have no play! The hinge that I use I think is a perfect solution! I think that it is by far better than the system that has the wooden arm of the original Eggbot ....
If you print the one layer you can change the marker (other color) and you can continue with the next layer. Is very simple
Seriously. Extremely cool! Plus it makes such interesting noises! I wonder if one reverse extrapolated the motor frequencies (audible sounds) generated by specific geometries to a MIDI controller, and played music, what you would get encoded on the surface? Or, conversely?