

A standalone keyboard/mouse interface first test
 pik33
Posts: 2,417
pik33
Posts: 2,417
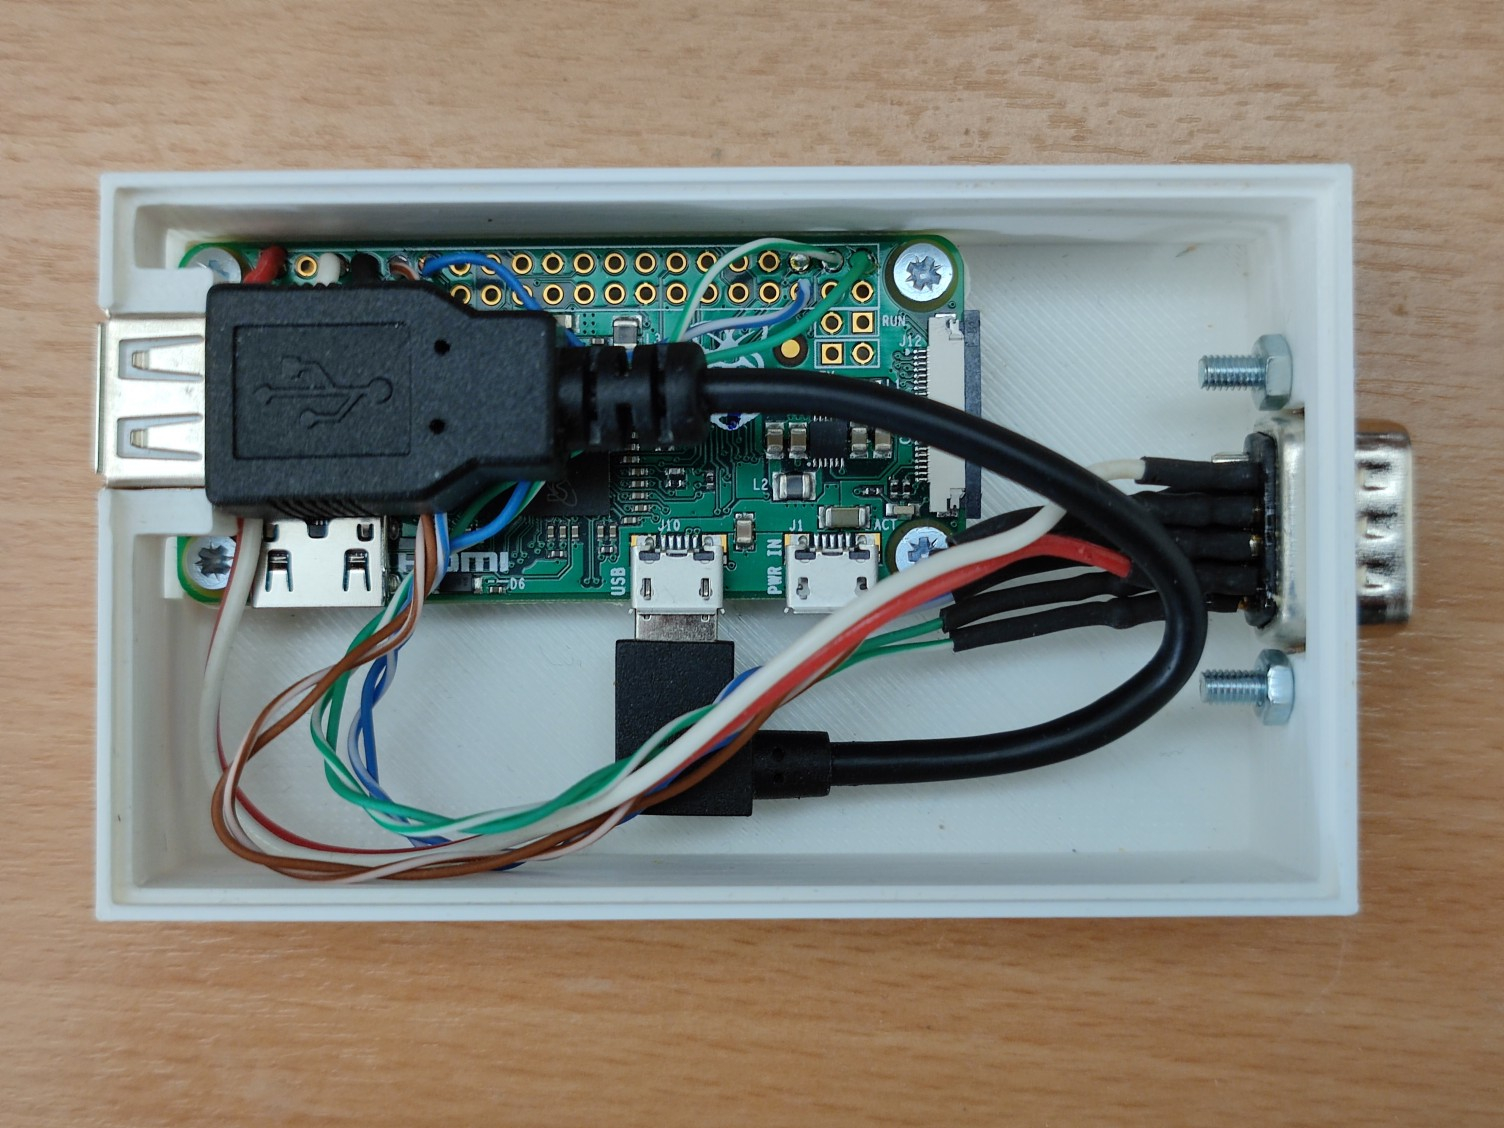
Several months ago I tested a Raspberry Pi Zero as a keyboard and mouse interface for a P2. Today I soldered a standalone contraption and it works.
I will publish here schematics and code after cleaning it up.
The RPi Zero with a USB OTG cable and DB9 male connector was placed in a 3d-printed box. I connected UART and i2s (not tested yet) to this DB9 connector via 100 Ohm resistors. I also made a cable to connect DB9 to 12-pin standard Eval Board I/O bank. It uses 6 first I/O pins of the bank, 2 for UART, 4 for i2s.
The interface is powered from Eval/Edge board 5V.
The RPi Zero code is written using Ultibo, so it starts immediately after power on and doesn't need closing the system, so it can be disconnected and reconnected at any time.
As it is now the interface gets data from attached keyboard and mouse and sends it via 1.92 MBps UART (maximum available without messing with a RPi hardware registers manually) to a P2 using a simple, but full protocol - every pressed and released key is reported, including modifier keys. Mouse movement including a wheel is also reported. The boot protocol doesn't report the mouse wheel so I had to switch to full mouse protocol and use a piece of ugly code to determine how the mouse talks to the host - there are at least 5 variants which I know about: not every mouse works.
The mass storage should be also possible. I can use my own protocol for it, but FlexProp uses Plan9 filesystem. I don't know how to implement this now. Maybe I can find something useful in Flexprop sources.


Comments
Hehe, and the next step is graphics and storage. It can provide Prop2 boot up as well. Everything done over P62/P63 pins.
Nice fairly cheap way to save a COG or use USB mice/keyboards that won't work yet with the P2 USB host code from garryj. A pair of USB to PS/2 adapters could be cheaper although they would need 2 more pins and not all keyboards/mice like those these days. We'd need a PS/2 driver COG that handles both devices, assuming one already exists for that (haven't checked).
PS/2 doesn't even need a whole cog. Could be done with just smartpins and interrupts.
P62, P63.... they are hardwired to FTDI on Eval, but not on Edge. I have to check if Ultibo can see the FTDI. If yes, the P2 eval can be connected to RPi keyboard USB port as a device and no serial cable is needed anymore.
Graphics, yes. I can do a graphic accelerator. P2 can send commands via serial port, RPi can draw lines, boxes, circles, etc. OpenGL ES and camera is also available. All of this without any OS on a RPi.
I used a standard cheapest "$5" (in the reality $9 and out of stock, but I have two of these), Zero in the project. It is more than sufficient for a keyboard and a mouse. For more heavy tasks, zero 2 will be better. It has also a wifi and we have now wifi for Ultibo. This means such an interface can also work as wifi.
Maybe I will print a bigger box and place an Edge and a RPi Zero 2 in it, connected together, to experiment with these possibilities.
Ultibo is really getting interesting. I must take a closer look
Nice work on the 3d printed project case too. I'm realising as time goes on that having a collection of right angle hdmi fittings is important.
This environment gives you near full control over a Pi, and - in the same environment - it gives you advanced set of possibilities. I made a camera library - https://github.com/pik33/SimpleCamera - and audio library - https://github.com/pik33/SimpleAudio for it
I also managed to recompile MAD mp3 decoder and XMP module player from C sources. They are here: https://github.com/pik33/ultibo_retro_gui There is also a 6502 emulator and a SID emulator there. I ported 6502 from C code, the SID is my own (file retromalina.pas from line ~2420)
Made using Blockscad: https://www.blockscad3d.com/ - I attached the project here. Unpack XMLs and open them in Blockscad. Blockscad is the simplest thing to make 3D printer projects, it is browser based and free.
That blockscad3d's a neat improvement on OpenScad, and it seems it generates compatible code behind the scenes. I'll have to spend some more time with it, but I was able to quickly enter a light cover design
Thanks for sharing pik33
When I tried BlocksCAD I thought, "Oh, this is like a Blockly version of OpenSCAD" -- then I found the code generation is for OpenSCAD. I'm a big fan of OpenSCAD, probably because my first 3d modeling was with POV-Ray in the early 1990s, which used the same code-based approach for generating 3d images.
Yes. Thank you.
I still use Povray. The problem is... exporting Povray model to stl is possible but not easy and sometimes produces weird results....
Wow. I remember that my IBM PS/2 Model 30 would sometimes take overnight to render an image.
I created a new repository for a bigger project based on this: https://github.com/pik33/P2-retromachine
It contains a first working test.
To try, you need:
Get the repository, connect the RPi Zero TxD to P2 pin 32, attach HDMI to pin 0, connect a keyboard and a mouse to the Pi.
Use Flexprop to compile P2 part, power up the Pi, use the keyboard, move and click the mouse.
If all works, the screen should look like this.
This is 50 Hz mode #0, if the monitor doesn't like it, change the mode to 256 instead.
If the mouse sends garbage instead of position, maybe it is not supported. There is way too many version of mouse protocols, the program recognizes only several of them which I tested and implemented. The cheaper the mouse, the better chance it will work")
Update: the test program receives MIDI IN events @ P29 using a midi breakout board. I started to make a dedicated cog to receive all these events and prepare them to the main program.