

Getting Started with the Parallax Serial LCD
 Andy Lindsay (Parallax)
Posts: 1,919
Andy Lindsay (Parallax)
Posts: 1,919
Getting Started with the Parallax Serial LCD
·
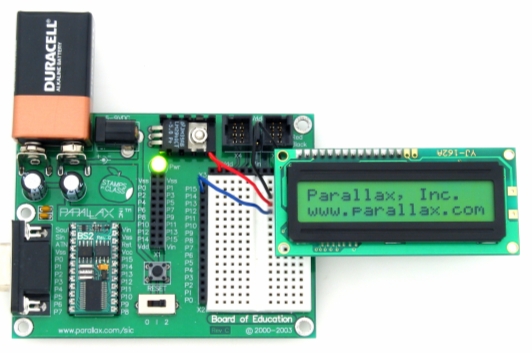
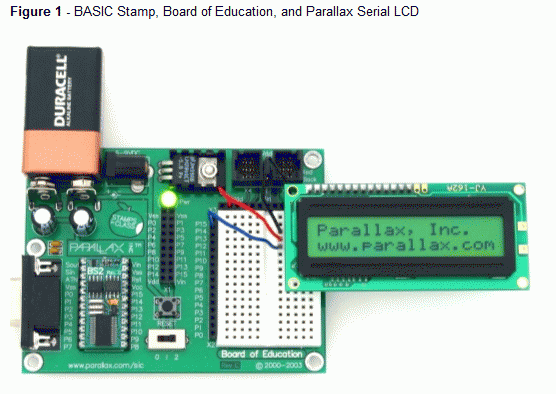
Especially if you've been following along with the Stamps in Class texts, you're probably familiar with what a valuable tool the Debug Terminal can be.· It makes it possible to display messages and variable values, which in turn makes it possible to figure out what's going on with your program, test circuits and sensors.· Think about how many times it wasn't convenient to be connected to the computer to test a sensor, or find out what the Boe-Bot was seeing with its infrared sensors in another room.· This is one situation that a serial liquid crystal display (LCD) like the one in Figure 1 can remedy.
·

·

·
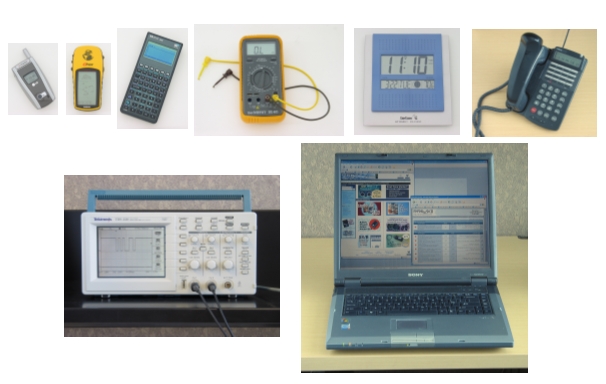
The items shown in Figure 2 all have liquid crystal displays.· They are easy to read, and the smaller ones consume very little power.· Think about how many products you own with liquid crystal displays.· Think also as you go through these activities about the various BASIC Stamp projects, prototypes and inventions you've got in the works, and how a serial LCD might help them to completion.
·

·

·
The activities in this chapter introduce how to use the Parallax Serial LCD with the BASIC Stamp 2.· LCD basics will include displaying text, numbers, placing and animating characters, and creating and animating custom characters.·
_____________________________________________________________________________
·
The draft material in this Topic·is part of a forthcoming Stamps in Class text by Andy Lindsay.
·
(c) 2005·by Parallax Inc - all rights reserved.··
Post Edited By Moderator (Jessica Uelmen (Parallax)) : 8/25/2010 5:48:06 PM GMT
·
Especially if you've been following along with the Stamps in Class texts, you're probably familiar with what a valuable tool the Debug Terminal can be.· It makes it possible to display messages and variable values, which in turn makes it possible to figure out what's going on with your program, test circuits and sensors.· Think about how many times it wasn't convenient to be connected to the computer to test a sensor, or find out what the Boe-Bot was seeing with its infrared sensors in another room.· This is one situation that a serial liquid crystal display (LCD) like the one in Figure 1 can remedy.
·
·
·
The items shown in Figure 2 all have liquid crystal displays.· They are easy to read, and the smaller ones consume very little power.· Think about how many products you own with liquid crystal displays.· Think also as you go through these activities about the various BASIC Stamp projects, prototypes and inventions you've got in the works, and how a serial LCD might help them to completion.
·
·
·
The activities in this chapter introduce how to use the Parallax Serial LCD with the BASIC Stamp 2.· LCD basics will include displaying text, numbers, placing and animating characters, and creating and animating custom characters.·
_____________________________________________________________________________
·
The draft material in this Topic·is part of a forthcoming Stamps in Class text by Andy Lindsay.
·
(c) 2005·by Parallax Inc - all rights reserved.··
Post Edited By Moderator (Jessica Uelmen (Parallax)) : 8/25/2010 5:48:06 PM GMT
532 x 353 - 107K
606 x 384 - 111K

51 x 54 - 2K

67 x 44 - 3K
556 x 394 - 56K

559 x 168 - 20K

630 x 473 - 76K

559 x 176 - 23K
Comments
Along with the electrical connections and some simple PBASIC test programs for the Parallax serial LCD, this activity will introduce the SEROUT command.· It will also demonstrate how DEBUG is just a special case of SEROUT.· This will be especially useful for working with your serial LCD because you can take many of the DEBUG command arguments and use them with the SEROUT command to control your LCD display.
Serial LCD Parts
In addition to the Parallax serial LCD and three wires, it will be especially important to have either a printed or PDF copy of the Parallax Serial LCD Documentation.· Although it's only a few pages, it has a long list of values you can send to your LCD to make it perform functions similar to those you've used with the Debug Terminal.· Cursor control, carriage returns, clear screen and so on, all have their own special codes that are not necessarily identical to the codes for the Debug Terminal.
·
(1) Parallax Serial LCD: Standard - 27976 or Backlit - 27977.
(1) Parallax Serial LCD Documentation (.pdf)
(3) Jumper wires ·
Building the Serial LCD Circuit
Connecting the serial LCD is amazingly simple.· Although there are five pins, you only need to use three, one for power, one for ground, and one for signal.· The LCD's RX pin is for the signal and should be connected to a BASIC Stamp I/O pin.· In this activity, we will use P14.·
·
·
Ö······· Disconnect power from your Board of Education.
Ö······· Connect the Board of Education's P14 socket to the LCD's RX pin.· (See figure 3.)·
Ö······· Connect the Board of Education's Vdd socket to the LCD's 5V pin
Ö······· Connect the Board of Education's Vss socket to the GND pin.·
Ö······· Do not turn the power back on yet.
·
Testing the Serial LCD
The Parallax Serial LCD has a self test mode you can use to make sure it's in working order and that the contrast is properly set.· The switches for the self test mode and the contrast adjustment are both on the back of the LCD module, shown in Figure 4.
·
Ö······· The power to your board should still be off.
Ö······· Find SW1 and SW2 on the underside of the LCD module shown in Figure 5.
Ö······· Set SW1 off.
Ö······· Set SW2 off.
Ö······· Turn the power back on now.
·
·
When you turn the power back on, the LCD should display the text "Parallax, Inc." on the top line and "www.parallax.com" on the bottom line.· (See Figure 1.)· If you leave the LCD in this mode for a while, custom character reminiscent of 1980's video games will appear and eat all the text.·
·
If the display seems dim or looks blank, there is a contrast adjustment potentiometer shown in Figure 6 that you can adjust with a screwdriver to make the display clear. ·If the display is already clear, you probably don't need to adjust it.· If the characters are too dim, or they appear in gray boxes, adjusting the potentiometer should help.
·
Ö······· Adjust the contrast potentiometer if needed.
·
Adjusting the LCD to Receive Messages from the BASIC Stamp
Serial communication involves a baud rate.· That's the number of bits per second (bps) the sender transmits and the receiver has to be ready to receive data at the same baud rate, otherwise the communication won't succeed.· In this chapter's activities, the BASIC Stamp will be programmed to send messages at 9600 bps.· You can adjust the same switches you used for the LCD self-test to set the baud rate.·
·
Ö······· Turn the Board of Education's power off.
Ö······· Set SW1 off.
Ö······· Set SW2 on as shown in Figure 7.
Ö······· Turn the power back on now.·
·
·
The screen will remain blank until you program the BASIC Stamp 2 to control the display.
Post Edited By Moderator (Jessica Uelmen (Parallax)) : 8/25/2010 5:50:06 PM GMT
As mentioned earlier, the commands that send text, numbers, formatters and control characters to a serial LCD are remarkably similar to the ones you use with DEBUG command.· That's not just a coincidence either.· The DEBUG command is actually a special case of a command called SEROUT.· The SEROUT command has many uses, some of which include sending messages to serial LCDs, other BASIC Stamps, and computers.·
·
·
In this activity, you will display and animate text messages, numeric values.· The SEROUT command will be your tool for accomplishing these tasks.· You will use the SEROUT command to send text, numbers, control characters and formatters to the Parallax serial LCD.· As you will soon see, the text, numbers, and formatters are identical to ones you use with the DEBUG command.· The control characters will be a little different, but with a little practice, they'll be just as easy to use as the DEBUG command's CR, CLS, HOME, and CRSRXY control characters.···
Simple Text Messages and Control Characters
Unlike the Debug Terminal, the serial LCD needs to be turned on with a command from the BASIC Stamp.· The LCD has to receive the value 22 from the BASIC Stamp to activate its display.· Here's the PBASIC command for sending the serial LCD the value 22:
·
SEROUT 14, 84, [noparse][[/noparse]22]
·
The value 22 is an example of an LCD control character.· Here's a list of some of some more basic control characters:
·
•········· 12 for clearing the display (requires PAUSE 5 to complete)
•········· 13 for carriage return
•········· 21 for turning the LCD off·
•········· 22 for turning the LCD on
·
·
It's usually a good idea to turn the display on and clear it with the control character 12 before displaying characters.· Here's how to do that:
·
SEROUT 14, 84, [noparse][[/noparse]22, 12]
PAUSE 5
·
Displaying messages with the LCD is very similar to displaying messages on the Debug Terminal.· For example, instead of
·
DEBUG "See this?", CR, "DEBUG Works!"
·
you can use the command
·
SEROUT 14, 84, [noparse]/noparse][/size][/font][font=Times New Roman][size=2][color=#ff0000]"See this?"[/color][/size][/font][font=Times New Roman][size=2], 13, [/size][/font][font=Times New Roman][size=2][color=#ff0000]"The LCD works!"[/color][/size][/font][font=Times New Roman][size=2
·
The resulting display should resemble Figure 8.· Let's try these commands in an example program.
·
·Example Program - LcdTestMessage.bs2
Ö······· Enter, save, and run LcdTestMessage.bs2
Ö······· Verify that it displayed the message "See this?" on the top line and "The LCD works!" on the bottom line.
Ö······· If the LCD didn't display properly, go through the instructions leading up to this program, and verify that each one was completed correctly.· Also double-check your wiring, program, and the SW settings on the back of the LCD.· Also try resetting power to your Board of Education.
[color=#008000]' Example Program - LcdTestMessage.bs2[/color]
[color=#008000]' Display a test message on the Parallax serial LCD.[/color]

[color=#008000]' {$STAMP BS2}                               ' Target device = BASIC Stamp 2[/color]
[color=#008000]' {$PBASIC 2.5}                              ' Language      = PBASIC 2.5[/color]

[color=#0000ff]SEROUT[/color][color=#000000] 14, 84, [noparse][[/noparse]22, 12]                      [/color][color=#008000]' Initialize LCD[/color]
[color=#0000ff]PAUSE[/color][color=#000000] 5[/color]

[color=#0000ff]SEROUT[/color][color=#000000] 14, 84, [noparse][[/noparse][/color][color=#ff0000]"See this?"[/color][color=#000000], 13,             [/color][color=#008000]' Text message, carriage return[/color]
                [color=#ff0000]"The LCD works!"[/color][color=#000000]]            [/color][color=#008000]' more text on line 2.[/color]

[color=#0000ff]END                                          [/color][color=#008000]' Program end[/color]
·
Your Turn - Control Characters to Make the Display Flash On/Off
Remember that 22 turns the display on, and 21 turns it off?· You can use these control characters to make the LCD text flash on and off.· All you have to do is replace the END command with this loop:
·
DO·········································· ' Start DO...LOOP code block
·
· PAUSE 600································· ' 6/10 second delay
· SEROUT 14, 84, [noparse][[/noparse]22]··············· ········' Turn display on
· PAUSE 400································· ' 4/10 second delay
· SEROUT 14, 84, [noparse][[/noparse]21]······················· ' Turn display off
·
LOOP········································ ' Repeat DO...LOOP code block
·
Ö······· Replace the END command in LcdTestMessage.bs2 with this code block.
Ö······· Run the modified program and note the effect.
Display Numbers with Formatters
Most of the formatters that worked for displaying numbers with the Debug Terminal can also be used with the Parallax Serial LCD.· The DEC formatter is probably the most useful, but you can also use DIG, REP, ASC, BIN, SDEC, and most of the others.· For example, if you want to display the decimal value of a variable named counter, you can use commands like this:
·
SEROUT 14, 84, [noparse][[/noparse]DEC counter]
Example Program - LcdTestNumbers.bs2
Aside from demonstrating that you can display variable values on the serial LCD, this program also shows what happens if the text displayed tries to go beyond 16 characters in line 1; it wraps to line 2.
·
Ö······· Enter, save, and run LcdTestNumbers.bs2
Ö······· Verify that the display resembles Figure 9.
·
[color=#008000]' Example Program - LcdTestNumbers.bs2[/color]
[color=#008000]' Display number values with the Parallax serial LCD.[/color]

[color=#008000]' {$STAMP BS2}                               ' Target device = BASIC Stamp 2[/color]
[color=#008000]' {$PBASIC 2.5}                              ' Language      = PBASIC 2.5[/color]

[color=#000000]counter        VAR     Byte                  [/color][color=#008000]' FOR...NEXT loop index[/color]

[color=#0000ff]SEROUT[/color][color=#000000] 14, 84, [noparse][[/noparse]22, 12]                      [/color][color=#008000]' Initialize LCD[/color]
[color=#0000ff]PAUSE[/color][color=#000000] 5                                      [/color][color=#008000]' 5 ms delay for clearing display[/color]

[color=#0000ff]FOR[/color][color=#000000] counter = 0 [/color][color=#0000ff]TO[/color][color=#000000] 12                        [/color][color=#008000]' Count to 12; increment at 1/2 s[/color]

  [color=#0000ff]SEROUT[/color][color=#000000] 14, 84, [noparse][[/noparse][/color][color=#000080]DEC[/color][color=#000000] counter, [/color][color=#ff0000]" "[/color][color=#000000]][/color]
  [color=#0000ff]PAUSE[/color][color=#000000] 500[/color]

[color=#0000ff]NEXT[/color]

[color=#0000ff]END[/color]                                          [color=#008000]' Program end[/color]
Your Turn - Other Formatters
Ö······· Try replacing DEC with DEC2 and observe what happens.
Ö······· Repeat with the ? formatter.
Control Characters for Cursor Positioning
The LCD's control characters are different from the DEBUG command's control characters.· For example, HOME, and CRSRXY just don't have the same effect they do with the Debug Terminal.· Take a look at the LCD documentation's Command Set section.· It lists all the valid control characters for the LCD; here are a few more examples from the list:
·
•········· 8 ·············· Cursor left
•········· 9 ·············· Cursor right
•········· 10 ············· Cursor down (bottom line will wrap to top line)
•········· 128 to 143 · Cursor to line 0, position 0 to 15
•········· 148 to 163 · Cursor to line 1, position 0 to 15
·
The values from 128 to 143 and 148 to 163 are particularly useful.· Figure 10 shows where these values will place the cursor.· You can use values from 128 to 143 to place the cursor at characters 0 to 15 on the top line of the LCD.· Likewise, you can use values from 148 to 163 to place the cursor on characters 0 to 15 of the bottom line.
·
·
After placing the cursor, the next character you send the LCD will display at that location.· For example, here is a SEROUT command with an optional pacing value set to 200 ms.· This command will display the characters "L", "I", "N", "E", "-", and "2", evenly spaced across the top line, one character every 200 ms.
·
SEROUT 14, 84, 200, [noparse][[/noparse]128, "L",
···················· 131, "I",
···················· 134, "N",
···················· 137, "E",
··········· ·········140, "-",
···················· 143, "1"]
·
The LCD will still automatically shift the cursor to the right after each character, making it easy to place the cursor and then display a message.· For example, you can also place the cursor on character 7 of the top line and then display "ALL", then move the cursor to character 6 of the bottom line and display "DONE!" like this:
·
SEROUT 14, 84, [noparse]/noparse]135, [/size][/font][font=Times New Roman][size=2][color=#ff0000]"ALL"[/color][/size][/font][font=Times New Roman][size=2], 13, 154, [/size][/font][font=Times New Roman][size=2][color=#ff0000]"DONE!"[/color][/size][/font][font=Times New Roman][size=2
·
Here's a code block that will make the text "Line-2" slide across the display's bottom line, from left to right.
·
FOR index = 9 TO 0
· SEROUT 14, 84, [noparse]/noparse]148 + index, [/size][/font][font=Times New Roman][size=2][color=#ff0000]"Line-2 "[/color][/size][/font][font=Times New Roman][size=2
· PAUSE 250
NEXT
·
You can always erase a character by placing the cursor where you want it, then sending the space " " character.· This is why the text "Line-2 " has a space after it, to erase the characters to the right as the text moves left.·
Example Program - Cursor Positions.bs2
This program introduces a few basic cursor placement tricks.·
·
Ö······· Look over CursorPositions.bs2 and try to predict what the program will make the LCD display along with the sequence and timing.
Ö······· Enter, save, and run MoreLcdControlCharacters.bs2.
Ö······· Compare the LCD display's behavior to your predictions.·
·
[color=#008000]' Example Program - CursorPositions.bs2
' Display number values with the Parallax serial LCD.

' {$STAMP BS2}                               ' Target device = BASIC Stamp 2
' {$PBASIC 2.5}                              ' Language      = PBASIC 2.5

[color=#000000]index          VAR     Nib                   [/color]' FOR...NEXT loop index
[color=#000000]character      VAR     Byte                  [/color]' Character storage
[color=#000000]offset         VAR     Byte                  [/color]' Offset value

[color=#0000ff]SEROUT[/color][color=#000000] 14, 84, [noparse][[/noparse]22, 12]                      [/color]' Initialize LCD
[color=#0000ff]PAUSE[/color][color=#000000] 500                                    [/color]' 1/2 second delay

' Display evenly spaced characters on line-1 every 200 ms.
[color=#000000]SEROUT 14, 84, 200, [noparse][[/noparse]128, [/color][color=#ff0000]"L"[/color][color=#000000],[/color]
[color=#000000]                     131, [/color][color=#ff0000]"I"[/color][color=#000000],[/color]
[color=#000000]                     134, [/color][color=#ff0000]"N"[/color][color=#000000],[/color]
[color=#000000]                     137, [/color][color=#ff0000]"E"[/color][color=#000000],[/color]
[color=#000000]                     140, [/color][color=#ff0000]"-"[/color][color=#000000],[/color]
[color=#000000]                     143, [/color][color=#ff0000]"1"[/color][color=#000000]][/color]

[color=#0000ff]PAUSE[/color][color=#000000] 1000[/color]

' Shift "line-2" across line-2 right to left, then left to right.
[color=#0000ff]FOR[/color][color=#000000] index = 9 [/color][color=#0000ff]TO[/color][color=#000000] 0[/color]
  [color=#0000ff]SEROUT[/color][color=#000000] 14, 84, [noparse][[/noparse]148 + index, [/color][color=#ff0000]"Line-2 "[/color][color=#000000]][/color]
  [color=#0000ff]PAUSE[/color][color=#000000] 250[/color]
[color=#0000ff]NEXT[/color]

[color=#0000ff]FOR[/color][color=#000000] index = 0 [/color][color=#0000ff]TO[/color][color=#000000] 9[/color]
  [color=#0000ff]SEROUT [/color][color=#000000]14, 84, [noparse][[/noparse]148 + index, [/color][color=#ff0000]" Line-2"[/color][color=#000000]][/color]
  [color=#0000ff]PAUSE[/color][color=#000000] 250[/color]
[color=#0000ff]NEXT[/color]

[color=#0000ff]PAUSE[/color][color=#000000] 1000                                   [/color]' 1 second delay

' Clear LCD, then display then Display "ALL DONE" in center and flash 5 times
[color=#0000ff]SEROUT[/color][color=#000000] 14, 84, [noparse][[/noparse]12]: PAUSE 5                 [/color]' Clear LCD
[color=#0000ff]SEROUT[/color][color=#000000] 14, 84, [noparse][[/noparse]135, [/color][color=#ff0000]"ALL"[/color][color=#000000], 13, 154, [/color][color=#ff0000]"DONE!"[/color][color=#000000]][/color]' "ALL" and "DONE" centered

[color=#0000ff]FOR[/color][color=#000000] index = 1 [/color][color=#0000ff]TO[/color][color=#000000] 4                           [/color]' Flash display 5 times
  [color=#0000ff]SEROUT[/color][color=#000000] 14, 84, 500, [noparse][[/noparse]21, 22][/color]
[color=#0000ff]NEXT[/color]

[color=#0000ff]END[/color]                                          ' Program end[/color]
Your Turn - More Positioning
More elaborate displays can benefit from loops and lookup tables.· Here is an example of a "T E S T" display in a loop and with the help of lookup table.· Note that you can control the position of each character's placement by adjusting the values in the second LOOKUP command's table.
·
PAUSE 1000
SEROUT 14, 84, [noparse][[/noparse]12]: PAUSE 5······ ' Clear display
SEROUT 14, 84, [noparse][[/noparse]"This is a", 13]·· ' Text & CR
·
FOR index = 0 TO 3················ ' Character display sequence
· PAUSE 600
· LOOKUP index, [noparse]/noparse][/size][size=2][color=#ff0000]"T"[/color][/size][size=2], [/size][size=2][color=#ff0000]"E"[/color][/size][size=2], [/size][size=2][color=#ff0000]"S"[/color][/size][size=2], [/size][size=2][color=#ff0000]"T"[/color][/size][size=2, character
· LOOKUP index, [noparse][[/noparse]· 1,·· 5,· 9,· 13], offset
· SEROUT 14, 84, [noparse][[/noparse](148 + offset), character]
NEXT
·
Ö······· Try it!
Post Edited By Moderator (Jessica Uelmen (Parallax)) : 8/25/2010 5:52:16 PM GMT
This activity applies the techniques introduced in Activity #2 to an hour, minute, second timer.·
Displaying Time Elapsed
Here is a code block that starts the LCD, clears the screen, and places some display characters on the LCD that will not change.· The rest of the program can then display hour, minute, and second number values next to the "h", "m", and "s" characters.
·
SEROUT 14, 84, [noparse][[/noparse]22, 12]····················· ' Start LCD & clear display
PAUSE 5····································· ' Pause 5 ms for clear display
·
SEROUT 14, 84, [noparse][[/noparse]"Time Elapsed...", 13]······ ' Text + carriage return
SEROUT 14, 84, [noparse]/noparse][/size][/font][font=Times New Roman][size=2][color=#ff0000]"[color=white]·[/color] h[color=white]·[/color] [color=white]··[/color]m[color=white]···[/color] s"[/color][/size][/font][font=Times New Roman][size=2············ ' Text on second line
·
For this application, control characters for cursor placement can be particularly useful.· For example, the cursor can be placed on line 2, character 0 before sending the two-digit decimal value of hours.· The cursor can then be moved to line 2, character 5 to display the minutes, and then to character 10 to display the seconds.· Here is a single SEROUT command that displays all three values, each at the correct location:
·
· SEROUT 14, 84, [noparse][[/noparse] 148, DEC2 hours,
·· ················153, DEC2 minutes,
················· ·158, DEC2 seconds ]
·
The next example program applies this concept with just the BASIC Stamp's timing abilities.· The accuracy isn't digital wristwatch quality, but it's good enough for an example.
·
Example Program - LcdTimer.bs2
This example program displays hours, minutes and seconds elapsed with the Parallax Serial LCD.· The time tracked is since the last time the RESET button was pressed/released or power to the board was reconnected.
·
Ö······· Enter, save, and run LcdMessages.bs2.
Ö······· Verify that the display works as advertised.·
[color=#008000]' Example Program - ClockApp.bs2[/color]
[color=#008000]' Display elapsed time with BS2 and Parallax Serial LCD.[/color]

[color=#008000]' {$STAMP BS2}                               ' Stamp directive[/color]
[color=#008000]' {$PBASIC 2.5}                              ' PBASIC Directive[/color]

[color=#000000]hours          VAR     Byte                  [/color][color=#008000]' Stores hours[/color]
[color=#000000]minutes        VAR     Byte                  [/color][color=#008000]' Stores minutes[/color]
[color=#000000]seconds        VAR     Word                  [/color][color=#008000]' Stores 1/10 seconds[/color]

[color=#0000ff]SEROUT[/color][color=#000000] 14, 84, [noparse][[/noparse]22, 12]                      [/color][color=#008000]' Start LCD & clear display[/color]
[color=#0000ff]PAUSE[/color][color=#000000] 5                                      [/color][color=#008000]' Pause 5 ms for clear display[/color]

[color=#0000ff]SEROUT[/color][color=#000000] 14, 84, [noparse][[/noparse][/color][color=#ff0000]"Time Elapsed..."[/color][color=#000000], 13]       [/color][color=#008000]' Text + carriage return[/color]
[color=#0000ff]SEROUT[/color][color=#000000] 14, 84, [noparse][[/noparse][/color][color=#ff0000]"  h    m    s"[/color][color=#000000]]             [/color][color=#008000]' Text on second line[/color]

[color=#0000ff]DO[/color]                                           [color=#008000]' Main routine[/color]

[color=#008000]  ' Calculate hours, minutes, seconds[/color]
  [color=#0000ff]IF[/color][color=#000000] seconds = 60 [/color][color=#0000ff]THEN[/color][color=#000000] seconds = 0: minutes = minutes + 1[/color]
  [color=#0000ff]IF[/color][color=#000000] minutes = 60 [/color][color=#0000ff]THEN[/color][color=#000000] minutes = 0: hours = hours + 1[/color]
  [color=#0000ff]IF[/color][color=#000000] hours   = 24 [/color][color=#0000ff]THEN[/color][color=#000000] hours   = 0[/color]

[color=#008000]  ' Display digits on LCD on line 2.  The values 148, 153, 158[/color]
[color=#008000]  ' place the cursor at character 0, 5, and 10 for the time values.[/color]
  [color=#0000ff]SEROUT[/color][color=#000000] 14, 84, [noparse][[/noparse]148, [/color][color=#000080]DEC2[/color][color=#000000] hours,[/color]
[color=#000000]                  153, [/color][color=#000080]DEC2[/color][color=#000000] minutes,[/color]
[color=#000000]                  158, [/color][color=#000080]DEC2[/color][color=#000000] seconds ][/color]

  [color=#0000ff]PAUSE[/color][color=#000000] 991                                  [/color][color=#008000]' Pause + overhead ~ 1 second[/color]
[color=#000000]  seconds = seconds + 1                      [/color][color=#008000]' Increment 1/10 second counter[/color]

[color=#0000ff]LOOP[/color]                                         [color=#008000]' Repeat main routine[/color]
Your Turn - Defining Control Characters with Constants
Up to this point, the LCD control characters have been decimal values.· It's better to declare a constants for each control character at the beginning of the program.· Then, use the constant names instead of the numbers.· You can do the same with the BaudMode value, and add a PIN directive for I/O pin P14.
·
LcdPin ········PIN···· 14··················· ' LCD I/O pin
·
T8N9600······· CON···· 84··················· ' True, 8-bits, no parity, 9600·
·
LcdCls········ CON···· 12··················· ' Form feed -> clear screen
LcdCr········· CON···· 13··················· ' Carriage return
LcdOff········ CON···· 21··················· ' Turns display off
LcdOn········· CON···· 22··················· ' Turns display on
Line1········· CON···· 128·················· ' Line 1, character 0
Line2········· CON···· 148·················· ' Line 2, character 0
·
This helps in many ways.· For example, the first SEROUT command can be rewritten like this:
·
SEROUT LcdPin, T8N9600, [noparse][[/noparse]LcdOn, LcdCls]
·
The SEROUT command that displays the numbers on line 2 can be rewritten like this:
·
SEROUT LcdPin, T8N9600, [noparse][[/noparse](Line2 + 0), DEC2 hours,
··············· ·········(Line2 + 5), DEC2 minutes,
··············· ·········(Line2 + 10), DEC2 seconds ]
·
Ö······· Add descriptive constants to your program.
Ö······· Replace all mystery numbers with their corresponding constant names.
Ö······· Run your program and trouble-shoot as needed.
Post Edited By Moderator (Jessica Uelmen (Parallax)) : 8/25/2010 5:52:45 PM GMT
If the message you want to display is too wide for the 16 character display, scrolling the text across the display can make it fit.· (See Figure 11.)· You can also use scrolling text to fit a message inside a few characters on the LCD.· With scrolling, the message begins at the far right of the display.· Then, it the texts shifts across the display one letter at a time.·
·
·
The scrolling code introduced in this activity is quite different from the example program in Activity #2 that made "Line-2" move back and forth across the display.· The main reason it's different is because the Parallax LCD line-wraps.· If you send it more characters than it can fit on the top line, the text wraps down to the bottom line.· After 16 more characters, it wraps back up to the top line.· To get text to scroll across just one line, the program has to start with the first character in a message and display it at the rightmost character.· After a short delay, the program has move the cursor to the second character from the right, and print both the first and second characters.· It has to continue this process until it places the cursor gets to the left of the display.· Then, the cursor has to be repeatedly repositioned to that same location as portions of the message shift from right to left, one character at a time.
·
The programming technique for this process is called sliding-window.· Aside from being useful for the Parallax LCD, sliding window is what you see when you scroll text up and down in programs like the BASIC Stamp Editor and your web browser.· It's also used in programs for transmitting and collecting TCP/IP packets.· So every time you open your web browser, there's more than one instance of sliding-window code at work in the background.·
Programming a Sliding Window
Let's say your window is only four characters wide on the top row because there are other things that need to be displayed at all times on the LCD.· The task at hand is to slide the text through the window without overprinting any other characters.· Figure 12 shows the setup and zeroth steps.· The first step is to have nothing displayed in the window.· Then, place the cursor in character 137, and display character 0, the "M".··
·
·
Figure 13 shows steps 1 and 2.· After waiting a moment for the "M" to be visible, the cursor has to be positioned at character 136, and then characters 0 and 1, "Me", can be displayed.· Next, move the cursor to 135, and display characters 0 to 2, "Mes". ·
·
·
Figure 14 shows steps 3 and 4.· Moving the cursor to 134 and displaying characters 0 to 3, "Mess" is still the same sequence, but when the "M" leaves the window, the sequence has to change.· The cursor does not advance left; it stays at 134.· Also, instead of displaying characters 0 to 3, characters 1 to 4 , "essa", have to be displayed.
·
·
The starting cursor position has to remain at 134 while the head and tail characters continue to advance:· 2 to 5 - "ssag", 3 to 6 - "sage".· The window keeps sliding, and Figure 15 shows the the second to last step of 6 to 9 - "e" followed by three spaces, and finally the last step, 7 to 10 - four spaces.
·
·
Here is one way to get the job done.· Try it first, and then we'll examine how it works.·
Example Program - ScrollingWindow.bs2
Ö······· Enter and run ScrollMessage.bs2
Ö······· Verify that the message in the DATA directive scrolls across the screen.
[color=#008000]' Example Program - SlidingWindowScroll.bs2
' Scroll a text message across a four character wide window in the LCD.

' {$STAMP BS2}                               ' BASIC Stamp Directive
' {$PBASIC 2.5}                              ' PBASIC Directive

[color=#000000]MessageStart DATA @ 2, [/color][color=#ff0000]"Message    " [/color]        ' Message + four spaces
[color=#000000]MessageEnd   DATA[/color]

[color=#000000]cursorStart    VAR     Byte                  [/color]' First character location
[color=#000000]head           VAR     Byte                  [/color]' Start of displayed text
[color=#000000]tail           VAR     Byte                  [/color]' End of displayed text
[color=#000000]pointer        VAR     Byte                  [/color]' EEPROM address pointer
[color=#000000]character      VAR     Byte                  [/color]' Stores a character

[color=#0000ff]SEROUT[/color][color=#000000] 14, 84, [noparse][[/noparse]22, 12]                      [/color]' Turn on display & clear
[color=#0000ff]PAUSE[/color][color=#000000] 5                                      [/color]' Delay 5 ms

[color=#000000]cursorStart = 137                            [/color]' Rightmost character in window
[color=#000000]head = 0                                     [/color]' Initialize head and tail
[color=#000000]tail = 0                                     [/color]' of message

[color=#0000ff]DO WHILE[/color][color=#000000] tail < (MessageEnd - MessageStart)  [/color]' Scrolling loop

  [color=#0000ff]SEROUT[/color][color=#000000] 14, 84, [noparse][[/noparse]cursorStart]               [/color]' Place window's right
  [color=#0000ff]SEROUT[/color][color=#000000] 14, 84, [noparse][[/noparse]21]                        [/color]' Turn off the display
  [color=#0000ff]PAUSE[/color][color=#000000] 140                                  [/color]' Let characters fade away

  [color=#0000ff]FOR[/color][color=#000000] pointer = head [/color][color=#0000ff]TO[/color][color=#000000] tail                 [/color]' Print new characters
    [color=#0000ff]READ[/color][color=#000000] pointer + MessageStart, character[/color]
    [color=#0000ff]SEROUT[/color][color=#000000] 14, 84, [noparse][[/noparse]character][/color]
  [color=#0000ff]NEXT[/color]

  [color=#0000ff]SEROUT[/color][color=#000000] 14, 84, [noparse][[/noparse]22]                        [/color]' Turn display back on
  [color=#0000ff]PAUSE [/color][color=#000000]180                                  [/color]' Give the characters some time

[color=#000000]  cursorStart = cursorStart - 1 MIN 134      [/color]' Increment until at window-left
[color=#000000]  tail = tail + 1                            [/color]' Increment tail pointer

  ' Increment head pointer if tail pointer > window width.
  [color=#0000ff]IF[/color][color=#000000] tail > (3) [/color][color=#0000ff]THEN[/color][color=#000000] head = head + 1 ELSE head = 0[/color]

[color=#0000ff]LOOP[/color]                                         ' Repeat scrolling loop

[color=#0000ff]END  [/color]                                        ' BASIC Stamp -> low power mode[/color]
How ScrollingWindow.bs2 Works
The program starts with two DATA directives to store the message, it's beginning, and its end.· The first DATA directive has a label, MessageStart, and the starting address in EEPROM has been set to 2 with the optional @ operator.· The second DATA directive is empty; it's just there to store the address that follows the end of the characters in the message.· Since the message has twelve characters, from EEPROM address 2 to 12, MessageEnd points at character 13.
·
MessageStart DATA @ 2, "Message··· "········ ' <--- 4 blank spaces after
MessageEnd·· DATA
The program uses the variables shown in Figure 16 for the sliding window.· cursorStart stores the location that the cursor is placed each time before it starts printing the characters in the message.· In the figure, cursorStart stores the value 135.· The next time the text shifts to the left, it will store 134.· Two variables, head and tail, store the beginning and ending addresses of the text that will fit in the message window.· In the figure, head stores 0, and tail stores 2.· The pointer variable will be used by the READ command to get the right character, and the character variable will store the character the READ command retrieves from EEPROM.· In this case pointer is pointing at character 1 in the sequence, which is "E".· A FOR...NEXT loop uses the pointer variable to read each of the characters in EEPROM, from head to tail then display each with SEROUT. ·Each time the text shifts to the right, the new text has to overwrite the old text with the same head to tail loop.·
·
·
At the start of the program, the LCD is turned on and cleared.
·
SEROUT 14, 84, [noparse][[/noparse]22, 12]················ ·····' Turn on display & clear
PAUSE 5· ····································' Delay 5 ms
·
Before the scrolling loop starts, the initial values of the cursorStart, head, and tail variables have to be set.· These initial values will have to be changed if you plan to start from the middle of the window or shift more than one character at a time.
·
cursorStart = 137··························· ' Rightmost character in window
head = 0···································· ' Initialize head and tail
tail = 0········ ····························' of message
·
A DO WHILE...LOOP waits for tail to get through the last character in the message, the 10th character in this case.· When tail gets to 11 it is no longer less than (MessageEnd - MessageStart), so the loop terminates.·
·
DO WHILE tail < (MessageEnd - MessageStart)· ' Scrolling loop
·· ··•
·· ··•
·· ··•
LOOP········································ ' Repeat scrolling loop
·
END· ········································' BASIC Stamp -> low power mode
·
The first thing that happens inside the scrolling DO WHILE...LOOP, is the cursor is placed where the characters will start to appear.· In this program, the value of cursorStart was initialized to 137 just before the loop started.· Before the DO WHILE...LOOP repeats, cursorStart will be decremented, so the next time through the loop, cursorStart will be placed one character to the left, at 136.· Each time through the loop, this value will decrease by one, until it gets to 134, at which point, it will remain constant until the end of the message.
·
· SEROUT 14, 84, [noparse][[/noparse]cursorStart]·············· ' Place cursor at far right
·
The display has to be turned off and given enough time for the characters to fade.· Without this step, the ghost characters in the old locations kind of ruin the scrolling effect.
·
· SEROUT 14, 84, [noparse][[/noparse]21]······················· ' Turn off the display
· PAUSE 140································· ' Let characters fade away
·
While the LCD is off, the new line is printed with this FOR...NEXT loop.· As the DO WHILE...LOOP repeats, cursor start moves to the left, and tail gets larger to accommodate printing more text as the message shifts to the left.
·
· FOR pointer = head TO tail················ ' Print characters to display
··· READ pointer + MessageStart, character
··· SEROUT 14, 84, [noparse][[/noparse]character]
· NEXT
·
After the new text is displayed, the display can be turned back on so that the text becomes visible.
·
· SEROUT 14, 84, [noparse][[/noparse]22]······················· ' Turn display back on
· PAUSE 180································· ' Give the characters some time
·
Each time through the DO WHILE...LOOP, corsorStart has to be incremented, but only until it gets to the left of the sliding window.· Then, cursorStart has to stay put, which is taken care of by MIN 134.·
·
· cursorStart = cursorStart - 1 MIN 134····· ' Increment until at window-left
·
The tail increases every time through the DO WHILE...LOOP.· After cursorStart gets to the left of the window and characters 0 to 3 are displayed, this command moves both the head and the tail so that the next time through the DO WHILE...LOOP, the head and tail cause characters 1 to 4 to be displayed.· The pattern continues with 2 to 5, 3 to 6, and so on.
·
· tail = tail + 1··························· ' Increment tail pointer
·
· ' Increment head pointer if tail pointer > window width.
· IF tail > (3) THEN head = head + 1 ELSE head = 0
Your Turn - Modify the Scrolling Behavior
With a few changes to the code, you can get a message to scroll across the LCD's top line.· Here's how:
·
Ö······· Save SlidingWindowScroll.bs2 as SlidingWindowScrollYourTurn1.bs2.
Ö······· Change
·
··· ··MessageStart DATA @ 2, "Message··· "········ ' Message + four spaces
··· ··MessageEnd·· DATA
·
······· to
·
··· ··' IMPORTANT - The entry on the second line of this DATA directive
····· ··is sixteen spaces between quotes.
··· ··MessageStart DATA @ 2, "Message wider than the LCD",
··· ·························"··············· "
··· ··MessageEnd·· DATA
·
Ö······· Change cursorStart = 137 to cursorStart = 143.
Ö······· Change cursorStart = cursorStart - 1 MIN 134 to cursorStart = cursorStart - 1 MIN 128.
Ö······· Change
·
····· IF tail > (3) THEN head = head + 1 ELSE head = 0
·
······· to
·
····· IF tail > (15) THEN head = head + 1 ELSE head = 0
·
Ö······· Run the modified program and verify that the changes worked.
·
You can further modify this code to scroll two characters at a time.·
·
Ö······· Save SlidingWindowScrollYourTurn1.bs2 as SlidingWindowScrollYourTurn2.bs2.
Ö······· Add a seventeenth blank space to the spaces between quotes that follow the message text.
·
··· ··MessageStart DATA @ 2, "Message wider than the LCD",
··· ·························"··············· ·"········· ' <- 17 blank spaces
··· ··MessageEnd·· DATA
·
Ö······· Change the cursorStart and tail variables so that the message starts on the second character from far right and then prints two characters.
·
··· cursorStart = 142
··· head = 0········
··· tail = 1········
·
Ö······· The code in the DO...LOOP has to be changed so that it increments the head and tail pointers by 2 instead of one.· There are three ones that need to be changed to twos.
·
· ··cursorStart = cursorStart - 2 MIN 128·····
· ··tail = tail + 2···························
·
· ··' Increment head pointer if tail pointer > window width.
· ··IF tail > (15) THEN head = head + 2 ELSE head = 0
·
Ö······· Run the modified program and verify that the changes worked.
Post Edited By Moderator (Jessica Uelmen (Parallax)) : 8/25/2010 5:54:44 PM GMT
Post Edited (Andy Lindsay (Parallax)) : 1/25/2006 7:15:32 PM GMT
My serial LCD suddenly began showing ONLY squares instead of text, even on test mode. This happened randomly after I disconnected power to my board and reconnected it the next time i went to use it.
Recently, my BS2 chip fried, while the LCD was connected. It still worked after i replaced the bs2 chip, however i had to reset the blue dip switches on the back continuously in order for my programmed text to appear. It was not long after that, that I experienced the square instead of text issue. Could I have short circuited the LCD when the bs2 short circuited, or what other causes could cause the LCD to randomly show squares instead of text?
Do you have any ideas ? Is this repairable?
Thanks,
Chris.
▔▔▔▔▔▔▔▔▔▔▔▔▔▔▔▔▔▔▔▔▔▔▔▔
Chris Savage
Parallax Engineering
This code is listed at the beginning of Activity #2
I think it should be SEROUT 14, - based on the wiring instructions from Activity #1.
Great work on this set of notes!
▔▔▔▔▔▔▔▔▔▔▔▔▔▔▔▔▔▔▔▔▔▔▔▔
Whit+
"We keep moving forward, opening new doors, and doing new things, because we're curious and curiosity keeps leading us down new paths." - Walt Disney
Post Edited (Whit) : 3/22/2009 2:14:34 AM GMT
I have this BS2 kit as above except the parallax serial LCD. Is it possible if i used any LCD available in market n follow program as what u did using the basic stamp kit as above?
Or i need to have an interface in between.
regards.
Not necessarily. The Parallax Serial LCD has a specific communication protocol, baud rates, etc. Any other Serial LCD might have different parameters. While you will still use SEROUT to send messages to a serial LCD, you may have to change the parameters of the command. All you can do is try the code, and if it doesn't work, take a look at the documentation for your LCD and see what the changes are between your LCD and the one from Parallax.
Hope this helps.
-- Jessica
▔▔▔▔▔▔▔▔▔▔▔▔▔▔▔▔▔▔▔▔▔▔▔▔
Jessica Uelmen
Education Department
Parallax Inc.
Thanks for the reply. I'll try that.hope it will works.
best regards.
My BASIC Stamp Homework Board USB with serial 4x16 LCD and I have both been lost for over 4 years and I am having trouble getting any response from my LCD. I have the 9vdc battery and Programming cable attached, and am using BASIC Stamp Editor/Dev System software on my WINXP PC.
I downloaded LCD-BS2.bs2 program, run it, see the Reset and other LED lite, but the LCD doesn't respond.
I'm pretty sure the wiring hasn't changed; the 3-lead cable between the module and LCD is ok, but maybe it was reversed somehow when I picked it up. Maybe. Black is GND, RED is 5+, and WHT is to P14. Right?
In any even I cannot get any response from the LCD. Any help getting this working for me and my 5 year old grandson is very much appreciated. I'm stumped!
Thanks,
Dave
There should be a contrast adjustment on the back of the board. Try turning on way or the other to see is you can see any characters.
Also, my LCD doesn't look the same as above mine has a 'piggy back' module on it and I can't find any identify numbers other than 'Parallax Serial LCD' on the piggy-back module.
Thanks for help,
Dave
Can you post a picture of the back of the board? (With the piggy back module?)
Is this a 2X16 or 4x16 module?
Turn the potentiometer to see if it gets brighter.
Did you turn the contrast control, (blue square potentiometer on the serial board)?
It should have a slot on the top to insert a small flat head screwdriver.
Should not matter either way.
Are you a Parallax programmer/tech person? Or just a very helpful person?
Dave
Have you tried turning to potentiometer? That should change the contrast and make the LCD more readable.
I am a moderator for the forums and help with questions when I can. I am not employed by Parallax.
Dave
Given you can see something, most of it is working.
Power should be easy to check with a voltmeter.
What supply voltage appears on the LCD pins (that row of 14), and what does the voltage on the Bias Pin sweep over, when you vary the pot ?