

Using the Propeller with Open Computer Vision on the RPi 2 with Python
 ratronic
Posts: 1,451
ratronic
Posts: 1,451
This is the method I used to install OpenCV-2.4.9 . OpenCV-3 has been in beta forever but is finally released.
I will have to wait for someone alot brighter than me to post instructions on how to install OpenCV-3.0.0 .
Here is the example I went from - http://robertcastle.com/2014/02/installing-opencv-on-a-raspberry-pi/
The difference is he is installing OpenCV-2.4.8 and this will show how to install OpenCV-2.4.9 .
So first I make sure I am in the 'pi' directory. Then in the terminal window enter -
After that there are 2 sets of dependencies that must be installed in the order shown. First in the terminal enter -
You will see that some of that is already installed with the latest Raspbian but I installed them anyway as shown above. Then to get OpenCV-2.4.9.zip into your pi directory enter -
When that finishes enter -
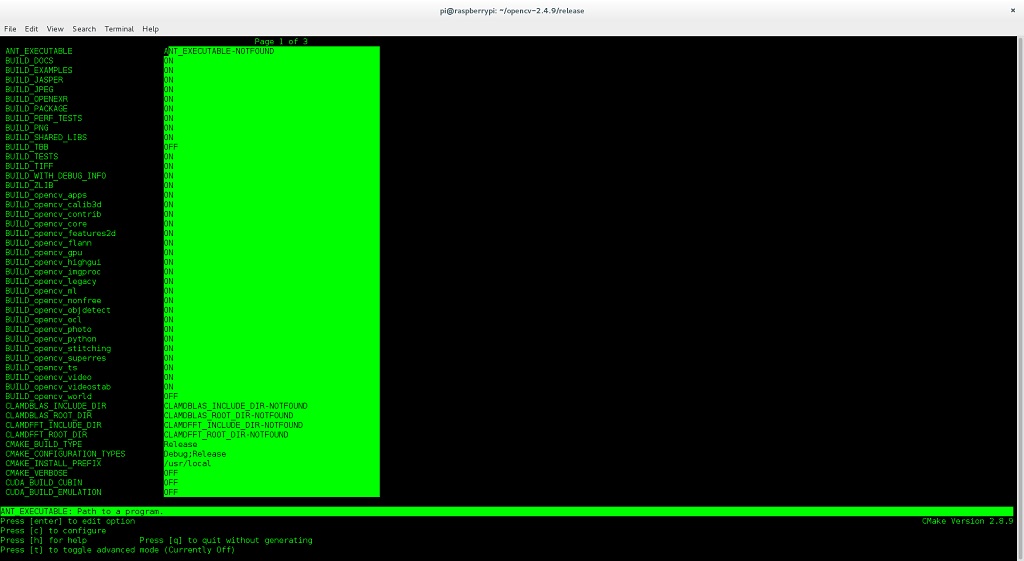
When the Window pops up press c to configure and when it finishes you will have 3 pages of configuration.
If you know what to do then have at it. If you don't then I have posted my setup in the 3 pictures of my pages.
Use the arrow up and down keys to move to the next option. The 'enter' key toggles off/on and allows entry
to type information in the options that take it. You only needed to put 'Release' in the CMAKE_BUILD_TYPE
on page 1. Other than that you just need to toggle the on or off options so they match what is in my pictures.
When you have all of the options set press 'c' to configure. When that finishes press 'g' to generate.
When that is done then in the terminal window enter -
The -j4 uses all of the cores for the build. The good news is that on a Pi 2 the build only takes around a hour and a half instead of several hours on a Pi 1.
When the above finishes enter -
At this time OpenCV will work with USB webcams but to make it see the RPi camera module
we need to setup the uv4l-raspicam driver including the uv4l-raspicam-extras which you can find here -
http://www.linux-projects.org/modules/sections/index.php?op=viewarticle&artid=14
After installing exactly as shown on that page, in a terminal window enter -
Editing that file remove the '#' in front of width = 640 and height = 480. Also remove the '#' in front of nopreview = yes.
Then save the file ctrl-x, y, then hit enter. In the terminal window enter -
You are done! The raspicam driver using the restart method shown above you can edit the raspicam.conf file to enable camera effects
or different camera settings. I will soon post a Python program that uses trackbars to adjust some of the settings in your program.
I will post both a Python program for the Pi and a C program for the Propeller to have a servo pan/tilt camera track an object.
If anyone gets OpenCV installed I would like to know. Mainly I have been using it to detect and track colored objects and then
send the info via serial to the Propeller after each processed frame.
I will have to wait for someone alot brighter than me to post instructions on how to install OpenCV-3.0.0 .
Here is the example I went from - http://robertcastle.com/2014/02/installing-opencv-on-a-raspberry-pi/
The difference is he is installing OpenCV-2.4.8 and this will show how to install OpenCV-2.4.9 .
So first I make sure I am in the 'pi' directory. Then in the terminal window enter -
sudo apt-get update

sudo apt-get upgrade

sudo rpi-update
After that there are 2 sets of dependencies that must be installed in the order shown. First in the terminal enter -
sudo apt-get -y install build-essential cmake cmake-curses-gui pkg-config libpng12-0 libpng12-dev libpng++-dev libpng3 libpnglite-dev zlib1g-dbg zlib1g zlib1g-dev pngtools libtiff4-dev libtiff4 libtiffxx0c2 libtiff-tools libeigen3-devWhen that finishes enter -
sudo apt-get -y install libjpeg8 libjpeg8-dev libjpeg8-dbg libjpeg-progs ffmpeg libavcodec-dev libavcodec53 libavformat53 libavformat-dev libgstreamer0.10-0-dbg libgstreamer0.10-0 libgstreamer0.10-dev libxine1-ffmpeg libxine-dev libxine1-bin libunicap2 libunicap2-dev swig libv4l-0 libv4l-dev python-numpy libpython2.6 python-dev python2.6-dev libgtk2.0-dev
You will see that some of that is already installed with the latest Raspbian but I installed them anyway as shown above. Then to get OpenCV-2.4.9.zip into your pi directory enter -
wget http://sourceforge.net/projects/opencvlibrary/files/opencv-unix/2.4.9/opencv-2.4.9.zip
When that finishes enter -
unzip opencv-2.4.9.zip

cd opencv-2.4.9

mkdir release

cd release

ccmake ../
When the Window pops up press c to configure and when it finishes you will have 3 pages of configuration.
If you know what to do then have at it. If you don't then I have posted my setup in the 3 pictures of my pages.
Use the arrow up and down keys to move to the next option. The 'enter' key toggles off/on and allows entry
to type information in the options that take it. You only needed to put 'Release' in the CMAKE_BUILD_TYPE
on page 1. Other than that you just need to toggle the on or off options so they match what is in my pictures.
When you have all of the options set press 'c' to configure. When that finishes press 'g' to generate.
When that is done then in the terminal window enter -
make -j4
The -j4 uses all of the cores for the build. The good news is that on a Pi 2 the build only takes around a hour and a half instead of several hours on a Pi 1.
When the above finishes enter -
sudo make install
At this time OpenCV will work with USB webcams but to make it see the RPi camera module
we need to setup the uv4l-raspicam driver including the uv4l-raspicam-extras which you can find here -
http://www.linux-projects.org/modules/sections/index.php?op=viewarticle&artid=14
After installing exactly as shown on that page, in a terminal window enter -
sudo nano /etc/uv4l/uv4l-raspicam.conf
Editing that file remove the '#' in front of width = 640 and height = 480. Also remove the '#' in front of nopreview = yes.
Then save the file ctrl-x, y, then hit enter. In the terminal window enter -
sudo service uv4l_raspicam restart
You are done! The raspicam driver using the restart method shown above you can edit the raspicam.conf file to enable camera effects
or different camera settings. I will soon post a Python program that uses trackbars to adjust some of the settings in your program.
I will post both a Python program for the Pi and a C program for the Propeller to have a servo pan/tilt camera track an object.
If anyone gets OpenCV installed I would like to know. Mainly I have been using it to detect and track colored objects and then
send the info via serial to the Propeller after each processed frame.


Comments
x, y screen location (1 byte each) and the object size (2 bytes) out the Pi's serial port. Also the
packet is preceeded by a 2 byte flag. This program first takes a full size camera image 640x480 and
then puts the trackbars on that image. The program changes from a BGR to a HSV color space and allows
you to adjust the upper and lower threshold for Hue Saturation and Value. In a day or two I hope to post a C program
for my Activitybot that has a servo pan/tilt camera tracking the object that has been tuned in using this
program. The frame size is set at 200x140 and the FPS looks to be over 20 bouncing up to 29.
# detect red initially - adjustable upper and lower Hue, Saturation, and Value threshholds import numpy as np import cv2 import serial import time def nothing(x): pass cap = cv2.VideoCapture(0) ser = serial.Serial('/dev/ttyAMA0', 115200) cv2.namedWindow('Frm') cv2.namedWindow('Thr') cv2.namedWindow('Th') cv2.moveWindow('Frm', 10, 100) cv2.moveWindow('Thr', 350, 100) cv2.moveWindow('Th', 700, 100) cv2.createTrackbar('HL', 'Th', 0, 179, nothing) cv2.createTrackbar('HH', 'Th', 3, 179, nothing) cv2.createTrackbar('SL', 'Th', 40, 255, nothing) cv2.createTrackbar('SH', 'Th', 255, 255, nothing) cv2.createTrackbar('VL', 'Th', 40, 255, nothing) cv2.createTrackbar('VH', 'Th', 255, 255, nothing) tt = str(0) cf = cv2.getTickFrequency() font = cv2.FONT_HERSHEY_SIMPLEX time.sleep(2) _, th = cap.read() cv2.imshow('Th', th) while(True): st = cv2.getTickCount() hl = cv2.getTrackbarPos('HL', 'Th') hh = cv2.getTrackbarPos('HH', 'Th') sl = cv2.getTrackbarPos('SL', 'Th') sh = cv2.getTrackbarPos('SH', 'Th') vl = cv2.getTrackbarPos('VL', 'Th') vh = cv2.getTrackbarPos('VH', 'Th') _, frame = cap.read() frame = cv2.resize(frame, (200, 140)) orig = frame.copy() frame = cv2.blur(frame, (5, 5)) hsv = cv2.cvtColor(frame, cv2.COLOR_BGR2HSV) thresh = cv2.inRange(hsv, np.array((hl, sl, vl)), np.array((hh, sh, vh))) thresh2 = thresh.copy() contours, hierarchy = cv2.findContours(thresh, cv2.RETR_LIST, cv2.CHAIN_APPROX_SIMPLE) max_area = 0 for cnt in contours: area = cv2.contourArea(cnt) if area > max_area: max_area = area best_cnt = cnt if max_area > 0: M = cv2.moments(best_cnt) cx, cy = int(M['m10'] / M['m00']), int(M['m01'] / M['m00']) cz = int(max_area) cv2.rectangle(orig, (cx - 5, cy - 5), (cx + 5, cy + 5), (255, 255, 255), 2) cv2.putText(orig, tt, (0, 25), font, 0.9, (0, 255, 255), 2) ser.write('!~') ser.write(chr(cx)) ser.write(chr(cy)) ser.write(chr(cz & 0xff)) ser.write(chr(cz >> 8)) # Show it, if key pressed is 'Esc', exit program cv2.imshow('Frm', orig) cv2.imshow('Thr', thresh2) if (cv2.waitKey(1) & 0xff) == 27: break tt = str('FPS %d'%(cf / (cv2.getTickCount() - st))) # Clean up everything before leaving cap.release() cv2.destroyAllWindows() ser.close()Looks very interesting!
I'll be keeping a close eye on this thread.
This is great - thank you for posting!
Activity board (actually an Activitybot). As you can tell from the video I am posting that
the light shining on a object makes a big difference on how well the filtered object shows up.
So do not be afraid to play with the threshold values to match your lighting. I was going to
post a video yesterday but I used a different room with different lighting and could not get
the defaults set in the program above to pick up the object good enough. So I took the video
in the room I made the program in. The LED on P27 toggles with each new received frame packet.
https://youtu.be/CJMGuesRhqo
/* pan/tilt camera tracker */ #include "simpletools.h" #include "servo.h" #include "fdserial.h" void track(void); #define INW 10 /* inner window +/- pixel boundry */ #define OUTW 40 /* outer window +/- pixel boundry */ #define INUSEC 2 /* inner window boundry microseconds to +/- from servo setting */ #define OUTUSEC 50 /* outer window boundry microseconds to +/- from servo setting */ #define CENTER 1500 #define MINSERVO 750 #define MAXSERVO 2250 #define PAN 8 #define TILT 9 fdserial *ser; int area, x, y, z; int x1 = CENTER; int y1 = CENTER; int main() { set_directions(27, 26, 0b11); ser = fdserial_open(6, 7, 0, 115200); servo_set(PAN, CENTER); servo_set(TILT, CENTER); pause(500); fdserial_rxFlush(ser); while(1) { track(); if (x < -OUTW) x1 -= OUTUSEC; if (x < -INW) x1 -= INUSEC; if (x > OUTW) x1 += OUTUSEC; if (x > INW) x1 += INUSEC; if (y < -OUTW) y1 -= OUTUSEC; if (y < -INW) y1 -=INUSEC; if (y > OUTW) y1 += OUTUSEC; if (y > INW) y1 += INUSEC; if (x1 > MAXSERVO) x1 = MAXSERVO; if (x1 < MINSERVO) x1 = MINSERVO; if (y1 > MAXSERVO) y1 = MAXSERVO; if (y1 < MINSERVO) y1 = MINSERVO; servo_set(PAN, x1); servo_set(TILT, y1); } } void track() { while(1){ if (fdserial_rxCheck(ser) == 33) { if (fdserial_rxTime(ser, 1) == 126) { x = fdserial_rxTime(ser, 1); y = fdserial_rxTime(ser, 1); z = fdserial_rxTime(ser, 1); area = z + (fdserial_rxTime(ser, 1) * 256); x -= 100; /* detected window frame size 200x140 */ y -= 70; toggle(27); break; } } } }Just got this working on my RaspberryPi B2+... I saw at least one compile failure, but continued with the installation (that takes a long time!). The detect red script runs (though I had to modify the raspiCam config file to rotate the image 180 degrees.
It's detecting some cabinets behind me that are actually more brownish than the red screwdriver handle that I place in front of the camera. SO, I'll look at modifying the script next to see if I can get it to detect the screwdriver handle or some other red item. So far, so good!
Thanks,
dgately
it would handle simple video stuff but would spit an error using findContours. You can loose the serial stuff to get a little better speed. The FPS
printed on the video screen does not count for the delays that creep in between some frames by Raspbian. That installation of OpenCV-2.4.9
will let you compile C++ programs too.
Edit: The hue threshold determines the color with red being at 0. The value lower threshold helps with the amount of light in the room.
opencv 3.0 syntax for findCounters changed, slightly. It returns an image as well. I just updated 1 line of your example python code:
Change the following line from:
    contours, hierarchy = cv2.findContours(thresh, cv2.RETR_LIST, cv2.CHAIN_APPROX_SIMPLE)

To:
    image, contours, hierarchy = cv2.findContours(thresh, cv2.RETR_TREE, cv2.CHAIN_APPROX_SIMPLE)
With that, I don't get the errors with opencv 3.0!
I think I figured out my detection of red, as well... I forgot that I'm using the NoIR Raspberry Pi cam, so everything is reddish. I'll switch back to the "normal" camera, and try again!
dgately
That was the error I was getting too many returned results but I had found an example on line using 3.0 that showed the same usage. Thanks for
that dgately.
Edit: Using this method of color filtering is not very good with simular colors in the same frame. You can also tighten the hue threshold range like
set both upper and lower thresholds to 0 for a more pure red.
pointing that out dgately 3.0.0 works here too. From now on I will be using it instead of 2.4.9. IIRC the setup for that has 7 pages.
Hi ratronic,
I am using a Raspberry Pi Model 2 B for an Autonomous UAV competition at my school to identify images. Indeed, it is capable of complex image processing at a high resolution ( a 15.9 Megapixel photo takes about 1 minute to run through my program ). The most time consuming part is finding contours, especially since I am finding all contours in an object to create a mask as opposed to just the edge contours.
Do you have any future plans for using OpenCV on the Raspberry Pi?
Activitybot. I have seen people that have RPi's and OpenCV to have thier robot read symbols to control it's next action. I am always looking for OpenCV things
on the net. At the moment I am just researching to see what can be done.
Edit: I use very small pictures to find contours for speed.
And there are even more features coming in OpenCV 3.x ( for lack of a completely stable release, I am using 2.4.11 currently )!
Hahahahahaha. I really hope it is gold.
Do you prefer it over 2.4.11? Is it stable? Does it run faster?
I had some problems compiling C++ code with it. I had been using 2.4.9 for awhile and liked it. But I think I will try
to do a new build of 3.0.0 and start new. Have any suggestion's to help me out?
I wish I could help. I have had so much trouble with 3.0.0 and it close-to-ready betas, I'm just going to stick with 2.4.11 for now, sorry. But good luck and let us know how it turns out!
FYI I have OpenCV working on my Pi B+, and the current goal is to make a balancing bot that can navigate through little mazes made with colored ribbon to find a blue box, hopefully in time for Maker Faire Detroit.
Now off to change this avatar... wow
sudo apt-get install python-opencv
to get opencv 2? The python package pulls in everything else without fuss in my experience,
in fact this is generally true for any complex library for which a python interface exists.
module in that OpenCV only sees 64x64 frames from the RPi camera module. USB webcams work with all of
the versions of OpenCV. I would actually recommend using Marks method for a much easier and quick
method of installing OpenCV. Just keep in mind that the frame size of the RPi camera module is 64x64
for that version of OpencV.
size to 640x480:
RPi camera module to output 640x480 at boot up. But the earlier version of OpenCV-2.4.3 you get using
the easy method to install has a problem with only the RPi camera module. It takes a later version to correct
the problem of it only seeing 64x64 frames from the RPi camera module. Last night I finally compiled a C++
program that is similar to the Python program I posted using OpenCV-3.0.0 (OpenCV 3.0 Gold). So I am
going to continue exploring using the latest version and will post more information about it if anybody is
interested. Keep in mind I am a noobie to this stuff.