

A Bi-Color LED Memory Game
 Jessica Uelmen
Posts: 490
Jessica Uelmen
Posts: 490
A Bi-Color LED Memory Game
Memory games have become a big hit in recent years.· They flood video games, phone applications, and even social networking sites.· Studies have shown that by playing games that require a certain level of memory recall, people can actually improve their fluid intelligence (the ability to reason and solve new problems).· This activity will help improve your memory by displaying a series of random LED colors through a Bi-Color LED.· You will then have to repeat the pattern shown using pushbuttons.· But be careful!· In each round the colors will appear faster and faster, making it harder to remember.
·
 ·
·
Download Source Code
Getting Started
If you are new to the BASIC Stamp microcontroller or to programming, it would be a good idea to review the following before beginning:
√······· Complete the following chapters in What’s a Microcontroller:
o······· Chapter 1 (Getting Started with the BASIC Stamp)
o······· Chapter 2 (Lights On – Lights Off)
o······· Chapter 3, Activities 2 & 3 (Pushbutton Control)
o······· Chapter 7, Activity 3 (Tracking Light Events)
√······· Review the following commands in the BASIC Stamp Syntax and Reference Manual (page numbers from v2.2):
o········ BUTTON (page 137)
o········ GOSUB (page 209)
o········ RANDOM (page 359)
o········ READ (page 369)
o········ WRITE (page 459)
Parts Required
This activity can be completed solely with the parts included in the BASIC Stamp Activity Kit or the Radio Shack What's a Microcontroller BASIC Stamp Kit. ·Below is a listing of all parts required for this activity:
·
(1) ·HomeWork Board with BASIC Stamp 2
····· The BASIC Stamp 2 Board of Education is also suitable for·this activity
(1)· Bi-Color LED
(1)· Green LED
(1)· Red LED
(2)· Pushbuttons
(4)· 220 Ω Resistors
(2)· 470 Ω Resistors
Schematics and Building the Circuits
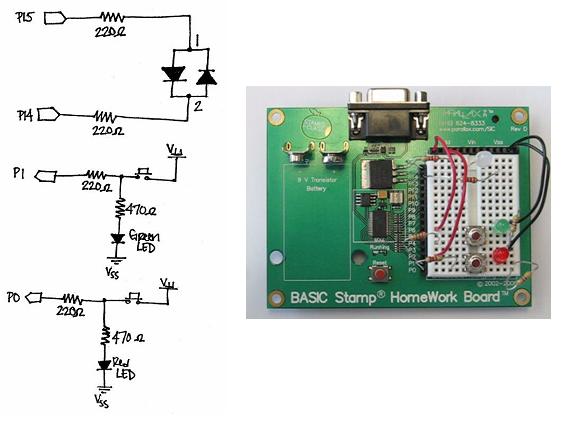
Figure 1 shows a schematic and wiring diagram for the game board.· Build the circuit shown below, paying close attention to the polarity of your LEDs.· Before continuing, check that your circuit meets the following criteria:
√······· The shorter ends (cathodes) of the red and green LEDs are connected to ground
√······· The shorter end (cathode) of the bi-color LED is connected to Pin 14
·
Figure 1 – Memory Game Schematic and Wiring


One other item to mention is that on the board pictured above, the LED leads were cut in order to be mounted closer to the pushbuttons.· If you decide to do this for your application and accidentally cut the leads so you’re not sure which one is shortest anymore, all is not lost, and the cathode can still be determined.· If you look at the top of the LED, you will notice that one edge is either flattened or has a small notch in it.· Whichever side has this marking is the cathode.
Testing 1, 2, 3…
Before continuing, it’s always a good idea to check your wiring for any errors.· The easiest way is to run a program that tests each aspect of your circuit.· Run HardwareTest.bs2 and check that the following happens:
√······· The Bi-Color LED blinks first red, then green
√······· When no pushbutton has been pressed, the Debug Terminal reads: “IN0 = 0” and “IN1 = 0”
√······· When you push the bottom pushbutton:
o······· The red LED turns on
o······· The Debug Terminal displays: “IN0 = 1” and “IN1 = 0”
√······· When you push the top pushbutton:
o······· The green LED turns on
o········ The Debug Terminal displays: “IN0 = 0” and “IN1 = 1”
Troubleshooting
If your code worked as directed, you’re free move on to the next section!· However, if your circuit did not work as described above, here are some quick troubleshooting tips:
√······· ·If the Bi-Color LED blinks green, then red:
o······· Double check and make sure the cathode and anode are connected properly.· Flip the LED around and see if that fixes the problem.
√······· If the red and green LEDs do not emit light when the buttons are pressed:
o······· Double check and make sure the cathode and anode are connected properly.· Flip the LED around and see if that fixes the problem.
o······· Check the wiring on the board.· The LED should not be directly connected to any pushbutton terminal, and should be as follows:
§········ The LED’s anode should be connected· in between the two pushbutton terminals
§········ The 470 Ω resistor should be connected to the bottom right pin of the pushbutton to the anode of the LED
§········ The LED’s cathode should be connected just above the top pushbutton terminal
√······· If both LEDs emit light when a button is pressed:
o······· Check that none of the resistor leads are touching.· You may choose to trim the resistor leads as well to prevent this from happening.
Random vs. Psuedo-Random Numbers
One of the most important parts of the game is the bi-color LED emitting random light patterns.· This can be accomplished using the BASIC Stamp’s RANDOM command.· This command generates a series of pseudo-random numbers ranging from 0 to 65535.· By looking at a single bit of the pseudo-random number generated, we can program the bi-color LED to blink green or red depending on if the value of that bit is 0 or 1.
·
Unfortunately, things aren’t quite that simple.· You may have noticed that the term “pseudo-random” used.· This is because the BASIC Stamp can only generate what’s known as pseudo-random numbers.· This means that even though the number generated appears random, it is really generated based on a logical operation.· This operation uses the initial value (also known as the “seed”[noparse];)[/noparse] to tap into a sequence of 65535 seemingly random numbers.· At the start of our program, this value will always be zero, which in turn will generate the same sequence of numbers – and the LED will blink the same red-green pattern.· This wouldn’t be very challenging for our game, so we’ll have to apply other coding techniques to generate a more desirable set of random numbers.
·
In RandomTest.bs2, we will accomplish this by using the BUTTON command.· This command monitors the state of a button, and does not allow the code to move on until the state changes.· Since the user can’t accurately time when they push a button, the variable generateColor will keep tapping into the sequence of pseudo-random numbers until the player presses the bottom pushbutton.
·
Run RandomTest.bs2 and:
√······· Make sure the bi-color LED emits random light patterns
√······· Press the reset button a few times to verify the pattern is different each time
Game on!
As well as being fun, this game also ties in a lot of useful programming techniques.· Essentially, there are main three “things” we want our program to do: display the color sequence, save the colors shown, and check user response.· Since we want the program to keep executing these main tasks indefinitely, the use of subroutines is perfect here.· Our main loop will check if the youLose flag has been set, and depending on if the flag has been set or not, will cycle through three subroutines:
√······· Begin_Game
o······· This subroutine will reset all values to zero and display and save the first pseudo-random color.· It will be used when the player first starts the game, or whenever he or she loses.
√······· Check_Response
o······· This subroutine checks the player’s response and sets the youLose flag equal to 1 when the response doesn’t match the color sequence.· If the player’s response is correct, this subroutine will add one to the round number count.
√······· Next_Round
o······· This subroutine will display the previously saved color sequence and add another color to the chain.
EEPROM Color Memory
In order to save the color sequence, we’ll have to make extensive use of the READ and WRITE commands.· Since the EEPROM address always increments by 1 each time we call the WRITE command, we’ll also have to keep a running count of the current EEPROM address in order to read the color sequence later.
·
The first thing we’ll want to specify, however, is what gets written to EEPROM if the color is red or green.· In order to keep things simple, we’ll write the number 1 to EEPROM if the color red is displayed and 0 to EEPROM if the color green is displayed:
· IF (displayColor = 1) THEN
··· ...
··· WRITE eepromAddress, 1··········
· ELSEIF (displayColor = 0) THEN··········
··· ...
··· WRITE eepromAddress, 0
After each color is written to EEPROM, we’ll add 1 to the EEPROM address counter.· This makes displaying the color sequence a simple FOR…NEXT loop:
· FOR eepromAddress = 0 TO currentAddress
··· READ eepromAddress, savedColor
··· IF (savedColor = 1) THEN
····· ...
··· ELSEIF (savedColor = 0) THEN
···· ·...
··· ENDIF
· · ...
· NEXT

Player Response
Once the color pattern is displayed, we want to check and be sure that the sequence of pushbutton states match the sequence of colors shown.· The first thing we want to do is read the color sequence from EEPROM.· This can be achieved in the same way we display the color sequence, with a FOR…NEXT loop:
FOR eepromAddress = 0 TO currentAddress
·· READ eepromAddress, savedColor
Next, we’ll want to keep track of the player pushbutton input, and this can get a bit tricky.· The code executes very quickly, and we have to be sure that it will wait for the player to enter the entire color sequence.· If we’re not careful, the code will read the first pushbutton state as the entire color sequence, which would be very frustrating for the player!
The simplest way to tackle this problem is to make sure the code waits for the player to press and release a pushbutton.· This will make the code wait for a press and release each time through the loop.· Since the pushbutton states will be 0 before we check the player response against the saved color, we’ll simply use two sets of variables to keep track of everything.· The first set (PbRed and PbGreen) will hold the states of the red and green pushbuttons.· Since we then want to save the states of these pushbuttons, the second set of variables (Red and Green) will be set to the states of PbRed and PbGreen before the pushbutton is released and their values are reset to 0.
DO
· PbGreen = IN1
· PbRed = IN0
LOOP UNTIL (PbGreen = 1) OR (PbRed = 1)
·
Green = PbGreen
Red = PbRed
·
DO
· PbGreen = IN1
· PbRed = IN0
LOOP UNTIL (PbGreen = 0) AND (PbRed = 0)
Next we’ll want to compare the player input against the color displayed.· When the user is repeating the color pattern displayed by the bi-color LED, there are four conditions that can occur, with only two results:
·

·
Since all of our values are either 0 or 1, we can use conditional IF…THEN statements to compare the value in savedColor to the state of the pushbutton pressed.· If the button pressed does not match the color shown, the youLose flag is set and the program returns to the main loop.· Otherwise, the program continues through the subroutine and adds 1 to the variable roundNumber if the player inputs the correct sequence:
IF savedColor <> Green THEN··············
· PbGreen = 0
· PAUSE 100··························
ELSEIF savedColor <> Red THEN············
· youLose = 1····························
· RETURN································· ·
ELSEIF savedColor = Red THEN·············
· PbRed = 0····
· PAUSE 100
ELSEIF savedColor = Green THEN
· youLose = 1
· RETURN··························
ENDIF

Project continued on next post...
▔▔▔▔▔▔▔▔▔▔▔▔▔▔▔▔▔▔▔▔▔▔▔▔
Jessica Uelmen
Education Department
Parallax Inc.
Post Edited (Jessica Uelmen (Parallax)) : 8/25/2010 6:29:47 PM GMT
Memory games have become a big hit in recent years.· They flood video games, phone applications, and even social networking sites.· Studies have shown that by playing games that require a certain level of memory recall, people can actually improve their fluid intelligence (the ability to reason and solve new problems).· This activity will help improve your memory by displaying a series of random LED colors through a Bi-Color LED.· You will then have to repeat the pattern shown using pushbuttons.· But be careful!· In each round the colors will appear faster and faster, making it harder to remember.
·
Download Source Code
Getting Started
If you are new to the BASIC Stamp microcontroller or to programming, it would be a good idea to review the following before beginning:
√······· Complete the following chapters in What’s a Microcontroller:
o······· Chapter 1 (Getting Started with the BASIC Stamp)
o······· Chapter 2 (Lights On – Lights Off)
o······· Chapter 3, Activities 2 & 3 (Pushbutton Control)
o······· Chapter 7, Activity 3 (Tracking Light Events)
√······· Review the following commands in the BASIC Stamp Syntax and Reference Manual (page numbers from v2.2):
o········ BUTTON (page 137)
o········ GOSUB (page 209)
o········ RANDOM (page 359)
o········ READ (page 369)
o········ WRITE (page 459)
Parts Required
This activity can be completed solely with the parts included in the BASIC Stamp Activity Kit or the Radio Shack What's a Microcontroller BASIC Stamp Kit. ·Below is a listing of all parts required for this activity:
·
(1) ·HomeWork Board with BASIC Stamp 2
····· The BASIC Stamp 2 Board of Education is also suitable for·this activity
(1)· Bi-Color LED
(1)· Green LED
(1)· Red LED
(2)· Pushbuttons
(4)· 220 Ω Resistors
(2)· 470 Ω Resistors
Schematics and Building the Circuits
Figure 1 shows a schematic and wiring diagram for the game board.· Build the circuit shown below, paying close attention to the polarity of your LEDs.· Before continuing, check that your circuit meets the following criteria:
√······· The shorter ends (cathodes) of the red and green LEDs are connected to ground
√······· The shorter end (cathode) of the bi-color LED is connected to Pin 14
·
Figure 1 – Memory Game Schematic and Wiring
One other item to mention is that on the board pictured above, the LED leads were cut in order to be mounted closer to the pushbuttons.· If you decide to do this for your application and accidentally cut the leads so you’re not sure which one is shortest anymore, all is not lost, and the cathode can still be determined.· If you look at the top of the LED, you will notice that one edge is either flattened or has a small notch in it.· Whichever side has this marking is the cathode.
Testing 1, 2, 3…
Before continuing, it’s always a good idea to check your wiring for any errors.· The easiest way is to run a program that tests each aspect of your circuit.· Run HardwareTest.bs2 and check that the following happens:
√······· The Bi-Color LED blinks first red, then green
√······· When no pushbutton has been pressed, the Debug Terminal reads: “IN0 = 0” and “IN1 = 0”
√······· When you push the bottom pushbutton:
o······· The red LED turns on
o······· The Debug Terminal displays: “IN0 = 1” and “IN1 = 0”
√······· When you push the top pushbutton:
o······· The green LED turns on
o········ The Debug Terminal displays: “IN0 = 0” and “IN1 = 1”
[color=#008000]' HardwareTest.bs2[/color]

[color=#008000]' Tests the functionality of each piece of your circuit.[/color]

[color=#008000]' {$STAMP BS2}[/color]
[color=#008000]' {$PBASIC 2.5}[/color]

[color=#000000]displayRed   PIN   15[/color]
[color=#000000]displayGreen PIN   14[/color]

[color=#020FC0]DO[/color]
  [color=#020FC0]HIGH[/color][color=#000000] displayRed       [/color][color=#008000]' Red[/color]
  [color=#020FC0]LOW[/color][color=#000000] displayGreen[/color]
  [color=#020FC0]PAUSE[/color][color=#000000] 200[/color]

  [color=#020FC0]HIGH[/color][color=#000000] displayGreen     [/color][color=#008000]' Green[/color]
  [color=#020FC0]LOW[/color][color=#000000] displayRed[/color]
  [color=#020FC0]PAUSE[/color][color=#000000] 200[/color]

  [color=#020FC0]DEBUG[/color] [color=#800080]HOME[/color][color=#000000], ? [/color][color=#800080]IN0[/color]     [color=#008000]' Display PB States[/color]
  [color=#020FC0]DEBUG[/color][color=#000000] ? [/color][color=#800080]IN1[/color]

  [color=#020FC0]PAUSE[/color][color=#000000] 100[/color]
[color=#020FC0]LOOP[/color]
Troubleshooting
If your code worked as directed, you’re free move on to the next section!· However, if your circuit did not work as described above, here are some quick troubleshooting tips:
√······· ·If the Bi-Color LED blinks green, then red:
o······· Double check and make sure the cathode and anode are connected properly.· Flip the LED around and see if that fixes the problem.
√······· If the red and green LEDs do not emit light when the buttons are pressed:
o······· Double check and make sure the cathode and anode are connected properly.· Flip the LED around and see if that fixes the problem.
o······· Check the wiring on the board.· The LED should not be directly connected to any pushbutton terminal, and should be as follows:
§········ The LED’s anode should be connected· in between the two pushbutton terminals
§········ The 470 Ω resistor should be connected to the bottom right pin of the pushbutton to the anode of the LED
§········ The LED’s cathode should be connected just above the top pushbutton terminal
√······· If both LEDs emit light when a button is pressed:
o······· Check that none of the resistor leads are touching.· You may choose to trim the resistor leads as well to prevent this from happening.
Random vs. Psuedo-Random Numbers
One of the most important parts of the game is the bi-color LED emitting random light patterns.· This can be accomplished using the BASIC Stamp’s RANDOM command.· This command generates a series of pseudo-random numbers ranging from 0 to 65535.· By looking at a single bit of the pseudo-random number generated, we can program the bi-color LED to blink green or red depending on if the value of that bit is 0 or 1.
·
Unfortunately, things aren’t quite that simple.· You may have noticed that the term “pseudo-random” used.· This is because the BASIC Stamp can only generate what’s known as pseudo-random numbers.· This means that even though the number generated appears random, it is really generated based on a logical operation.· This operation uses the initial value (also known as the “seed”[noparse];)[/noparse] to tap into a sequence of 65535 seemingly random numbers.· At the start of our program, this value will always be zero, which in turn will generate the same sequence of numbers – and the LED will blink the same red-green pattern.· This wouldn’t be very challenging for our game, so we’ll have to apply other coding techniques to generate a more desirable set of random numbers.
·
In RandomTest.bs2, we will accomplish this by using the BUTTON command.· This command monitors the state of a button, and does not allow the code to move on until the state changes.· Since the user can’t accurately time when they push a button, the variable generateColor will keep tapping into the sequence of pseudo-random numbers until the player presses the bottom pushbutton.
·
Run RandomTest.bs2 and:
√······· Make sure the bi-color LED emits random light patterns
√······· Press the reset button a few times to verify the pattern is different each time
[color=#008000]' RandomTest.bs2[/color]

[color=#008000]' Tests that the bi-color LED blinks random red-green patterns.[/color]

[color=#008000]' {$STAMP BS2}[/color]
[color=#008000]' {$PBASIC 2.5}[/color]

[color=#000000]displayRed      PIN   15                           [/color][color=#008000]' Red Pin[/color]
[color=#000000]displayGreen    PIN   14                           [/color][color=#008000]' Green Pin[/color]

[color=#000000]btnWrk          VAR   BYTE                         [/color][color=#008000]' Variable for BUTTON command[/color]
[color=#000000]generateColor   VAR   WORD                         [/color][color=#008000]' Random number variable[/color]
[color=#000000]displayColor    VAR   generateColor.BIT0           [/color][color=#008000]' Bit 0 of random number[/color]

[color=#000000]Begin_Game:[/color]

  [color=#020FC0]RANDOM[/color][color=#000000] generateColor                            [/color][color=#008000] ' Create a random number[/color]
  [color=#020FC0]BUTTON[/color][color=#000000] 0, 1, 100, 250, btnWrk, 0, Begin_Game     [/color][color=#008000]' Do not continue until button[/color]
                                                   [color=#008000]' is pressed[/color]
  [color=#020FC0]DO[/color]
    [color=#020FC0]IF[/color][color=#000000] (displayColor = 1) [/color][color=#020FC0]THEN[/color]                     [color=#008000]' If bit0 of the random number[/color]
      [color=#020FC0]HIGH[/color][color=#000000] displayRed                              [/color][color=#008000]' generated is 1, display the[/color]
      [color=#020FC0]LOW[/color][color=#000000] displayGreen                             [/color][color=#008000]' color red.[/color]
      [color=#020FC0]PAUSE[/color][color=#000000] 500[/color]
    [color=#020FC0]ELSEIF[/color][color=#000000] (displayColor = 0) [/color][color=#020FC0]THEN[/color]                [color=#008000] ' If bit0 of the random number[/color]
      [color=#020FC0]HIGH[/color][color=#000000] displayGreen                            [/color][color=#008000]' generated is 0, display the[/color]
      [color=#020FC0]LOW[/color][color=#000000] displayRed                               [/color][color=#008000]' [/color][color=#008000]color green[/color]
      [color=#020FC0]PAUSE[/color][color=#000000] 500[/color]
    [color=#020FC0]ENDIF[/color]

    [color=#020FC0]LOW[/color][color=#000000] displayRed                                 [/color][color=#008000]' Turn LED off before next color[/color]
    [color=#020FC0]LOW[/color][color=#000000] displayGreen[/color]
    [color=#020FC0]PAUSE[/color][color=#000000] 500[/color]

    [color=#020FC0]RANDOM[/color][color=#000000] generateColor                          [/color][color=#008000] ' Generate a new random number[/color]
  [color=#020FC0]LOOP[/color]
Game on!
As well as being fun, this game also ties in a lot of useful programming techniques.· Essentially, there are main three “things” we want our program to do: display the color sequence, save the colors shown, and check user response.· Since we want the program to keep executing these main tasks indefinitely, the use of subroutines is perfect here.· Our main loop will check if the youLose flag has been set, and depending on if the flag has been set or not, will cycle through three subroutines:
√······· Begin_Game
o······· This subroutine will reset all values to zero and display and save the first pseudo-random color.· It will be used when the player first starts the game, or whenever he or she loses.
√······· Check_Response
o······· This subroutine checks the player’s response and sets the youLose flag equal to 1 when the response doesn’t match the color sequence.· If the player’s response is correct, this subroutine will add one to the round number count.
√······· Next_Round
o······· This subroutine will display the previously saved color sequence and add another color to the chain.
EEPROM Color Memory
In order to save the color sequence, we’ll have to make extensive use of the READ and WRITE commands.· Since the EEPROM address always increments by 1 each time we call the WRITE command, we’ll also have to keep a running count of the current EEPROM address in order to read the color sequence later.
·
The first thing we’ll want to specify, however, is what gets written to EEPROM if the color is red or green.· In order to keep things simple, we’ll write the number 1 to EEPROM if the color red is displayed and 0 to EEPROM if the color green is displayed:
· IF (displayColor = 1) THEN
··· ...
··· WRITE eepromAddress, 1··········
· ELSEIF (displayColor = 0) THEN··········
··· ...
··· WRITE eepromAddress, 0
After each color is written to EEPROM, we’ll add 1 to the EEPROM address counter.· This makes displaying the color sequence a simple FOR…NEXT loop:
· FOR eepromAddress = 0 TO currentAddress
··· READ eepromAddress, savedColor
··· IF (savedColor = 1) THEN
····· ...
··· ELSEIF (savedColor = 0) THEN
···· ·...
··· ENDIF
· · ...
· NEXT
Player Response
Once the color pattern is displayed, we want to check and be sure that the sequence of pushbutton states match the sequence of colors shown.· The first thing we want to do is read the color sequence from EEPROM.· This can be achieved in the same way we display the color sequence, with a FOR…NEXT loop:
FOR eepromAddress = 0 TO currentAddress
·· READ eepromAddress, savedColor
Next, we’ll want to keep track of the player pushbutton input, and this can get a bit tricky.· The code executes very quickly, and we have to be sure that it will wait for the player to enter the entire color sequence.· If we’re not careful, the code will read the first pushbutton state as the entire color sequence, which would be very frustrating for the player!
The simplest way to tackle this problem is to make sure the code waits for the player to press and release a pushbutton.· This will make the code wait for a press and release each time through the loop.· Since the pushbutton states will be 0 before we check the player response against the saved color, we’ll simply use two sets of variables to keep track of everything.· The first set (PbRed and PbGreen) will hold the states of the red and green pushbuttons.· Since we then want to save the states of these pushbuttons, the second set of variables (Red and Green) will be set to the states of PbRed and PbGreen before the pushbutton is released and their values are reset to 0.
DO
· PbGreen = IN1
· PbRed = IN0
LOOP UNTIL (PbGreen = 1) OR (PbRed = 1)
·
Green = PbGreen
Red = PbRed
·
DO
· PbGreen = IN1
· PbRed = IN0
LOOP UNTIL (PbGreen = 0) AND (PbRed = 0)
Next we’ll want to compare the player input against the color displayed.· When the user is repeating the color pattern displayed by the bi-color LED, there are four conditions that can occur, with only two results:
·
·
Since all of our values are either 0 or 1, we can use conditional IF…THEN statements to compare the value in savedColor to the state of the pushbutton pressed.· If the button pressed does not match the color shown, the youLose flag is set and the program returns to the main loop.· Otherwise, the program continues through the subroutine and adds 1 to the variable roundNumber if the player inputs the correct sequence:
IF savedColor <> Green THEN··············
· PbGreen = 0
· PAUSE 100··························
ELSEIF savedColor <> Red THEN············
· youLose = 1····························
· RETURN································· ·
ELSEIF savedColor = Red THEN·············
· PbRed = 0····
· PAUSE 100
ELSEIF savedColor = Green THEN
· youLose = 1
· RETURN··························
ENDIF
Project continued on next post...
▔▔▔▔▔▔▔▔▔▔▔▔▔▔▔▔▔▔▔▔▔▔▔▔
Jessica Uelmen
Education Department
Parallax Inc.
Post Edited (Jessica Uelmen (Parallax)) : 8/25/2010 6:29:47 PM GMT
564 x 423 - 31K


727 x 144 - 20K

727 x 80 - 10K

425 x 193 - 4K

727 x 152 - 19K
Comments
Enter and run BiColorLedGame.bs2 to start improving your fluid memory!· Since the highest round number is displayed whenever the player loses, challenge your family and friends and see who can reach the highest level!
[color=green]' BiColorLedGame.bs2[/color]
[color=green]' This program is for a memory game using a bi-color LED and two pushbuttons.[/color]
[color=green]' The bi-color LED will emit random red-green patterns, which the player will[/color]
[color=green]' have to imitate using the two pushbuttons wired to the board.[/color]

[color=green]' {$STAMP BS2}[/color]
[color=green]' {$PBASIC 2.5}[/color]

[color=green]' -----[noparse][[/noparse] EEPROM Definitions ]--------------------------------------------------[/color]

[color=#000000]eepromAddress   VAR   Word[/color][color=green]                    ' Current address in EEPROM[/color]
[color=#000000]currentAddress  VAR   Word[/color][color=green]                    ' Address counter variable for[/color]
[color=green]                                              ' reading from EEPROM[/color]

[color=green]' -----[noparse][[/noparse] I/O Definitions ]-----------------------------------------------------[/color]

[color=#000000]displayRed      PIN   15[/color][color=green]                      ' Red Pin[/color]
[color=#000000]displayGreen    PIN   14[/color][color=green]                      ' Green Pin[/color]

[color=green]' -----[noparse][[/noparse] Variables ]-----------------------------------------------------------[/color]

[color=#000000]PbGreen         VAR   Byte[/color][color=green]                    ' Pushbutton pressed = green[/color]
[color=#000000]PbRed           VAR   Byte[/color][color=green]                    ' Pushbutton pressed = red[/color]
[color=#000000]Green           VAR   Byte[/color][color=green]                    ' Green pushbutton select[/color]
[color=#000000]Red             VAR   Byte[/color][color=green]                    ' Red pushbutton select[/color]
[color=#000000]btnWrk          VAR   Byte[/color][color=green]                    ' BUTTON command workspace[/color]
[color=#000000]youLose         VAR   Byte[/color][color=green]                    ' Lose flag[/color]

[color=#000000]roundNumber     VAR   Word[/color][color=green]                    ' Current level[/color]
[color=#000000]delayTime       VAR   Word[/color][color=green]                    ' Current light delay time[/color]
[color=#000000]generateColor   VAR   Word[/color][color=green]                    ' Random color generated[/color]
[color=#000000]displayColor    VAR   generateColor.BIT0[/color][color=green]      ' Bit 0 of random color gen.[/color]
[color=#000000]savedColor      VAR   Word[/color][color=green]                    ' Save colors displayed[/color]

[color=#0000ff]GOSUB[/color] [color=#000000]Begin_Game[/color][color=green]                              ' At startup, go to the[/color]
[color=green]                                              ' Begin_Game subroutine[/color]

[color=green]' -----[noparse][[/noparse] Main Routine ]--------------------------------------------------------[/color]
[color=#000000]Main:[/color]
  [color=#0000ff]DO[/color]
    [color=#0000ff]GOSUB[/color] [color=#000000]Check_Response[/color][color=green]                      ' Check player response[/color]

    [color=#0000ff]IF[/color] [color=#000000](youLose = 1)[/color] [color=#0000ff]THEN[/color][color=green]                     ' If the youLose flag has been[/color]
      [color=#0000ff]DEBUG[/color] [color=#ff0000]"You Lose!  Game Over."[/color][color=#000000],[/color] [color=#800080]CR[/color][color=#000000],[/color][color=green]      ' set, inform the player,  & show[/color]
            [color=#ff0000]"Level Reached: "[/color][color=#000000],[/color][color=green]                ' the highest level reached[/color]
            [color=#000080]DEC[/color] [color=#000000]roundNumber[/color]
      [color=#0000ff]PAUSE[/color] [color=#000000]2000[/color]
      [color=#0000ff]DEBUG[/color] [color=#800080]CLS[/color]
      [color=#0000ff]GOSUB[/color] [color=#000000]Begin_Game                        [/color][color=green]' Reset - go to Begin_Game[/color]
    [color=#0000ff]ELSEIF[/color] [color=#000000](youLose = 0) [/color][color=#0000ff]THEN[/color][color=green]                 ' If the youLose flag was not[/color]
      [color=#0000ff]GOSUB[/color] [color=#000000]Next_Round                        [/color][color=green]' set, go to the Next_Round[/color]
    [color=#0000ff]ENDIF[/color][color=green]                                     ' subroutine[/color]
  [color=#0000ff]LOOP[/color]

[color=green]' -----[noparse][[/noparse] Subroutine - Begin_Game ]---------------------------------------------[/color]
[color=green]' Only used at beginning or after the player loses.  Resets all variables to[/color]
[color=green]' their initial values, and displays the first color.[/color]

[color=#000000]Begin_Game:[/color]

[color=green]  ' Reset all variables to their initial values.[/color]
[color=#000000]  eepromAddress = 0[/color]
[color=#000000]  currentAddress = 0[/color]
[color=#000000]  roundNumber = 0[/color]
[color=#000000]  delayTime = 750[/color]

[color=green]  ' Tell user to press the bottom button to begin and randomize the variable[/color]
[color=green]  ' generateColor until the button is pressed.[/color]
  [color=#0000ff]DEBUG[/color] [color=#800080]HOME[/color][color=#000000],[/color] [color=#ff0000]"Press the bottom button to begin."[/color][color=#000000],[/color] [color=#800080]CR[/color]
  [color=#0000ff]RANDOM[/color] [color=#000000]generateColor[/color]
  [color=#0000ff]BUTTON[/color] [color=#000000]0, 1, 100, 250, btnWrk, 0, Begin_Game[/color]

  [color=#0000ff]DEBUG[/color] [color=#800080]CLS [/color][color=green]                                  ' Clear the Screen[/color]

  [color=#0000ff]IF[/color] [color=#000000](displayColor[/color] [color=#000000]= 1)[/color] [color=#0000ff]THEN[/color][color=green]                  ' If bit0 of the random number[/color]
    [color=#0000ff]HIGH[/color] [color=#000000]displayRed[/color][color=green]                           ' generated is 1, then display[/color]
    [color=#0000ff]LOW[/color] [color=#000000]displayGreen[/color][color=green]                          ' the color red.[/color]
    [color=#0000ff]PAUSE[/color] [color=#000000]delayTime[/color][color=green]                           ' Wait for the value in delayTime[/color]
    [color=#0000ff]WRITE[/color] [color=#000000]eepromAddress, 1[/color][color=green]                    ' Write a 1 to EEPROM to save[/color]
[color=green]                                              ' the color displayed[/color]
  [color=#0000ff]ELSEIF[/color] [color=#000000](displayColor = 0)[/color] [color=#0000ff]THEN[/color][color=green]              ' If bit0 of the random number[/color]
    [color=#0000ff]HIGH[/color] [color=#000000]displayGreen[/color][color=green]                         ' generated is 0, then display[/color]
    [color=#0000ff]LOW[/color] [color=#000000]displayRed[/color][color=green]                            ' the color green.[/color]
    [color=#0000ff]PAUSE[/color] [color=#000000]delayTime[/color][color=green]                           ' Wait for the value in delayTime[/color]
    [color=#0000ff]WRITE[/color] [color=#000000]eepromAddress, 0[/color][color=green]                    ' Write a 0 to EEPROM to save[/color]
  [color=#0000ff]ENDIF[/color][color=green]                                       ' the color displayed[/color]

  [color=#0000ff]LOW[/color] [color=#000000]displayRed[/color][color=green]                              ' Turn the LED off[/color]
  [color=#0000ff]LOW[/color] [color=#000000]displayGreen[/color]
[color=#0000ff]RETURN[/color][color=green]                                        ' Return to [/color][color=green]Main[/color]

[color=green]' -----[noparse][[/noparse] Subroutine - Check_Response ]-----------------------------------------[/color]
[color=green]' Checks the player's response to see if the pattern they've entered matches[/color]
[color=green]' the pattern displayed by the LEDs.[/color]

[color=#000000]Check_Response:[/color]

  [color=#000000]youLose = 0[/color][color=green]                                 ' You lose flag is cleared[/color]

[color=green]  ' Reads values from EEPROM until it reaches the number of colors that have[/color]
[color=green]  ' been displayed.[/color]
  [color=#0000ff]FOR[/color] [color=#000000]eepromAddress = 0[/color] [color=#0000ff]TO[/color] [color=#000000]currentAddress[/color]
    [color=#0000ff]READ[/color] [color=#000000]eepromAddress, savedColor[/color]
[color=green]    ' Monitor pushbutton states until one is pressed[/color]
    [color=#0000ff]DO[/color]
      [color=#000000]PbGreen =[/color] [color=#800080]IN1[/color][color=green]                           ' State of pin 1 (green button)[/color]
      [color=#000000]PbRed =[/color] [color=#800080]IN0[/color][color=green]                             ' State of pin 0 (red button)[/color]
    [color=#0000ff]LOOP[/color] [color=#0000ff]UNTIL[/color] [color=#000000](PbGreen = 1) OR (PbRed = 1)[/color]

    [color=#000000]Green = PbGreen[/color][color=green]                           ' Save the state of each PB[/color]
    [color=#000000]Red = PbRed[/color][color=green]                               ' Save the state of each PB[/color]

[color=green]    ' Wait until the player releases the pushbutton[/color]
    [color=#0000ff]DO[/color]
      [color=#000000]PbGreen =[/color] [color=#800080]IN1[/color][color=green]                           ' State of pin 1 (green button)[/color]
      [color=#000000]PbRed =[/color] [color=#800080]IN0[/color][color=green]                             ' State of pin 0 (red button)[/color]
    [color=#0000ff]LOOP[/color] [color=#0000ff]UNTIL[/color] [color=#000000](PbGreen = 0) AND (PbRed = 0)[/color]

    [color=#0000ff]IF[/color] [color=#000000]savedColor <> Green[/color] [color=#0000ff]THEN[/color][color=green]               ' If the values of savedColor[/color]
      [color=#000000]PbGreen = 0[/color][color=green]                             ' and Green are different,[/color]
      [color=#0000ff]PAUSE[/color] [color=#000000]100[/color][color=green]                               ' keep looping[/color]
    [color=#0000ff]ELSEIF[/color] [color=#000000]savedColor <> Red[/color] [color=#0000ff]THEN[/color][color=green]             ' If the values of savedColor[/color]
      [color=#000000]youLose = 1[/color][color=green]                             ' and Red are different, the[/color]
      [color=#0000ff]RETURN[/color][color=green]                                  ' player lost, return to main[/color]
    [color=#0000ff]ELSEIF[/color] [color=#000000]savedColor = Red[/color] [color=#0000ff]THEN[/color][color=green]              ' If the values of savedColor[/color]
      [color=#000000]PbRed = 0[/color][color=green]                               ' and Red are equal, keep[/color]
      [color=#0000ff]PAUSE[/color] [color=#000000]100[/color][color=green]                               ' looping[/color]
    [color=#0000ff]ELSEIF[/color] [color=#000000]savedColor = Green[/color] [color=#0000ff]THEN[/color][color=green]            ' If the values of savedColor[/color]
      [color=#000000]youLose = 1[/color][color=green]                             ' and Red are equal, the[/color]
      [color=#0000ff]RETURN[/color][color=green]                                  ' player lost, return to main[/color]
    [color=#0000ff]ENDIF[/color]
  [color=#0000ff]NEXT[/color]

[color=green]  ' If the code got here, the player did not lose, add 1 to the round number[/color]
[color=#000000]  roundNumber = roundNumber + 1[/color]
[color=#0000ff]RETURN[/color][color=green]                                        ' Return to main[/color]

[color=green]' -----[noparse][[/noparse] Subroutine - Next_Round ]---------------------------------------------[/color]
[color=green]' Displays the last colors shown and adds a new random color to the sequence[/color]

[color=#000000]Next_Round:[/color]

  [color=#0000ff]PAUSE[/color] [color=#000000]750[/color][color=green]                                   ' Wait so player can get ready[/color]

[color=green]  ' Subtract 50 from the delayTime so the sequence displays faster, but set a[/color]
[color=green]  ' limit so the colors are still viewable[/color]
[color=#000000]  delayTime = (delayTime - 50) MIN 200[/color]

[color=green]  ' Read the last colors from EEPROM and display them[/color]
  [color=#0000ff]FOR[/color] [color=#000000]eepromAddress = 0[/color] [color=#0000ff]TO[/color] [color=#000000]currentAddress[/color]
    [color=#0000ff]READ[/color] [color=#000000]eepromAddress, savedColor[/color]
    [color=#0000ff]IF[/color] [color=#000000](savedColor = 1)[/color] [color=#0000ff]THEN[/color]
      [color=#0000ff]HIGH[/color] [color=#000000]displayRed[/color]
      [color=#0000ff]LOW[/color] [color=#000000]displayGreen[/color]
      [color=#0000ff]PAUSE[/color] [color=#000000]delayTime[/color]
    [color=#0000ff]ELSEIF[/color] [color=#000000](savedColor = 0)[/color] [color=#0000ff]THEN[/color]
      [color=#0000ff]HIGH[/color] [color=#000000]displayGreen[/color]
      [color=#0000ff]LOW[/color] [color=#000000]displayRed[/color]
      [color=#0000ff]PAUSE[/color] [color=#000000]delayTime[/color]
    [color=#0000ff]ENDIF[/color]
    [color=#0000ff]LOW[/color] [color=#000000]displayRed[/color]
    [color=#0000ff]LOW[/color] [color=#000000]displayGreen[/color]
[color=#0000ff]    PAUSE[/color] [color=#000000]delayTime[/color]
  [color=#0000ff]NEXT[/color]

  [color=#0000ff]RANDOM[/color] [color=#000000]generateColor[/color][color=green]                        ' Generate a new random number[/color]

  [color=#0000ff]IF[/color] [color=#000000](displayColor = 1)[/color] [color=#0000ff]THEN[/color][color=green]                  ' If bit0 of the random number[/color]
    [color=#0000ff]HIGH[/color] [color=#000000]displayRed[/color][color=green]                           ' generated is 1, then display[/color]
    [color=#0000ff]LOW[/color] [color=#000000]displayGreen[/color][color=green]                          ' the color red.[/color]
    [color=#0000ff]PAUSE[/color] [color=#000000]delayTime[/color][color=green]                           ' Wait for the value in delayTime[/color]
    [color=#0000ff]WRITE[/color] [color=#000000]eepromAddress, 1[/color][color=green]                    ' Write a 1 to EEPROM to save[/color]
[color=green]                                              ' the color displayed[/color]
  [color=#0000ff]ELSEIF[/color] [color=#000000](displayColor = 0)[/color] [color=#0000ff]THEN[/color][color=green]              ' If bit0 of the random number[/color]
    [color=#0000ff]HIGH[/color] [color=#000000]displayGreen[/color][color=green]                         ' generated is 0, then display[/color]
    [color=#0000ff]LOW[/color] [color=#000000]displayRed[/color][color=green]                            ' the color green.[/color]
    [color=#0000ff]PAUSE[/color] [color=#000000]delayTime[/color][color=green]                           ' Wait for the value in delayTime[/color]
    [color=#0000ff]WRITE[/color] [color=#000000]eepromAddress, 0[/color][color=green]                    ' Write a 0 to EEPROM to save[/color]
  [color=#0000ff]ENDIF[/color][color=green]                                       ' the color displayed[/color]

  [color=#0000ff]LOW[/color][color=#000000] displayRed[/color][color=green]                              ' Turn LED off[/color]
  [color=#0000ff]LOW[/color] [color=#000000]displayGreen[/color]

  [color=#000000]currentAddress = currentAddress + 1[/color][color=green]         ' Add 1 to the current EEPROM[/color]
[color=green]                                              ' address counter[/color]
[color=#0000ff]RETURN[/color][color=green]                                        ' Return to [/color][color=green]Main[/color]
_____________________________________________________________________________
·
Copyright (c) 2009·by Parallax Inc - all rights reserved.··
▔▔▔▔▔▔▔▔▔▔▔▔▔▔▔▔▔▔▔▔▔▔▔▔
Jessica Uelmen
Education Department
Parallax, Inc.
Post Edited (Jessica Uelmen (Parallax)) : 4/28/2009 1:41:34 AM GMT
Secondly, you can cut down the loop that waits for the user to release the button. I think it can go all on one line with a colon, but I haven't done much BASIC so I'm not sure.
    DO
    LOOP UNTIL (IN1 = 0) AND (IN2 = 0)
Next, I think your IF block can be cut down to be a bit more efficient. You don't need to clear Green or Red to 0. The next time through the loop it will reassign (and overwrite) what was there before. I think there may also be a bug in both versions if both of the buttons are high at the same time, but I'll have to sleep on it.
 IF savedColor = Green OR savedColor <> Red OR Red = Green THEN
    youLose = 1
    RETURN
  ENDIF

  PAUSE 100
I like the use of min for the time delay. I haven't seen that before. You may want to mention the use of the modulus operator as the traditional (at least in C++) method of limiting a number to a range. I think also that a flowchart would be useful for displaying how the program runs.
Semantics here, but I think the 'GOSUB Begin_Game' call should be put right after the main label and before the loop. That would make it (more) consistent with other languages where the compiler forces you to put function calls inside other functions.
Some more of the ifs could be condensed. This one is the second to last one in the program:
' Read the last colors from EEPROM and display them
  FOR eepromAddress = 0 TO currentAddress


    READ eepromAddress, savedColor
    IF (savedColor = 1) THEN : HIGH displayRed
    ELSEIF (savedColor = 0) THEN : HIGH displayGreen
    ENDIF

    PAUSE delayTime
    LOW displayRed
    LOW displayGreen
    PAUSE delayTime
  NEXT
I must say, I've enjoyed working through the code. I like the nice documentation, especially the synergy between the video and forum posts.
Post Edited (SRLM) : 5/7/2009 7:06:14 AM GMT
Thanks very much for your feedback and compliments! Code can always be improved, I don't think "perfect" code could ever possibly be achieved by mere mortals. [noparse];)[/noparse]
It's always a balancing act when developing code for the Stamps in Class "Mini Projects". These are educational material meant for beginners who may not have even gone through WAM or Robo and just want to make something "cool". We try not to condense things too much, because it's easier for the new programmer to follow if things are spelled out. It's like trying to do calculus without your teacher explaining Trig identities. Of course more advanced users like yourself are more than welcome to use this as a building block and make it more efficient, we love seeing that here in Education!
One thing I want to mention is that the Check_Response subroutine is tricky, and I probably should explain that better. I was only using a single variable before, but the problem is that the code loops through the program so fast, and it wouldn't wait for a second button to get pressed. So if you had a sequence of one color, you'd be fine, but say the light flashed red-green, and you pressed the red button to start, you would still lose since the program looped through so quickly. So here, the code waits for the user to press a button, and then saves the state of each button, since if you use a single variable, the variable will return to 0 once the user lets go. You probably could use another loop like you described, but again, that's not consistent for the beginner.
A flowchart is a great suggestion, though! I will have to do that when I find time to edit the post. [noparse]:)[/noparse]
- Jessica
▔▔▔▔▔▔▔▔▔▔▔▔▔▔▔▔▔▔▔▔▔▔▔▔
Jessica Uelmen
Education Department
Parallax, Inc.
Here is a suggestion: offer the full program to the user and uncondensed, then give an explanation of various optimizations and provide the code. I think the presentation of the techniques would be appreciated when users start to incorporate code from all over the place, and find out of memory errors.
Here is a suggestion for the check button button press code. I'm not at my own computer right now, so I may have missed a few syntax details:
' Monitor pushbutton states until one is pressed DO Green = IN1 ' State of pin 1 (green button) Red = IN0 ' State of pin 0 (red button) LOOP UNTIL ((Green = 1) OR (Red = 1)) AND (Green <> Red) ' Wait until the player releases the pushbutton DO : LOOP UNTIL (IN1 = 0) AND (IN2 = 0) ' The if statement(s) go hereNo, you do not. And yes, the HomeWork Board does have 220-ohm resistors built in. We always include it in the wiring just in case people are using the Board of Education in order to protect the pin.
Jessica
▔▔▔▔▔▔▔▔▔▔▔▔▔▔▔▔▔▔▔▔▔▔▔▔
Jessica Uelmen
Education Department
Parallax, Inc.
' {$STAMP BS2} ' {$PBASIC 2.5} outgreen PIN 15 outred PIN 14 green PIN 1 red PIN 0 nextcolor VAR Bit eepromaddress VAR Word currenteepromaddress VAR Word redgreen VAR Bit redgreencheck VAR Bit nextcolor = 0 eepromaddress = 0 currenteepromaddress = 0 DEBUG CLS DO nextcolor = nextcolor + 1 DEBUG HOME, "Push either button to begin" LOOP UNTIL (green = 1) OR (red = 1) DEBUG CLS WRITE 0, nextcolor 'Main Routine---------------------------------------------------------------------------- Main: DO GOSUB Out_LED GOSUB Check_Response LOOP 'Subroutine: Out_LED--------------------------------------------------------------------- Out_LED: DEBUG HOME, "Round " DEBUG DEC3 (currenteepromaddress + 1), " ", CR FOR eepromaddress = 0 TO currenteepromaddress READ eepromaddress, redgreen IF (redgreen = 0) THEN PAUSE 500 HIGH outred LOW outgreen PAUSE 500 LOW outgreen LOW outred ELSEIF (redgreen = 1) THEN PAUSE 500 HIGH outgreen LOW outred PAUSE 500 LOW outgreen LOW outred ENDIF NEXT RETURN 'Subroutine: Check_Response-------------------------------------------------------------- Check_Response: FOR eepromaddress = 0 TO currenteepromaddress READ eepromaddress, redgreen DO nextcolor = nextcolor + 1 IF (red = 1) THEN redgreencheck = 0 ELSEIF (green = 1) THEN redgreencheck = 1 ENDIF LOOP UNTIL (red = 1) OR (green = 1) IF (redgreen <> redgreencheck) THEN DEBUG "You lose", CR : END DO LOOP UNTIL (red = 0) AND (green = 0) PAUSE 55 NEXT currenteepromaddress = currenteepromaddress + 1 WRITE currenteepromaddress, nextcolor RETURNEdit: I forgot to mention that you have to swith the bi color LED around when switching between Uelmen's code and my code.
' {$STAMP BS2}
' {$PBASIC 2.5}

'PIN DECLARATIONS
outgreen PIN 15                            'green side of bi color LED
outred PIN 14                              'red side of bi color LED
green PIN 1                                'green button
red PIN 0                                  'red button

'VARIABLE DECLARATIONS RED=0 GREEN=1
nextcolor VAR Bit                          'created by random user input for the next color to be written in eeprom
eepromaddress VAR Word                     'variable used to switch between addresses on eeprom
currenteepromaddress VAR Word              'the last eepromaddress used so far i.e. level number
redgreen VAR Bit                           'variable read from eepromaddress to check against user input (redgreencheck variable) red=0 green=1
redgreencheck VAR Bit                      'variable created depending on button pushed red=0 green=1

'Initialization
nextcolor = 0
eepromaddress = 0
currenteepromaddress = 0


DEBUG CLS                                  'Clear Debug Screen to start new game

DO                                         'This loop waits until the user pushes either button and when user pushes button, it determines next color
  nextcolor = nextcolor + 1
  DEBUG HOME, "Push either button to begin"
LOOP UNTIL (green = 1) OR (red = 1)
DEBUG CLS
WRITE 0, nextcolor

'Main Routine----------------------------------------------------------------------------

Main:
  DO
    GOSUB Out_LED
    GOSUB Check_Response
  LOOP


'Subroutine: Out_LED---------------------------------------------------------------------
'Function: Read on eeprom, store in redgreen variable and output accordingly.  Red=0 Green=1


Out_LED:

  DEBUG HOME, "Round  "                                      'Output on debug screen what round or level number game is on
  DEBUG DEC3 (currenteepromaddress + 1), "       ", CR

  FOR eepromaddress = 0 TO currenteepromaddress
    READ eepromaddress, redgreen                             'Store eeprom on redgreen variable
    IF (redgreen = 0) THEN                                   'Determine whether to output red or green
      PAUSE 500
      HIGH outred                                            'Output red
      LOW outgreen
      PAUSE 500
      LOW outgreen                                           'Turn off LED
      LOW outred
    ELSEIF (redgreen = 1) THEN
      PAUSE 500
      HIGH outgreen                                          'Output green
      LOW outred
      PAUSE 500
      LOW outgreen                                           'Turn off LED
      LOW outred
    ENDIF
  NEXT                                                       'Continue until all colors are outputted
  RETURN                                                     'Go back to main routine

'Subroutine: Check_Response--------------------------------------------------------------
'Function: Read of eeprom, store in redgreen variable, read user input store in redgreencheck variable, and compare redgreencheck to redgreen.
'Function2: Toggle the variable nextcolor between 1 and 0 to determine nextcolor to be outputted. Red=0 Green=1

Check_Response:

  FOR eepromaddress = 0 TO currenteepromaddress
    READ eepromaddress, redgreen                                      'Store eeprom on redgreen
    DO
      nextcolor = nextcolor + 1                                       'Toggle nextcolor to determine nextcolor to be outputted
      IF (red = 1) THEN                                               'If the red button PIN is on, make redgreencheck=0
        redgreencheck = 0
      ELSEIF (green = 1) THEN                                         'If the green button PIN is on, make redgreencheck=1
        redgreencheck = 1
      ENDIF                                                           'Continue looping until either button is pushed
    LOOP UNTIL (red = 1) OR (green = 1)
    IF (redgreen <> redgreencheck) THEN DEBUG "You lose", CR : END    'Compare redgreen and redgreencheck, if not equal, debug "You lose" and end game
    DO
    LOOP UNTIL (red = 0) AND (green = 0)                              'Loop until both buttons are released
    PAUSE 20                                                          'Delay for switch bounce
  NEXT                                                                'Continue to check user inputs for all colors

  currenteepromaddress = currenteepromaddress + 1                     'Increase currenteepromaddress by 1
  WRITE currenteepromaddress, nextcolor                               'Write on the eeprom the nextcolor
  RETURN                                                              'Go to main routine
Edit: I just copied that from the Basic Stamp Editor and it looks really ugly. Is there an easy way to make it look pretty?