

Upgrading my BOE-Bot... to a Tesla
 localroger
Posts: 3,451
localroger
Posts: 3,451
I had mentioned on GD that a couple of weeks ago I dropped into the rotting husk of my local Office Depot and saw a stack of USB power bank batteries marked down from $10, which was a fair price, by machine to $3.04, which was a very good price, and again by hand to $1.00 each. These were 5,000 mAH slimline form-factor banks and I scooped up all seven of them.
So, what to do? Eight years ago I got a BOE-Bot but I never did much with it because of power. A fresh set of alkalines would run it for long enough to be interesting, but that got expensive. Rechargeable options in AA format were even shorter lived. And there wasn't room for much else. Until last week.
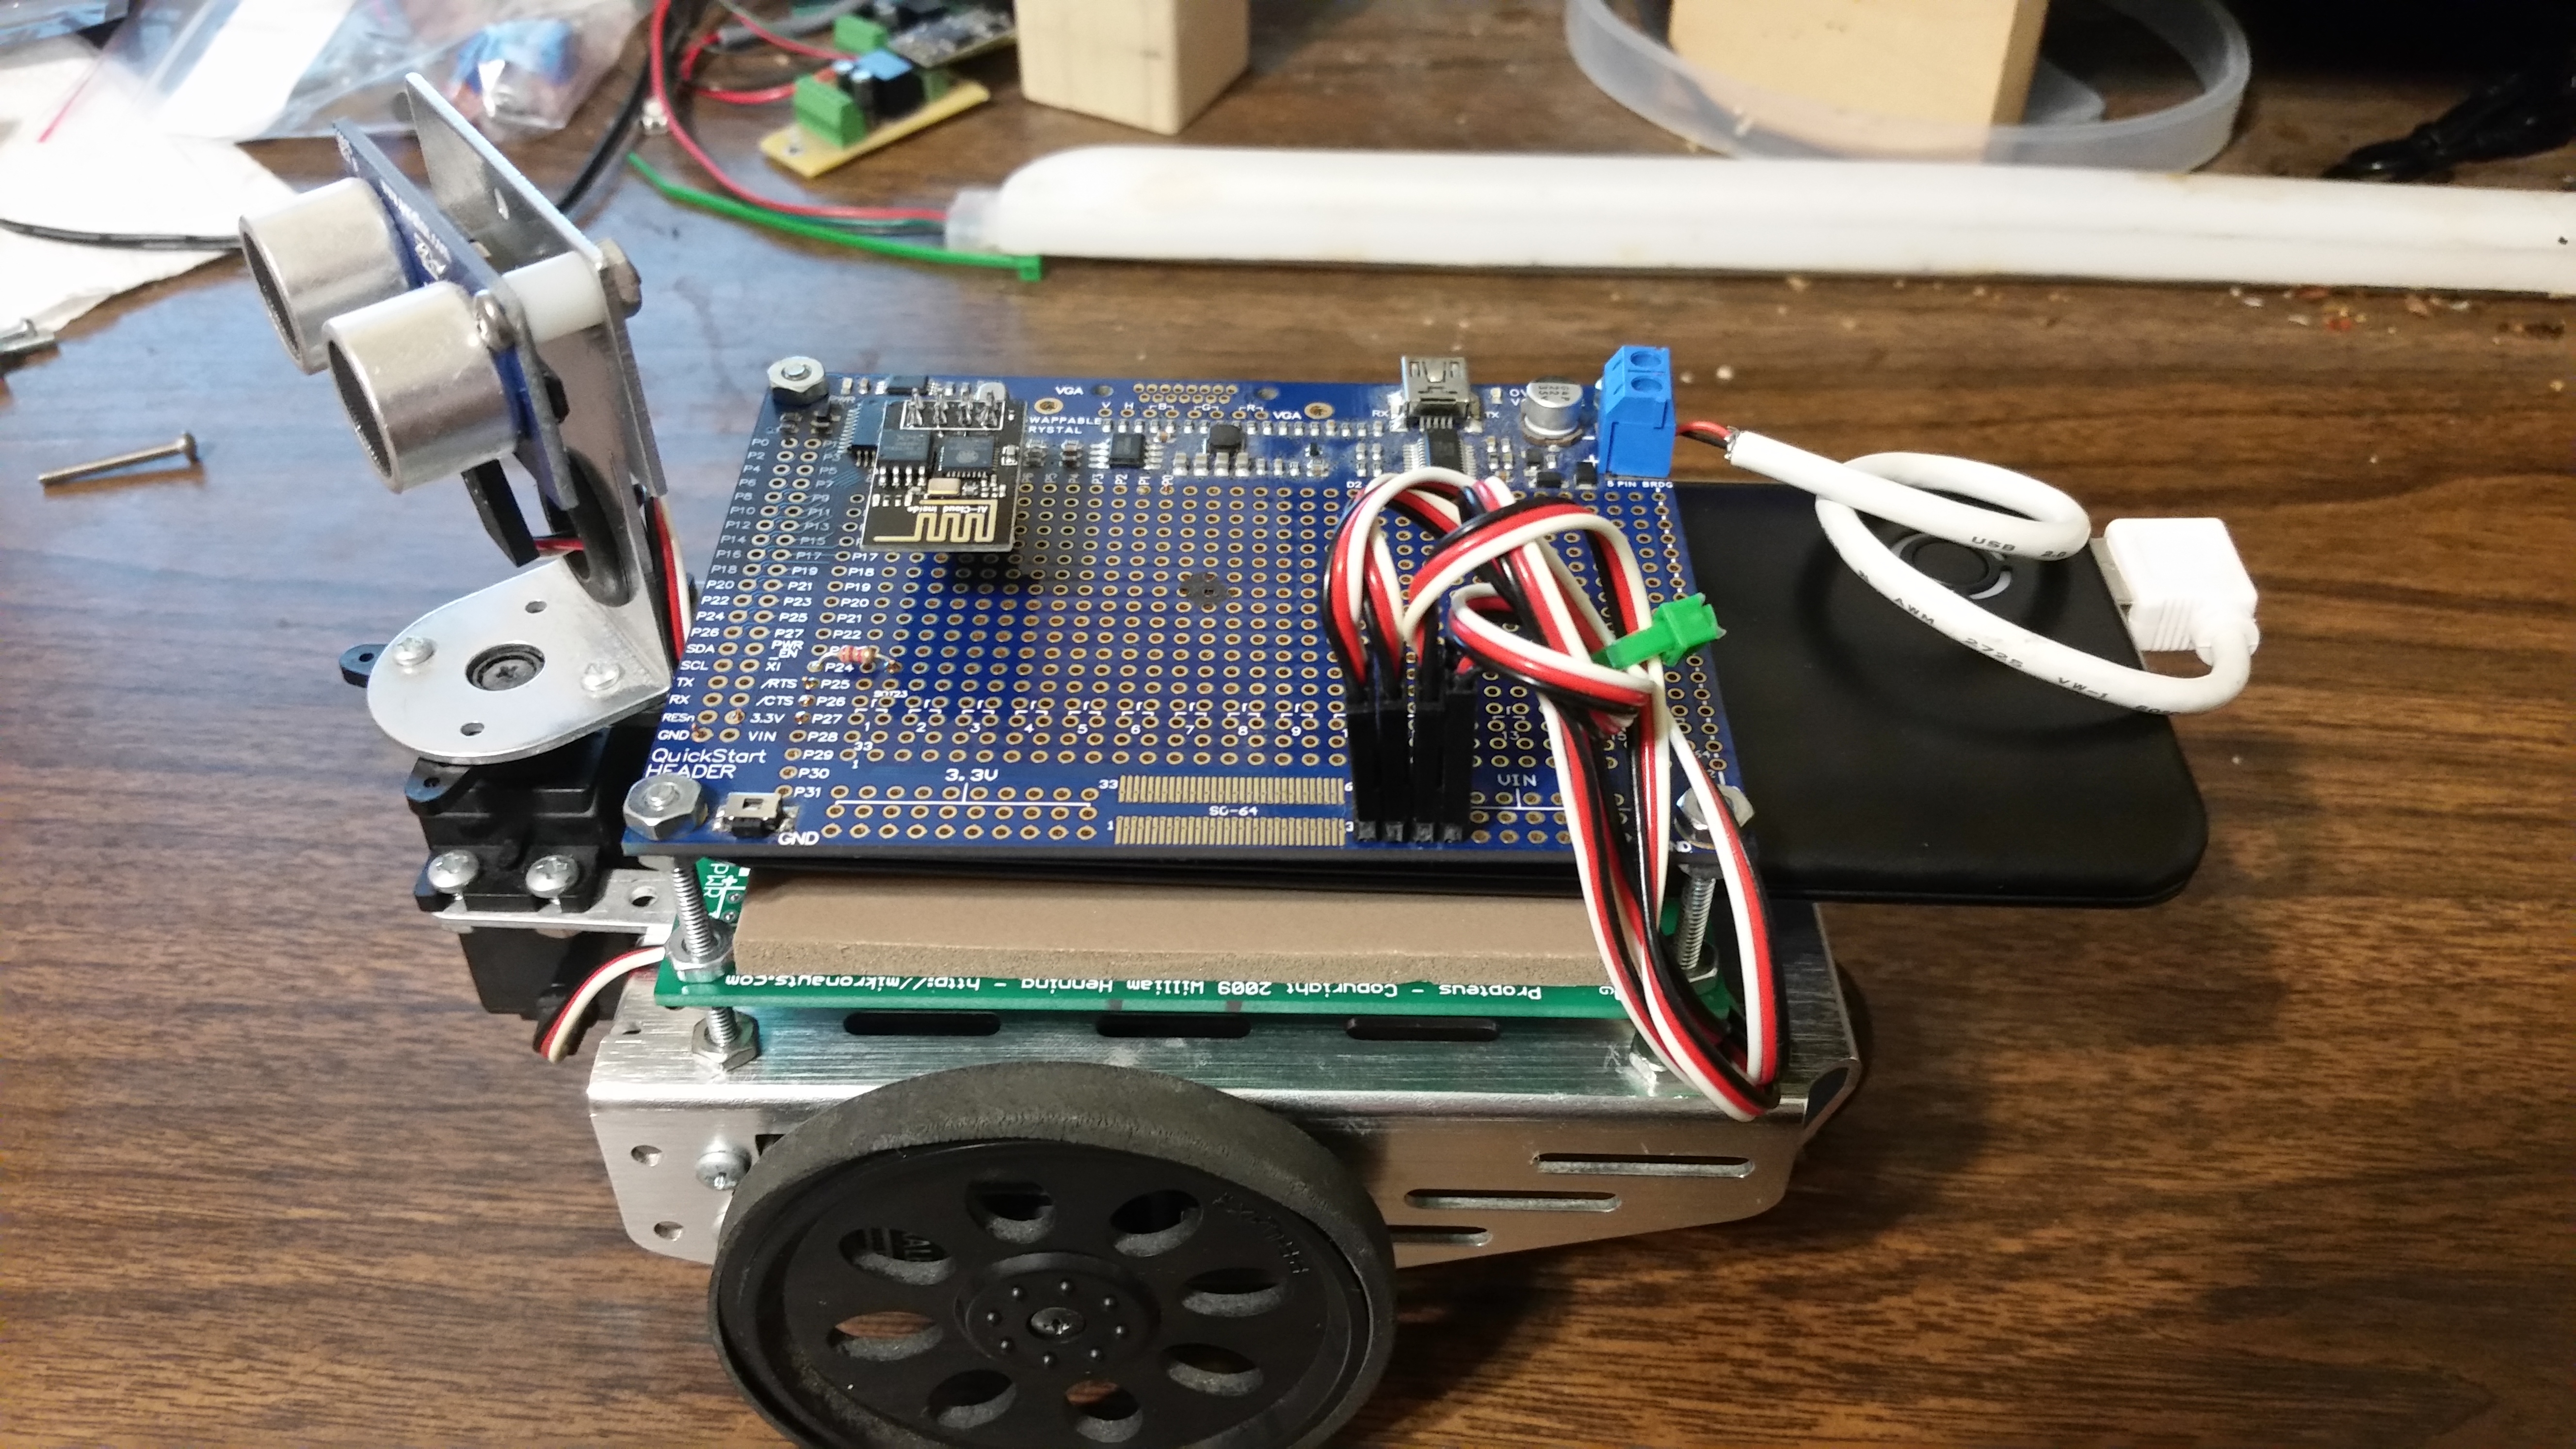
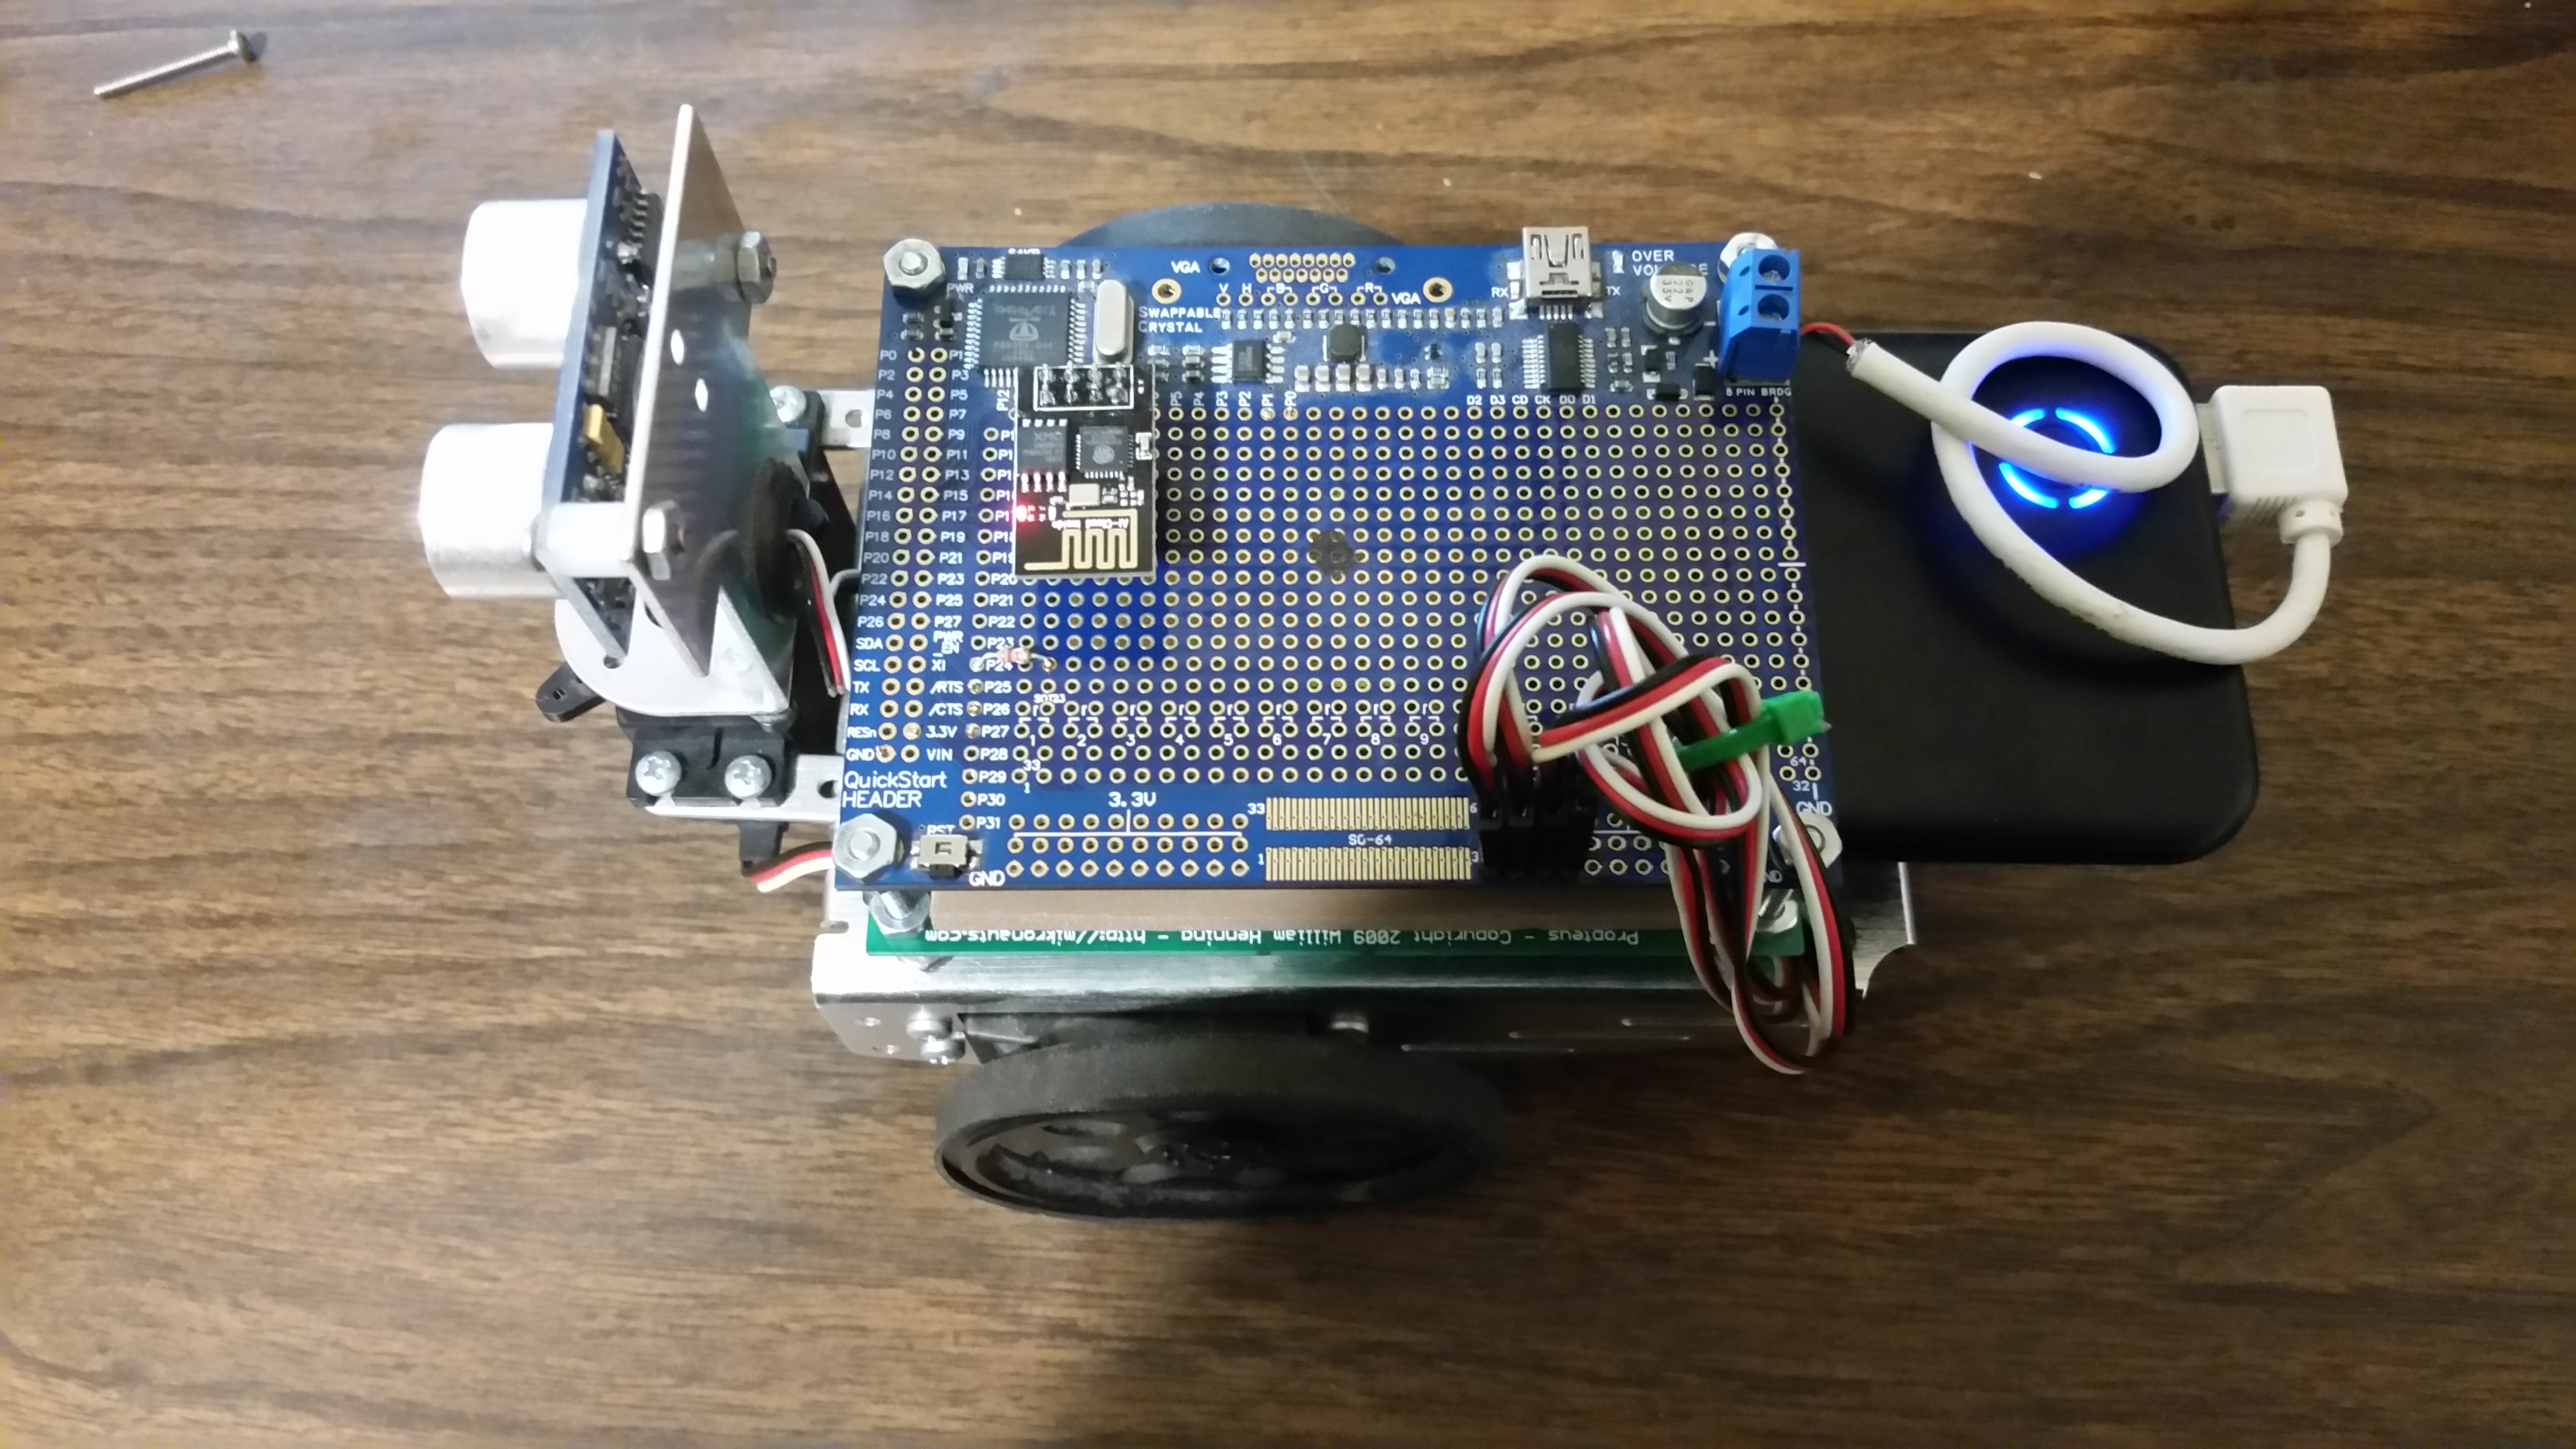
I found that the power bank wouldn't quite slip between the standoffs under the circuit board it would if I replaced the standoffs with 4-40 bolts, which gave me the opportunity to use a second protoboard I had never gotten around to using to form a bottom support. Some weatherstripping provides a nice soft grip which is adjusted so that I can slide the battery out to replace it (remember, I have seven of these things.) That is a five amp-hour pack, comfortably better performance than the original AA holder even with alkalines, regulated, with built-in charging circuitry, a charge indicator (the light is segmented), and built in on-off switch.
I upgraded the brains to the one Propeller Project Board USB I had lying around which is nice for powering the electronics for programming without powering the servos at the same time. And since it wouldn't be a Tesla without the ability to phone home over the internet I added an ESP8266 backpack for remote control and diagnostic purposes. There is no reason this robot shouldn't now be able to run five to ten hours on a charge, and if I'm on a real development jag I can slip that battery out and slide in a fully charged replacement.
If I ever want to build a charging station for it I suspect all I need to do is put a connector in the pack's charging port and run the power leads to contacts. A photodiode would do to detect low charge status from the LED's.
Two wrinkles so far: (1) The damn thing isn't heavy enough and the bot doesn't recover if it pitches forward. Because lithium, baby. (2) The battery helpfully turns itself off if it's not in use, and it doesn't think it's in use with just the Prop and ESP in quiet mode. Fortunately I have verified that it doesn't turn itself off if the servos are active and any practical application will probably be either in motion or scanning the Ping just about constantly. I also suspect that when I get around to telling the ESP to connect to my home wifi it may draw enough to keep the pack's interest up.
So, what to do? Eight years ago I got a BOE-Bot but I never did much with it because of power. A fresh set of alkalines would run it for long enough to be interesting, but that got expensive. Rechargeable options in AA format were even shorter lived. And there wasn't room for much else. Until last week.
I found that the power bank wouldn't quite slip between the standoffs under the circuit board it would if I replaced the standoffs with 4-40 bolts, which gave me the opportunity to use a second protoboard I had never gotten around to using to form a bottom support. Some weatherstripping provides a nice soft grip which is adjusted so that I can slide the battery out to replace it (remember, I have seven of these things.) That is a five amp-hour pack, comfortably better performance than the original AA holder even with alkalines, regulated, with built-in charging circuitry, a charge indicator (the light is segmented), and built in on-off switch.
I upgraded the brains to the one Propeller Project Board USB I had lying around which is nice for powering the electronics for programming without powering the servos at the same time. And since it wouldn't be a Tesla without the ability to phone home over the internet I added an ESP8266 backpack for remote control and diagnostic purposes. There is no reason this robot shouldn't now be able to run five to ten hours on a charge, and if I'm on a real development jag I can slip that battery out and slide in a fully charged replacement.
If I ever want to build a charging station for it I suspect all I need to do is put a connector in the pack's charging port and run the power leads to contacts. A photodiode would do to detect low charge status from the LED's.
Two wrinkles so far: (1) The damn thing isn't heavy enough and the bot doesn't recover if it pitches forward. Because lithium, baby. (2) The battery helpfully turns itself off if it's not in use, and it doesn't think it's in use with just the Prop and ESP in quiet mode. Fortunately I have verified that it doesn't turn itself off if the servos are active and any practical application will probably be either in motion or scanning the Ping just about constantly. I also suspect that when I get around to telling the ESP to connect to my home wifi it may draw enough to keep the pack's interest up.
Comments
https://www.amazon.com/gp/product/B07MNKH8PK
12,800 mAh. Can start a car... Didn't think about using it for a robot... until now...
When you do get a moment, can you share your build steps?
1. Score great deal on the battery pack. (duh.)
2. Remove the BOE-bot original board and standoffs and the battery holder.
3. Replace the standoffs with 4 1.5 inch 4-40 bolts inserted from the bottom. You will need to remove the front mounting screws for the wheel servos to make clearance, but this can be done without removing the wheel or completely removing the servos. You will need a fixed 1/4 inch wrench to do this; there's no room for an adjustable wrench, pliers, etc.
4. Acquire another circuit board or cut and drill something appropriate to be the battery's bottom support. Apply 2 strips of weatherstripping along the outside upper edges.
5. Apply a single strip of weatherstripping along the bottom middle of the Propeller Project Board, sticking to the prototyping area.
6. Working around the weatherstrip, wire in servo connectors for the three servos and Ping on the Vin rail. This is fine for the Ping since the battery pack provides regulated 5V. The Ping needs a 2.2K resistor in series with its data line; the servos don't. I wired these to pins 24-27. The ESP01 socket is located kind of randomly as there is no good location for it; I get its power from GND and 3v3 on the QuickStart connector, and TX and RX go to P0 and P1. Also put a 2-pin screw connector on the Vin pads.
7. Dress the servo and Ping wires with wire ties to come out the back as a bundle. It will be harder to do this after the boards are mounted.
8. Run 4 nuts down within 1/4 inch of the bot platform to support the lower board, place the lower board on the bolts, then 4 more nuts. Run 4 more nuts down to about 1/4 inch from the top, place the Prop board, and finish with 4 nuts at the very top. Tighten the Prop board in place by running the bottom nuts up to it.
9. With the battery in place run the bottom nuts up under the bottom support board until the battery is snug but still can be slipped out. Then tighten by running the top nuts down to clamp the bottom board in place.
10. Cut a USB cable to wire from the battery to the Vin terminal. Every cable I have ever cut has used red and black for the +5 and GND power.
11. Turn the battery on and make sure the power lights come on. Then modify test programs for the pins you've used and test the servos, Ping, and ESP comms.
TBD: I am suspecting that when I start actually driving it around I will need to bolt a bit of steel bar to the back to provide some ballast, as it doesn't recover if you tip it forward. Obviously this is less of a problem if your bot doesn't have the PING sensor swivel servo kit mounted on it.
Hope this helps...
Now to find the time. I ran out of the contents of the bucket marked "spare time" a long time ago.
Seriously though, that's an amazing build. For example the company does sell a Prop BOE and probably has appnotes for rigging a BOE Bot around everything, but this is an amazing job. But where's the mascot who spent the time watching you at work, and will then chase it? Wasn't he(she) involved?