

Building and outdoor weather station

Objectives:
Measure the following items:
1) Wind Direction
2) Wind Speed
3) Temperature
4) Humidity
5) Air Pressure
6) Rain Amount
Connect wirelessly to home network
Battery Operated
Construction items:
3D Printer
Glue Gun
Soldiering Iron
Propeller Mini
Prop Plug
AS5048A 360 Degree Indicator (Wind Direction)
Hall Sensors Digital Switch (Tipping Bucket, Wind Speed)
Magnets (Hall Sensors)
HIH8120 Humidity Sensor (Humidity, Temperature)
MS5607 Altimeter (Air Pressure)
Xbee Wi-Fi S6B Module (Wireless Communications)
Xbee Adapter Board
3.3 Volt Regulator (Power Sensors)
Knowledge Required:
3D Printer Operation
123D Design Software
Cura Slicing Software
SimpleIDE Software
C Programming (Collect Sensor Data, Transmit Results)
C# Programming (Receive Sensor Data)
JSON Data (Format of Transmitted Data)
Xbee Wi-Fi Configuration
The following items have been designed and printed:
Box, Wind Vane, top and bottom mounts, anemometer.
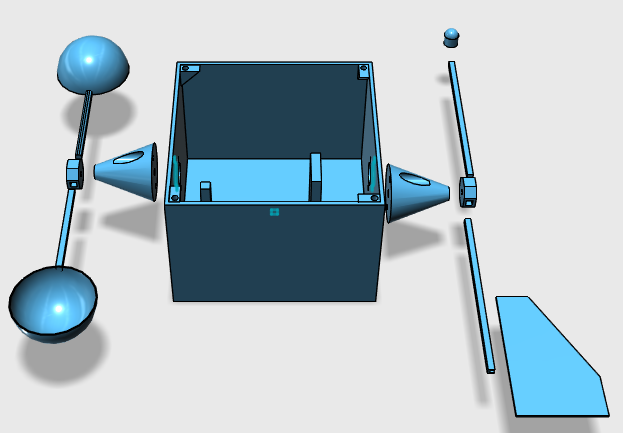
Since it's winter here I will hold off on the Tipping Bucket for now.
Next time I will preset each of the sensors as a library and show the master code used to transmit the data.
I will also show the C# code needed to receive the data and display it on the screen.
I will also present some design issues.
Mike
Measure the following items:
1) Wind Direction
2) Wind Speed
3) Temperature
4) Humidity
5) Air Pressure
6) Rain Amount
Connect wirelessly to home network
Battery Operated
Construction items:
3D Printer
Glue Gun
Soldiering Iron
Propeller Mini
Prop Plug
AS5048A 360 Degree Indicator (Wind Direction)
Hall Sensors Digital Switch (Tipping Bucket, Wind Speed)
Magnets (Hall Sensors)
HIH8120 Humidity Sensor (Humidity, Temperature)
MS5607 Altimeter (Air Pressure)
Xbee Wi-Fi S6B Module (Wireless Communications)
Xbee Adapter Board
3.3 Volt Regulator (Power Sensors)
Knowledge Required:
3D Printer Operation
123D Design Software
Cura Slicing Software
SimpleIDE Software
C Programming (Collect Sensor Data, Transmit Results)
C# Programming (Receive Sensor Data)
JSON Data (Format of Transmitted Data)
Xbee Wi-Fi Configuration
The following items have been designed and printed:
Box, Wind Vane, top and bottom mounts, anemometer.
Since it's winter here I will hold off on the Tipping Bucket for now.
Next time I will preset each of the sensors as a library and show the master code used to transmit the data.
I will also show the C# code needed to receive the data and display it on the screen.
I will also present some design issues.
Mike
Comments
The AS5048 comes in two flavors, the A version supports SPI interface and the B flavor supports I2C interface. For this weather station I choose the AS5048A SPI interface.
The unit also outputs PWM and will work at 3.3v for my application. It also is available as a demo kit with the unit completely mounted on a board with magnet. All that is needed is to hook up the wires and mount the unit under the wind vane.
The programming is straight forward in that you just need to read the angle from the unit. It also has error detection and parity on the data so this adds a little to the programming that I also included but is really not necessary as it works just fine without clearing the errors and ignoring the parity. It is a little confusing at first as you need to send it a command and then read two responses as the response lags by one command. If you just read the sensor you won't notice this since you don't need to send it any commands.
The angle is based on each bit representing .0219 degrees. So it's a matter of multiplying the angle read by .0219. For my application a tried to stay away from floating point and stick to integers for all math. So I used the reciprocal of this number, 45.6, times 10 so that I could get one degree of accuracy.
I constructed a library routine that will allow this sensor to run in a cog on its own once started up. From there is just a matter of picking up the angle at regular intervals and sending them down the pipe.
Here are the library routines:
As5048a_open - start cog process
As5048a_close - shutdown cog
As5048a_readAngle - get current angle
As5048a_setOffset - account for orientation
/discussion/download/116420/libas5048a.zip
Jim
The humidity value needs to be divided by 16382 to get a percent. I multiplied the humidity value by 100 before dividing to avoid using floating point.
The temperature value needs to be divided also by 16382 and then multiplied by 165 minus 40.
I multiplied this by 10 so that I could get the temperature in 10ths and avoid the decimal value.
The library function starts this sensor in a cog and reads a value every second.
Here are the library functions:
Hih8120_open - start cog
Hih8120_close - stop cog
Hih8120_humidity - get humidity percentage
Hih8120_celsius - get temperature in 10ths
Hih8120_fahrenheit - get temperature
/discussion/download/116423/libhih8120.zip
fast xorgate and some R/C will produce a analog voltage as to not having to use fast timing calculation if MCU can not do it.
Equals: no moving parts!!!
The sensor also includes a temperature sensor and is used to compensate the pressure reading. There are functions in the library to display this reading as well.
Once I have the pressure reading in mbars I needed to convert it to inches of mercury.
The library functions started this process in a cog and read the pressure every second.
These are the library functions:
Ms5607_open - start cog process
Ms5607_close - stop cog
Ms5607_celsius - temperature in 10ths
Ms5607_fahrenheit - temperature
Ms5607_pressure - pressure in mbars
Ms5607_mercury - pressure in inches of mercury in 100ths
Ms5607_rawtemp - raw temperature value
Ms5607_rawpressure - raw pressure value
/discussion/download/116424/libms5607.zip
So using the count function and letting it run for 1 minute and counting the number of times the switch closed, we can get revolutions per minute. That sounds simple except that the count function can't count that high. So this meant counting for a shorter period of time and multiplying it to get RPM's.
Once I have RPM's I needed to convert that to miles per hour. So the radius of each cup is 3 inches in length. Then you need to calculate the circumference to determine how far the cup travels in one revolution. Now that you know the distance in one minute you can convert to MPH.
The library functions start it in a cog and measures the number of turns per minute to get mph.
Here are the library functions:
Windspd_open - start cog process
Windspd_close - stop cog
Windspd_speed - get miles per hour
/discussion/download/116425/libwindspd.zip
The following items need to be configured with the XCTU software from DIGI.
1. I set the PL - power level to lowest to conserve battery power. 2. You need to set your ID - SSID or network router broadcast id. 3. Encryption type EE - mine is WPA2. 4. PK - Network password. 5. IP - The IP protocol to use which I set to TCP. 6. Address mode MA - I set this to static so that doesn't need to get an address. 7. I set TM - Client timeout to 1 second. 8. You need to set DL - Destination address of the computer the data is going to. 9. Since we are using Static IP addresses you need to set MY.
That's all that is need to get this thing working.On the hardware side of things you need 5 wires coming from the Xbee:
VSS - GND VCC - 3.2v DOUT - Returned data not used. DIN - Outbound data packet. CTS - Clear to set (not normally needed but will be explained later).
Now when there is weather data to send it connects to the address of the other computer and transmits it. Following is the main weather station program that gathers the sensors and builds the JSON packed to transmit.One of the issues I ran into was the amount of power that is required to run the Xbee wi-fi unit. When on it uses over 300ma of power. This definitely will consume most batteries in short order. So far I have not found a way to power these devices. With a power source of 11 volts the total power needed is just under 200ma.
One thing I have done is configured the Xbee to go into sleep mode and only wake every minute for about 5 seconds, long enough to transmit the weather data. With the Xbee in sleep mode the current draw drops by about 100ma. This still leaves a lot of power being used by the propeller mini.
To configure the Xbee to sleep every minute required some research as I was having some issues trying to determine when it was sleeping and then having the unit not go to sleep after it was awake. This is where the CTS pin comes into play. By monitoring the CTS you can determine when the unit is sleeping or ready to except weather data. The secondary problem was that after it was awake the unit would not go back to sleep for up to 45 seconds. This is 40 seconds of wasted power and it turns out to be a bug or issue with WPA/WPA2 networks.
To fix the 40 second sleep delay issue you need to set SO - sleep option to 0x300. This will cause it to disassociate with the network and go to sleep after 5 seconds. So the next thing that needs to be set is SP - sleep time and this is set to 60 seconds (0x1770). In addition the SM - sleep mode needs to be set to 4 which once done you will not be able to communicate with the Xbee unit until it wakes up every minute and then only for 5 seconds. To get out of the sleep mode you need to short the reset pin to ground and then be very quick with the refresh button or write parameters to device. Typically setting it back to sleep mode 0 takes just one reset or wait for the red light to come on and write the parameter out to the device.
Even with all this set up using a 3S (11.1) volt Lipo battery rated at 900 mah it could only power the unit for about 7 hours. This would not really be a usable configuration.
Here is the main code that waits for the CTS to go low before sending a packet of data and then waits for the unit to go to sleep before starting the process over. I found that waiting a few seconds before sending the data help in getting the packet to the other side. For some reason if I sent the packet right away some packets got thrown away.
  while(1)
  {
    pause(1000);

    //print(".");
    i = Wait(0); // wait for CTS to go low

    Index++;

    Direction = as5048a_readAngle();

    Humidity = hih8120_humidity();

    Temperature = hih8120_fahrenheit();

    Mercury = ms5607_mercury();

    Speed = windspd_speed();

    // Construct JSON data
    sprint(Data, FormData, Index, Direction, Humidity, Temperature, Mercury, Speed);

    //print("sending (%d) %d\n", Index, i);
    pause(2000);  // Settling Time
    SendData();

    i = Wait(1);  // wait for CTS to go high
    //print("Done %d\n", i);
  }
/discussion/download/116428/HMWS.zip
I love your thinking, tonyp12! Always a fresh, innovative perspective.
After some investigation I was finally able to make double longs work with MS5607 math. Spin can do 64 bit math but in C it gets a little tricky.
To do 64 bit math in C you need to declare your variable as "long long" while in C# long is 64 bit by default and integers are 32. So the problem is that if one of the variables it not 64 bit all the math drops to 32 and you get truncation issues and your number become negative because of roll over.
So I updated my routine to calculate pressure by use 64bit math instead of using smaller integers and making the math less accurate so they would fit the math.
In addition I have changed the main code by adding an RC value to monitor the battery voltage and report it along with the reset of the values. By using curve fitting algorithm I was able to convert the time value back to volts so I could determine when the battery needed to be changed.
/discussion/download/116471/libms5607.zip
Main code with battery monitor:
/discussion/download/116472/HMWS.zip
C# code to receive the weather data and display it on the screen as well as write it to disk:
/discussion/download/116473/WeatherDisplay.zip
Sample of what the screen looks like:
I am still having a problem with the wind speed monitor. It seems to not be keeping up with the wind. apparently there is enough wind resistance and will need to be calibrated some how.
Mike